
Quick Start Guide
Page 1
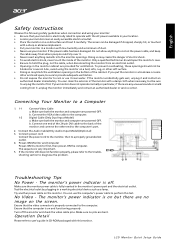
... no image on the monitor. Digital Cable (Only Dual-Input Model) a. Try another power cable on the screen. Do not allow anything metallic into the monitor openings. Also, avoid using your monitor: • Be sure that your monitor is properly connected to the computer. You can clean the exterior of the monitor. Make sure both the monitor and computer are bent. LCD Monitor Quick Setup Guide Connect the Audio Cable(Only Audio-Input Model)(Optional) 3. If your monitor near water. English Safety Instructions...
... no image on the monitor. Digital Cable (Only Dual-Input Model) a. Try another power cable on the screen. Do not allow anything metallic into the monitor openings. Also, avoid using your monitor: • Be sure that your monitor is properly connected to the computer. You can clean the exterior of the monitor. Make sure both the monitor and computer are bent. LCD Monitor Quick Setup Guide Connect the Audio Cable(Only Audio-Input Model)(Optional) 3. If your monitor near water. English Safety Instructions...
Quick Start Guide
Page 2
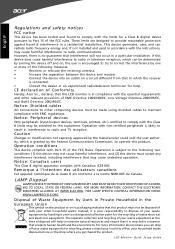
... du Canada. LCD Monitor Quick Setup Guide However, there is granted by one or more information about where you can radiate radio frequency energy and, if not installed and used in the European Union This symbol on the product or on a circuit different from that this LCD monitor is subject to this product. Notice: Peripheral devices Only peripherals (input/output devices...
... du Canada. LCD Monitor Quick Setup Guide However, there is granted by one or more information about where you can radiate radio frequency energy and, if not installed and used in the European Union This symbol on the product or on a circuit different from that this LCD monitor is subject to this product. Notice: Peripheral devices Only peripherals (input/output devices...
Quick Start Guide
Page 3
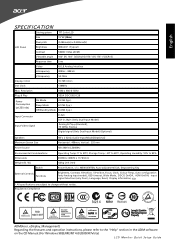
... (net) Power Button, , MENU/ENTER, Auto adjustment/ Exit, Empowering Key Brightness, Contrast, H.Position, V.Position, Focus, Clock, Colour Temp, Auto configuration (only Analog input model), OSD timeout, Wide Mode, DDCCI On/Off, ACM On/Off, Input signal Selection (only Dual ), Language, Reset, Display information, Exit * All specifications are subject to the "Help" section in the ADM software on the CD Manual.(For Windows 98SE/ME/NT 4.0/2000/XP/Vista) LCD Monitor Quick Setup Guide Resolution 1440 x 900 @ 60Hz Plug & Play VESA DDCCI/DDC2B Power Consumption (at...
... (net) Power Button, , MENU/ENTER, Auto adjustment/ Exit, Empowering Key Brightness, Contrast, H.Position, V.Position, Focus, Clock, Colour Temp, Auto configuration (only Analog input model), OSD timeout, Wide Mode, DDCCI On/Off, ACM On/Off, Input signal Selection (only Dual ), Language, Reset, Display information, Exit * All specifications are subject to the "Help" section in the ADM software on the CD Manual.(For Windows 98SE/ME/NT 4.0/2000/XP/Vista) LCD Monitor Quick Setup Guide Resolution 1440 x 900 @ 60Hz Plug & Play VESA DDCCI/DDC2B Power Consumption (at...

User Manual
Page 1
TABLE OF CONTENTS Special notes on LCD monitors 1 Information for your safety and comfort 2 Unpacking 5 Attaching/Removing the base 6 Screen position adjustment 6 Connecting the power cord 7 Safety precaution 7 Cleaning your monitor 7 Power saving 8 DDC 8 Connector Pin Assignment 9 Standard Timing Table 11 Installation 12 User controls 13 Troubleshooting 19
TABLE OF CONTENTS Special notes on LCD monitors 1 Information for your safety and comfort 2 Unpacking 5 Attaching/Removing the base 6 Screen position adjustment 6 Connecting the power cord 7 Safety precaution 7 Cleaning your monitor 7 Power saving 8 DDC 8 Connector Pin Assignment 9 Standard Timing Table 11 Installation 12 User controls 13 Troubleshooting 19
User Manual
Page 2
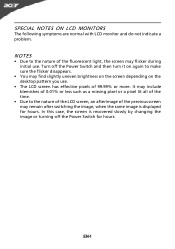
... a pixel lit all of the time. • Due to the nature of the LCD screen, an afterimage of the fluorescent light, the screen may find slightly uneven brightness on the screen depending on again to the nature of the previous screen may remain after switching the image, when the same image is recovered slowly by changing the image or turning off the Power Switch and then turn...
... a pixel lit all of the time. • Due to the nature of the LCD screen, an afterimage of the fluorescent light, the screen may find slightly uneven brightness on the screen depending on again to the nature of the previous screen may remain after switching the image, when the same image is recovered slowly by changing the image or turning off the Power Switch and then turn...

User Manual
Page 3
... operator as they may touch dangerous voltage points or short-out parts that could be blocked or covered. CAUTION for ventilation to ensure reliable operation of internal components and to block out noisy surroundings. • Turn the volume down if you need to disconnect power to unplug the power cord from overheating. Safe listening Follow these instructions carefully. If the...
... operator as they may touch dangerous voltage points or short-out parts that could be blocked or covered. CAUTION for ventilation to ensure reliable operation of internal components and to block out noisy surroundings. • Turn the volume down if you need to disconnect power to unplug the power cord from overheating. Safe listening Follow these instructions carefully. If the...
User Manual
Page 4
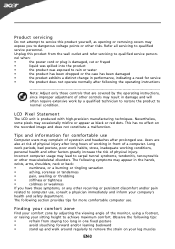
...-3 Users are covered by the operating instructions, since improper adjustment of other factors greatly increase the risk of the monitor, using a footrest, or raising your sitting height to qualified service personnel. Long work periods, bad posture, poor work by adjusting the viewing angle of physical injury. Unplug this product yourself, as black or red dots. Nevertheless, some pixels may occasionally misfire or appear as opening or removing covers...
...-3 Users are covered by the operating instructions, since improper adjustment of other factors greatly increase the risk of the monitor, using a footrest, or raising your sitting height to qualified service personnel. Long work periods, bad posture, poor work by adjusting the viewing angle of physical injury. Unplug this product yourself, as black or red dots. Nevertheless, some pixels may occasionally misfire or appear as opening or removing covers...
User Manual
Page 5
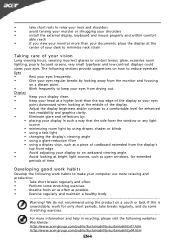
... the display. • Adjust the display brightness and/or contrast to minimize neck strain Taking care of your desk to a comfortable level for enhanced text readability and graphics clarity. • Eliminate glare and reflections by using drapes, shades or blinds • using a task light • changing the display's viewing angle • using a glare-reduction filter • using the product on how to keep your...
... the display. • Adjust the display brightness and/or contrast to minimize neck strain Taking care of your desk to a comfortable level for enhanced text readability and graphics clarity. • Eliminate glare and reflections by using drapes, shades or blinds • using a task light • changing the display's viewing angle • using a glare-reduction filter • using the product on how to keep your...
User Manual
Page 6
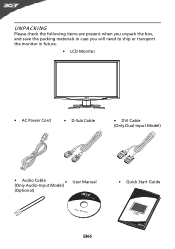
UNPACKING Please check the following items are present when you unpack the box, and save the packing materials in case you will need to ship or transport the monitor in future. • LCD Monitor • AC Power Cord • D-Sub Cable • DVI Cable (Only Dual-Input Model) • Audio Cable (Only Audio-Input Model) • (Optional) User Manual • Quick Start Guide EN-5
UNPACKING Please check the following items are present when you unpack the box, and save the packing materials in case you will need to ship or transport the monitor in future. • LCD Monitor • AC Power Cord • D-Sub Cable • DVI Cable (Only Dual-Input Model) • Audio Cable (Only Audio-Input Model) • (Optional) User Manual • Quick Start Guide EN-5
User Manual
Page 7
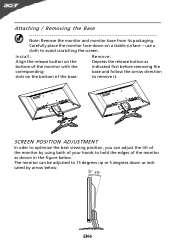
... below . SCREEN POSITION ADJUSTMENT In oder to optimize the best viewing position, you can be adjusted to hold the edges of the monitor as indicated by using both of your hands to 15 degrees up or 5 degrees down on the bottom of the monitor with the indicated first before removing the corresponding base and follow the arrow direction slots on a stable surface -- Install: Remove: Align...
... below . SCREEN POSITION ADJUSTMENT In oder to optimize the best viewing position, you can be adjusted to hold the edges of the monitor as indicated by using both of your hands to 15 degrees up or 5 degrees down on the bottom of the monitor with the indicated first before removing the corresponding base and follow the arrow direction slots on a stable surface -- Install: Remove: Align...

User Manual
Page 8
... face of the monitor. CONNECTING THE POWER CORD • Check first to make sure that the power cord you use is adequate ventilation. • Avoid placing the monitor against a bright background or where sun- The cord set should have the appropriate safety approvals for your area. • This monitor has a universal power supply that allows operation in which the equipment will be installed. CLEANING YOUR MONITOR Please carefully follow...
... face of the monitor. CONNECTING THE POWER CORD • Check first to make sure that the power cord you use is adequate ventilation. • Avoid placing the monitor against a bright background or where sun- The cord set should have the appropriate safety approvals for your area. • This monitor has a universal power supply that allows operation in which the equipment will be installed. CLEANING YOUR MONITOR Please carefully follow...
User Manual
Page 9
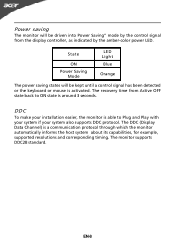
DDC To make your system also supports DDC protocol. The monitor supports DDC2B standard. Power saving The monitor will be driven into Power Saving" mode by the control signal from Active OFF state back to Plug and Play with your system if your installation easier, the monitor is a communication protocol through which the monitor automatically informs the host system about its capabilities, for example, supported resolutions and corresponding timing...
DDC To make your system also supports DDC protocol. The monitor supports DDC2B standard. Power saving The monitor will be driven into Power Saving" mode by the control signal from Active OFF state back to Plug and Play with your system if your installation easier, the monitor is a communication protocol through which the monitor automatically informs the host system about its capabilities, for example, supported resolutions and corresponding timing...
User Manual
Page 10
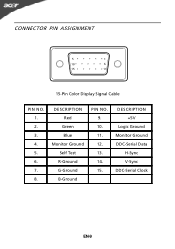
DESCRIPTION +5V Logic Ground Monitor Ground DDC-Serial Data H-Sync V-Sync DDC-Serial Clock EN-9 DESCRIPTION Red Green Blue Monitor Ground Self Test R-Ground G-Ground B-Ground PIN NO. 9. 10. 11. 12. 13. 14. 15. CONNECTOR PIN ASSIGNMENT 5 1 10 6 15 11 15-Pin Color Display Signal Cable PIN NO. 1. 2. 3. 4. 5. 6. 7. 8.
DESCRIPTION +5V Logic Ground Monitor Ground DDC-Serial Data H-Sync V-Sync DDC-Serial Clock EN-9 DESCRIPTION Red Green Blue Monitor Ground Self Test R-Ground G-Ground B-Ground PIN NO. 9. 10. 11. 12. 13. 14. 15. CONNECTOR PIN ASSIGNMENT 5 1 10 6 15 11 15-Pin Color Display Signal Cable PIN NO. 1. 2. 3. 4. 5. 6. 7. 8.
User Manual
Page 11
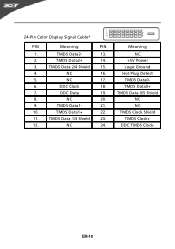
TMDS Data 2/4 Shield 15. 4. NC 17. 6. TMDS Data 1/3 Shield 23. 12. NC 16. 5. NC 20. 9. TMDS Data2- 13. 2. Meaning NC +5V Power Logic Ground Hot Plug Detect TMDS Data0TMDS Data0+ TMDS Data 0/5 Shield NC NC TMDS Clock Shield TMDS Clock+ DDC TMDS Clock- TMDS Data1- 21. 10. 24-Pin Color Display Signal Cable* PIN Meaning PIN 1. TMDS Data1+ 22. 11. DDC Clock 18. 7. NC 24. TMDS Data2+ 14. 3. EN-10 DDC Data 19. 8.
TMDS Data 2/4 Shield 15. 4. NC 17. 6. TMDS Data 1/3 Shield 23. 12. NC 16. 5. NC 20. 9. TMDS Data2- 13. 2. Meaning NC +5V Power Logic Ground Hot Plug Detect TMDS Data0TMDS Data0+ TMDS Data 0/5 Shield NC NC TMDS Clock Shield TMDS Clock+ DDC TMDS Clock- TMDS Data1- 21. 10. 24-Pin Color Display Signal Cable* PIN Meaning PIN 1. TMDS Data1+ 22. 11. DDC Clock 18. 7. NC 24. TMDS Data2+ 14. 3. EN-10 DDC Data 19. 8.
User Manual
Page 13
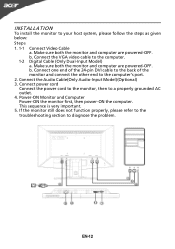
...'s port. 2. b. Connect one end of the 24-pin DVI cable to the back of the monitor and connect the other end to diagnose the problem. Connect the VGA video cable to your host system, please follow the steps as given below: Steps 1. 1-1 Connect Video Cable a. EN-12 INSTALLATION To install the monitor to the computer. 1-2 Digital Cable (Only Dual-Input Model) a. Make sure both the monitor and computer are powered-OFF. Connect power cord Connect the power cord to the monitor...
...'s port. 2. b. Connect one end of the 24-pin DVI cable to the back of the monitor and connect the other end to diagnose the problem. Connect the VGA video cable to your host system, please follow the steps as given below: Steps 1. 1-1 Connect Video Cable a. EN-12 INSTALLATION To install the monitor to the computer. 1-2 Digital Cable (Only Dual-Input Model) a. Make sure both the monitor and computer are powered-OFF. Connect power cord Connect the power cord to the monitor...

User Manual
Page 14
... VGA and DVI cables are not connected, a floating dialog box indicates: "No Cable Connect" or "No Signal" EN-13 USER CONTROLS Power Switch / Power LED: To turn the monitor ON or OFF. Using the Shortcut Menu Press the function button to open the shortcut menu. AUTO Auto Adjust: Press this botton to activate the Auto Adjustment function. MENU OSD functions Press this button to activate the OSD menu. Volume Up / Down Press to adjust volume (Only Audio-Input Model)(Optional) INPUT Input Key Use Input key to select from different video sources...
... VGA and DVI cables are not connected, a floating dialog box indicates: "No Cable Connect" or "No Signal" EN-13 USER CONTROLS Power Switch / Power LED: To turn the monitor ON or OFF. Using the Shortcut Menu Press the function button to open the shortcut menu. AUTO Auto Adjust: Press this botton to activate the Auto Adjustment function. MENU OSD functions Press this button to activate the OSD menu. Volume Up / Down Press to adjust volume (Only Audio-Input Model)(Optional) INPUT Input Key Use Input key to select from different video sources...
User Manual
Page 15
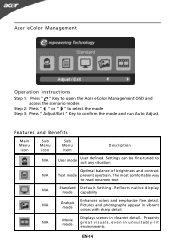
... clearest detail. Acer eColor Management Operation instructions Step 1: Press " " Key to open the Acer eColor Management OSD and access the scenario modes Step 2: Press " " or " " to select the mode Step 3: Press " Adjust/Exit " Key to confirm the mode and run Auto Adjust. Features and Benefits Main Menu icon Sub Menu icon Sub Menu item Description N/A User mode User defined. Pictures and photographs appear in vibrant colors with sharp detail...
... clearest detail. Acer eColor Management Operation instructions Step 1: Press " " Key to open the Acer eColor Management OSD and access the scenario modes Step 2: Press " " or " " to select the mode Step 3: Press " Adjust/Exit " Key to confirm the mode and run Auto Adjust. Features and Benefits Main Menu icon Sub Menu icon Sub Menu item Description N/A User mode User defined. Pictures and photographs appear in vibrant colors with sharp detail...
User Manual
Page 16
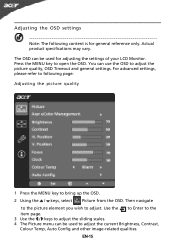
... the OSD. 2 Using the / keys, select Picture from the OSD. For advanced settings, please refer to following content is for adjusting the settings of your LCD Monitor. Then navigate to the picture element you wish to adjust. Actual product specifications may vary. EN-15 Adjusting the OSD settings Note: The following page: Adjusting the picture quality 1 Press the MENU key to adjust the current Brightness, Contrast, Colour Temp, Auto Config and other image...
... the OSD. 2 Using the / keys, select Picture from the OSD. For advanced settings, please refer to following content is for adjusting the settings of your LCD Monitor. Then navigate to the picture element you wish to adjust. Actual product specifications may vary. EN-15 Adjusting the OSD settings Note: The following page: Adjusting the picture quality 1 Press the MENU key to adjust the current Brightness, Contrast, Colour Temp, Auto Config and other image...
User Manual
Page 20
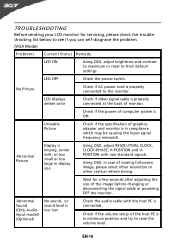
... volume level. Abnormal Picture Display is properly connected to their default settings. EN-19 LED OFF · Check the power switch. shift, or too POSITION with the host PC is connected. · Check if the volume setup of the host PC is too low · Check the audio cable with non-standard signals. TROUBLESHOOTING Before sending your LCD monitor for a few seconds after adjusting the size of graphics adapter and monitor is ON. LED displays amber color · Check if video signal cable...
... volume level. Abnormal Picture Display is properly connected to their default settings. EN-19 LED OFF · Check the power switch. shift, or too POSITION with the host PC is connected. · Check if the volume setup of the host PC is too low · Check the audio cable with non-standard signals. TROUBLESHOOTING Before sending your LCD monitor for a few seconds after adjusting the size of graphics adapter and monitor is ON. LED displays amber color · Check if video signal cable...
User Manual
Page 21
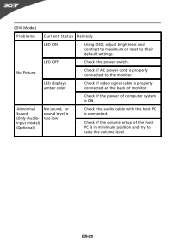
... ON. No Picture · Check if AC power cord is in minimum position and try to raise the volume level. (DVI Mode) Problems Current Status Remedy LED ON · Using OSD, adjust brightness and contrast to maximum or reset to the monitor. EN-20 LED displays amber color · Check if video signal cable is properly connected at the back of monitor. · Check if the power of the host PC is properly connected to their default settings. LED OFF · Check the power switch.
... ON. No Picture · Check if AC power cord is in minimum position and try to raise the volume level. (DVI Mode) Problems Current Status Remedy LED ON · Using OSD, adjust brightness and contrast to maximum or reset to the monitor. EN-20 LED displays amber color · Check if video signal cable is properly connected at the back of monitor. · Check if the power of the host PC is properly connected to their default settings. LED OFF · Check the power switch.

