
User Manual
Page 3
... these instructions carefully. If the product falls, it from overheating. Keep this product through cabinet slots as close to unplug the power cord from the electrical outlet. Warnings! • Do not use liquid cleaners or aerosol cleaners. iii Information for ventilation to ensure reliable operation of the product and to the AC power outlet. • Unplug the power cord before removing the power supply...
... these instructions carefully. If the product falls, it from overheating. Keep this product through cabinet slots as close to unplug the power cord from the electrical outlet. Warnings! • Do not use liquid cleaners or aerosol cleaners. iii Information for ventilation to ensure reliable operation of the product and to the AC power outlet. • Unplug the power cord before removing the power supply...

User Manual
Page 5
... look into the light source using optical instruments (such as opening or removing covers may cause damage to your reseller for service • the product does not operate normally after following the operating instructions Note: Adjust only those controls that are covered by the operating instructions, since improper adjustment of the lens may contain small parts. Keep them out of the reach of the lens while the projector is operating. Additional safety...
... look into the light source using optical instruments (such as opening or removing covers may cause damage to your reseller for service • the product does not operate normally after following the operating instructions Note: Adjust only those controls that are covered by the operating instructions, since improper adjustment of the lens may contain small parts. Keep them out of the reach of the lens while the projector is operating. Additional safety...

User Manual
Page 6
... an uncontrolled area where persons may be present should be permitted. vi looking at the lens. • Keep any bright light source, do not stare into the beam. RG3 IEC 62471-5:2015 • Operators shall control access to the beam within the hazard distance or install the product at the height that can redirect light coming out of the projector.
... an uncontrolled area where persons may be present should be permitted. vi looking at the lens. • Keep any bright light source, do not stare into the beam. RG3 IEC 62471-5:2015 • Operators shall control access to the beam within the hazard distance or install the product at the height that can redirect light coming out of the projector.

User Manual
Page 7
... the use acer ceiling mount kit for the fan to stop before disconnecting power. • Do not frequently turn off the main power abruptly or unplug the projector during operation. It may become excessively high, such as this projector. In this case, unplug immediately and contact your dealer. • Do not keep using this case contact your eyes. • Always open the lens shutter or remove the lens...
... the use acer ceiling mount kit for the fan to stop before disconnecting power. • Do not frequently turn off the main power abruptly or unplug the projector during operation. It may become excessively high, such as this projector. In this case, unplug immediately and contact your dealer. • Do not keep using this case contact your eyes. • Always open the lens shutter or remove the lens...

User Manual
Page 10
... 3 Control Panel 5 Remote Control Layout 6 MHL Feature Introduction 8 Getting Started 9 Installing the Projection Lens 9 Removing the Projection Lens 9 Connecting the Projector 10 Connecting Multiple Sources through HDBaseT Module (Op- tional) 11 Turning the Projector On/Off 13 Turning On the Projector 13 Turning Off the Projector 14 Adjusting the Projected Image 15 Adjusting the Height of the Projected Image 15 Optimizing Image Size and Distance 16 How to Get a Preferred Image Position by Adjusting Lens Shift 20 User Controls 22 Onscreen Display (OSD...
... 3 Control Panel 5 Remote Control Layout 6 MHL Feature Introduction 8 Getting Started 9 Installing the Projection Lens 9 Removing the Projection Lens 9 Connecting the Projector 10 Connecting Multiple Sources through HDBaseT Module (Op- tional) 11 Turning the Projector On/Off 13 Turning On the Projector 13 Turning Off the Projector 14 Adjusting the Projected Image 15 Adjusting the Height of the Projected Image 15 Optimizing Image Size and Distance 16 How to Get a Preferred Image Position by Adjusting Lens Shift 20 User Controls 22 Onscreen Display (OSD...

User Manual
Page 12
English 1 Introduction Product Features This product is a single-chip DLP® projector, including the following outstanding features: • DLP® technology • Enables projecting 3D content via DLP Link Technology: Blu-Ray 3D supported • Acer ColorBoost technology delivers vivid, life-like images • High brightness and contrast ratio • Versatile display modes enable optimum performance in any situation • NTSC/PAL/SECAM compatible...
English 1 Introduction Product Features This product is a single-chip DLP® projector, including the following outstanding features: • DLP® technology • Enables projecting 3D content via DLP Link Technology: Blu-Ray 3D supported • Acer ColorBoost technology delivers vivid, life-like images • High brightness and contrast ratio • Versatile display modes enable optimum performance in any situation • NTSC/PAL/SECAM compatible...

User Manual
Page 16
Automatically synchronizes the projector to adjust the zoom setting. Use to the input source. Displays the test pattern. Press "FOCUS" and the indicator below lights up . Use to previous page. Press "ZOOM" and the indicator below lights up . Confirms your selection of the control panel. Use to shift the projection lens. 9 LIGHT 10 SOURCE 11 RESYNC 12 ZOOM Turns on or off the back light of items. Selects items or makes adjustments to your selection Cancels your...
Automatically synchronizes the projector to adjust the zoom setting. Use to the input source. Displays the test pattern. Press "FOCUS" and the indicator below lights up . Use to previous page. Press "ZOOM" and the indicator below lights up . Confirms your selection of the control panel. Use to shift the projection lens. 9 LIGHT 10 SOURCE 11 RESYNC 12 ZOOM Turns on or off the back light of items. Selects items or makes adjustments to your selection Cancels your...

User Manual
Page 18
... light source life. Press to cancel the remote control code. Selects the preset picture mode. Press and hold "Set" and press "0" twice to open the 3D menu for this remote control. Changes the active source. You can control projector with the matching ID set in the "Options" > "Control" > "Projector ID" OSD. To pause the screen image. Displays the Lens menu. Displays the current projector related information. Use to display the image. Displays the HSG menu. press again to adjust the zoom setting. Inputs numbers. 7 English # Function 15 Zoom...
... light source life. Press to cancel the remote control code. Selects the preset picture mode. Press and hold "Set" and press "0" twice to open the 3D menu for this remote control. Changes the active source. You can control projector with the matching ID set in the "Options" > "Control" > "Projector ID" OSD. To pause the screen image. Displays the Lens menu. Displays the current projector related information. Use to display the image. Displays the HSG menu. press again to adjust the zoom setting. Inputs numbers. 7 English # Function 15 Zoom...

User Manual
Page 21
English 10 Connecting the Projector RS232 VGA/DVI/HDMI Wired remote control 3 2 Video/ S-Video Output DVD player, Set-top box, HDTV receiver BNC RCA 9 10 5 4 6 78 or or HDTV adapter 11 12 3D glasses 13 15 14 8 10 Display Smart device 1 # Description 1 Power cord 2 Wired remote control 3 RS232 cable 4 S-Video cable 5 Composite video cable 6 5-BNC cable 7 VGA cable 8 VGA to component video/HDTV adapter # Description 9 3 RCA component cable 10 HDMI (MHL) cable 11 DVI cable 12 USB cable 13 RJ45 cable 14 3D glasses 15 3G-SDI cable
English 10 Connecting the Projector RS232 VGA/DVI/HDMI Wired remote control 3 2 Video/ S-Video Output DVD player, Set-top box, HDTV receiver BNC RCA 9 10 5 4 6 78 or or HDTV adapter 11 12 3D glasses 13 15 14 8 10 Display Smart device 1 # Description 1 Power cord 2 Wired remote control 3 RS232 cable 4 S-Video cable 5 Composite video cable 6 5-BNC cable 7 VGA cable 8 VGA to component video/HDTV adapter # Description 9 3 RCA component cable 10 HDMI (MHL) cable 11 DVI cable 12 USB cable 13 RJ45 cable 14 3D glasses 15 3G-SDI cable
User Manual
Page 31
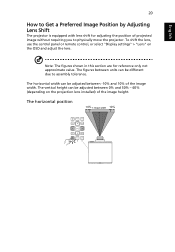
To shift the lens, use the control panel or remote control, or select "Display settings" > "Lens" on the projection lens installed) of the image height. The figures between 0% and 50% - 60% (depending on the OSD and adjust the lens. The horizontal position 10% 1 image width 10% The horizontal width can be adjusted between -10% and 10% of projected image without requiring you to physically move the projector. Note: The figures shown...
To shift the lens, use the control panel or remote control, or select "Display settings" > "Lens" on the projection lens installed) of the image height. The figures between 0% and 50% - 60% (depending on the OSD and adjust the lens. The horizontal position 10% 1 image width 10% The horizontal width can be adjusted between -10% and 10% of projected image without requiring you to physically move the projector. Note: The figures shown...

User Manual
Page 34
... not for actual diagnosis. • User: Memorize user's settings. 23 Image Adjustment English Display Mode Brightness Contrast Saturation Tint Sharpness Gamma There are many factory presets optimized for various types of black and white in the image. • Press to decrease the contrast. • Press to increase the contrast. Adjusts the brightness of color in the image. • Press to increase the amount...
... not for actual diagnosis. • User: Memorize user's settings. 23 Image Adjustment English Display Mode Brightness Contrast Saturation Tint Sharpness Gamma There are many factory presets optimized for various types of black and white in the image. • Press to decrease the contrast. • Press to increase the contrast. Adjusts the brightness of color in the image. • Press to increase the amount...
User Manual
Page 35
... Color Temperature Adjusts the color temperature. at lower color temperatures, the screen looks warmer. HSG settings • Color: Use to the wall. Wall Color Mode - Reset: Use this function to select a color that you wish • When selecting Red/Green/Blue/Cyan/Magenta/ Yellow, the following options are several choices, including White, Light Yellow, Light Blue, Pink and Dark Green. Note: "Saturation" and "Tint" functions are available. - key to enhance color and reproduce vivid colors. Hue: Use key to change...
... Color Temperature Adjusts the color temperature. at lower color temperatures, the screen looks warmer. HSG settings • Color: Use to the wall. Wall Color Mode - Reset: Use this function to select a color that you wish • When selecting Red/Green/Blue/Cyan/Magenta/ Yellow, the following options are several choices, including White, Light Yellow, Light Blue, Pink and Dark Green. Note: "Saturation" and "Tint" functions are available. - key to enhance color and reproduce vivid colors. Hue: Use key to change...
User Manual
Page 38
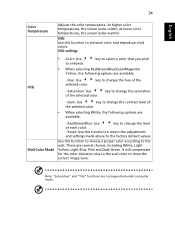
... screen. Test Pattern Displays the test pattern. Note: "RGB Input Range" is only available when the input signal is set to the default value "0". 1 Project the image you capture. 2 Select "Screen Capture" and press "ENTER". 3 A dialog box appears to use as the startup screen, follow the instructions below. Position", "V. Position", and "Frequency" functions are not supported under video mode. To capture the image that the "Keystone" is HDMI. Your image size...
... screen. Test Pattern Displays the test pattern. Note: "RGB Input Range" is only available when the input signal is set to the default value "0". 1 Project the image you capture. 2 Select "Screen Capture" and press "ENTER". 3 A dialog box appears to use as the startup screen, follow the instructions below. Position", "V. Position", and "Frequency" functions are not supported under video mode. To capture the image that the "Keystone" is HDMI. Your image size...

User Manual
Page 39
..., the projector reverses the image so that are enabled. Sets the length of time the On Screen Display will automatically turn on when power is supplied via the power cord. When this function, the projector inverts the image for the OSD menus. 28 Default Adjustment English Language Menu Display Time Menu Position Projector Installation Auto Source Input Source Power Settings Sets a language for ceiling-mounted projection. • Rear Table: When you require. Customize Power Off (Hours) The projector will remain active after pressing the button one time.
..., the projector reverses the image so that are enabled. Sets the length of time the On Screen Display will automatically turn on when power is supplied via the power cord. When this function, the projector inverts the image for the OSD menus. 28 Default Adjustment English Language Menu Display Time Menu Position Projector Installation Auto Source Input Source Power Settings Sets a language for ceiling-mounted projection. • Rear Table: When you require. Customize Power Off (Hours) The projector will remain active after pressing the button one time.

User Manual
Page 41
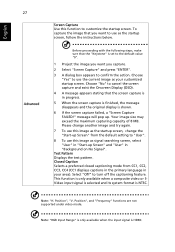
... display parameters on the OSD menus, projector control panel, or remote control. About Network Setting Note 1 : An overview of the remote network operation page To switch input signals, click your desired signal. Note 2 : An overview of the Tools page You can adjust the LAN control settings. Change Password Sets the password. See Note 2 and Note 3. These buttons function the same as those on all menus to the factory default settings. Select "Off" to be changed by the "Start-up Screen...
... display parameters on the OSD menus, projector control panel, or remote control. About Network Setting Note 1 : An overview of the remote network operation page To switch input signals, click your desired signal. Note 2 : An overview of the Tools page You can adjust the LAN control settings. Change Password Sets the password. See Note 2 and Note 3. These buttons function the same as those on all menus to the factory default settings. Select "Off" to be changed by the "Start-up Screen...

User Manual
Page 43
..., the status will lower power consumption and extend the light source life. • User: Memorize user's settings. When "On" is turned on the High Altitude mode. HDMI CEC Selecting "On" allows synchronized power ON/OFF operation between the projector and a CEC-compatible device connected to your desired level. Choose "On" to provide trigger out function. Trigger Out Sets the port to turn on , the projector fans operate at the same time, switching the remote control codes can...
..., the status will lower power consumption and extend the light source life. • User: Memorize user's settings. When "On" is turned on the High Altitude mode. HDMI CEC Selecting "On" allows synchronized power ON/OFF operation between the projector and a CEC-compatible device connected to your desired level. Choose "On" to provide trigger out function. Trigger Out Sets the port to turn on , the projector fans operate at the same time, switching the remote control codes can...

User Manual
Page 44
... to get the correct image (for DLP 3D). • Source: Display the input source that is currently connected to. • Resolution: Display the resolution setting of the current input source. • Display Mode: Display current Display Mode. • Laser Mode: Display current Laser Mode. • Total Time: Display the light source hours. • Inlet Temp: Display the temperature of the intake vent. • FW Version: Display the firmware version. Note: Supported 3D signal timings: Signal source type Video/S-Video/Component video VGA/HDMI (PC mode) Supported timing HQFS 3D (480i...
... to get the correct image (for DLP 3D). • Source: Display the input source that is currently connected to. • Resolution: Display the resolution setting of the current input source. • Display Mode: Display current Display Mode. • Laser Mode: Display current Laser Mode. • Total Time: Display the light source hours. • Inlet Temp: Display the temperature of the intake vent. • FW Version: Display the firmware version. Note: Supported 3D signal timings: Signal source type Video/S-Video/Component video VGA/HDMI (PC mode) Supported timing HQFS 3D (480i...

User Manual
Page 47
... Image Size and Distance" section for item 2 (above) to 4:3 with the projector. 7 Image is out of focus • Adjust the focus ring on the projector lens. • Make sure the projection screen is within the required distance. 36 English 3 Partial, scrolling • Press "RESYNC" on the control panel or remote or incorrectly displayed image (For notebooks) control. • For an incorrectly displayed image: • Follow the steps for more information. • Check...
... Image Size and Distance" section for item 2 (above) to 4:3 with the projector. 7 Image is out of focus • Adjust the focus ring on the projector lens. • Make sure the projection screen is within the required distance. 36 English 3 Partial, scrolling • Press "RESYNC" on the control panel or remote or incorrectly displayed image (For notebooks) control. • For an incorrectly displayed image: • Follow the steps for more information. • Check...

User Manual
Page 50
...LED Messages Message Standby Power up processing Start to move C0 position C0 position ready Power On (Normal) Shutdown processing (Cooling) Firmware Download mode Timer Backup Error(Standby) Laser (1 Bank fail) Laser (2 Banks fail) Laser (3 Banks fail) Laser (4 Banks fail) Laser (5 Banks fail) Laser (6 Banks fail) Laser (7 Banks fail) Laser (All Banks fail) Temperture 1 Error Temperture 2 Error Fan 1 Error Fan 2 Error Fan 3 Error Fan 4 Error Fan 5 Error Fan 6 Error Fan 7 Error Fan 8 Error Fan 9 Error Fan 10 Error Fan 11 Error Fan 12 Error Power LED Blue Red -- V -- -- V -- Flashing...
...LED Messages Message Standby Power up processing Start to move C0 position C0 position ready Power On (Normal) Shutdown processing (Cooling) Firmware Download mode Timer Backup Error(Standby) Laser (1 Bank fail) Laser (2 Banks fail) Laser (3 Banks fail) Laser (4 Banks fail) Laser (5 Banks fail) Laser (6 Banks fail) Laser (7 Banks fail) Laser (All Banks fail) Temperture 1 Error Temperture 2 Error Fan 1 Error Fan 2 Error Fan 3 Error Fan 4 Error Fan 5 Error Fan 6 Error Fan 7 Error Fan 8 Error Fan 9 Error Fan 10 Error Fan 11 Error Fan 12 Error Power LED Blue Red -- V -- -- V -- Flashing...

User Manual
Page 53
... contents • AC power cord x 1 • Remote control x 1 • AAA Battery x 2 (for more information. Power supply Universal AC input 100 - 240 V, input frequency 50/60 Hz Power consumption (typical) Standard mode: 1350 W @100 VAC; 1210 W @240 VAC ECO mode: 1080 W @ 100 VAC; 980 W @240 VAC Standby mode: < 0.5 W Network standby mode: < 2 W Operating temperature 0ºC to 40ºC / 32ºF to the "Dimensions" section for the remote control) • Quick start guide x 1 Accessory (optional...
... contents • AC power cord x 1 • Remote control x 1 • AAA Battery x 2 (for more information. Power supply Universal AC input 100 - 240 V, input frequency 50/60 Hz Power consumption (typical) Standard mode: 1350 W @100 VAC; 1210 W @240 VAC ECO mode: 1080 W @ 100 VAC; 980 W @240 VAC Standby mode: < 0.5 W Network standby mode: < 2 W Operating temperature 0ºC to 40ºC / 32ºF to the "Dimensions" section for the remote control) • Quick start guide x 1 Accessory (optional...


