User Guide
Page 3
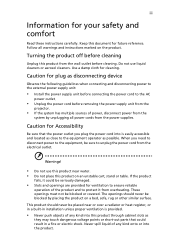
... power cord before cleaning Unplug this product on an unstable cart, stand or table. Turning the product off before removing the power supply unit from the projector. • If the system has multiple sources of any kind into this document for cleaning. Caution for your safety and comfort Read these instructions carefully. The openings should never be blocked by unplugging all warnings and instructions...
... power cord before cleaning Unplug this product on an unstable cart, stand or table. Turning the product off before removing the power supply unit from the projector. • If the system has multiple sources of any kind into this document for cleaning. Caution for your safety and comfort Read these instructions carefully. The openings should never be blocked by unplugging all warnings and instructions...

User Guide
Page 5
... often require extensive work by the operating instructions, since improper adjustment of a car with all servicing to qualified service personnel. v Product servicing Do not attempt to service this product from walls and free flow of air around the projector is necessary. • Locations where temperatures may become excessively high, such as opening or removing covers may expose you to dangerous voltage points or other controls may result in...
... often require extensive work by the operating instructions, since improper adjustment of a car with all servicing to qualified service personnel. v Product servicing Do not attempt to service this product from walls and free flow of air around the projector is necessary. • Locations where temperatures may become excessively high, such as opening or removing covers may expose you to dangerous voltage points or other controls may result in...
User Guide
Page 6
... the replacement lamp. • Reset the lamp timer from Management > Lamp Hour Reset in front of the projector when it is on . Wait until the fan has stopped running before turning the main power off the lamp temporarily, press HIDE on its indicated lifespan. It may fall over . If you when the lamp life is over causing injury and damaging the projector. • This projector may lead to high temperatures...
... the replacement lamp. • Reset the lamp timer from Management > Lamp Hour Reset in front of the projector when it is on . Wait until the fan has stopped running before turning the main power off the lamp temporarily, press HIDE on its indicated lifespan. It may fall over . If you when the lamp life is over causing injury and damaging the projector. • This projector may lead to high temperatures...
User Guide
Page 8
... do not open or disassemble the product as recommended in operation. • When the lamp reaches the end of its life, it shows warning messages. • Reset the "Lamp Hour Reset" function from the Onscreen display "Management" menu after replacing the lamp module. • When switching the projector off the product before cleaning. • Use a soft cloth moistened with mild detergent to clean the display housing. • Disconnect the power plug...
... do not open or disassemble the product as recommended in operation. • When the lamp reaches the end of its life, it shows warning messages. • Reset the "Lamp Hour Reset" function from the Onscreen display "Management" menu after replacing the lamp module. • When switching the projector off the product before cleaning. • Use a soft cloth moistened with mild detergent to clean the display housing. • Disconnect the power plug...

User Guide
Page 9
... 2 Projector Overview 3 Projector Outlook 3 Control Panel 5 Remote Control Layout 6 Getting Started 8 Connecting the Projector 8 Turning the Projector On/Off 9 Turning on the Projector 9 Turning the projector off 10 Adjusting the Projected Image 11 Adjusting the Height of Projected Image 11 How to optimize image size and distance 12 How to get a preferred image size by adjusting distance and zoom 14 User Controls 16 Installation menu 16 Acer Empowering Technology 17 Onscreen Display (OSD) Menus 18 Color 19 Image 20 Setting 22 Management 25 Audio 25...
... 2 Projector Overview 3 Projector Outlook 3 Control Panel 5 Remote Control Layout 6 Getting Started 8 Connecting the Projector 8 Turning the Projector On/Off 9 Turning on the Projector 9 Turning the projector off 10 Adjusting the Projected Image 11 Adjusting the Height of Projected Image 11 How to optimize image size and distance 12 How to get a preferred image size by adjusting distance and zoom 14 User Controls 16 Installation menu 16 Acer Empowering Technology 17 Onscreen Display (OSD) Menus 18 Color 19 Image 20 Setting 22 Management 25 Audio 25...

User Guide
Page 11
... This product is a single-chip DLP® projector. Outstanding features include: • DLP® technology • True 1024 x 768 XGA resolution 4:3 / 16:9 aspect ratio supported • Acer ColorBoost technology delivers nature's true colors for vivid, life-like images • Acer ColorSafe II technology ensures consistent color rendition over time • High brightness and contrast ratio • Versatile display modes (Bright, Presentation, Standard, Video, User) enable optimum performance in any...
... This product is a single-chip DLP® projector. Outstanding features include: • DLP® technology • True 1024 x 768 XGA resolution 4:3 / 16:9 aspect ratio supported • Acer ColorBoost technology delivers nature's true colors for vivid, life-like images • Acer ColorSafe II technology ensures consistent color rendition over time • High brightness and contrast ratio • Versatile display modes (Bright, Presentation, Standard, Video, User) enable optimum performance in any...
User Guide
Page 15
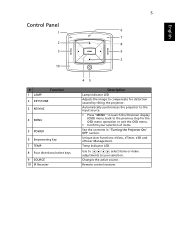
... in "Turning the Projector On/ Off" section. Temp Indicator LED Use to select items or make adjustments to the previous step for distortion caused by tilting the projector. Changes the active source. Unique Acer functions: eView, eTimer, e3D and ePower Management. Remote control receiver. English SOURCE 5 Control Panel 1 LAMP 2 6 TEMP 7 8 3 MENU 9 RESYNC 2 10 # 1 LAMP Function 2 KEYSTONE 3 RESYNC 4 MENU 5 POWER 6 Empowering key 7 TEMP 8 Four directional select keys 9 SOURCE 10 IR Recevier 45 Description Lamp Indicator LED Adjusts the image to compensate...
... in "Turning the Projector On/ Off" section. Temp Indicator LED Use to select items or make adjustments to the previous step for distortion caused by tilting the projector. Changes the active source. Unique Acer functions: eView, eTimer, e3D and ePower Management. Remote control receiver. English SOURCE 5 Control Panel 1 LAMP 2 6 TEMP 7 8 3 MENU 9 RESYNC 2 10 # 1 LAMP Function 2 KEYSTONE 3 RESYNC 4 MENU 5 POWER 6 Empowering key 7 TEMP 8 Four directional select keys 9 SOURCE 10 IR Recevier 45 Description Lamp Indicator LED Adjusts the image to compensate...
User Guide
Page 16
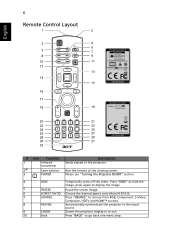
... the screen image. 6 ASPECT RATIO Choose the desired aspect ratio (Auto/4:3/16:9) 7 SOURCE Press "SOURCE" to choose from RGB, Component, S-Video, Composite, HDTV and HDMI™ sources. 8 RESYNC Automatically synchronizes the projector to the input source. 9 ZOOM Zooms the projector display in or out. 10 Back Press "BACK" to the projector. Please see "Turning the Projector On/Off" section. 4 HIDE Temporarily turns off the video. Aim the remote at the viewing screen. English 6 Remote Control...
... the screen image. 6 ASPECT RATIO Choose the desired aspect ratio (Auto/4:3/16:9) 7 SOURCE Press "SOURCE" to choose from RGB, Component, S-Video, Composite, HDTV and HDMI™ sources. 8 RESYNC Automatically synchronizes the projector to the input source. 9 ZOOM Zooms the projector display in or out. 10 Back Press "BACK" to the projector. Please see "Turning the Projector On/Off" section. 4 HIDE Temporarily turns off the video. Aim the remote at the viewing screen. English 6 Remote Control...

User Guide
Page 17
... change source to HDMI™/DVI. the center button works as a multidirectional pointer stick. PAGE For computer mode only. This function is not supported. To change source to COMPOSITE VIDEO. Four directional Use up, down, left and right, Right Click respectively; This connection supports YPbPr (480p/576p/720p/ 1080i) and YCbCr (480i/576i). USB B HDMI™/DVI LAN/WiFi KeyPad 0~9 No function. Empowering key Unique Acer functions...
... change source to HDMI™/DVI. the center button works as a multidirectional pointer stick. PAGE For computer mode only. This function is not supported. To change source to COMPOSITE VIDEO. Four directional Use up, down, left and right, Right Click respectively; This connection supports YPbPr (480p/576p/720p/ 1080i) and YCbCr (480i/576i). USB B HDMI™/DVI LAN/WiFi KeyPad 0~9 No function. Empowering key Unique Acer functions...
User Guide
Page 19
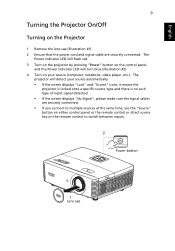
... input signal detected. • If the screen displays "No Signal", please make sure the signal cables are securely connected. The projector will turn blue.(Illustration #2) 4 Turn on the remote control to multiple sources at the same time, use the "Source" button on either control panel or the remote control or direct source key on your source (computer, notebook, video player ,etc.). English 9 Turning the Projector On/Off Turning on the Projector 1 Remove the lens cap.(Illustration #1) 2 Ensure that the power cord and signal cable are securely connected...
... input signal detected. • If the screen displays "No Signal", please make sure the signal cables are securely connected. The projector will turn blue.(Illustration #2) 4 Turn on the remote control to multiple sources at the same time, use the "Source" button on either control panel or the remote control or direct source key on your source (computer, notebook, video player ,etc.). English 9 Turning the Projector On/Off Turning on the Projector 1 Remove the lens cap.(Illustration #1) 2 Ensure that the power cord and signal cable are securely connected...

User Guide
Page 20
... projector will automatically shut down, and the LED temp indicator will turn solid red. The lamp will automatically turn off , press the power button. English 10 Turning the projector off 1 To turn the projector off , the projector will automatically shut down, and the LED temp indicator will blink. This onscreen message indicates that the projector has overheated. Contact your local dealer or service center. • "Fan failed. Warning indicators: • "Projector Overheated. Note: Whenever the projector automatically shuts down and the LED lamp indicator turns solid red, contact...
... projector will automatically shut down, and the LED temp indicator will turn solid red. The lamp will automatically turn off , press the power button. English 10 Turning the projector off 1 To turn the projector off , the projector will automatically shut down, and the LED temp indicator will blink. This onscreen message indicates that the projector has overheated. Contact your local dealer or service center. • "Fan failed. Warning indicators: • "Projector Overheated. Note: Whenever the projector automatically shuts down and the LED lamp indicator turns solid red, contact...

User Guide
Page 26
... "Power" button on the control pad. 2 Press the menu button on the screen. English 16 User Controls Installation menu The installation menu provides an onscreen display (OSD) for projector installation and maintenance. 3 The background pattern acts as a guide to adjusting the calibration and alignment settings, such as screen size and distance, focus and more . 4 The Installation menu includes the following options: •Projection method •Keystone settings •Language settings •Control Channel settings •IP / Mask settings •Reset to factory default function Use...
... "Power" button on the control pad. 2 Press the menu button on the screen. English 16 User Controls Installation menu The installation menu provides an onscreen display (OSD) for projector installation and maintenance. 3 The background pattern acts as a guide to adjusting the calibration and alignment settings, such as screen size and distance, focus and more . 4 The Installation menu includes the following options: •Projection method •Keystone settings •Language settings •Control Channel settings •IP / Mask settings •Reset to factory default function Use...

User Guide
Page 30
... • When you select this function to choose CT1 (6500K), CT2 (Native CT), CT3 (7500K), User mode. Note: "Saturation" and "Tint" functions are not supported under computer or HDMI mode. English 20 Color Temperature Gamma Mode Use this function, the projector reverses the image so you can project from behind a translucent screen with ceiling mounted projection. R Gain Adjusts the red gain for color temperature optimization. G Gain Adjusts the green gain for color temperature optimization.
... • When you select this function to choose CT1 (6500K), CT2 (Native CT), CT3 (7500K), User mode. Note: "Saturation" and "Tint" functions are not supported under computer or HDMI mode. English 20 Color Temperature Gamma Mode Use this function, the projector reverses the image so you can project from behind a translucent screen with ceiling mounted projection. R Gain Adjusts the red gain for color temperature optimization. G Gain Adjusts the green gain for color temperature optimization.
User Guide
Page 32
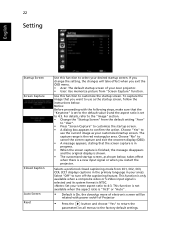
... change the setting, the changes will be related with the following steps, make sure that the "Keystone" is set to return the parameters on /off the captioning feature. Notice: Before proceeding with power on all menus to 4:3. Choose "Yes" to use as your screen aspect ratio to the factory default settings. Select "Off" to turn off of your Acer projector. • User: Use memorize picture from the default setting "Acer...
... change the setting, the changes will be related with the following steps, make sure that the "Keystone" is set to return the parameters on /off the captioning feature. Notice: Before proceeding with power on all menus to 4:3. Choose "Yes" to use as your screen aspect ratio to the factory default settings. Select "Off" to turn off of your Acer projector. • User: Use memorize picture from the default setting "Acer...
User Guide
Page 33
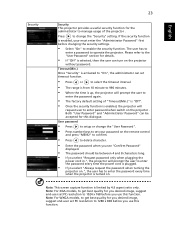
... projector will prompt the user to enter the password every time the power cord is enabled, your password on the remote control and press "MENU" to confirm. • Press to delete character. • Enter the password when you see "Confirm Password" displayed. • The password should be accepted for this function. The user has to enter a password to 1024 x 768 before you desired image, suggest end-user set PC resolution...
... projector will prompt the user to enter the password every time the power cord is enabled, your password on the remote control and press "MENU" to confirm. • Press to delete character. • Enter the password when you see "Confirm Password" displayed. • The password should be accepted for this function. The user has to enter a password to 1024 x 768 before you desired image, suggest end-user set PC resolution...

User Guide
Page 35
... -life. Press the button and choose "Yes" to turn on High Altitude mode. Choose "On" to turn the lamp hour counter to 0 hours. English 25 Management ECO Mode High Altitude Turn Off Mode Auto Shutdown Lamp Hour Elapse Lamp Reminding Lamp Hour Reset Choose "On" to dim the projector lamp which will automatically shutdown when there is no signal input after the allocated time. (default is pressed again within 2 minutes. • Instant Off: Shuts down the projector without fan cooling. Audio...
... -life. Press the button and choose "Yes" to turn on High Altitude mode. Choose "On" to turn the lamp hour counter to 0 hours. English 25 Management ECO Mode High Altitude Turn Off Mode Auto Shutdown Lamp Hour Elapse Lamp Reminding Lamp Hour Reset Choose "On" to dim the projector lamp which will automatically shutdown when there is no signal input after the allocated time. (default is pressed again within 2 minutes. • Instant Off: Shuts down the projector without fan cooling. Audio...

User Guide
Page 38
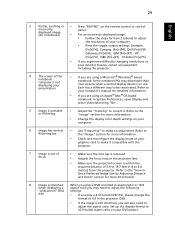
... image appears • Connected as described in the "Getting Started" onscreen section. • Ensure none of the monitor display is switched on. 2 Partial, scrolling or • Press "RESYNC" on the remote control or control panel. If the problem persists, please contact your Acer projector, refer to UXGA (1600 x 1200). • Click the "Advanced Properties" button. If the problem still appears, change the monitor display you have removed...
... image appears • Connected as described in the "Getting Started" onscreen section. • Ensure none of the monitor display is switched on. 2 Partial, scrolling or • Press "RESYNC" on the remote control or control panel. If the problem persists, please contact your Acer projector, refer to UXGA (1600 x 1200). • Click the "Advanced Properties" button. If the problem still appears, change the monitor display you have removed...
User Guide
Page 39
...; Mac® OS based notebook: In System Preferences, open Display and select Video Mirroring "On". 5 Image is out of 5.9 to 19.7 feet (1.8 to correct it compatible with the projector. 7 Image is unstable • Adjust the "Tracking" to 6.0 meters) from the projector. Refer to flickering bar the "Image" section for more information. • Change the display color depth settings on the projector lens. • Make sure the projection screen is...
...; Mac® OS based notebook: In System Preferences, open Display and select Video Mirroring "On". 5 Image is out of 5.9 to 19.7 feet (1.8 to correct it compatible with the projector. 7 Image is unstable • Adjust the "Tracking" to 6.0 meters) from the projector. Refer to flickering bar the "Image" section for more information. • Change the display color depth settings on the projector lens. • Make sure the projection screen is...

User Guide
Page 40
... lamp, follow the procedures in the "Replacing the Lamp" section. Go to all controls unplug the power cord and wait at least 30 seconds before reconnecting power. 2 Lamp burns out or makes a popping sound When the lamp reaches the end of the projector. • Move the projector closer to or further from the screen. • Press "MENU" on the remote control or on the control panel. 30 English 9 Image...
... lamp, follow the procedures in the "Replacing the Lamp" section. Go to all controls unplug the power cord and wait at least 30 seconds before reconnecting power. 2 Lamp burns out or makes a popping sound When the lamp reaches the end of the projector. • Move the projector closer to or further from the screen. • Press "MENU" on the remote control or on the control panel. 30 English 9 Image...

User Guide
Page 49
Projection system Resolution Computer compatibility Video compatibility Aspect ratio Displayable colors Projection lens Projection screen size (diagonal) Projection distance Throw ratio Horizontal scan rate Vertical refresh scan rate Lamp type Keystone correction Audio Weight Dimensions (W x D x H) Remote control Digital Zoom Power supply Power consumption Operating temperature DLP® Native: XGA (1024 x 768), Maximum: UXGA (1600 x 1200),WSXGA+ (1680 x 1050), 1080p (1920 x 1080) IBM PC and compatibles, Apple Macintosh, iMac and VESA standards: SXGA, XGA, VGA, SVGA, SXGA+, WXGA, WXGA+, ...
Projection system Resolution Computer compatibility Video compatibility Aspect ratio Displayable colors Projection lens Projection screen size (diagonal) Projection distance Throw ratio Horizontal scan rate Vertical refresh scan rate Lamp type Keystone correction Audio Weight Dimensions (W x D x H) Remote control Digital Zoom Power supply Power consumption Operating temperature DLP® Native: XGA (1024 x 768), Maximum: UXGA (1600 x 1200),WSXGA+ (1680 x 1050), 1080p (1920 x 1080) IBM PC and compatibles, Apple Macintosh, iMac and VESA standards: SXGA, XGA, VGA, SVGA, SXGA+, WXGA, WXGA+, ...


