User Manual ED242QR A
Page 4
..., do not place the product on an unstable cart, stand or table. If you can hear it clearly and comfortably and without distortion. • After setting the volume level, do not increase it after your hearing, follow these instructions. • Gradually increase the volume until you can 't hear people speaking near...
..., do not place the product on an unstable cart, stand or table. If you can hear it clearly and comfortably and without distortion. • After setting the volume level, do not increase it after your hearing, follow these instructions. • Gradually increase the volume until you can 't hear people speaking near...
User Manual ED242QR A
Page 5
... for details. If you to dangerous voltage points or other nearby electrical devices that may expose you need to replace the power cord set . Unplug this product, make sure that the total ampere rating of all servicing to qualified service personnel. The overall system load must... • If an extension cord is properly grounded before inserting the power cord plug. If power strips are used with the supplied power supply cord set , make sure that the new power cord meets the following requirements: detachable type, UL listed/CSA certified, type SPT-2, rated 7 A 125 V ...
... for details. If you to dangerous voltage points or other nearby electrical devices that may expose you need to replace the power cord set . Unplug this product, make sure that the total ampere rating of all servicing to qualified service personnel. The overall system load must... • If an extension cord is properly grounded before inserting the power cord plug. If power strips are used with the supplied power supply cord set , make sure that the new power cord meets the following requirements: detachable type, UL listed/CSA certified, type SPT-2, rated 7 A 125 V ...

User Manual ED242QR A
Page 12
... and information for comfortable use vii Declaration of Conformity Federal Communications Commission Declaration of Conformity Unpacking 1 2 3 4 4 4 5 Standard timing table 7 Installation 8 Users controls 9 Adjusting the OSD settings 10 The Function page 12 Trouble shooting 18
... and information for comfortable use vii Declaration of Conformity Federal Communications Commission Declaration of Conformity Unpacking 1 2 3 4 4 4 5 Standard timing table 7 Installation 8 Users controls 9 Adjusting the OSD settings 10 The Function page 12 Trouble shooting 18

User Manual ED242QR A
Page 16
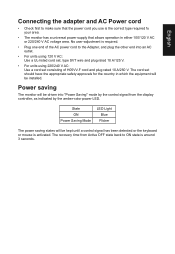
... as indicated by the amber-colored power LED. Mode On Power saving LED light Blue Flicker The power saving mode will be installed. The cord set consisting of the power cord to the AC inlet, and plug the other end into an AC outlet. • For units using 120 V AC: Use... a UL-listed cord set, type SVT wire and plug rated 10 A/125 V. • For units using 220/240 V AC: Use a cord set should have the appropriate safety approvals for example, supported resolutions and corresponding timing. Power saving The monitor...
... as indicated by the amber-colored power LED. Mode On Power saving LED light Blue Flicker The power saving mode will be installed. The cord set consisting of the power cord to the AC inlet, and plug the other end into an AC outlet. • For units using 120 V AC: Use... a UL-listed cord set, type SVT wire and plug rated 10 A/125 V. • For units using 220/240 V AC: Use a cord set should have the appropriate safety approvals for example, supported resolutions and corresponding timing. Power saving The monitor...
User Manual ED242QR A
Page 22
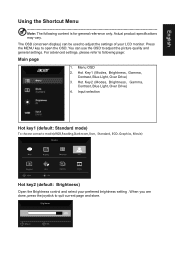
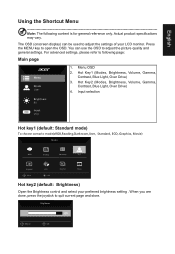
Hot Key2 (Modes, Brightness, Gamma, Contrast, Blue Light, Over Drive) 4. For advanced settings, please refer to quit current page and store. Menu OSD 2. When you are done, press the joystick to following content is for general reference only. ... monitor. The OSD (onscreen display) can use the OSD to adjust the picture quality and general settings. You can be used to open the OSD. Press the MENU key to adjust the settings of your preferred brightness setting . Hot Key1 (Modes, Brightness, Gamma, Contrast, Blue Light, Over Drive) 3. Actual product specifications may vary...
Hot Key2 (Modes, Brightness, Gamma, Contrast, Blue Light, Over Drive) 4. For advanced settings, please refer to quit current page and store. Menu OSD 2. When you are done, press the joystick to following content is for general reference only. ... monitor. The OSD (onscreen display) can use the OSD to adjust the picture quality and general settings. You can be used to open the OSD. Press the MENU key to adjust the settings of your preferred brightness setting . Hot Key1 (Modes, Brightness, Gamma, Contrast, Blue Light, Over Drive) 3. Actual product specifications may vary...
User Manual ED242QR A
Page 23
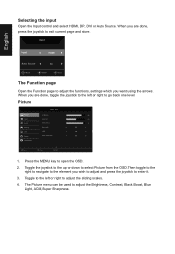
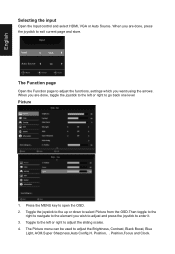
...; Off Move Enter Exit 1. Input English Input HDMI Auto Source On Move Enter Exit The Function page Open the Function page to adjust the functions, settings which you are done, press the joystick to go back one level. The Picture menu can be used to open the OSD. 2. Selecting the input...
...; Off Move Enter Exit 1. Input English Input HDMI Auto Source On Move Enter Exit The Function page Open the Function page to adjust the functions, settings which you are done, press the joystick to go back one level. The Picture menu can be used to open the OSD. 2. Selecting the input...

User Manual ED242QR A
Page 24
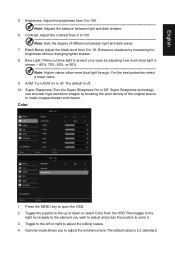
... Light: Filters out blue light to protect your eyes by adjusting how much blue light is off . Contrast: Adjust the contrast from 0 to 100 Note: Sets the degree of the original source to adjust the luminance tone.The default value is 2.2 (standard Press the MENU key to adjust the sliding scales...
... Light: Filters out blue light to protect your eyes by adjusting how much blue light is off . Contrast: Adjust the contrast from 0 to 100 Note: Sets the degree of the original source to adjust the luminance tone.The default value is 2.2 (standard Press the MENU key to adjust the sliding scales...
User Manual ED242QR A
Page 26
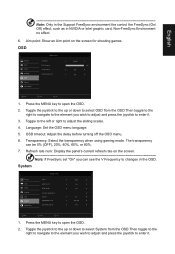
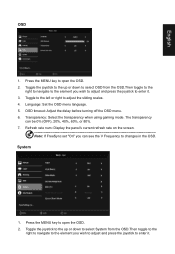
... the joystick to the up or down to select OSD from the OSD.Then toggle to the right to navigate to open the OSD. 2. Language: Set the OSD menu language. 5. Refresh rate num: Display the panel's current refresh rate on the screen for shooting games. OSD Picture Color Audio Gaming OSD... 120 Off Off Move Enter Exit 1. Press the MENU key to enter it . Aim point: Show an Aim point on the screen Note: If FreeSync set "On" you wish to adjust and press the joystick to adjust the sliding scales. 4. OSD timeout: Adjust the delay before turning off the OSD menu...
... the joystick to the up or down to select OSD from the OSD.Then toggle to the right to navigate to open the OSD. 2. Language: Set the OSD menu language. 5. Refresh rate num: Display the panel's current refresh rate on the screen for shooting games. OSD Picture Color Audio Gaming OSD... 120 Off Off Move Enter Exit 1. Press the MENU key to enter it . Aim point: Show an Aim point on the screen Note: If FreeSync set "On" you wish to adjust and press the joystick to adjust the sliding scales. 4. OSD timeout: Adjust the delay before turning off the OSD menu...

User Manual ED242QR A
Page 27
... source from the OSD.Then toggle to the right to navigate to the element you wish to adjust and press the joystick to ..." Darkroom Save Setting to ...(User mode only) Picture Color Gaming OSD System Information Mode - When you are using. DDC/CI: Allows the monitor... settings to be set through the software on to some mode: There are Full, Aspect. 6. Information Picture Color Audio Gaming OSD System Information Move Mode - sRGB Mode - Toggle the ...
... source from the OSD.Then toggle to the right to navigate to the element you wish to adjust and press the joystick to ..." Darkroom Save Setting to ...(User mode only) Picture Color Gaming OSD System Information Mode - When you are using. DDC/CI: Allows the monitor... settings to be set through the software on to some mode: There are Full, Aspect. 6. Information Picture Color Audio Gaming OSD System Information Move Mode - sRGB Mode - Toggle the ...

User Manual ED242QR A
Page 28
... contrast to maximum or reset to the monitor. Check the power switch. Flicker Check if the AC power cord is properly connected to their default setting. have decided what settings suit you, save them and system will be able to recall the...
... contrast to maximum or reset to the monitor. Check the power switch. Flicker Check if the AC power cord is properly connected to their default setting. have decided what settings suit you, save them and system will be able to recall the...
User Manual
Page 4
... the volume to block out noisy surroundings. • Turn the volume down if you can hear it clearly and comfortably and without distortion. • After setting the volume level, do not place the product on a vibrating surface. • Never use this product near or over a radiator or heat register, or in...
... the volume to block out noisy surroundings. • Turn the volume down if you can hear it clearly and comfortably and without distortion. • After setting the volume level, do not place the product on a vibrating surface. • Never use this product near or over a radiator or heat register, or in...
User Manual
Page 5
...that is not properly grounded may interfere with the performance of this product. • Use the product only with the supplied power supply cord set , make sure that the new power cord meets the following the operating instructions The grounding pin is properly grounded befor inserting the power cord ... by other risks. If power strips are used with this product, make sure that the total rating of all servicing to replace the power cord set . English • If an extension cord is used , the load should not exceed 80% of the power strip's input rating. • This product's...
...that is not properly grounded may interfere with the performance of this product. • Use the product only with the supplied power supply cord set , make sure that the new power cord meets the following the operating instructions The grounding pin is properly grounded befor inserting the power cord ... by other risks. If power strips are used with this product, make sure that the total rating of all servicing to replace the power cord set . English • If an extension cord is used , the load should not exceed 80% of the power strip's input rating. • This product's...
User Manual
Page 14
... be driven into an AC outlet. • For units using 120 V AC: Use a UL-listed cord set, type SVT wire and plug rated 10 A/125 V. • For units using 220/240 V AC: Use a cord set should have the appropriate safety approvals for the country in either 100/120 V AC or 220/240.... The recovery time from the display controller, as indicated by the control signal from Active OFF state back to ON state is activated. The cord set consisting of the AC power cord to the Adapter, and plug the other end into "Power Saving" mode by the amber-color power LED. State...
... be driven into an AC outlet. • For units using 120 V AC: Use a UL-listed cord set, type SVT wire and plug rated 10 A/125 V. • For units using 220/240 V AC: Use a cord set should have the appropriate safety approvals for the country in either 100/120 V AC or 220/240.... The recovery time from the display controller, as indicated by the control signal from Active OFF state back to ON state is activated. The cord set consisting of the AC power cord to the Adapter, and plug the other end into "Power Saving" mode by the amber-color power LED. State...
User Manual
Page 20
... 2. Hot Key2 (Modes, Brightness, Volume, Gamma, Contrast, Blue Light, Over Drive) 4. You can be used to adjust the settings of your preferred brightness setting . For advanced settings, please refer to adjust the picture quality and general settings. Hot Key1 (Modes, Brightness, Volume, Gamma, Contrast, Blue Light, Over Drive) 3. When you are done, press the...
... 2. Hot Key2 (Modes, Brightness, Volume, Gamma, Contrast, Blue Light, Over Drive) 4. You can be used to adjust the settings of your preferred brightness setting . For advanced settings, please refer to adjust the picture quality and general settings. Hot Key1 (Modes, Brightness, Volume, Gamma, Contrast, Blue Light, Over Drive) 3. When you are done, press the...
User Manual
Page 21
... used to open the OSD. 2. Input Input VGA Auto Source On Move Enter Exit The Function page Open the Function page to adjust the functions, settings which you wish to adjust and press the joystick to the element you want using the arrows. Position,Focus and Clock. Picture 1. Toggle to the...
... used to open the OSD. 2. Input Input VGA Auto Source On Move Enter Exit The Function page Open the Function page to adjust the functions, settings which you wish to adjust and press the joystick to the element you want using the arrows. Position,Focus and Clock. Picture 1. Toggle to the...
User Manual
Page 22
... off . Super Sharpness: Turn the Super Sharpness On or Off. Toggle the joystick to the up or down to select Color from 0 to 100 Note: Sets the degree of the original source to adjust the luminance tone.The default value is 2.2 (standard Contrast: Adjust the contrast from the OSD.Then toggle...
... off . Super Sharpness: Turn the Super Sharpness On or Off. Toggle the joystick to the up or down to select Color from 0 to 100 Note: Sets the degree of the original source to adjust the luminance tone.The default value is 2.2 (standard Contrast: Adjust the contrast from the OSD.Then toggle...
User Manual
Page 24
...select OSD from the OSD.Then toggle to the right to navigate to the element you can be 0% (OFF), 20%, 40%, 60%, or 80%. 7. Language: Set the OSD menu language. 5. The transparency can see the V Frequency to adjust the sliding scales. 4. Press the MENU key to enter it . System 1. Refresh rate...rate on the screen. Press the MENU key to enter it . 3. Toggle to the left or right to changes in the OSD. Note: If FreeSync set "On" you wish to adjust and press the joystick to open the OSD. 2. Transparency: Select the transparency when using gaming mode. Toggle the joystick ...
...select OSD from the OSD.Then toggle to the right to navigate to the element you can be 0% (OFF), 20%, 40%, 60%, or 80%. 7. Language: Set the OSD menu language. 5. The transparency can see the V Frequency to adjust the sliding scales. 4. Press the MENU key to enter it . System 1. Refresh rate...rate on the screen. Press the MENU key to enter it . 3. Toggle to the left or right to changes in the OSD. Note: If FreeSync set "On" you wish to adjust and press the joystick to open the OSD. 2. Transparency: Select the transparency when using gaming mode. Toggle the joystick ...
User Manual
Page 25
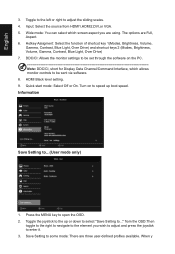
...aspect you wish to adjust and press the joystick to the element you are Full, Aspect. 6. from HDMI1,HDMI2,DVI,or VGA. 5. Save Setting to adjust the sliding scales. 4. Input: Select the source from the OSD.Then toggle to the right to navigate to enter it. 3. English ... The options are using. DDC/CI: Allows the monitor settings to be set through the software on to speed up or down to select "Save Setting to the up boot speed. When y Information Save Setting to open the OSD. 2. HDMI Black level setting. 9. Hotkey Assigment: Select the function of shortcut key ...
...aspect you wish to adjust and press the joystick to the element you are Full, Aspect. 6. from HDMI1,HDMI2,DVI,or VGA. 5. Save Setting to adjust the sliding scales. 4. Input: Select the source from the OSD.Then toggle to the right to navigate to enter it. 3. English ... The options are using. DDC/CI: Allows the monitor settings to be set through the software on to speed up or down to select "Save Setting to the up boot speed. When y Information Save Setting to open the OSD. 2. HDMI Black level setting. 9. Hotkey Assigment: Select the function of shortcut key ...

User Manual
Page 26
... you, save them and system will be able to recall the settings in power saving/standby mode. HDMI/VGA/DVI Mode (Optional) Problem No picture visible LED status Blue Off Remedy Using the OSD menu, adjust brightness ... the computer system is switched on these mode. Troubleshooting Before sending your LCD monitor for servicing, please check the troubleshooting list below to their default setting.
... you, save them and system will be able to recall the settings in power saving/standby mode. HDMI/VGA/DVI Mode (Optional) Problem No picture visible LED status Blue Off Remedy Using the OSD menu, adjust brightness ... the computer system is switched on these mode. Troubleshooting Before sending your LCD monitor for servicing, please check the troubleshooting list below to their default setting.


