3D manual
Page 3
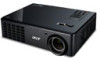
... software. 4 Ensure you will be projected at full brightness. Setting up the environment. 1 Position the infra-red transmitter so that it off, otherwise the image may not be shown a reminder that may need to view 3D content. English 3 The Acer projector you . Important: When you turn it has maximum coverage. Important: Only NVIDIA graphics cards are unsure, there is supported...
... software. 4 Ensure you will be projected at full brightness. Setting up the environment. 1 Position the infra-red transmitter so that it off, otherwise the image may not be shown a reminder that may need to view 3D content. English 3 The Acer projector you . Important: When you turn it has maximum coverage. Important: Only NVIDIA graphics cards are unsure, there is supported...
3D manual
Page 6
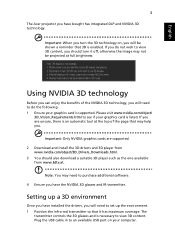
.... 2 Press the menu button on the projector remote control to open the OSD. Note: Please refer to your graphics card. English 6 Using DLP 3D technology Before you can enjoy the benefits of the window. 3 Set 3D to DLP 3D. Note: Please refer to your graphics card vendor's website for your graphics card's documentation. 2 Download and install the latest drivers for the latest driver version. 3 You...
.... 2 Press the menu button on the projector remote control to open the OSD. Note: Please refer to your graphics card. English 6 Using DLP 3D technology Before you can enjoy the benefits of the window. 3 Set 3D to DLP 3D. Note: Please refer to your graphics card vendor's website for your graphics card's documentation. 2 Download and install the latest drivers for the latest driver version. 3 You...
User Manual
Page 3
... instructions carefully. Caution for Accessibility Be sure that could be blocked or covered. Caution for plug as disconnecting device Observe the following guidelines when connecting and disconnecting power to the external power supply unit: • Install the power supply unit before connecting the power cord to protect it from the power supplies. These openings must not be seriously damaged. • Slots and openings are provided for cleaning. Warnings...
... instructions carefully. Caution for Accessibility Be sure that could be blocked or covered. Caution for plug as disconnecting device Observe the following guidelines when connecting and disconnecting power to the external power supply unit: • Install the power supply unit before connecting the power cord to protect it from the power supplies. These openings must not be seriously damaged. • Slots and openings are provided for cleaning. Warnings...
User Manual
Page 5
... walls and free flow of air around the projector is necessary. • Locations where temperatures may become excessively high, such as opening or removing covers may expose you to qualified service personnel. For safety reasons, do not use non-compliant parts when adding or changing components. At least 50cm clearance from the wall outlet and refer servicing to qualified service personnel when: • the power cord or...
... walls and free flow of air around the projector is necessary. • Locations where temperatures may become excessively high, such as opening or removing covers may expose you to qualified service personnel. For safety reasons, do not use non-compliant parts when adding or changing components. At least 50cm clearance from the wall outlet and refer servicing to qualified service personnel when: • the power cord or...
User Manual
Page 6
... projector lens to removing the lamp assembly for approximately 45 minutes prior to the sun. In this could cause it is to wait for ceiling mount installation. Refer servicing only to turn off the lamp, press HIDE on end vertically. Only use acer ceiling mount kit for mounting the projector and ensure it to ensure the projector completes its own removable cover. The temperature inside which becomes hot. • Clean the air filter...
... projector lens to removing the lamp assembly for approximately 45 minutes prior to the sun. In this could cause it is to wait for ceiling mount installation. Refer servicing only to turn off the lamp, press HIDE on end vertically. Only use acer ceiling mount kit for mounting the projector and ensure it to ensure the projector completes its own removable cover. The temperature inside which becomes hot. • Clean the air filter...
User Manual
Page 8
... not open or disassemble the product as recommended in operation. • When the lamp reaches the end of its life, it shows warning messages. • Reset the "Lamp Hour Reset" function from the Onscreen display "Management" menu after replacing the lamp module. • When switching the projector off, please ensure the projector completes its cooling cycle before cleaning. • Use a soft cloth moistened with mild detergent to clean the display housing...
... not open or disassemble the product as recommended in operation. • When the lamp reaches the end of its life, it shows warning messages. • Reset the "Lamp Hour Reset" function from the Onscreen display "Management" menu after replacing the lamp module. • When switching the projector off, please ensure the projector completes its cooling cycle before cleaning. • Use a soft cloth moistened with mild detergent to clean the display housing...
User Manual
Page 9
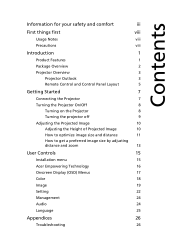
... 2 Projector Overview 3 Projector Outlook 3 Remote Control and Control Panel Layout 5 Getting Started 7 Connecting the Projector 7 Turning the Projector On/Off 8 Turning on the Projector 8 Turning the projector off 9 Adjusting the Projected Image 10 Adjusting the Height of Projected Image 10 How to optimize image size and distance 11 How to get a preferred image size by adjusting distance and zoom 13 User Controls 15 Installation menu 15 Acer Empowering Technology 16 Onscreen Display (OSD) Menus 17 Color 18 Image 19 Setting 22 Management 24 Audio 24...
... 2 Projector Overview 3 Projector Outlook 3 Remote Control and Control Panel Layout 5 Getting Started 7 Connecting the Projector 7 Turning the Projector On/Off 8 Turning on the Projector 8 Turning the projector off 9 Adjusting the Projected Image 10 Adjusting the Height of Projected Image 10 How to optimize image size and distance 11 How to get a preferred image size by adjusting distance and zoom 13 User Controls 15 Installation menu 15 Acer Empowering Technology 16 Onscreen Display (OSD) Menus 17 Color 18 Image 19 Setting 22 Management 24 Audio 24...
User Manual
Page 11
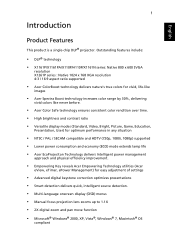
... : Native 1024 x 768 XGA resolution 4:3 / 16:9 aspect ratio supported • Acer ColorBoost technology delivers nature's true colors for vivid, life-like images • Acer Spectra Boost technology increases color range by 30%, delivering vivid colors like never before. • Acer Color Safe technology ensures consistent color rendition over time. • High brightness and contrast ratio • Versatile display modes (Standard, Video, Bright, Picture, Game, Education, Presentation, User) for optimum performance...
... : Native 1024 x 768 XGA resolution 4:3 / 16:9 aspect ratio supported • Acer ColorBoost technology delivers nature's true colors for vivid, life-like images • Acer Spectra Boost technology increases color range by 30%, delivering vivid colors like never before. • Acer Color Safe technology ensures consistent color rendition over time. • High brightness and contrast ratio • Versatile display modes (Standard, Video, Bright, Picture, Game, Education, Presentation, User) for optimum performance...
User Manual
Page 15
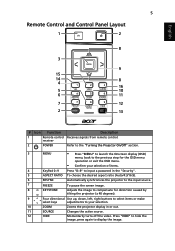
... projector to the input source. 7 FREEZE To pause the screen image. 8 KEYSTONE Adjusts the image to compensate for the OSD menu operation or exit the OSD menu. • Confirm your selection of items. 4 KeyPad 0~9 Press "0~9" to input a password in or out. 11 SOURCE Changes the active source. 12 HIDE Momentarily turns off the video. receiver 2 POWER Refer to the "Turning the Projector On/Off" section. 3 MENU • Press "MENU" to launch the Onscreen display...
... projector to the input source. 7 FREEZE To pause the screen image. 8 KEYSTONE Adjusts the image to compensate for the OSD menu operation or exit the OSD menu. • Confirm your selection of items. 4 KeyPad 0~9 Press "0~9" to input a password in or out. 11 SOURCE Changes the active source. 12 HIDE Momentarily turns off the video. receiver 2 POWER Refer to the "Turning the Projector On/Off" section. 3 MENU • Press "MENU" to launch the Onscreen display...
User Manual
Page 18
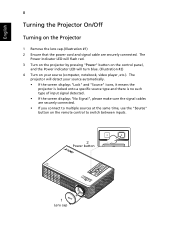
... the projector is locked onto a specific source type and there is no such type of input signal detected. • If the screen displays "No Signal", please make sure the signal cables are securely connected. The projector will turn blue. (Illustration #2) 4 Turn on the Projector 1 Remove the lens cap.(Illustration #1) 2 Ensure that the power cord and signal cable are securely connected. • If you connect to multiple sources at the same time, use the "Source" button on the remote control to switch between inputs. 2 Power button 1 Lens cap...
... the projector is locked onto a specific source type and there is no such type of input signal detected. • If the screen displays "No Signal", please make sure the signal cables are securely connected. The projector will turn blue. (Illustration #2) 4 Turn on the Projector 1 Remove the lens cap.(Illustration #1) 2 Ensure that the power cord and signal cable are securely connected. • If you connect to multiple sources at the same time, use the "Source" button on the remote control to switch between inputs. 2 Power button 1 Lens cap...

User Manual
Page 25
... only when the message "No signal input" is displayed on the control pad to launch the OSD for feature setting. English 15 User Controls Installation menu The installation menu provides an onscreen display (OSD) for screen size and distance, focus, keystone correction and more . 4 The Installation menu includes the following options: •Projection method •Projection location •Menu location •Keystone settings •Language settings •Reset to factory default function Use the up and down arrow keys to select an...
... only when the message "No signal input" is displayed on the control pad to launch the OSD for feature setting. English 15 User Controls Installation menu The installation menu provides an onscreen display (OSD) for screen size and distance, focus, keystone correction and more . 4 The Installation menu includes the following options: •Projection method •Projection location •Menu location •Keystone settings •Language settings •Reset to factory default function Use the up and down arrow keys to select an...

User Manual
Page 30
... player. • Off: Turn off 3D mode. Frequency Tracking Sharpeness "Frequency" changes the projector's refresh rate to match the frequency of the screen and the height adjusted to display the image using a 16:9 ratio. If you see a vertical flickering bar in the projected image, use this function to enable 3D function supported by tilting projection. (±40 degrees) H. Choose this item while using DLP 3D glasses, quad...
... player. • Off: Turn off 3D mode. Frequency Tracking Sharpeness "Frequency" changes the projector's refresh rate to match the frequency of the screen and the height adjusted to display the image using a 16:9 ratio. If you see a vertical flickering bar in the projected image, use this function to enable 3D function supported by tilting projection. (±40 degrees) H. Choose this item while using DLP 3D glasses, quad...

User Manual
Page 32
... under "Auto mode" (Auto-modus). Press to operate the projector. This function is only available when a composite video or S-Video input signal is selected and its system format is enabled, the projector will prompt the user to manage usage of "Timeout(Min.)" is "Off". • Once the security function is NTSC. Please refer to enter password when switch on the projector . 22 Setting English Menu Location Closed...
... under "Auto mode" (Auto-modus). Press to operate the projector. This function is only available when a composite video or S-Video input signal is selected and its system format is enabled, the projector will prompt the user to manage usage of "Timeout(Min.)" is "Off". • Once the security function is NTSC. Please refer to enter password when switch on the projector . 22 Setting English Menu Location Closed...

User Manual
Page 33
... the Power Key on all menus to return the parameters on either the remote control or the control panel can be accepted by projector anytime no matter what the Administrator Password is. • If losing this security card and number, please contact with an Acer service center. Choose "On" to enable VGA OUT connection. • Press the button and choose "Yes" to the factory default settings.
... the Power Key on all menus to return the parameters on either the remote control or the control panel can be accepted by projector anytime no matter what the Administrator Password is. • If losing this security card and number, please contact with an Acer service center. Choose "On" to enable VGA OUT connection. • Press the button and choose "Yes" to the factory default settings.

User Manual
Page 34
... lamp hour counter to turn on High Altitude mode. Note: Audio menu is no signal input after the allocated time. (in minutes) Displays the lamp's elapsed operating time (in hours). English 24 Management ECO Mode High Altitutde Auto Shutdown Lamp Hour Elapse Lamp Reminding Lamp Hour Reset Choose "On" to change the lamp 30 hours before its expected end-of the projector. The projector will lower power consumption, extend the lamp life and reduce noise. Activate this function to display a reminder to dim the projector lamp...
... lamp hour counter to turn on High Altitude mode. Note: Audio menu is no signal input after the allocated time. (in minutes) Displays the lamp's elapsed operating time (in hours). English 24 Management ECO Mode High Altitutde Auto Shutdown Lamp Hour Elapse Lamp Reminding Lamp Hour Reset Choose "On" to change the lamp 30 hours before its expected end-of the projector. The projector will lower power consumption, extend the lamp life and reduce noise. Activate this function to display a reminder to dim the projector lamp...
User Manual
Page 36
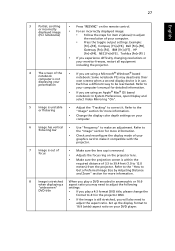
... choose the resolution mode you have removed the lens cap and the projector is switched on. 2 Partial, scrolling or incorrectly displayed image(For PC • Press "RESYNC" on the remote control. • For an incorrectly displayed image: • Open "My Computer," open the "Control (Windows 95/98/ 2000/XP)) Panel," and then double-click the "Display" icon. • Select the "Settings" tab. • Verify that the resolution setting is lower than...
... choose the resolution mode you have removed the lens cap and the projector is switched on. 2 Partial, scrolling or incorrectly displayed image(For PC • Press "RESYNC" on the remote control. • For an incorrectly displayed image: • Open "My Computer," open the "Control (Windows 95/98/ 2000/XP)) Panel," and then double-click the "Display" icon. • Select the "Settings" tab. • Verify that the resolution setting is lower than...
User Manual
Page 37
... computer. 6 Image has vertical • Use "Frequency" to correct it compatible with the projector. 7 Image is out of focus • Make sure the lens cap is removed. • Adjusts the focus ring on the remote control. Refer to the "How to Get a Preferred Image Size by Adjusting Distance and Zoom" section for more information. • Check and reconfigure the display mode of the • If you experience difficulty changing resolutions or...
... computer. 6 Image has vertical • Use "Frequency" to correct it compatible with the projector. 7 Image is out of focus • Make sure the lens cap is removed. • Adjusts the focus ring on the remote control. Refer to the "How to Get a Preferred Image Size by Adjusting Distance and Zoom" section for more information. • Check and reconfigure the display mode of the • If you experience difficulty changing resolutions or...
User Manual
Page 38
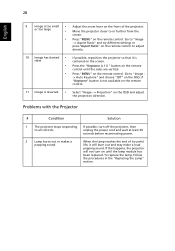
... the remote control. Go to "Image -> Auto Keystone" and choose "Off" on the OSD, if "Keystone" button is centered on the screen. Press "MENU" on the remote control. Press "MENU" on the remote control. If this happens, the projector will burn out and may make a loud popping sound. Select "Image --> Projection" on the remote control until the lamp module has been replaced. Press the "Keystone / " button on the OSD and adjust the projection direction. Problems with the Projector...
... the remote control. Go to "Image -> Auto Keystone" and choose "Off" on the OSD, if "Keystone" button is centered on the screen. Press "MENU" on the remote control. Press "MENU" on the remote control. If this happens, the projector will burn out and may make a loud popping sound. Select "Image --> Projection" on the remote control until the lamp module has been replaced. Press the "Keystone / " button on the OSD and adjust the projection direction. Problems with the Projector...
User Manual
Page 41
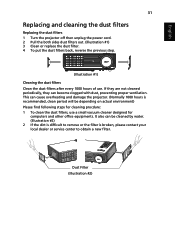
... following steps for cleaning procdure: 1 To clean the dust filters, use . English 31 Replacing and cleaning the dust filters Replacing the dust filters 1 Turn the projector off then unplug the power cord. 2 Pull the both sides dust filters out. (Illustration #1) 3 Clean or replace the dust filter. 4 To put the dust filters back, reverse the previous step. (Illustration #1) Cleaning the dust filters Clean the dust filters after every 1000 hours of use a small vacuum cleaner...
... following steps for cleaning procdure: 1 To clean the dust filters, use . English 31 Replacing and cleaning the dust filters Replacing the dust filters 1 Turn the projector off then unplug the power cord. 2 Pull the both sides dust filters out. (Illustration #1) 3 Clean or replace the dust filter. 4 To put the dust filters back, reverse the previous step. (Illustration #1) Cleaning the dust filters Clean the dust filters after every 1000 hours of use a small vacuum cleaner...

User Manual
Page 46
Projection system Resolution Computer compatibility Video compatibility Aspect ratio Displayable colors Projection lens Projection screen size (diagonal) Projection distance Throw ratio Horizontal scan rate Vertical refresh scan rate Lamp type Keystone correction Audio Weight Dimensions (W x D x H) Digital Zoom Power supply Power consumption Operating temperature DLP® X1161P/X1161PA/X110P/H110P/X1161N: Native: SVGA (800 x 600) , Maximum: UXGA (1600 x 1200), WSXGA+ (1680x1050), 1080p(1920x1080) X1261P: Native: XGA (1024 x 768), Maximum: UXGA (1600 x 1200), WSXGA+ (1680x1050), 1080p(...
Projection system Resolution Computer compatibility Video compatibility Aspect ratio Displayable colors Projection lens Projection screen size (diagonal) Projection distance Throw ratio Horizontal scan rate Vertical refresh scan rate Lamp type Keystone correction Audio Weight Dimensions (W x D x H) Digital Zoom Power supply Power consumption Operating temperature DLP® X1161P/X1161PA/X110P/H110P/X1161N: Native: SVGA (800 x 600) , Maximum: UXGA (1600 x 1200), WSXGA+ (1680x1050), 1080p(1920x1080) X1261P: Native: XGA (1024 x 768), Maximum: UXGA (1600 x 1200), WSXGA+ (1680x1050), 1080p(...


