
User Manual
Page 2
... to notify any person of this manual or supplementary documents and publications. Record the model number, serial number, purchase date and place of Acer Incorporated. All correspondence concerning your computer. No part of this publication may be made periodically to their respective companies. Acer LCD Monitor User's Guide Model number Serial number Date of purchase Place of purchase Acer and the Acer logo are registered trademarks of merchantability...
... to notify any person of this manual or supplementary documents and publications. Record the model number, serial number, purchase date and place of Acer Incorporated. All correspondence concerning your computer. No part of this publication may be made periodically to their respective companies. Acer LCD Monitor User's Guide Model number Serial number Date of purchase Place of purchase Acer and the Acer logo are registered trademarks of merchantability...

User Manual
Page 3
... the LCD screen, an afterimage of the previous screen may find slightly uneven brightness on the screen depending on the desktop pattern you use . Connecting/disconnecting the device Observe the following are turned off the power switch for your monitor Please carefully follow these instructions carefully. In this document for hours. Follow all power cords from the system by changing the image or turning off before cleaning. • Use...
... the LCD screen, an afterimage of the previous screen may find slightly uneven brightness on the screen depending on the desktop pattern you use . Connecting/disconnecting the device Observe the following are turned off the power switch for your monitor Please carefully follow these instructions carefully. In this document for hours. Follow all power cords from the system by changing the image or turning off before cleaning. • Use...

User Manual
Page 4
... volume. • Avoid turning up the volume to the equipment operator as possible. Safe listening To protect your ears have adjusted. • Limit the amount of the display as the bezel may touch dangerous voltage points or short-out parts that could be operated from surrounding light and bright surfaces." This product should be seriously damaged. • Slots and openings...
... volume. • Avoid turning up the volume to the equipment operator as possible. Safe listening To protect your ears have adjusted. • Limit the amount of the display as the bezel may touch dangerous voltage points or short-out parts that could be operated from surrounding light and bright surfaces." This product should be seriously damaged. • Slots and openings...
User Manual
Page 5
... that the new power cord meets the following the operating instructions v ampere rating of the branch circuit rating. Product servicing Do not attempt to service this product. • Use the product only with the supplied power supply cord set , make sure that the total rating of all servicing to replace the power cord set . Refer all products plugged into the product • the product was spilled into the wall outlet does not...
... that the new power cord meets the following the operating instructions v ampere rating of the branch circuit rating. Product servicing Do not attempt to service this product. • Use the product only with the supplied power supply cord set , make sure that the total rating of all servicing to replace the power cord set . Refer all products plugged into the product • the product was spilled into the wall outlet does not...

User Manual
Page 6
... Recycling Information Acer is strongly committed to environmental protection and views recycling, in damage and will often require extensive work by a qualified technician to restore the product to turn off your device in fuel depots, storage and distribution areas; vi Note: Adjust only those controls that are covered by the operating instructions, since improper adjustment of other products. Switch off...
... Recycling Information Acer is strongly committed to environmental protection and views recycling, in damage and will often require extensive work by a qualified technician to restore the product to turn off your device in fuel depots, storage and distribution areas; vi Note: Adjust only those controls that are covered by the operating instructions, since improper adjustment of other products. Switch off...

User Manual
Page 8
... for power management: • Activate display's Sleep mode within 15 minutes of user inactivity. • Activate computer's Sleep mode within 30 minutes of user inactivity. • Wake the computer from staying too long in one fixed posture • avoid slouching forward and/or leaning backward • stand up and walk around regularly to remove the strain on your leg muscles Long work...
... for power management: • Activate display's Sleep mode within 15 minutes of user inactivity. • Activate computer's Sleep mode within 30 minutes of user inactivity. • Wake the computer from staying too long in one fixed posture • avoid slouching forward and/or leaning backward • stand up and walk around regularly to remove the strain on your leg muscles Long work...

User Manual
Page 9
... focused screens, very small typefaces and low-contrast displays could stress your eyes regular breaks by its base. Developing good work habits to an awkward viewing angle. • Avoid looking at bright light sources, such as open windows, for enhanced text readability and graphics clarity. • Eliminate glare and reflections by: • placing your computer use more relaxing and productive: • Take...
... focused screens, very small typefaces and low-contrast displays could stress your eyes regular breaks by its base. Developing good work habits to an awkward viewing angle. • Avoid looking at bright light sources, such as open windows, for enhanced text readability and graphics clarity. • Eliminate glare and reflections by: • placing your computer use more relaxing and productive: • Take...

User Manual
Page 10
...a framework for the setting of EMC Directive 2004/108/EC, Low Voltage Directive 2006/95/EC, and RoHS Directive 2011/65/EU and Directive 2009/125/EC with regard to begin affixing CE marking 2015 . RU Jan / Sr. Manager Regulation, Acer Inc. Acer Incorporated 8F, 88,... Lepetit, 40, 20020 Lainate (MI) Italy Tel: +39-02-939-921 ,Fax: +39-02 9399-2913 www.acer.it Declare under our own responsibility that the product: Product: LCD Monitor Trade Name: Acer Model Number: CB281HK SKU Number: CB281HK xxxxxx; ("x" = 0~9, a ~ z, A ~ Z, or blank) To which this declaration refers conforms to...
...a framework for the setting of EMC Directive 2004/108/EC, Low Voltage Directive 2006/95/EC, and RoHS Directive 2011/65/EU and Directive 2009/125/EC with regard to begin affixing CE marking 2015 . RU Jan / Sr. Manager Regulation, Acer Inc. Acer Incorporated 8F, 88,... Lepetit, 40, 20020 Lainate (MI) Italy Tel: +39-02-939-921 ,Fax: +39-02 9399-2913 www.acer.it Declare under our own responsibility that the product: Product: LCD Monitor Trade Name: Acer Model Number: CB281HK SKU Number: CB281HK xxxxxx; ("x" = 0~9, a ~ z, A ~ Z, or blank) To which this declaration refers conforms to...
User Manual
Page 12
... Safe listening Warnings Using electrical power Product servicing Additional safety information IT equipment recycling information Disposal instructions LCD pixel statement Tips and information for comfortable use Federal Communications Commission Declaration of Conformity Unpacking Attaching/removing the base Screen position adjustment Connecting the power cord Power saving Display Data Channel (DDC) Connector pin assignment Standard timing table Installation User controls How to adjust a setting Acer eColor Management User Troubleshooting HDMI mode DVI mode DP mode 1 iii iii iii...
... Safe listening Warnings Using electrical power Product servicing Additional safety information IT equipment recycling information Disposal instructions LCD pixel statement Tips and information for comfortable use Federal Communications Commission Declaration of Conformity Unpacking Attaching/removing the base Screen position adjustment Connecting the power cord Power saving Display Data Channel (DDC) Connector pin assignment Standard timing table Installation User controls How to adjust a setting Acer eColor Management User Troubleshooting HDMI mode DVI mode DP mode 1 iii iii iii...

User Manual
Page 13
English 1 Unpacking Please check that the following items are present when you unpack the box, and save the packing materials in case you need to ship or transport the monitor in the future. LCD monitor Quick start guide DP cable (Option) C B 2 8 1 H K HDMI Cable (Optional) DVI cable (Option) AC power cord Audio Cable (Option) MHL cable (Optional) MHL MiniDP-MiniDP cable (optional)
English 1 Unpacking Please check that the following items are present when you unpack the box, and save the packing materials in case you need to ship or transport the monitor in the future. LCD monitor Quick start guide DP cable (Option) C B 2 8 1 H K HDMI Cable (Optional) DVI cable (Option) AC power cord Audio Cable (Option) MHL cable (Optional) MHL MiniDP-MiniDP cable (optional)

User Manual
Page 14
English 2 ATTACHING/REMOVING THE BASE Install: Align the base with the stand and push the base towards the top of the monitor, and then rotate the base clockwise. Remove: Reverse the steps to remove the base. Tighten the screw clockwise.
English 2 ATTACHING/REMOVING THE BASE Install: Align the base with the stand and push the base towards the top of the monitor, and then rotate the base clockwise. Remove: Reverse the steps to remove the base. Tighten the screw clockwise.

User Manual
Page 15
English 3 SCREEN POSITION ADJUSTMENT In oder to optimize the best viewing position, you can adjust the height/tilt/ swivel/pivot of the monitor. • Height Adjustment After pressing the top of the monitor then you can 35 degrees of recline be offered for an example of elevation. 5o 35o Only at the highest point can adjust the height of the monitor. 1 2 150mm • Tilt Please see the illustration below for the angle of the tilt range.
English 3 SCREEN POSITION ADJUSTMENT In oder to optimize the best viewing position, you can adjust the height/tilt/ swivel/pivot of the monitor. • Height Adjustment After pressing the top of the monitor then you can 35 degrees of recline be offered for an example of elevation. 5o 35o Only at the highest point can adjust the height of the monitor. 1 2 150mm • Tilt Please see the illustration below for the angle of the tilt range.

User Manual
Page 17
...; The cord set consisting of the power cord to "power saving" mode by the amber-colored power LED. for your system supports the DDC protocol, the monitor is able to "on" is around 3 seconds. 5 English Connecting the power cord • Check first to make installation easier, so long as indicated by the control signal from "power saving" mode back to plug-and-play. Mode On Power saving LED light Blue Amber The power saving mode will be installed. Power saving The monitor will be kept until a control signal has been...
...; The cord set consisting of the power cord to "power saving" mode by the amber-colored power LED. for your system supports the DDC protocol, the monitor is able to "on" is around 3 seconds. 5 English Connecting the power cord • Check first to make installation easier, so long as indicated by the control signal from "power saving" mode back to plug-and-play. Mode On Power saving LED light Blue Amber The power saving mode will be installed. Power saving The monitor will be kept until a control signal has been...
User Manual
Page 18
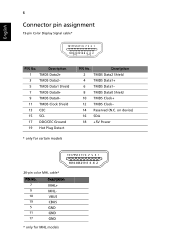
Description 2 TMDS Data2 Shield 4 TMDS Data1+ 6 TMDS Data1- 8 TMDS Data0 Shield 10 TMDS Clock+ 12 TMDS Clock- 14 Reserved (N.C. English 6 Connector pin assignment 19-pin Color Display Signal cable* 1917151311 9 7 5 3 1 1816141210 8 6 4 2 PIN No. Description 1 TMDS Data2+ 3 TMDS Data2- 5 TMDS Data1 Shield 7 TMDS Data0+ 9 TMDS Data0- 11 TMDS Clock Shield 13 CEC 15 SCL 17 DDC/CEC Ground 19 Hot Plug Detect * only for certain models PIN No. on device) 16 SDA 18 +5V Power
Description 2 TMDS Data2 Shield 4 TMDS Data1+ 6 TMDS Data1- 8 TMDS Data0 Shield 10 TMDS Clock+ 12 TMDS Clock- 14 Reserved (N.C. English 6 Connector pin assignment 19-pin Color Display Signal cable* 1917151311 9 7 5 3 1 1816141210 8 6 4 2 PIN No. Description 1 TMDS Data2+ 3 TMDS Data2- 5 TMDS Data1 Shield 7 TMDS Data0+ 9 TMDS Data0- 11 TMDS Clock Shield 13 CEC 15 SCL 17 DDC/CEC Ground 19 Hot Plug Detect * only for certain models PIN No. on device) 16 SDA 18 +5V Power

User Manual
Page 22
... the computer's port. c Connect the digital cable (only for dual-input models). (1) Make sure both the monitor and computer are switched off. (2) Connect one end of the 24-pin DVI cable to the back of the LCD monitor and the line-out port on the computer with the audio cable. 4 Turn on the monitor and computer Turn on your host system, please follow the steps below: Steps 1 Connect the video cable a Make sure both...
... the computer's port. c Connect the digital cable (only for dual-input models). (1) Make sure both the monitor and computer are switched off. (2) Connect one end of the 24-pin DVI cable to the back of the LCD monitor and the line-out port on the computer with the audio cable. 4 Turn on the monitor and computer Turn on your host system, please follow the steps below: Steps 1 Connect the video cable a Make sure both...
User Manual
Page 23
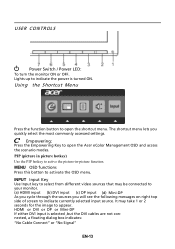
... indicate currently selected input source. Empowering: Press the Empowering Key to open the shortcut menu. USER CONTROLS Power Switch / Power LED: To turn the monitor ON or OFF. Lights up to activate the OSD menu. Using the Shortcut Menu Press the function button to appear. MENU OSD functions Press this botton to indicate the power is selected ,but the DVI cables are not connected, a floating dialog box indicates: "No Cable Connect" or "No Signal" EN-13 It...
... indicate currently selected input source. Empowering: Press the Empowering Key to open the shortcut menu. USER CONTROLS Power Switch / Power LED: To turn the monitor ON or OFF. Lights up to activate the OSD menu. Using the Shortcut Menu Press the function button to appear. MENU OSD functions Press this botton to indicate the power is selected ,but the DVI cables are not connected, a floating dialog box indicates: "No Cable Connect" or "No Signal" EN-13 It...
User Manual
Page 24
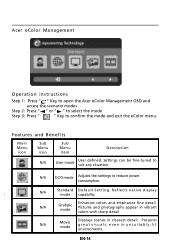
Acer eColor Management Operation instructions Step 1: Press " " Key to open the Acer eColor Management OSD and access the scenario modes Step 2: Press " " or " " to select the mode Step 3: Press " " Key to reduce power consumption. Settings can be fine-tuned to suit any situation N/A ECO mode Adjusts the settings to confirm the mode and exit the eColor menu. Presents great visuals, even in vibrant colors with sharp...
Acer eColor Management Operation instructions Step 1: Press " " Key to open the Acer eColor Management OSD and access the scenario modes Step 2: Press " " or " " to select the mode Step 3: Press " " Key to reduce power consumption. Settings can be fine-tuned to suit any situation N/A ECO mode Adjusts the settings to confirm the mode and exit the eColor menu. Presents great visuals, even in vibrant colors with sharp...
User Manual
Page 25
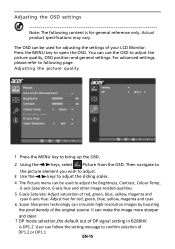
... to adjust the picture quality, OSD position and general settings. User can make the image more sharper and clear. 7 DP mode selection,the default out of the original source. Actual product specifications may vary. For advanced settings, please refer to following content is DP1.2. Then navigate to the picture element you wish to adjust. 3 Use the / keys to adjust the sliding scales. 4 The Picture menu can be used to adjust the Brightness, Contrast...
... to adjust the picture quality, OSD position and general settings. User can make the image more sharper and clear. 7 DP mode selection,the default out of the original source. Actual product specifications may vary. For advanced settings, please refer to following content is DP1.2. Then navigate to the picture element you wish to adjust. 3 Use the / keys to adjust the sliding scales. 4 The Picture menu can be used to adjust the Brightness, Contrast...
User Manual
Page 27
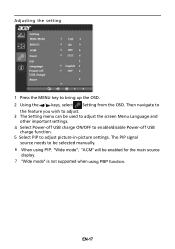
... main source display. 7 "Wide mode" is not supported when using PBP function. The PIP signal source needs to be selected manually. 6 When using PIP, "Wide mode", "ACM" will be used to adjust the screen Menu Language and other important settings. 4 Select Power-off USB charge ON/OFF to enable/disable Power-off USB charge function. 5 Select PIP to bring up the OSD. 2 Using the / keys, select Setting from the OSD. Adjusting the setting 1 Press the MENU key to adjust picture‐in‐picture settings.
... main source display. 7 "Wide mode" is not supported when using PBP function. The PIP signal source needs to be selected manually. 6 When using PIP, "Wide mode", "ACM" will be used to adjust the screen Menu Language and other important settings. 4 Select Power-off USB charge ON/OFF to enable/disable Power-off USB charge function. 5 Select PIP to bring up the OSD. 2 Using the / keys, select Setting from the OSD. Adjusting the setting 1 Press the MENU key to adjust picture‐in‐picture settings.
User Manual
Page 29
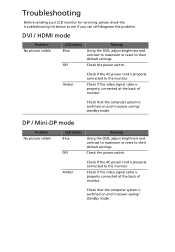
... the video signal cable is properly connected to their default settings. Problem No picture visible LED status Blue Off Remedy Using the OSD, adjust brightness and contrast to maximum or reset to the monitor. Amber Check if the AC power cord is properly connected at the back of monitor. Troubleshooting Before sending your LCD monitor for servicing, please check the troubleshooting list below to the monitor. DVI / HDMI mode Problem No picture visible LED status Blue Off Remedy Using the OSD, adjust brightness and contrast to maximum or reset to their default settings. Check...
... the video signal cable is properly connected to their default settings. Problem No picture visible LED status Blue Off Remedy Using the OSD, adjust brightness and contrast to maximum or reset to the monitor. Amber Check if the AC power cord is properly connected at the back of monitor. Troubleshooting Before sending your LCD monitor for servicing, please check the troubleshooting list below to the monitor. DVI / HDMI mode Problem No picture visible LED status Blue Off Remedy Using the OSD, adjust brightness and contrast to maximum or reset to their default settings. Check...

