
Quick Start Guide
Page 5
...setup program first. For more productive, please refer to the Aspire Generic User Guide. Follow these steps to complete the installation. Note: Viewing the file requires Adobe Reader. Follow the instructions on the screen to access it contains warranty information and the general regulations and...topics such as system utilities, data recovery, expansion options and troubleshooting. 3 First things first We would like to thank you for making an Acer notebook your choice for your notebook. In addition it : 1 Click on Start > All Programs > AcerSystem. 2 Click on how your ...
...setup program first. For more productive, please refer to the Aspire Generic User Guide. Follow these steps to complete the installation. Note: Viewing the file requires Adobe Reader. Follow the instructions on the screen to access it contains warranty information and the general regulations and...topics such as system utilities, data recovery, expansion options and troubleshooting. 3 First things first We would like to thank you for making an Acer notebook your choice for your notebook. In addition it : 1 Click on Start > All Programs > AcerSystem. 2 Click on how your ...
Quick Start Guide
Page 6
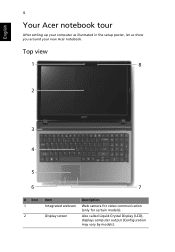
Top view 1 8 2 3 4 5 6 7 # Icon 1 2 Item Integrated webcam Display screen Description Web camera for video communication (only for certain models). English 4 Your Acer notebook tour After setting up your computer as illustrated in the setup poster, let us show you around your new Acer notebook. Also called Liquid-Crystal Display (LCD), displays computer output (Configuration may vary by models).
Top view 1 8 2 3 4 5 6 7 # Icon 1 2 Item Integrated webcam Display screen Description Web camera for video communication (only for certain models). English 4 Your Acer notebook tour After setting up your computer as illustrated in the setup poster, let us show you around your new Acer notebook. Also called Liquid-Crystal Display (LCD), displays computer output (Configuration may vary by models).
Quick Start Guide
Page 8
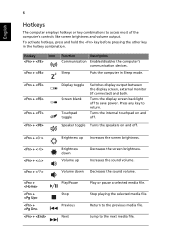
...Decreases the sound volume. Press any key to save power. Next Jump to access most of the computer's controls like screen brightness and volume output. English 6 Hotkeys The computer employs hotkeys or key combinations to the next media file. Sleep... press and hold the key before pressing the other key in Sleep mode. + + + + Display toggle Screen blank Touchpad toggle Switches display output between the display screen, external monitor (if connected) and both. Hotkey Icon + + Function Description Communication Enables/disables the computer's ...
...Decreases the sound volume. Press any key to save power. Next Jump to access most of the computer's controls like screen brightness and volume output. English 6 Hotkeys The computer employs hotkeys or key combinations to the next media file. Sleep... press and hold the key before pressing the other key in Sleep mode. + + + + Display toggle Screen blank Touchpad toggle Switches display output between the display screen, external monitor (if connected) and both. Hotkey Icon + + Function Description Communication Enables/disables the computer's ...

Service Guide
Page 3
.... WARNING: Indicates a potential for the proper completion of a procedure, choice of data or damage to equipment. + IMPORTANT: Indicates information that represents information displayed on a computer screen, such as command names, option letters, and words) are shown in constant width bold. Variables contained within user input are shown in bold italics. http...
.... WARNING: Indicates a potential for the proper completion of a procedure, choice of data or damage to equipment. + IMPORTANT: Indicates information that represents information displayed on a computer screen, such as command names, option letters, and words) are shown in constant width bold. Variables contained within user input are shown in bold italics. http...
Service Guide
Page 21
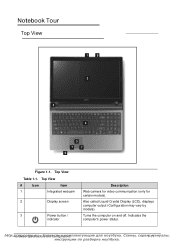
Top View # Icon Item 1 Integrated webcam 2 Display screen 3 Power button / indicator Description Web camera for video communication (only for certain models). Turns the computer on and off. http:/H/armdwyacreoSmpepc.isficuat-ionЗsаa&#...
Top View # Icon Item 1 Integrated webcam 2 Display screen 3 Power button / indicator Description Web camera for video communication (only for certain models). Turns the computer on and off. http:/H/armdwyacreoSmpepc.isficuat-ionЗsаa&#...
Service Guide
Page 28
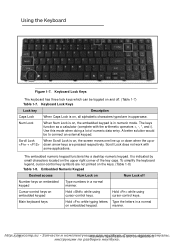
... are in a normal on the keys. (Table 1-8) Table 1-8. The keys function as a calculator (complete with some applications. Scroll Lock When Scroll Lock is on , the screen moves one line up or down when the up or + down arrow keys are not printed on embedded keypad. To simplify the keyboard legend, cursor...
... are in a normal on the keys. (Table 1-8) Table 1-8. The keys function as a calculator (complete with some applications. Scroll Lock When Scroll Lock is on , the screen moves one line up or down when the up or + down arrow keys are not printed on embedded keypad. To simplify the keyboard legend, cursor...
Service Guide
Page 30
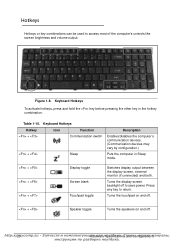
... press and hold the key before pressing the other key in Sleep mode. + + + Display toggle Screen blank Touchpad toggle Switches display output between the display screen, external monitor (if connected) and both. Keyboard Hotkeys Hotkey Icon Function + Communication switch + Sleep Description...the computer's communication devices. (Communication devices may vary by configuration.) Puts the computer in the hotkey combination. Turns the display screen backlight off . Turns the touchpad on and off. + Speaker toggle Turns the speakers on and off to return. Press ...
... press and hold the key before pressing the other key in Sleep mode. + + + Display toggle Screen blank Touchpad toggle Switches display output between the display screen, external monitor (if connected) and both. Keyboard Hotkeys Hotkey Icon Function + Communication switch + Sleep Description...the computer's communication devices. (Communication devices may vary by configuration.) Puts the computer in the hotkey combination. Turns the display screen backlight off . Turns the touchpad on and off. + Speaker toggle Turns the speakers on and off to return. Press ...

Service Guide
Page 31
Increases audio volume. Decreases the screen brightness. Plays or pauses media files Stops media file Plays the previous media file in the play sequence Plays the next media file in the ...;-2м1 Table 1-10. Keyboard Hotkeys (Continued) Hotkey + Icon Function Brightness up + Brightness down + Volume up + Volume down + Play/Pause + Stop + Previous + Next Description Increases the screen brightness. Decreases audio volume.
Increases audio volume. Decreases the screen brightness. Plays or pauses media files Stops media file Plays the previous media file in the play sequence Plays the next media file in the ...;-2м1 Table 1-10. Keyboard Hotkeys (Continued) Hotkey + Icon Function Brightness up + Brightness down + Volume up + Volume down + Play/Pause + Stop + Previous + Next Description Increases the screen brightness. Decreases audio volume.
Service Guide
Page 42
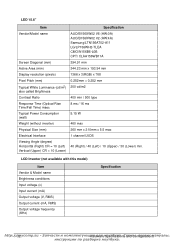
...кtаio.nСs хaеndмCыo,nсfiеgрurвaиtioсnмs LED 15.6" Item Vendor/Model name Screen Diagonal (mm) Active Area (mm) Display resolution (pixels) Pixel Pitch (mm) Typical White Luminance (cd/m2) also called Brightness Contrast Ratio Response Time (Optical Rise...
...кtаio.nСs хaеndмCыo,nсfiеgрurвaиtioсnмs LED 15.6" Item Vendor/Model name Screen Diagonal (mm) Active Area (mm) Display resolution (pixels) Pixel Pitch (mm) Typical White Luminance (cd/m2) also called Brightness Contrast Ratio Response Time (Optical Rise...
Service Guide
Page 55
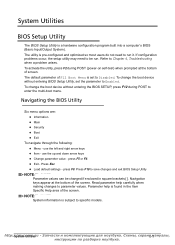
Refer to specific models. press F9. Navigation keys appear at the bottom of the screen. http:/S/ysmteymcUotmilitpie.ssu 2-м3 To activate the utility, press F2 during POST to enter the multi-boot menu. use the up and down arrow keys &#... boot device without entering the BIOS SETUP, press F12 during POST (power-on self-test) when prompted at the bottom of screen. Press F10 to Disabled. The default parameter of the screen. use the left and right arrow keys Item - The utility is set the parameter to be changed if...
Refer to specific models. press F9. Navigation keys appear at the bottom of the screen. http:/S/ysmteymcUotmilitpie.ssu 2-м3 To activate the utility, press F2 during POST to enter the multi-boot menu. use the up and down arrow keys &#... boot device without entering the BIOS SETUP, press F12 during POST (power-on self-test) when prompted at the bottom of screen. Press F10 to Disabled. The default parameter of the screen. use the left and right arrow keys Item - The utility is set the parameter to be changed if...

Service Guide
Page 56
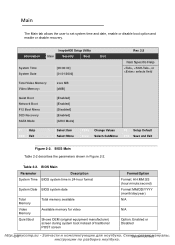
...сieмs Actual values may differ by model. Information 0 The Information tab shows a summary of the tabs found on the InsydeH20 BIOS Setup Utility screen: NOTE: NOTE: The screens provided are for reference only.
...сieмs Actual values may differ by model. Information 0 The Information tab shows a summary of the tabs found on the InsydeH20 BIOS Setup Utility screen: NOTE: NOTE: The screens provided are for reference only.
Service Guide
Page 58
... Date BIOS system date Total Memory Video Memory Quiet Boot Total memory available Available memory for video Shows OEM (original equipment manufacturer) screen during system boot instead of traditional POST screen Format/Option Format: HH:MM:SS (hour:minute:second) Format MM/DD/YYYY (month/day/year) N/A N/A Option: Enabled or Disabled http...
... Date BIOS system date Total Memory Video Memory Quiet Boot Total memory available Available memory for video Shows OEM (original equipment manufacturer) screen during system boot instead of traditional POST screen Format/Option Format: HH:MM:SS (hour:minute:second) Format MM/DD/YYYY (month/day/year) N/A N/A Option: Enabled or Disabled http...
Service Guide
Page 61
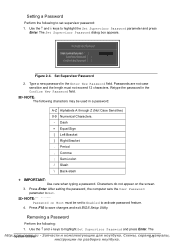
... Supervisor Password parameter and press Enter. The http:/S/ysmteymcUotmilitpie.ssu 2-м9 Retype the password in the Enter New Password field. NOTE: NOTE: Password on the screen. 3. Removing a Password 0 Perform the following characters may be set supervisor password: 1. Use the and keys to highlight Set Supervisor Password and press...
... Supervisor Password parameter and press Enter. The http:/S/ysmteymcUotmilitpie.ssu 2-м9 Retype the password in the Enter New Password field. NOTE: NOTE: Password on the screen. 3. Removing a Password 0 Perform the following characters may be set supervisor password: 1. Use the and keys to highlight Set Supervisor Password and press...

Service Guide
Page 62
... to activate the password feature. 5. Type current password in Enter Current Password field and press Enter. 3. Set Supervisor Password 2. If the verification is OK, the screen shows as follows.
... to activate the password feature. 5. Type current password in Enter Current Password field and press Enter. 3. Set Supervisor Password 2. If the verification is OK, the screen shows as follows.
Service Guide
Page 63
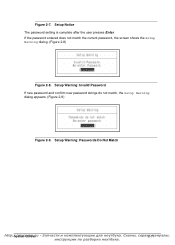
Setup Warning: Passwords Do Not Match http:/S/ysmteymcUotmilitpie.ssu 2с-1м1 Setup Warning: Invalid Password If new password and confirm new password strings do not match, the Setup Warning dialog appears. (Figure 2-9) Figure 2-9. If the password entered does not match the current password, the screen shows the Setup Warning dialog. (Figure 2-8) Figure 2-8. Setup Notice The password setting is complete after the user presses Enter. Figure 2-7.
Setup Warning: Passwords Do Not Match http:/S/ysmteymcUotmilitpie.ssu 2с-1м1 Setup Warning: Invalid Password If new password and confirm new password strings do not match, the Setup Warning dialog appears. (Figure 2-9) Figure 2-9. If the password entered does not match the current password, the screen shows the Setup Warning dialog. (Figure 2-8) Figure 2-8. Setup Notice The password setting is complete after the user presses Enter. Figure 2-7.

Service Guide
Page 69
Double-click the WinFlash executable. 2. Click OK to use the WinFlash Utility: 1. A progress screen is shown. (Figure 2-17) Figure 2-17. WinFlash Utility 0 Perform the following to begin the update. InsydeFlash http:/S/ysmteymcUotmilitpie.ssu 2с-1м7
Double-click the WinFlash executable. 2. Click OK to use the WinFlash Utility: 1. A progress screen is shown. (Figure 2-17) Figure 2-17. WinFlash Utility 0 Perform the following to begin the update. InsydeFlash http:/S/ysmteymcUotmilitpie.ssu 2с-1м7

Service Guide
Page 72
Figure 2-23. The on the screen. Press 1 or 2 to clean the desired password shown on screen message shows function success or failure. CMOS Jumper Cleaning BIOS Passwords 0 To clean the User or Supervisor passwords, perform the following steps: 1. http:/2/-2m0 ycomp.su Sыys,teсmерUвtиilitсieмs Clean BIOS Password 3. At the DOS prompt, enter clnpwd.exe. 2. Removing BIOS Passwords 0 The User and Supervisor passwords can be cleared by shorting the RTC_RST point with a metal instrument. (Figure 2-22) Figure 2-22.
Figure 2-23. The on the screen. Press 1 or 2 to clean the desired password shown on screen message shows function success or failure. CMOS Jumper Cleaning BIOS Passwords 0 To clean the User or Supervisor passwords, perform the following steps: 1. http:/2/-2m0 ycomp.su Sыys,teсmерUвtиilitсieмs Clean BIOS Password 3. At the DOS prompt, enter clnpwd.exe. 2. Removing BIOS Passwords 0 The User and Supervisor passwords can be cleared by shorting the RTC_RST point with a metal instrument. (Figure 2-22) Figure 2-22.

Service Guide
Page 73
When prompted, press F12 during POST procedure. Press Enter to be set to Enabled in the BIOS Setup Utility's Main screen. (refer to highlight the boot device. 4. Boot Manager Dialog 3. http:/S/ysmteymcUotmilitpie.ssu 2с-2м1 Using Boot Manager 0 The Boot Manager allows the boot device to ...
When prompted, press F12 during POST procedure. Press Enter to be set to Enabled in the BIOS Setup Utility's Main screen. (refer to highlight the boot device. 4. Boot Manager Dialog 3. http:/S/ysmteymcUotmilitpie.ssu 2с-2м1 Using Boot Manager 0 The Boot Manager allows the boot device to ...
Service Guide
Page 140
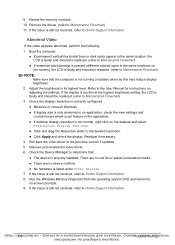
...;uеbрleвsиhoсoмtinаg If the Issue is still not resolved, refer to the User Manual for instructions on -screen prompts. 9. Refer to Online Support Information. Readjust if necessary. 4. If the Issue is still not resolved, refer to Maintenance Flowchart) 3. Reseat ... display size is only abnormal in an application, check the view settings and control/mouse wheel zoom feature in the same locations on the screen), the LCD is faulty and should be replaced. (refer to the desired resolution. Click Apply and check the display. There...
...;uеbрleвsиhoсoмtinаg If the Issue is still not resolved, refer to the User Manual for instructions on -screen prompts. 9. Refer to Online Support Information. Readjust if necessary. 4. If the Issue is still not resolved, refer to Maintenance Flowchart) 3. Reseat ... display size is only abnormal in an application, check the view settings and control/mouse wheel zoom feature in the same locations on the screen), the LCD is faulty and should be replaced. (refer to the desired resolution. Click Apply and check the display. There...

Service Guide
Page 145
... and not muted. 6. If the issue is still not resolved, refer to configure the speakers. 8. NOTE: NOTE: If Speakers does not show, right-click on -screen prompts to Online Support Information. Select Speakers and click Configure to Start Control Panel Hardware and Sound Sound. Navigate to start Speaker...
... and not muted. 6. If the issue is still not resolved, refer to configure the speakers. 8. NOTE: NOTE: If Speakers does not show, right-click on -screen prompts to Online Support Information. Select Speakers and click Configure to Start Control Panel Hardware and Sound Sound. Navigate to start Speaker...


