Service Guide
Page 17
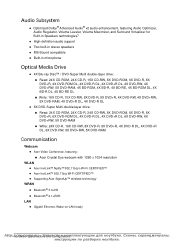
..., 4X BD-R DL, 4X BD-RE DL Write: 16X CD-R, 10X CD-RW, 8X DVD-R, 8X DVD+R, 4X DVD-RW, 4X DVD+RW, 5X DVD-RAM, 4X DVD+R DL, 4X DVD-R DL 8X DVD-Super Multi double-layer drive: Read: 24X CD-ROM, 24X CD-R, 24X CD-RW, 8X DVD-ROM...+R DL, 6X DVD-RW, 8X DVD+RW, 5X DVD-RAM Communication 0 Webcam Acer Video Conference, featuring: Acer Crystal Eye webcam with 1280 x 1024 resolution WLAN Acer InviLink™ Nplify™ 802.11b/g/n Wi-Fi CERTIFIED™ Acer InviLink™ 802.11b/g Wi-Fi CERTIFIED™ Supporting Acer SignalUp™ wireless technology WPAN Bluetooth® 3.0+HS Bluetooth...
..., 4X BD-R DL, 4X BD-RE DL Write: 16X CD-R, 10X CD-RW, 8X DVD-R, 8X DVD+R, 4X DVD-RW, 4X DVD+RW, 5X DVD-RAM, 4X DVD+R DL, 4X DVD-R DL 8X DVD-Super Multi double-layer drive: Read: 24X CD-ROM, 24X CD-R, 24X CD-RW, 8X DVD-ROM...+R DL, 6X DVD-RW, 8X DVD+RW, 5X DVD-RAM Communication 0 Webcam Acer Video Conference, featuring: Acer Crystal Eye webcam with 1280 x 1024 resolution WLAN Acer InviLink™ Nplify™ 802.11b/g/n Wi-Fi CERTIFIED™ Acer InviLink™ 802.11b/g Wi-Fi CERTIFIED™ Supporting Acer SignalUp™ wireless technology WPAN Bluetooth® 3.0+HS Bluetooth...
Service Guide
Page 37
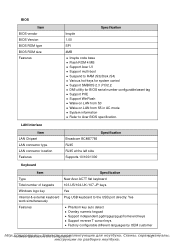
... Item Type Total number of keypads Windows logo key Internal & external keyboard work simultaneously Features Specification New Acer AC7T flat keyboard 103-US/104-UK /107-JP keys Yes Plug USB keyboard to RAM (S3)/Disk (S4) Various hot-keys for BIOS serial number configurable/asset tag Support PXE Support WinFlash... Wake on LAN from S3 Wake on LAN from S5 in AC mode System information Refer to Acer BIOS specification. BIOS Item BIOS vendor BIOS ...
... Item Type Total number of keypads Windows logo key Internal & external keyboard work simultaneously Features Specification New Acer AC7T flat keyboard 103-US/104-UK /107-JP keys Yes Plug USB keyboard to RAM (S3)/Disk (S4) Various hot-keys for BIOS serial number configurable/asset tag Support PXE Support WinFlash... Wake on LAN from S3 Wake on LAN from S5 in AC mode System information Refer to Acer BIOS specification. BIOS Item BIOS vendor BIOS ...
Service Guide
Page 40
... XA, Photo CD (multi-session), Video CD, Cd-Extra (CD+), CD-text DVD: DVD-VIDEO, DVD-ROM, DVD-R (3.9GB, 4.7GB) DVD-R DL, DVD-RW, DVD-RAM, DVD+R, DVD+R DL, DVD+RW CD: CD-DA (Red Book) -
... XA, Photo CD (multi-session), Video CD, Cd-Extra (CD+), CD-text DVD: DVD-VIDEO, DVD-ROM, DVD-R (3.9GB, 4.7GB) DVD-R DL, DVD-RW, DVD-RAM, DVD+R, DVD+R DL, DVD+RW CD: CD-DA (Red Book) -

Service Guide
Page 41
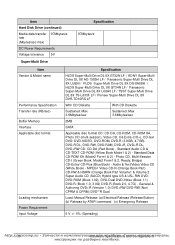
... XA, Photo CD (multi-session), Video CD, Cd-Extra (CD+), CD-text DVD: DVD-VIDEO, DVD-ROM, DVD-R (3.9GB, 4.7GB) DVD-R DL, DVD-RW, DVD-RAM, DVD+R, DVD+R DL, DVD+RW CD: CD-DA (Red Book) - Standard Data CD-ROM XA (Mode2 Form1 & 2) -
... XA, Photo CD (multi-session), Video CD, Cd-Extra (CD+), CD-text DVD: DVD-VIDEO, DVD-ROM, DVD-R (3.9GB, 4.7GB) DVD-R DL, DVD-RW, DVD-RAM, DVD+R, DVD+R DL, DVD+RW CD: CD-DA (Red Book) - Standard Data CD-ROM XA (Mode2 Form1 & 2) -

Service Guide
Page 48
... MS/MS-PRO: 16G XD Picture: 2G 5 in the system are turned off completely. Off (G3) Soft Off (G2/S5) Working (G0/S0) Suspend to RAM (S3) Save to power off completely. CPU set power down VGA Suspend PCMCIA Suspend Audio Power Down Hard Disk Power Down CD-ROM Power Down...
... MS/MS-PRO: 16G XD Picture: 2G 5 in the system are turned off completely. Off (G3) Soft Off (G2/S5) Working (G0/S0) Suspend to RAM (S3) Save to power off completely. CPU set power down VGA Suspend PCMCIA Suspend Audio Power Down Hard Disk Power Down CD-ROM Power Down...
Service Guide
Page 67
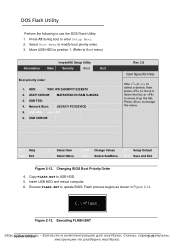
... boot priority order. 3. Copy FLASH.BAT to escape the menu. Press to USB HDD. 5. Flash process begins as shown in Figure 2-14. ATAPI CDROM: MATSHITADVD-RAM UJ890AS 3. USB HDD: xxxx USB 6. Executing FLASH.BAT http:/S/ysmteymcUotmilitpie.ssu 2с-1м5 Figure 2-13. Move USB HDD to position 1. (Refer to enter Setup Menu...
... boot priority order. 3. Copy FLASH.BAT to escape the menu. Press to USB HDD. 5. Flash process begins as shown in Figure 2-14. ATAPI CDROM: MATSHITADVD-RAM UJ890AS 3. USB HDD: xxxx USB 6. Executing FLASH.BAT http:/S/ysmteymcUotmilitpie.ssu 2с-1м5 Figure 2-13. Move USB HDD to position 1. (Refer to enter Setup Menu...


