Quick Start Guide
Page 10
Acer smart handheld headsets). based network. 3 External display Connects to a display device (e.g., (VGA) port external monitor, LCD projector). 4 HDMI port Supports high-definition digital video connections. 5 USB 2.0 port Connects to audio ...
Acer smart handheld headsets). based network. 3 External display Connects to a display device (e.g., (VGA) port external monitor, LCD projector). 4 HDMI port Supports high-definition digital video connections. 5 USB 2.0 port Connects to audio ...
Quick Start Guide
Page 53
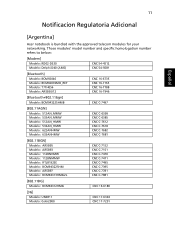
...] Modelo: BCM94312HMG CNC 16-6180 [3G] Modelo: UNDP-1 Modelo: Gobi2000 CNC 17-6334 CNC 17-7291 11 English Notificacion Regulatoria Adicional Español [Argentina] Acer notebook is bundled with the approved telecom modules for your...
...] Modelo: BCM94312HMG CNC 16-6180 [3G] Modelo: UNDP-1 Modelo: Gobi2000 CNC 17-6334 CNC 17-7291 11 English Notificacion Regulatoria Adicional Español [Argentina] Acer notebook is bundled with the approved telecom modules for your...
Quick Start Guide
Page 56
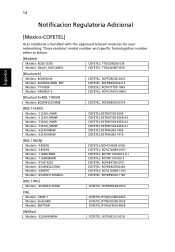
...: EM770W COFETEL:RTIQUUN08-0253 COFETEL:RTIQUGO09-0555 COFETEL:RTIHUEM10-0096 [WiMax] Modelo: 622ANXHMW COFETEL: RCPIN6210-0219 14 Notificacion Regulatoria Adicional Español [Mexico-COFETEL] Acer notebook is bundled with the approved telecom modules for your...
...: EM770W COFETEL:RTIQUUN08-0253 COFETEL:RTIQUGO09-0555 COFETEL:RTIHUEM10-0096 [WiMax] Modelo: 622ANXHMW COFETEL: RCPIN6210-0219 14 Notificacion Regulatoria Adicional Español [Mexico-COFETEL] Acer notebook is bundled with the approved telecom modules for your...
Service Guide
Page 7
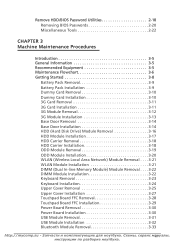
... 3-16 HDD Module Installation 3-17 HDD Carrier Removal 3-18 HDD Carrier Installation 3-18 ODD Module Removal 3-19 ODD Module Installation 3-20 WLAN (Wireless Local Area Network) Module Removal . . . .3-21 WLAN Module Installation 3-21 DIMM (Dual In-line Memory Module) Module Removal . . . .3-22 DIMM Module Installation 3-22 Keyboard Removal 3-23 Keyboard Installation...
... 3-16 HDD Module Installation 3-17 HDD Carrier Removal 3-18 HDD Carrier Installation 3-18 ODD Module Removal 3-19 ODD Module Installation 3-20 WLAN (Wireless Local Area Network) Module Removal . . . .3-21 WLAN Module Installation 3-21 DIMM (Dual In-line Memory Module) Module Removal . . . .3-22 DIMM Module Installation 3-22 Keyboard Removal 3-23 Keyboard Installation...
Service Guide
Page 24
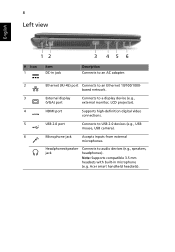
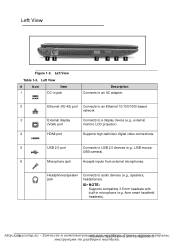
...with built-in jack Description Connects to an AC adapter. 2 Ethernet (RJ-45) port Connects to an Ethernet 10/100/1000-based network. 3 External display Connects to a display device (e.g., external (VGA) port monitor, LCD projector). 4 HDMI port Supports high-definition digital... video connections. 5 USB 2.0 port Connects to audio devices (e.g., speakers, headphones). Left View Table 1-3. Acer smart handheld headsets). http:/1/-1m4 ycomp.su HиaеrdдwлaяreнSоpуeтcбifiуca...
...with built-in jack Description Connects to an AC adapter. 2 Ethernet (RJ-45) port Connects to an Ethernet 10/100/1000-based network. 3 External display Connects to a display device (e.g., external (VGA) port monitor, LCD projector). 4 HDMI port Supports high-definition digital... video connections. 5 USB 2.0 port Connects to audio devices (e.g., speakers, headphones). Left View Table 1-3. Acer smart handheld headsets). http:/1/-1m4 ycomp.su HиaеrdдwлaяreнSоpуeтcбifiуca...

Service Guide
Page 29
... < > + : Open Ease of Access Center Application key This key has the same effect as clicking on a network) < > + : Lock your computer (if you are connected to a network domain), or switch users (if you're not connected to a network domain) + < > + : Moves focus from Start menu, to the Quick Launch toolbar, to the system tray (use...
... < > + : Open Ease of Access Center Application key This key has the same effect as clicking on a network) < > + : Lock your computer (if you are connected to a network domain), or switch users (if you're not connected to a network domain) + < > + : Moves focus from Start menu, to the Quick Launch toolbar, to the system tray (use...
Service Guide
Page 58
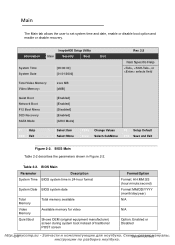
... System Date [09:00:00] [01/01/2003] Rev. 3.5 Item Specific Help , , or selects field Total Video Memory: Video Memory: xxxx MB [xMB] Quiet Boot Network Boot F12 Boot Menu D2D Recovery SATA Mode [Enabled] [Enabled] [Disabled] [Enabled] [AHCI Mode] F1 Help ESC Exit Select Item Select...
... System Date [09:00:00] [01/01/2003] Rev. 3.5 Item Specific Help , , or selects field Total Video Memory: Video Memory: xxxx MB [xMB] Quiet Boot Network Boot F12 Boot Menu D2D Recovery SATA Mode [Enabled] [Enabled] [Disabled] [Enabled] [AHCI Mode] F1 Help ESC Exit Select Item Select...

Service Guide
Page 59
Table 2-2. BIOS Main (Continued) Parameter Description Format/Option Network Boot Option to boot system from LAN (local area network) Option: Enabled or Disabled F12 Boot Menu Option to use boot menu during POST Option: Enabled or Disabled D2D Recovery Option to use D2D Recovery function Option: Enabled or Disabled SATA Mode Option to set SATA controller mode Option: AHCI or IDE http:/S/ysmteymcUotmilitpie.ssu 2-м7
Table 2-2. BIOS Main (Continued) Parameter Description Format/Option Network Boot Option to boot system from LAN (local area network) Option: Enabled or Disabled F12 Boot Menu Option to use boot menu during POST Option: Enabled or Disabled D2D Recovery Option to use D2D Recovery function Option: Enabled or Disabled SATA Mode Option to set SATA controller mode Option: AHCI or IDE http:/S/ysmteymcUotmilitpie.ssu 2-м7
Service Guide
Page 64
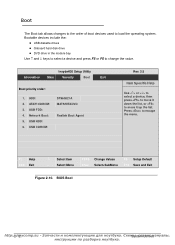
...сieмs Press to move it up the list. InsydeH20 Setup Utility Information Main Security Boot Exit Boot priority order: 1. ATAPI CDROM: 3. USB FDD: 4. Network Boot: 5. F1 Help ESC Exit Select Item Select Menu F5/F6 Enter Change Values Select>SubMenu F9 Setup Default F10 Save...
...сieмs Press to move it up the list. InsydeH20 Setup Utility Information Main Security Boot Exit Boot priority order: 1. ATAPI CDROM: 3. USB FDD: 4. Network Boot: 5. F1 Help ESC Exit Select Item Select Menu F5/F6 Enter Change Values Select>SubMenu F9 Setup Default F10 Save...
Service Guide
Page 67
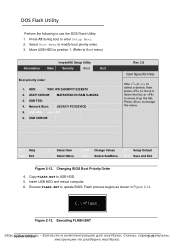
... Figure 2-14. Press to update BIOS. Execute FLASH.BAT to escape the menu. HDD: WDC WD 2500BPVT-22ZEST0 2. ATAPI CDROM: MATSHITADVD-RAM UJ890AS 3. Figure 2-13. Network Boot: LEGACY PCI DEVICE 5. Press F2 during boot to use the DOS Flash Utility: 1. DOS Flash Utility 0 Perform the following to enter Setup Menu. 2.
... Figure 2-14. Press to update BIOS. Execute FLASH.BAT to escape the menu. HDD: WDC WD 2500BPVT-22ZEST0 2. ATAPI CDROM: MATSHITADVD-RAM UJ890AS 3. Figure 2-13. Network Boot: LEGACY PCI DEVICE 5. Press F2 during boot to use the DOS Flash Utility: 1. DOS Flash Utility 0 Perform the following to enter Setup Menu. 2.
Service Guide
Page 78
... 3-16 HDD Module Installation 3-17 HDD Carrier Removal 3-18 HDD Carrier Installation 3-18 ODD Module Removal 3-19 ODD Module Installation 3-20 WLAN (Wireless Local Area Network) Module Removal . . . .3-21 WLAN Module Installation 3-21 DIMM (Dual In-line Memory Module) Module Removal . . . .3-22 DIMM Module Installation 3-22 Keyboard Removal 3-23 Keyboard Installation...
... 3-16 HDD Module Installation 3-17 HDD Carrier Removal 3-18 HDD Carrier Installation 3-18 ODD Module Removal 3-19 ODD Module Installation 3-20 WLAN (Wireless Local Area Network) Module Removal . . . .3-21 WLAN Module Installation 3-21 DIMM (Dual In-line Memory Module) Module Removal . . . .3-22 DIMM Module Installation 3-22 Keyboard Removal 3-23 Keyboard Installation...

Service Guide
Page 97
...: Main (black) antenna connector is close to Figure 3-12. 2. WLAN Module Installation 0 1. Install main (B) and auxiliary (C) antenna cables on lower cover. WLAN (Wireless Local Area Network) Module Removal 0 Prerequisite: Base Door Removal 1. Refer to front of computer. B D A C Figure 3-17. Remove screw (A) from mainboard connector (D). Remove module from mainboard. 4. Install and secure...
...: Main (black) antenna connector is close to Figure 3-12. 2. WLAN Module Installation 0 1. Install main (B) and auxiliary (C) antenna cables on lower cover. WLAN (Wireless Local Area Network) Module Removal 0 Prerequisite: Base Door Removal 1. Refer to front of computer. B D A C Figure 3-17. Remove screw (A) from mainboard connector (D). Remove module from mainboard. 4. Install and secure...

Service Guide
Page 112
...;n,ceсеPрroвcиeсduмreаs Mainboard Removal 0 Prerequisite: HDD (Hard Disk Drive) Module Removal WLAN (Wireless Local Area Network) Module Removal Speaker Module Removal 1. Remove adhesive tape (B) securing WLAN antennas to Figure 3-29. 2. Remove WLAN antennas from lower cover (Figure 3-35). A B A B Figure 3-35. Mainboard...
...;n,ceсеPрroвcиeсduмreаs Mainboard Removal 0 Prerequisite: HDD (Hard Disk Drive) Module Removal WLAN (Wireless Local Area Network) Module Removal Speaker Module Removal 1. Remove adhesive tape (B) securing WLAN antennas to Figure 3-29. 2. Remove WLAN antennas from lower cover (Figure 3-35). A B A B Figure 3-35. Mainboard...


