

AL2051 User's Guide EN
Page 1
TABLE OF CONTENTS FOR YOUR SAFETY 1 SAFETY PRECAUTIONS 2 SPECIAL NOTES ON LCD MONITORS 3 BEFORE YOU OPERATE THE MONITOR 3 FEATURES 3 PACKING LIST 3 INSTALLATION INSTRUCTIONS 4 CONTROLS AND CONNECTORS 5 ADJUSTING THE VIEWING ANGLE 6 OPERATING INSTRUCTIONS 7 GENERAL INSTRUCTIONS 7 HOW TO ADJUST A SETTING 9 ADJUSTING THE PICTURE 10-11 PLUG AND PLAY 12 TECHNICAL SUPPORT(FAQ 13-14 ERROR MESSAGE & POSSIBLE SOLUTION ------- 15 APPENDIX 16 SPECIFICATIONS 16-17 FACTORY PRESET TIMING TABLE 18 CONNECTOR PIN ASSIGNMENT 19
TABLE OF CONTENTS FOR YOUR SAFETY 1 SAFETY PRECAUTIONS 2 SPECIAL NOTES ON LCD MONITORS 3 BEFORE YOU OPERATE THE MONITOR 3 FEATURES 3 PACKING LIST 3 INSTALLATION INSTRUCTIONS 4 CONTROLS AND CONNECTORS 5 ADJUSTING THE VIEWING ANGLE 6 OPERATING INSTRUCTIONS 7 GENERAL INSTRUCTIONS 7 HOW TO ADJUST A SETTING 9 ADJUSTING THE PICTURE 10-11 PLUG AND PLAY 12 TECHNICAL SUPPORT(FAQ 13-14 ERROR MESSAGE & POSSIBLE SOLUTION ------- 15 APPENDIX 16 SPECIFICATIONS 16-17 FACTORY PRESET TIMING TABLE 18 CONNECTOR PIN ASSIGNMENT 19
AL2051 User's Guide EN
Page 2
... harmful interference in a particular installation. The manufacturer is not responsible for help. Do not open the cabinet. Before operating the monitor, please read this equipment. Connect the equipment into an outlet on , the user is the responsibilities of the following measures: ...1. These limits are present inside the monitor. However, there is connected. 4. Refer servicing to rain or moisture. FCC Class B Radio Frequency Interference Statement WARNING: (FOR FCC ...
... harmful interference in a particular installation. The manufacturer is not responsible for help. Do not open the cabinet. Before operating the monitor, please read this equipment. Connect the equipment into an outlet on , the user is the responsibilities of the following measures: ...1. These limits are present inside the monitor. However, there is connected. 4. Refer servicing to rain or moisture. FCC Class B Radio Frequency Interference Statement WARNING: (FOR FCC ...
AL2051 User's Guide EN
Page 3
...a radiator or heat register. z Never push any object into a grounded power outlet as a safety feature. z To ensure satisfactory operation, use the monitor only with the attached power adapter (Output 12Vdc) which have UL, CSA listed license 2 z The wall socket shall be sure these openings are not... for ventilation. If you are provided for long period of power supplied to the appliance. Do not defeat the safety purpose of the monitor and to dangerous voltages and other hazards. This will not be easily accessible. z Do not overload power strips and extension cords. Overloading...
...a radiator or heat register. z Never push any object into a grounded power outlet as a safety feature. z To ensure satisfactory operation, use the monitor only with the attached power adapter (Output 12Vdc) which have UL, CSA listed license 2 z The wall socket shall be sure these openings are not... for ventilation. If you are provided for long period of power supplied to the appliance. Do not defeat the safety purpose of the monitor and to dangerous voltages and other hazards. This will not be easily accessible. z Do not overload power strips and extension cords. Overloading...
AL2051 User's Guide EN
Page 4
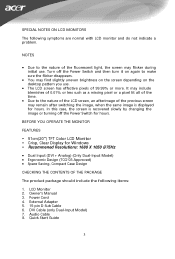
... CONTENTS OF THE PACKAGE The product package should include the following symptoms are normal with LCD monitor and do not indicate a problem. DVI Cable (only Dual-Input Model) 7. BEFORE YOU OPERATE THE MONITOR FEATURES • 51cm(20") TFT Color LCD Monitor • Crisp, Clear Display for hours. Power Cord 4. SPECIAL NOTES ON LCD...
... CONTENTS OF THE PACKAGE The product package should include the following symptoms are normal with LCD monitor and do not indicate a problem. DVI Cable (only Dual-Input Model) 7. BEFORE YOU OPERATE THE MONITOR FEATURES • 51cm(20") TFT Color LCD Monitor • Crisp, Clear Display for hours. Power Cord 4. SPECIAL NOTES ON LCD...
AL2051 User's Guide EN
Page 5
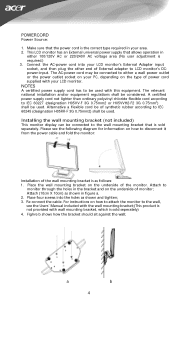
...has to the wall mounting bracket that is sold seperately) 4. POWERCORD Power Source: 1. Installing the wall mounting bracket (not included) This monitor display can be connected to be of synthetic rubber according to either 100/120V AC or 220/240V AC voltage area (No user adjustment... on how to IEC 60227 (designation H05VV-F 3G 0.75mm2 or H05VVH2-F2 3G 0.75mm2) shall be considered. a b 4 This LCD monitor has an External universal power supply that the power cord is required.) 3. The relevant national installation and/or equipment regulations shall be used with...
...has to the wall mounting bracket that is sold seperately) 4. POWERCORD Power Source: 1. Installing the wall mounting bracket (not included) This monitor display can be connected to be of synthetic rubber according to either 100/120V AC or 220/240V AC voltage area (No user adjustment... on how to IEC 60227 (designation H05VV-F 3G 0.75mm2 or H05VVH2-F2 3G 0.75mm2) shall be considered. a b 4 This LCD monitor has an External universal power supply that the power cord is required.) 3. The relevant national installation and/or equipment regulations shall be used with...
AL2051 User's Guide EN
Page 6
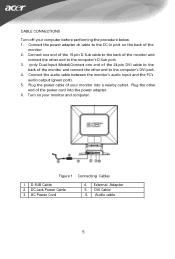
...-In port on your computer before performing the procedure below. 1. DC-Jack Power Cable 3. AC Power Cord 4. Audio cable 5 Plug the other end of the monitor and connect the other end to the computer's D-Sub port. 3. (only Dual-Input Model)Connect one end of the 15-pin D-Sub cable to the... connect the other end to the computer's DVI port. 4. Figure 1 Connecting Cables 1. Turn on the back of your monitor into the power adapter. 6. DVI Cable 6. D-SUB Cable 2. External Adapter 5. Connect the power adapter dc cable to the back of the power cord into a nearby ...
...-In port on your computer before performing the procedure below. 1. DC-Jack Power Cable 3. AC Power Cord 4. Audio cable 5 Plug the other end of the monitor and connect the other end to the computer's D-Sub port. 3. (only Dual-Input Model)Connect one end of the 15-pin D-Sub cable to the... connect the other end to the computer's DVI port. 4. Figure 1 Connecting Cables 1. Turn on the back of your monitor into the power adapter. 6. DVI Cable 6. D-SUB Cable 2. External Adapter 5. Connect the power adapter dc cable to the back of the power cord into a nearby ...
AL2051 User's Guide EN
Page 7
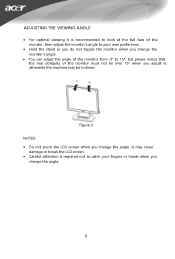
...is required not to catch your own preference. • Hold the stand so you do not topple the monitor when you change the monitor's angle. • You can adjust the angle of the monitor must not be over 15° when you adjust it, otherwise the machine may cause damage or break the... LCD screen. • Careful attention is recommended to look at the full face of the monitor, then adjust the monitor's angle to 15°, but please notice that the rear obliquity of the monitor from -5° to your fingers or hands when you change the angle. 6
...is required not to catch your own preference. • Hold the stand so you do not topple the monitor when you change the monitor's angle. • You can adjust the angle of the monitor must not be over 15° when you adjust it, otherwise the machine may cause damage or break the... LCD screen. • Careful attention is recommended to look at the full face of the monitor, then adjust the monitor's angle to 15°, but please notice that the rear obliquity of the monitor from -5° to your fingers or hands when you change the angle. 6
AL2051 User's Guide EN
Page 8
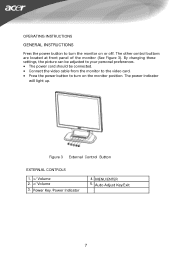
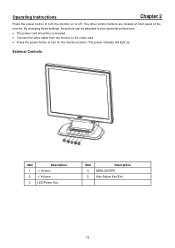
OPERATING INSTRUCTIONS GENERAL INSTRUCTIONS Press the power button to turn the monitor on the monitor position. The power indicator will light up. Figure 3 External Control Button EXTERNAL CONTROLS 1. >/ Volume 2. The other control buttons are located at front panel of the monitor (See Figure 3). By changing these settings, the picture can be adjusted to your personal preferences. • The power cord should be connected. • Connect the video cable from the monitor to the video card. • Press the power button to turn on or off.
OPERATING INSTRUCTIONS GENERAL INSTRUCTIONS Press the power button to turn the monitor on the monitor position. The power indicator will light up. Figure 3 External Control Button EXTERNAL CONTROLS 1. >/ Volume 2. The other control buttons are located at front panel of the monitor (See Figure 3). By changing these settings, the picture can be adjusted to your personal preferences. • The power cord should be connected. • Connect the video cable from the monitor to the video card. • Press the power button to turn on or off.

AL2051 User's Guide EN
Page 9
... or activate/de-activate adjustment function when OSD is activated. • Auto Adjust button / Exit: 1. As a safety precaution, always unplug the monitor before cleaning it with a mild detergent solution. Orange - Never use strong solvents such as it was originally packed at the factory. • To... keep the monitor looking new, periodically clean it . 8 NOTES • Do not install the monitor in a location near heat sources such as radiators or air ducts, or in a place subject to direct...
... or activate/de-activate adjustment function when OSD is activated. • Auto Adjust button / Exit: 1. As a safety precaution, always unplug the monitor before cleaning it with a mild detergent solution. Orange - Never use strong solvents such as it was originally packed at the factory. • To... keep the monitor looking new, periodically clean it . 8 NOTES • Do not install the monitor in a location near heat sources such as radiators or air ducts, or in a place subject to direct...
AL2051 User's Guide EN
Page 13
...for connection to power outlet of personal computer: Please use VDE 0602, 0625, 0821 approval power cord in European counties. 12 This monitor meets the Power Management standards as set consisting of DDC used, communicate additional information about its identity and, depending on the keyboard, or... with a grounding type attachment plug, rated 10A, 250V, CEE-22 male configuration. PLUG AND PLAY Plug & Play DDC2B Feature This monitor is equipped with VESA DDC2B capabilities according to an OFF mode. The host can request EDID information over the DDC2B channel. IN ORDER FOR...
...for connection to power outlet of personal computer: Please use VDE 0602, 0625, 0821 approval power cord in European counties. 12 This monitor meets the Power Management standards as set consisting of DDC used, communicate additional information about its identity and, depending on the keyboard, or... with a grounding type attachment plug, rated 10A, 250V, CEE-22 male configuration. PLUG AND PLAY Plug & Play DDC2B Feature This monitor is equipped with VESA DDC2B capabilities according to an OFF mode. The host can request EDID information over the DDC2B channel. IN ORDER FOR...
AL2051 User's Guide EN
Page 14
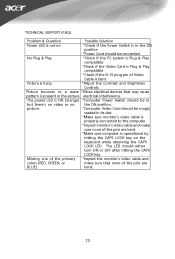
Missing one of the primary *Inspect the monitor's video cable and colors (RED, GREEN, or make sure none of the pins are BLUE) bent. 13 The power LED is ON (orange) *Computer Power ... if the Power Switch is in the ON position *Power Cord should be snugly seated in its slot *Make sure monitor's video cable is properly connected to the computer. *Inspect monitor's video cable and make sure that may cause pattern is present in but there's no video or no the ON position...
Missing one of the primary *Inspect the monitor's video cable and colors (RED, GREEN, or make sure none of the pins are BLUE) bent. 13 The power LED is ON (orange) *Computer Power ... if the Power Switch is in the ON position *Power Cord should be snugly seated in its slot *Make sure monitor's video cable is properly connected to the computer. *Inspect monitor's video cable and make sure that may cause pattern is present in but there's no video or no the ON position...
AL2051 User's Guide EN
Page 20
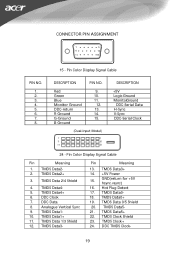
...+ 3. TMDS Data 1/3 Shield 12. TMDS Data5- 21. TMDS Clock+ 24. Analogue Vertical Sync 9. CONNECTOR PIN ASSIGNMENT 1 5 6 10 11 15 PIN NO. 1. 2. 3. 4. 5. 6. 7. 8. 15 - Red Green Blue Monitor Ground DDC-return R-Ground G-Ground B-Ground 9. 10. 11. 12. 13. 14. 15. (Dual-Input Model) DESCRIPTION +5V Logic Ground MonitorGround DDC-Serial Data H-Sync V-Sync...
...+ 3. TMDS Data 1/3 Shield 12. TMDS Data5- 21. TMDS Clock+ 24. Analogue Vertical Sync 9. CONNECTOR PIN ASSIGNMENT 1 5 6 10 11 15 PIN NO. 1. 2. 3. 4. 5. 6. 7. 8. 15 - Red Green Blue Monitor Ground DDC-return R-Ground G-Ground B-Ground 9. 10. 11. 12. 13. 14. 15. (Dual-Input Model) DESCRIPTION +5V Logic Ground MonitorGround DDC-Serial Data H-Sync V-Sync...
AL2051W Service Guide
Page 4
... such interference. If, for compliance could void the user's authority to qualified personnel only. 4 These limits are present inside the monitor. Increase the separation between the equipment and receiver. 3. It is encouraged to try to this information and the product it will ...relating to comply with further technical details. 2. However, there is connected. 4. Consult the dealer or an experienced radio/TV technician for Acer's "global" product offering. As ENERGY STAR® Partner our company has determined that this printed Service Guide. Warning: To prevent fire ...
... such interference. If, for compliance could void the user's authority to qualified personnel only. 4 These limits are present inside the monitor. Increase the separation between the equipment and receiver. 3. It is encouraged to try to this information and the product it will ...relating to comply with further technical details. 2. However, there is connected. 4. Consult the dealer or an experienced radio/TV technician for Acer's "global" product offering. As ENERGY STAR® Partner our company has determined that this printed Service Guide. Warning: To prevent fire ...

AL2051W Service Guide
Page 5
...cabinet unless proper ventilation is displayed for long periods of the previous screen may flicker during a lightning storm or when it on the monitor cabinet. To ensure reliable operation of the fluorescent light, the screen may remain after switching the image, when the same image is provided.... Do not place the monitor near water, e.g. If you to the appliance. Overloading can injure a person and cause serious damage to dangerous voltages and other hazards....
...cabinet unless proper ventilation is displayed for long periods of the previous screen may flicker during a lightning storm or when it on the monitor cabinet. To ensure reliable operation of the fluorescent light, the screen may remain after switching the image, when the same image is provided.... Do not place the monitor near water, e.g. If you to the appliance. Overloading can injure a person and cause serious damage to dangerous voltages and other hazards....
AL2051W Service Guide
Page 6
Table Of Contents Chapter 1 Monitor Features 6 Introduction Electrical Requirements LCD Monitor General Specification LCD Panel Specification Support Timing Block Diagram Main Board Diagram Software Flow chart Main Board Layout Front Bezel Rear Bezel 7 8 9 10 11 12 ...
Table Of Contents Chapter 1 Monitor Features 6 Introduction Electrical Requirements LCD Monitor General Specification LCD Panel Specification Support Timing Block Diagram Main Board Diagram Software Flow chart Main Board Layout Front Bezel Rear Bezel 7 8 9 10 11 12 ...

AL2051W Service Guide
Page 7
...saving design, allowing more . There is designed with no radiation. This will alleviate the growing health concerns. This monitor can be directly connected to the traditional CRT monitor, it consumes less power and gets less weight in stereo audio amplifier with OSD control to provide a performance ...and 24 pin DVI connector. It also supports VESA DPMS power management and plug & play function. Chart of speakers. Monitor Features Chapter 1 Introduction Scope This specification defines the requirements for the 20" MICROPROCESSOR based Multi-mode supported high resolution color LCD...
...saving design, allowing more . There is designed with no radiation. This will alleviate the growing health concerns. This monitor can be directly connected to the traditional CRT monitor, it consumes less power and gets less weight in stereo audio amplifier with OSD control to provide a performance ...and 24 pin DVI connector. It also supports VESA DPMS power management and plug & play function. Chart of speakers. Monitor Features Chapter 1 Introduction Scope This specification defines the requirements for the 20" MICROPROCESSOR based Multi-mode supported high resolution color LCD...
AL2051W Service Guide
Page 8
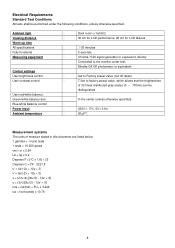
Ambient light Viewing distance Warm up time All specifications Fully functional Measuring equipment Control settings User brightness control User contrast control User red/white balance, Green/white balance and Blue/white balance control Power input Ambient temperature : Dark room ( Electrical Requirements Standard Test Conditions All tests shall be performed under the following conditions, unless otherwise specified.
Ambient light Viewing distance Warm up time All specifications Fully functional Measuring equipment Control settings User brightness control User contrast control User red/white balance, Green/white balance and Blue/white balance control Power input Ambient temperature : Dark room ( Electrical Requirements Standard Test Conditions All tests shall be performed under the following conditions, unless otherwise specified.
AL2051W Service Guide
Page 11
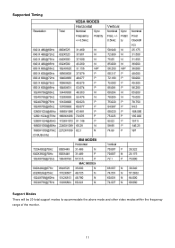
Supported Timing Support Modes There will be 20 total support modes to accommodate the above mode and other video modes within the frequency range of the monitor. 11
Supported Timing Support Modes There will be 20 total support modes to accommodate the above mode and other video modes within the frequency range of the monitor. 11
AL2051W Service Guide
Page 12
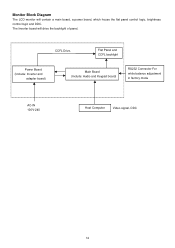
CCFL Drive. Flat Panel and CCFL backlight Power Board (Include: Inverter and adapter board) Main Board (Include: Audio and Keypad board) RS232 Connector For white balance adjustment in factory mode AC-IN 100V-240 Host Computer Video signal, DDC 12 Monitor Block Diagram The LCD monitor will drive the backlight of panel. The Inverter board will contain a main board, a power board, which house the flat panel control logic, brightness control logic and DDC.
CCFL Drive. Flat Panel and CCFL backlight Power Board (Include: Inverter and adapter board) Main Board (Include: Audio and Keypad board) RS232 Connector For white balance adjustment in factory mode AC-IN 100V-240 Host Computer Video signal, DDC 12 Monitor Block Diagram The LCD monitor will drive the backlight of panel. The Inverter board will contain a main board, a power board, which house the flat panel control logic, brightness control logic and DDC.
AL2051W Service Guide
Page 19
By changing these settings, the picture can be adjusted to your personal preferences. • The power cord should be connected. • Connect the video cable from the monitor to the video card. • Press the power button to turn on or off. The power indicator will light up. External Controls Item 1. 2. 3. Operating Instructions Chapter 2 Press the power button to turn the monitor on the monitor position. Description >/ Volume The other control buttons are located at front panel of the monitor.
By changing these settings, the picture can be adjusted to your personal preferences. • The power cord should be connected. • Connect the video cable from the monitor to the video card. • Press the power button to turn on or off. The power indicator will light up. External Controls Item 1. 2. 3. Operating Instructions Chapter 2 Press the power button to turn the monitor on the monitor position. Description >/ Volume The other control buttons are located at front panel of the monitor.


