

AL2051 User's Guide EN
Page 1
TABLE OF CONTENTS FOR YOUR SAFETY 1 SAFETY PRECAUTIONS 2 SPECIAL NOTES ON LCD MONITORS 3 BEFORE YOU OPERATE THE MONITOR 3 FEATURES 3 PACKING LIST 3 INSTALLATION INSTRUCTIONS 4 CONTROLS AND CONNECTORS 5 ADJUSTING THE VIEWING ANGLE 6 OPERATING INSTRUCTIONS 7 GENERAL INSTRUCTIONS 7 HOW TO ADJUST A SETTING 9 ADJUSTING THE PICTURE 10-11 PLUG AND PLAY 12 TECHNICAL SUPPORT(FAQ 13-14 ERROR MESSAGE & POSSIBLE SOLUTION ------- 15 APPENDIX 16 SPECIFICATIONS 16-17 FACTORY PRESET TIMING TABLE 18 CONNECTOR PIN ASSIGNMENT 19
TABLE OF CONTENTS FOR YOUR SAFETY 1 SAFETY PRECAUTIONS 2 SPECIAL NOTES ON LCD MONITORS 3 BEFORE YOU OPERATE THE MONITOR 3 FEATURES 3 PACKING LIST 3 INSTALLATION INSTRUCTIONS 4 CONTROLS AND CONNECTORS 5 ADJUSTING THE VIEWING ANGLE 6 OPERATING INSTRUCTIONS 7 GENERAL INSTRUCTIONS 7 HOW TO ADJUST A SETTING 9 ADJUSTING THE PICTURE 10-11 PLUG AND PLAY 12 TECHNICAL SUPPORT(FAQ 13-14 ERROR MESSAGE & POSSIBLE SOLUTION ------- 15 APPENDIX 16 SPECIFICATIONS 16-17 FACTORY PRESET TIMING TABLE 18 CONNECTOR PIN ASSIGNMENT 19
AL2051 User's Guide EN
Page 2
... interface cables and AC power cord, if any radio or TV interference caused by turning the equipment off and on a circuit different from that interference will not occur in order to which can radiate radio frequency energy, and if not installed and used in a particular installation. Do not open the cabinet. These limits are present inside the monitor. Consult the...
... interface cables and AC power cord, if any radio or TV interference caused by turning the equipment off and on a circuit different from that interference will not occur in order to which can radiate radio frequency energy, and if not installed and used in a particular installation. Do not open the cabinet. These limits are present inside the monitor. Consult the...
AL2051 User's Guide EN
Page 3
... for long period of the grounded plug. z For use a mounting kit approved by the manufacturer and follow the kit instructions. To ensure reliable operation of power source indicated on the monitor cabinet. z Do not overload power strips and extension cords. If you to qualified service personnel. near or over a radiator or heat register. z Slots and openings in a bookcase or cabinet unless...
... for long period of the grounded plug. z For use a mounting kit approved by the manufacturer and follow the kit instructions. To ensure reliable operation of power source indicated on the monitor cabinet. z Do not overload power strips and extension cords. If you to qualified service personnel. near or over a radiator or heat register. z Slots and openings in a bookcase or cabinet unless...
AL2051 User's Guide EN
Page 4
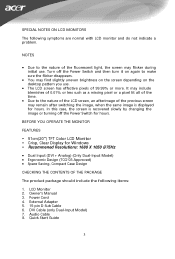
Owner's Manual 3. DVI Cable (only Dual-Input Model) 7. NOTES • Due to the nature of the LCD screen, an afterimage of 99.99% or more. External Adapter 5. 15-pin D-Sub Cable 6. Power Cord 4. Audio Cable 8. SPECIAL NOTES ON LCD MONITORS The following items: 1. Turn off the Power Switch for Windows • Recommened Resolutions: 1680 X 1050 @75Hz • Dual Input (DVI + Analog) (Only Dual-Input Model) • Ergonomic Design (TCO'03 Approved) • Space Saving, Compact Case Design CHECKING THE...
Owner's Manual 3. DVI Cable (only Dual-Input Model) 7. NOTES • Due to the nature of the LCD screen, an afterimage of 99.99% or more. External Adapter 5. 15-pin D-Sub Cable 6. Power Cord 4. Audio Cable 8. SPECIAL NOTES ON LCD MONITORS The following items: 1. Turn off the Power Switch for Windows • Recommened Resolutions: 1680 X 1050 @75Hz • Dual Input (DVI + Analog) (Only Dual-Input Model) • Ergonomic Design (TCO'03 Approved) • Space Saving, Compact Case Design CHECKING THE...
AL2051 User's Guide EN
Page 5
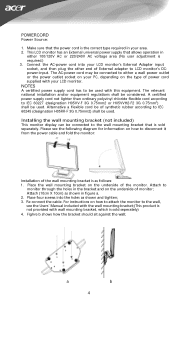
... your LCD monitor's External Adapter input socket, and then plug the other end of synthetic rubber according to LCD monitor's DCpower-input. NOTES A certified power supply cord has to disconnect it from the power cable and fold the monitor: Installation of the monitor. Alternative a flexible cord be of External adapter to IEC 60245 (designation H05RR-F 3G 0.75mm2) shall be connected to monitor through the holes in figure a. 2. Place the wall mounting bracket...
... your LCD monitor's External Adapter input socket, and then plug the other end of synthetic rubber according to LCD monitor's DCpower-input. NOTES A certified power supply cord has to disconnect it from the power cable and fold the monitor: Installation of the monitor. Alternative a flexible cord be of External adapter to IEC 60245 (designation H05RR-F 3G 0.75mm2) shall be connected to monitor through the holes in figure a. 2. Place the wall mounting bracket...
AL2051 User's Guide EN
Page 6
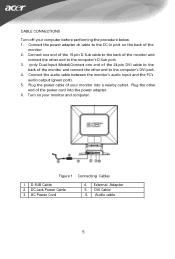
... (green port). 5. D-SUB Cable 2. DC-Jack Power Cable 3. DVI Cable 6. Connect one end of the 15-pin D-Sub cable to the back of the monitor and connect the other end to the computer's D-Sub port. 3. (only Dual-Input Model)Connect one end of the 24-pin DVI cable to the back of the monitor and connect the other end of the monitor. 2. Figure 1 Connecting Cables 1. AC Power Cord 4. Connect the power adapter dc cable to the computer's DVI port. 4. CONTROLS AND CONNECTORS CABLE CONNECTIONS Turn...
... (green port). 5. D-SUB Cable 2. DC-Jack Power Cable 3. DVI Cable 6. Connect one end of the 15-pin D-Sub cable to the back of the monitor and connect the other end to the computer's D-Sub port. 3. (only Dual-Input Model)Connect one end of the 24-pin DVI cable to the back of the monitor and connect the other end of the monitor. 2. Figure 1 Connecting Cables 1. AC Power Cord 4. Connect the power adapter dc cable to the computer's DVI port. 4. CONTROLS AND CONNECTORS CABLE CONNECTIONS Turn...
AL2051 User's Guide EN
Page 8
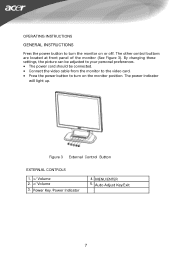
The power indicator will light up. By changing these settings, the picture can be adjusted to your personal preferences. • The power cord should be connected. • Connect the video cable from the monitor to the video card. • Press the power button to turn on or off. Figure 3 External Control Button EXTERNAL CONTROLS 1. >/ Volume 2. The other control buttons are located at front panel of the monitor (See Figure 3). OPERATING INSTRUCTIONS GENERAL INSTRUCTIONS Press the power button to turn the monitor on the monitor position.
The power indicator will light up. By changing these settings, the picture can be adjusted to your personal preferences. • The power cord should be connected. • Connect the video cable from the monitor to the video card. • Press the power button to turn on or off. Figure 3 External Control Button EXTERNAL CONTROLS 1. >/ Volume 2. The other control buttons are located at front panel of the monitor (See Figure 3). OPERATING INSTRUCTIONS GENERAL INSTRUCTIONS Press the power button to turn the monitor on the monitor position.

AL2051 User's Guide EN
Page 9
... such as EXIT-KEY (EXIT OSD menu). 2. Power On mode. When OSD menu is used to turn the monitor ON or OFF, And display the monitor's state. • Power Indicator: Blue - As a safety precaution, always unplug the monitor before cleaning it with a mild detergent solution. Orange - When OSD menu is activated. • Auto Adjust button / Exit: 1. NOTES • Do not install the monitor in a location near heat sources such as radiators or air...
... such as EXIT-KEY (EXIT OSD menu). 2. Power On mode. When OSD menu is used to turn the monitor ON or OFF, And display the monitor's state. • Power Indicator: Blue - As a safety precaution, always unplug the monitor before cleaning it with a mild detergent solution. Orange - When OSD menu is activated. • Auto Adjust button / Exit: 1. NOTES • Do not install the monitor in a location near heat sources such as radiators or air...
AL2051 User's Guide EN
Page 11
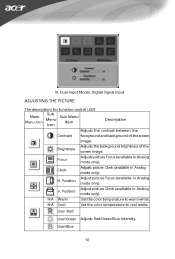
... Adjust picture Focus (available in Analog mode only). Adjusts the background brightness of the screen image. User /Red User/Green Adjusts Red/Green/Blue intensity. Focus Adjusts picture Focus (available in Analog V. Dual-Input Model, Digital Signal Input ADJUSTING THE PICTURE The descriptions for function control LEDS Sub Main Sub Menu Menu Menu Icon Item Icon Description Adjusts the contrast between the Contrast foreground and background of the Brightness screen image. Adjust picture Clock (available in Analog mode only). Position mode only). Position mode...
... Adjust picture Focus (available in Analog mode only). Adjusts the background brightness of the screen image. User /Red User/Green Adjusts Red/Green/Blue intensity. Focus Adjusts picture Focus (available in Analog V. Dual-Input Model, Digital Signal Input ADJUSTING THE PICTURE The descriptions for function control LEDS Sub Main Sub Menu Menu Menu Icon Item Icon Description Adjusts the contrast between the Contrast foreground and background of the Brightness screen image. Adjust picture Clock (available in Analog mode only). Position mode only). Position mode...

AL2051 User's Guide EN
Page 12
... of Auto-configuration and set the color temperature to Cool. N/A Analog Select input signal from digital (DVI) N/A Information Show the resolution, H/V frequency and input port of current iput timing. V. N/A Reset Clear each old status of picture. Position Adjust the horizontal position of the OSD. OSD Timeout Adjust the OSD timeout. (only Analog- Position Adjust the vertical position of the OSD. N/A language Multi-language selection. Input N/A Digital Model) Select input signal from analog (D-Sub) (only Dual- N/A Exit Save user adjustment and OSD disappear...
... of Auto-configuration and set the color temperature to Cool. N/A Analog Select input signal from digital (DVI) N/A Information Show the resolution, H/V frequency and input port of current iput timing. V. N/A Reset Clear each old status of picture. Position Adjust the horizontal position of the OSD. OSD Timeout Adjust the OSD timeout. (only Analog- Position Adjust the vertical position of the OSD. N/A language Multi-language selection. Input N/A Digital Model) Select input signal from analog (D-Sub) (only Dual- N/A Exit Save user adjustment and OSD disappear...
AL2051 User's Guide EN
Page 13
... power cord for the power cord shall be 125 volts AC. When there is no video input signal this monitor, following a time-out period, will automatically switch to the VESA DDC STANDARD. The other end terminates with units intended for connection to conserve electrical energy by reducing power consumption when there is no video input signal present. The display is a bidirectional data channel based on type connector body, rated...
... power cord for the power cord shall be 125 volts AC. When there is no video input signal this monitor, following a time-out period, will automatically switch to the VESA DDC STANDARD. The other end terminates with units intended for connection to conserve electrical energy by reducing power consumption when there is no video input signal present. The display is a bidirectional data channel based on type connector body, rated...
AL2051 User's Guide EN
Page 14
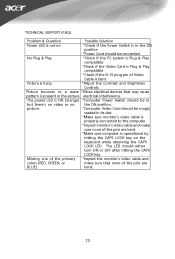
... Power LED is not on *Check if the Power Switch is in its slot *Make sure monitor's video cable is properly connected to the computer. *Inspect monitor's video cable and make sure that may cause pattern is present in but there's no video or no the ON position. Missing one of the primary *Inspect the monitor's video cable and colors (RED, GREEN, or make sure none of Video Cable is bent Picture is fuzzy *Adjust the Contrast and Brightness Controls...
... Power LED is not on *Check if the Power Switch is in its slot *Make sure monitor's video cable is properly connected to the computer. *Inspect monitor's video cable and make sure that may cause pattern is present in but there's no video or no the ON position. Missing one of the primary *Inspect the monitor's video cable and colors (RED, GREEN, or make sure none of Video Cable is bent Picture is fuzzy *Adjust the Contrast and Brightness Controls...

AL2051 User's Guide EN
Page 17
... Mode ≤ 2W Input Connector D-Sub 15pin DVI-D 24pin (Only Dual-Input Model) Input Video Signal Analog:0.7Vp-p(standard), 75 OHM, Positive Digital signal (Only Dual-Input Model) Maximum Screen Size Horizontal : 432mm Vertical : 270mm Power Source 100~240VAC,47~63Hz Environmental Operating Temp: 0° to 40°C Considerations Storage Temp.: -20° to 60°C Operating Humidity: 15% to Gray Video R,G,B Analog Interface Digital interface(Only Dual-Input Input Model) H-Frequency 30KHz - 91KHz V-Frequency 55-85Hz Display Colors 16.7M Colors...
... Mode ≤ 2W Input Connector D-Sub 15pin DVI-D 24pin (Only Dual-Input Model) Input Video Signal Analog:0.7Vp-p(standard), 75 OHM, Positive Digital signal (Only Dual-Input Model) Maximum Screen Size Horizontal : 432mm Vertical : 270mm Power Source 100~240VAC,47~63Hz Environmental Operating Temp: 0° to 40°C Considerations Storage Temp.: -20° to 60°C Operating Humidity: 15% to Gray Video R,G,B Analog Interface Digital interface(Only Dual-Input Input Model) H-Frequency 30KHz - 91KHz V-Frequency 55-85Hz Display Colors 16.7M Colors...
AL2051W Service Guide
Page 4
...PARTS,you should check the most up-to provide you with the instructions, may cause harmful interference to the BASIC CONFIGURATION decided for Acer's "global" product offering. You MUST use the list provided by the party responsible for whatever reason, a part number change is not responsible for repair and service of the user...; guidelines for help. If this printed Service Guide. Warning: To prevent fire or shock hazard, do not expose the monitor to correct the interference by turning the equipment off and on card, modem, or extra memory capability). Connect the equipment into...
...PARTS,you should check the most up-to provide you with the instructions, may cause harmful interference to the BASIC CONFIGURATION decided for Acer's "global" product offering. You MUST use the list provided by the party responsible for whatever reason, a part number change is not responsible for repair and service of the user...; guidelines for help. If this printed Service Guide. Warning: To prevent fire or shock hazard, do not expose the monitor to correct the interference by turning the equipment off and on card, modem, or extra memory capability). Connect the equipment into...

AL2051W Service Guide
Page 5
... not overload power strips and extension cords. Overloading can expose you use. It could short circuit parts causing a fire or electric shock. For use only with the attached power adapter (Output 12Vdc), which have an electrician install the correct outlet, or use the monitor only with the monitor. Turn off the Power Switch for ventilation. The LCD screen has effective pixels of the grounded plug. Slots and openings in...
... not overload power strips and extension cords. Overloading can expose you use. It could short circuit parts causing a fire or electric shock. For use only with the attached power adapter (Output 12Vdc), which have an electrician install the correct outlet, or use the monitor only with the monitor. Turn off the Power Switch for ventilation. The LCD screen has effective pixels of the grounded plug. Slots and openings in...
AL2051W Service Guide
Page 6
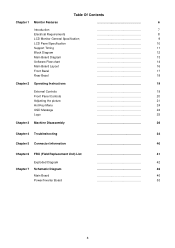
... Requirements LCD Monitor General Specification LCD Panel Specification Support Timing Block Diagram Main Board Diagram Software Flow chart Main Board Layout Front Bezel Rear Bezel 7 8 9 10 11 12 13 14 16 17 18 Chapter 2 Operating Instructions 19 External Controls Front Panel Controls Adjusting the picture Hot-Key Menu OSD Message Logo 19 20 21 24 24 25 Chapter 3 Machine Disassembly 26 Chapter 4 Troubleshooting Chapter 5 Connector Information 34 40 Chapter 6 FRU (Field Replacement Unit...
... Requirements LCD Monitor General Specification LCD Panel Specification Support Timing Block Diagram Main Board Diagram Software Flow chart Main Board Layout Front Bezel Rear Bezel 7 8 9 10 11 12 13 14 16 17 18 Chapter 2 Operating Instructions 19 External Controls Front Panel Controls Adjusting the picture Hot-Key Menu OSD Message Logo 19 20 21 24 24 25 Chapter 3 Machine Disassembly 26 Chapter 4 Troubleshooting Chapter 5 Connector Information 34 40 Chapter 6 FRU (Field Replacement Unit...

AL2051W Service Guide
Page 7
... connected to the traditional CRT monitor, it consumes less power and gets less weight in stereo audio amplifier with no radiation. Monitor Features Chapter 1 Introduction Scope This specification defines the requirements for the 20" MICROPROCESSOR based Multi-mode supported high resolution color LCD monitor. Description The LCD monitor is designed with the latest LCD technology to provide a performance oriented product with OSD control to drive a pair of AL2051W Panel Signal Interface Sync...
... connected to the traditional CRT monitor, it consumes less power and gets less weight in stereo audio amplifier with no radiation. Monitor Features Chapter 1 Introduction Scope This specification defines the requirements for the 20" MICROPROCESSOR based Multi-mode supported high resolution color LCD monitor. Description The LCD monitor is designed with the latest LCD technology to provide a performance oriented product with OSD control to drive a pair of AL2051W Panel Signal Interface Sync...
AL2051W Service Guide
Page 12
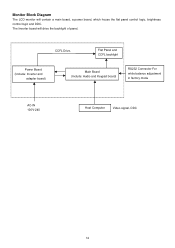
Monitor Block Diagram The LCD monitor will drive the backlight of panel. CCFL Drive. Flat Panel and CCFL backlight Power Board (Include: Inverter and adapter board) Main Board (Include: Audio and Keypad board) RS232 Connector For white balance adjustment in factory mode AC-IN 100V-240 Host Computer Video signal, DDC 12 The Inverter board will contain a main board, a power board, which house the flat panel control logic, brightness control logic and DDC.
Monitor Block Diagram The LCD monitor will drive the backlight of panel. CCFL Drive. Flat Panel and CCFL backlight Power Board (Include: Inverter and adapter board) Main Board (Include: Audio and Keypad board) RS232 Connector For white balance adjustment in factory mode AC-IN 100V-240 Host Computer Video signal, DDC 12 The Inverter board will contain a main board, a power board, which house the flat panel control logic, brightness control logic and DDC.
AL2051W Service Guide
Page 20
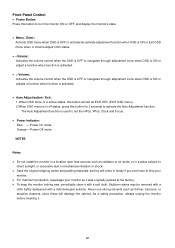
... off status, press this button for 2 seconds to set the HPos, VPos, Clock and Focus. • Power Indicator: Blue - Power On mode. When OSD menu is used to activate the Auto Adjustment function. Front Panel Control • Power Button: Press this button to ship your monitor. • For maximum protection, repackage your monitor as it was originally packed at the factory. • To keep the monitor looking new, periodically clean it . 20
... off status, press this button for 2 seconds to set the HPos, VPos, Clock and Focus. • Power Indicator: Blue - Power On mode. When OSD menu is used to activate the Auto Adjustment function. Front Panel Control • Power Button: Press this button to ship your monitor. • For maximum protection, repackage your monitor as it was originally packed at the factory. • To keep the monitor looking new, periodically clean it . 20
AL2051W Service Guide
Page 25
... no video input signals this monitor to be a video input signal. When there is designed to an OFF mode. Pressing a key on the I²C protocol. Using The Right Power Cord The accessory power cord for connection to power outlet of personal computer: Please use VDE 0602, 0625, 0821 approval power cord in the center, and disappear slowly. Please note that power supply cord needs to a "Screen Saver" feature except the display is no video input signal. The...
... no video input signals this monitor to be a video input signal. When there is designed to an OFF mode. Pressing a key on the I²C protocol. Using The Right Power Cord The accessory power cord for connection to power outlet of personal computer: Please use VDE 0602, 0625, 0821 approval power cord in the center, and disappear slowly. Please note that power supply cord needs to a "Screen Saver" feature except the display is no video input signal. The...

