
AL1521 User Guide
Page 1
... CONTENTS FOR YOUR SAFETY 1 SAFETY PRECAUTIONS 2 SPECIAL NOTES ON LCD MONITORS 3 BEFORE YOU OPERATE THE MONITOR 3 FEATURES 3 PACKING LIST 3 INSTALLATION INSTRUCTIONS 4 CONTROLS AND CONNECTORS 5 ADJUSTING THE VIEWING ANGLE 6 OPERATING INSTRUCTIONS GENERAL INSTRUCTIONS HOW TO ADJUST A SETTING ADJUSTING THE PICTURE PLUG AND PLAY 7 7 9 10-11 12 TECHNICAL SUPPORT(FAQ 13-14 ERROR MESSAGE & POSSIBLE SOLUTION --------- 15 APPENDIX SPECIFICATIONS FACTORY PRESET TIMING TABLE CONNECTOR PIN ASSIGNMENT 16 16-17 18 19 41L1500-786...
... CONTENTS FOR YOUR SAFETY 1 SAFETY PRECAUTIONS 2 SPECIAL NOTES ON LCD MONITORS 3 BEFORE YOU OPERATE THE MONITOR 3 FEATURES 3 PACKING LIST 3 INSTALLATION INSTRUCTIONS 4 CONTROLS AND CONNECTORS 5 ADJUSTING THE VIEWING ANGLE 6 OPERATING INSTRUCTIONS GENERAL INSTRUCTIONS HOW TO ADJUST A SETTING ADJUSTING THE PICTURE PLUG AND PLAY 7 7 9 10-11 12 TECHNICAL SUPPORT(FAQ 13-14 ERROR MESSAGE & POSSIBLE SOLUTION --------- 15 APPENDIX SPECIFICATIONS FACTORY PRESET TIMING TABLE CONNECTOR PIN ASSIGNMENT 16 16-17 18 19 41L1500-786...
AL1521 User Guide
Page 2
... are present inside the monitor. If this product meets the ENERGY STAR guidelines for a Class B digital device, pursuant to comply with the instructions, may cause harmful interference to rain or moisture. Connect the equipment into an outlet on , the user is not responsible for any , must be retained for help. Do not open the cabinet. NOTICE...
... are present inside the monitor. If this product meets the ENERGY STAR guidelines for a Class B digital device, pursuant to comply with the instructions, may cause harmful interference to rain or moisture. Connect the equipment into an outlet on , the user is not responsible for any , must be retained for help. Do not open the cabinet. NOTICE...
AL1521 User Guide
Page 3
... have an electrician install the correct outlet, or use the monitor near the equipment and shall be used for ventilation. Do not defeat the safety purpose of power supplied to your home, consult your outlet does not accommodate the three-wire plug, have appropriate configured receptacles marked between 100 - 240V AC, Min. 3.5A. opening or removing covers can expose you...
... have an electrician install the correct outlet, or use the monitor near the equipment and shall be used for ventilation. Do not defeat the safety purpose of power supplied to your home, consult your outlet does not accommodate the three-wire plug, have appropriate configured receptacles marked between 100 - 240V AC, Min. 3.5A. opening or removing covers can expose you...
AL1521 User Guide
Page 4
... • 38.1cm(15") TFT Color LCD Monitor • Crisp, Clear Display for hours. DVI CABLE (Only Dual-Input Model) 6. LCD Monitor 2. External Adapter 7. SPECIAL NOTES ON LCD MONITORS The following items: 1. Power Cord 4. Turn off the Power Switch for Windows • Recommended Resolutions: 1024 X 768 @60Hz • EPA ENERGY STAR® • Ergonomic Design (TCO'99 Approved) • Dual Input (DVI + Analog) (Only Dual-Input Model) • Space Saving, Compact Case Design CHECKING THE CONTENTS OF THE...
... • 38.1cm(15") TFT Color LCD Monitor • Crisp, Clear Display for hours. DVI CABLE (Only Dual-Input Model) 6. LCD Monitor 2. External Adapter 7. SPECIAL NOTES ON LCD MONITORS The following items: 1. Power Cord 4. Turn off the Power Switch for Windows • Recommended Resolutions: 1024 X 768 @60Hz • EPA ENERGY STAR® • Ergonomic Design (TCO'99 Approved) • Dual Input (DVI + Analog) (Only Dual-Input Model) • Space Saving, Compact Case Design CHECKING THE CONTENTS OF THE...
AL1521 User Guide
Page 5
.../240V AC voltage area (No user adjustment is the correct type required in your area. 2. Make sure the power cord is required.) 3. POWERCORD Power Source: 1. Connect the AC-power cord into your LCD monitor. The AC-power cord may be used. The relevant national installation and/or equipment regulations shall be used with your LCD monitor's External Adapter input socket, and then plug the other end of External adapter to IEC 60245 (designation...
.../240V AC voltage area (No user adjustment is the correct type required in your area. 2. Make sure the power cord is required.) 3. POWERCORD Power Source: 1. Connect the AC-power cord into your LCD monitor. The AC-power cord may be used. The relevant national installation and/or equipment regulations shall be used with your LCD monitor's External Adapter input socket, and then plug the other end of External adapter to IEC 60245 (designation...
AL1521 User Guide
Page 6
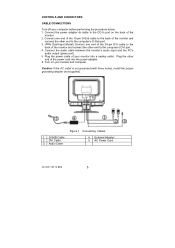
... computer's D-Sub port. 3. (Only Dual-Input Model) Connect one end of the 24-pin DVI cable to the back of the monitor and connect the other end of your monitor and computer. Plug the power cable of the power cord into a nearby outlet. Caution: If the AC outlet is not grounded (with three holes), install the proper grounding adapter (not supplied). 1. Audio Cable Figure 1 Connecting Cables 4. External Adapter 5. CONTROLS AND CONNECTORS CABLE CONNECTIONS Turn off your computer...
... computer's D-Sub port. 3. (Only Dual-Input Model) Connect one end of the 24-pin DVI cable to the back of the monitor and connect the other end of your monitor and computer. Plug the power cable of the power cord into a nearby outlet. Caution: If the AC outlet is not grounded (with three holes), install the proper grounding adapter (not supplied). 1. Audio Cable Figure 1 Connecting Cables 4. External Adapter 5. CONTROLS AND CONNECTORS CABLE CONNECTIONS Turn off your computer...
AL1521 User Guide
Page 7
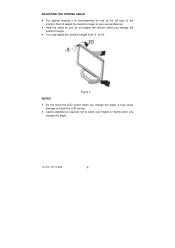
... • Do not touch the LCD screen when you change the monitor's angle. • You may cause damage or break the LCD screen. • Careful attention is recommended to look at the full face of the monitor, then to adjust the monitor's angle to your fingers or hands when you change the angle. ADJUSTING THE VIEWING ANGLE • For optimal viewing it is required not...
... • Do not touch the LCD screen when you change the monitor's angle. • You may cause damage or break the LCD screen. • Careful attention is recommended to look at the full face of the monitor, then to adjust the monitor's angle to your fingers or hands when you change the angle. ADJUSTING THE VIEWING ANGLE • For optimal viewing it is required not...
AL1521 User Guide
Page 8
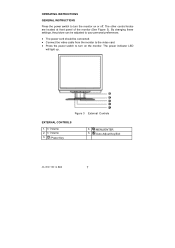
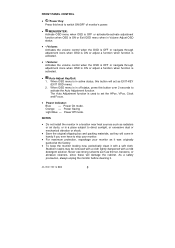
The other control knobs are located at front panel of the monitor (See Figure 3). OPERATING INSTRUCTIONS GENERAL INSTRUCTIONS Press the power switch to turn the monitor on the monitor. Figure 3 External Controls EXTERNAL CONTROLS 1. >/ Volume 2. The power indicator LED will light up. By changing these settings, the picture can be adjusted to your personal preferences. • The power cord should be connected. • Connect the video cable from the monitor to the video card. • Press the power switch to turn on or off.
The other control knobs are located at front panel of the monitor (See Figure 3). OPERATING INSTRUCTIONS GENERAL INSTRUCTIONS Press the power switch to turn the monitor on the monitor. Figure 3 External Controls EXTERNAL CONTROLS 1. >/ Volume 2. The power indicator LED will light up. By changing these settings, the picture can be adjusted to your personal preferences. • The power cord should be connected. • Connect the video cable from the monitor to the video card. • Press the power switch to turn on or off.
AL1521 User Guide
Page 9
... the factory. • To keep the monitor looking new, periodically clean it . 41L1500-786-1A 英文 8 As a safety precaution, always unplug the monitor before cleaning it with a mild detergent solution. Power Off mode. Stubborn stains may be removed with a cloth lightly dampened with a soft cloth. FRONT PANEL CONTROL • /Power Key: Press this knob to switch ON/OFF of monitor's power. • /MENU/ENTER : Activate OSD menu when OSD...
... the factory. • To keep the monitor looking new, periodically clean it . 41L1500-786-1A 英文 8 As a safety precaution, always unplug the monitor before cleaning it with a mild detergent solution. Power Off mode. Stubborn stains may be removed with a cloth lightly dampened with a soft cloth. FRONT PANEL CONTROL • /Power Key: Press this knob to switch ON/OFF of monitor's power. • /MENU/ENTER : Activate OSD menu when OSD...

AL1521 User Guide
Page 10
Press < or > to make the OSD window appear. 2. Press the MENU key to select the function that you want to adjust. 4. Analog-Only Mode II. Dual-Input Model, Analog Signal Input 41L1500-786-1A 英文 9 To exit and save, select the exit functions,. Press the MENU key to change the settings of the current function. 5. I. HOW TO ADJUST A SETTING 1. Press < or > to adjust any other function, repeat steps 2-4. If you want to select the desired function. 3.
Press < or > to make the OSD window appear. 2. Press the MENU key to select the function that you want to adjust. 4. Analog-Only Mode II. Dual-Input Model, Analog Signal Input 41L1500-786-1A 英文 9 To exit and save, select the exit functions,. Press the MENU key to change the settings of the current function. 5. I. HOW TO ADJUST A SETTING 1. Press < or > to adjust any other function, repeat steps 2-4. If you want to select the desired function. 3.
AL1521 User Guide
Page 11
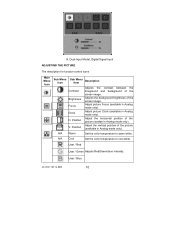
... in Analog mode only). N/A Cool Set the color temperature to warm white. Adjusts the background brightness of the picture (availab in Analog mode only). User / Blue 41L1500-786-1A 英文 10 Dual-Input Model, Digital Signal Input ADJUSTING THE PICTURE The description for function control icons Main Menu Icon Sub Menu Icon Sub Menu Item Description Contrast Brightness Focus Clock H. Adjust picture Clock (available in Analog mode only). Adjust the horizontal position of the screen image. User / Red User / Green Adjusts Red/Green/blue intensity...
... in Analog mode only). N/A Cool Set the color temperature to warm white. Adjusts the background brightness of the picture (availab in Analog mode only). User / Blue 41L1500-786-1A 英文 10 Dual-Input Model, Digital Signal Input ADJUSTING THE PICTURE The description for function control icons Main Menu Icon Sub Menu Icon Sub Menu Item Description Contrast Brightness Focus Clock H. Adjust picture Clock (available in Analog mode only). Adjust the horizontal position of the screen image. User / Red User / Green Adjusts Red/Green/blue intensity...

AL1521 User Guide
Page 12
Position Adjust the horizontal position of picture. OSDTimeout Adjust the OSD timeout. (Analog -Only N/A Auto Config Auto Adjust the H/V Position, Focus and Clock of the OSD. autoauto- V. Position Adjust the vertical position of current inputs timing. N/A Information Show the resolution, H/V frequency and input port of the OSD. Model) (DualInput Model) N/A Analog Select input signal from digital (DVI). N/A Reset N/A Exit Clears all old status of configuration And re-does configuration. N/A English N/A N/A Deutsch N/A Français N/A Español Multi...
Position Adjust the horizontal position of picture. OSDTimeout Adjust the OSD timeout. (Analog -Only N/A Auto Config Auto Adjust the H/V Position, Focus and Clock of the OSD. autoauto- V. Position Adjust the vertical position of current inputs timing. N/A Information Show the resolution, H/V frequency and input port of the OSD. Model) (DualInput Model) N/A Analog Select input signal from digital (DVI). N/A Reset N/A Exit Clears all old status of configuration And re-does configuration. N/A English N/A N/A Deutsch N/A Français N/A Español Multi...
AL1521 User Guide
Page 13
... a bidirectional data channel based on the level of its display capabilities. This reduces the monitor's internal power supply consumption. This monitor meets the Green monitor standards as set consisting of a minimum No. 18 AWG, type SJT or SVT three conductors flexible cord. The voltage rating for the Northern American region is the wallet plug with VESA DDC1/2B capabilities according to a "Screen Saver" feature...
... a bidirectional data channel based on the level of its display capabilities. This reduces the monitor's internal power supply consumption. This monitor meets the Green monitor standards as set consisting of a minimum No. 18 AWG, type SJT or SVT three conductors flexible cord. The voltage rating for the Northern American region is the wallet plug with VESA DDC1/2B capabilities according to a "Screen Saver" feature...
AL1521 User Guide
Page 14
... SUPPORT (FAQ) Problem & Question Power LED is not on the keyboard while observing the CAPS LOCK LED. Missing one of the primary colors (RED, GREEN, or BLUE) Possible Solution *Check that the Power Switch is in the ON position *Power Cord should be connected *Check that the PC system is Plug & Play compatible *Check that the Video Card is Plug & Play compatible *Check that the D-15 plug pin of Video Cable is ON (light blue) but there's no video or no picture. The LED...
... SUPPORT (FAQ) Problem & Question Power LED is not on the keyboard while observing the CAPS LOCK LED. Missing one of the primary colors (RED, GREEN, or BLUE) Possible Solution *Check that the Power Switch is in the ON position *Power Cord should be connected *Check that the PC system is Plug & Play compatible *Check that the Video Card is Plug & Play compatible *Check that the D-15 plug pin of Video Cable is ON (light blue) but there's no video or no picture. The LED...
AL1521 User Guide
Page 15
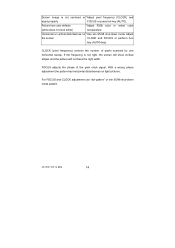
...- Screen image is not right, the screen will show vertical stripes and the picture will not have the right width. With a wrong phase adjustment the picture has horizontal disturbances on *Use win 95/98 shut-down mode pattern. 41L1500-786-1A 英文 14 Picture has color defects *Adjust RGB color or select color (white does not look white) temperature Horizontal or vertical disturbances on light pictures. CLOCK (pixel frequency) controls the number of the pixel clock signal...
...- Screen image is not right, the screen will show vertical stripes and the picture will not have the right width. With a wrong phase adjustment the picture has horizontal disturbances on *Use win 95/98 shut-down mode pattern. 41L1500-786-1A 英文 14 Picture has color defects *Adjust RGB color or select color (white does not look white) temperature Horizontal or vertical disturbances on light pictures. CLOCK (pixel frequency) controls the number of the pixel clock signal...

AL1521 User Guide
Page 16
Check the signal-cable's connection pins for damage. ERROR MESSAGE & POSSIBLE SOLUTION CABLE NOT CONNECTED: 1. Check that the signal-cable is properly connected, if the connector is loose, tighten the connector's screws. 2. INPUT NOT SUPPORTS: Your computer has been set to unsuitable display mode, set the computer to Display mode given in the following table(See page 18). 41L1500-786-1A 英文 15
Check the signal-cable's connection pins for damage. ERROR MESSAGE & POSSIBLE SOLUTION CABLE NOT CONNECTED: 1. Check that the signal-cable is properly connected, if the connector is loose, tighten the connector's screws. 2. INPUT NOT SUPPORTS: Your computer has been set to unsuitable display mode, set the computer to Display mode given in the following table(See page 18). 41L1500-786-1A 英文 15
AL1521 User Guide
Page 17
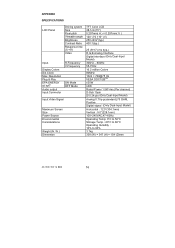
Resolution Plug & Play EPA ENERGY STAR® Audio output Input Connector H-Frequency V-Frequency ON Mode OFF Mode Input Video Signal Maximum Screen Size Power Source Environmental Considerations Weight (N. W.) Dimension TFT Color LCD 38.1cm(15") 0.297mm( H ) × 0.297mm( V ) 120° (H) 110° (V) 250 cd/m2(typ.) 400:1(typ.) 25 (8+17) ms (typ.) R,G,B Analog Interface Digital Interface (Only Dual-Input Model) 30kHz - 60kHz 55-75Hz 16.2 million Colors 80MHz 1024 × 768@75 Hz VESA DDC1/2BTM...
Resolution Plug & Play EPA ENERGY STAR® Audio output Input Connector H-Frequency V-Frequency ON Mode OFF Mode Input Video Signal Maximum Screen Size Power Source Environmental Considerations Weight (N. W.) Dimension TFT Color LCD 38.1cm(15") 0.297mm( H ) × 0.297mm( V ) 120° (H) 110° (V) 250 cd/m2(typ.) 400:1(typ.) 25 (8+17) ms (typ.) R,G,B Analog Interface Digital Interface (Only Dual-Input Model) 30kHz - 60kHz 55-75Hz 16.2 million Colors 80MHz 1024 × 768@75 Hz VESA DDC1/2BTM...

AL1521 User Guide
Page 18
Switch External Controls: Functions Regulatory Compliance • Power Switch • MENU/ ENTER • >/Volume •
Switch External Controls: Functions Regulatory Compliance • Power Switch • MENU/ ENTER • >/Volume •
AL1521 Service Guide
Page 40
... repair and service of AL1521. You MUST use the local FRU list provided by your regional Acer office to dispose it, or follow the local government ordinance or regulations on how best to order FRU parts for RMA (Return Merchandise Authorization). For whatever reasons a part number change is made, it . NOTE: To scrap or to return the defective parts, you should check...
... repair and service of AL1521. You MUST use the local FRU list provided by your regional Acer office to dispose it, or follow the local government ordinance or regulations on how best to order FRU parts for RMA (Return Merchandise Authorization). For whatever reasons a part number change is made, it . NOTE: To scrap or to return the defective parts, you should check...
AL1521 Service Guide
Page 43
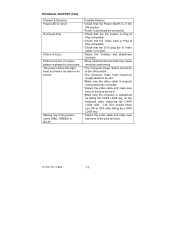
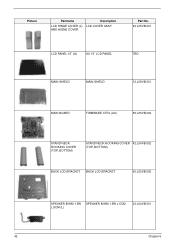
Picture Partname LCD HINGE COVER (L) AND HIGNE COVER Description LCD COVER ASSY Part No. 42.L05VB.001 LCD PANEL 15" AU AU 15" LCD PANEL TBD MAIN SHIELD MAIN SHIELD 33.L05VB.001 MAIN BOARD FIRMWARE CTRL (AU) 55.L05VB.002 STAND NECK HOOKING COVER (TOP, BOTTOM) STAND NECK HOOKING COVER 42.L04VB.002 (TOP, BOTTOM) BACK LCD BRACKET BACK LCD BRACKET 60.L05VB.005 SPEAKER 80HM 1.5W SPEAKER 80HM 1.5W L:5CM L:5CM (L) 23.L04VB.001 42 Chapter 6
Picture Partname LCD HINGE COVER (L) AND HIGNE COVER Description LCD COVER ASSY Part No. 42.L05VB.001 LCD PANEL 15" AU AU 15" LCD PANEL TBD MAIN SHIELD MAIN SHIELD 33.L05VB.001 MAIN BOARD FIRMWARE CTRL (AU) 55.L05VB.002 STAND NECK HOOKING COVER (TOP, BOTTOM) STAND NECK HOOKING COVER 42.L04VB.002 (TOP, BOTTOM) BACK LCD BRACKET BACK LCD BRACKET 60.L05VB.005 SPEAKER 80HM 1.5W SPEAKER 80HM 1.5W L:5CM L:5CM (L) 23.L04VB.001 42 Chapter 6


