User Manual
Page 3
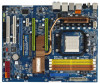
... and Operation Guide ....... 43 2.15 Driver Installation Guide 45 2.16 Installing Windows® XP / XP 64-bit / VistaTM / VistaTM 64-bit Without RAID Functions 45 2.16.1 Installing Windows® XP / XP 64-bit Without RAID Functions 45 2.16.2 Installing Windows® VistaTM / VistaTM 64-bit Without RAID Functions 46 3 Installation 15...ATA (SATA) / Serial ATAII (SATAII) Hard Disks Installation 41 2.13 Hot Plug and Hot Swap Functions for 3-Way SLITM Mode .. 11 1.6 Motherboard Layout 12 1.7 ASRock WiFi_SPDIF I/O 13 1.8 ASRock WiFi-802.11g Module Specifications 14 2 . Contents 1 .
... and Operation Guide ....... 43 2.15 Driver Installation Guide 45 2.16 Installing Windows® XP / XP 64-bit / VistaTM / VistaTM 64-bit Without RAID Functions 45 2.16.1 Installing Windows® XP / XP 64-bit Without RAID Functions 45 2.16.2 Installing Windows® VistaTM / VistaTM 64-bit Without RAID Functions 46 3 Installation 15...ATA (SATA) / Serial ATAII (SATAII) Hard Disks Installation 41 2.13 Hot Plug and Hot Swap Functions for 3-Way SLITM Mode .. 11 1.6 Motherboard Layout 12 1.7 ASRock WiFi_SPDIF I/O 13 1.8 ASRock WiFi-802.11g Module Specifications 14 2 . Contents 1 .
User Manual
Page 4
...; XP / XP 64-bit / VistaTM / VistaTM 64-bit With RAID Functions 47 2.17.1 Installing Windows® XP / XP 64-bit With RAID Functions 47 2.17.2 Installing Windows® VistaTM / VistaTM 64-bit With RAID Functions 48 2.18 DTS Operation Guide 49 2.19 Untied Overclocking Technology 51 3 . BIOS SETUP UTILITY 5 2 3.1 Introduction 52 3.1.1 BIOS...
...; XP / XP 64-bit / VistaTM / VistaTM 64-bit With RAID Functions 47 2.17.1 Installing Windows® XP / XP 64-bit With RAID Functions 47 2.17.2 Installing Windows® VistaTM / VistaTM 64-bit With RAID Functions 48 2.18 DTS Operation Guide 49 2.19 Untied Overclocking Technology 51 3 . BIOS SETUP UTILITY 5 2 3.1 Introduction 52 3.1.1 BIOS...
User Manual
Page 6
...(see CAUTION 5) - 3 x PCI Express 2.0 x16 slots (green @ x16 mode, blue @ x8 mode) - 1 x PCI Express x1 slot - 2 x PCI slots - DAC with Content Protection - ASRock WiFi-802.11g module - 54Mbps IEEE 802.11g / 11Mbps IEEE 802.11b - Support DDR2 1066/800/667/533 non-ECC, un-buffered memory (see CAUTION 7) - 7.1 CH... Windows® VistaTM Premium Level HD Audio with 110dB dynamic range (ALC890 Audio Codec) - ATX Form Factor: 12.0-in x 9.6-in, 30.5 cm x 24.4 cm...
...(see CAUTION 5) - 3 x PCI Express 2.0 x16 slots (green @ x16 mode, blue @ x8 mode) - 1 x PCI Express x1 slot - 2 x PCI slots - DAC with Content Protection - ASRock WiFi-802.11g module - 54Mbps IEEE 802.11g / 11Mbps IEEE 802.11b - Support DDR2 1066/800/667/533 non-ECC, un-buffered memory (see CAUTION 7) - 7.1 CH... Windows® VistaTM Premium Level HD Audio with 110dB dynamic range (ALC890 Audio Codec) - ATX Form Factor: 12.0-in x 9.6-in, 30.5 cm x 24.4 cm...
User Manual
Page 8
...thirdparty overclocking tools. If you want to adopt DDR2 1066 memory module on our website for details. 3. ASRock website http://www.asrock.com 5. For Windows® XP 64-bit and Windows® VistaTM 64-bit with 64-bit CPU, there is a certain risk involved with overclocking, including... less than 4GB for the reservation for possible damage caused by overclocking. ASRock website http://www.asrock.com 2. Chassis Temperature Sensing - We are not responsible for system usage under Windows® XP and Windows® VistaTM. Due to the operating system limitation, the actual memory ...
...thirdparty overclocking tools. If you want to adopt DDR2 1066 memory module on our website for details. 3. ASRock website http://www.asrock.com 5. For Windows® XP 64-bit and Windows® VistaTM 64-bit with 64-bit CPU, there is a certain risk involved with overclocking, including... less than 4GB for the reservation for possible damage caused by overclocking. ASRock website http://www.asrock.com 2. Chassis Temperature Sensing - We are not responsible for system usage under Windows® XP and Windows® VistaTM. Due to the operating system limitation, the actual memory ...
User Manual
Page 9
...to "Hybrid SLITM Operation Guide" on page 19. 7. This motherboard supports eSATAII interface, the external SATAII specification. WiFi/E header supports WiFi+AP function with ASRock WiFi-802.11g or WiFi-802.11n module, an easy-to-use 3-Way SLITM function, please install three identical 3-Way SLITM support graphics ... cores are idle. Please read the "SATAII Hard Disk Setup Guide" on page 49 for USB 2.0 works fine under Windows® environment. The voltage regulator can also connect SATA hard disk to provide exceptional power saving and improve power efficiency without sacrificing...
...to "Hybrid SLITM Operation Guide" on page 19. 7. This motherboard supports eSATAII interface, the external SATAII specification. WiFi/E header supports WiFi+AP function with ASRock WiFi-802.11g or WiFi-802.11n module, an easy-to-use 3-Way SLITM function, please install three identical 3-Way SLITM support graphics ... cores are idle. Please read the "SATAII Hard Disk Setup Guide" on page 49 for USB 2.0 works fine under Windows® environment. The voltage regulator can also connect SATA hard disk to provide exceptional power saving and improve power efficiency without sacrificing...
User Manual
Page 10
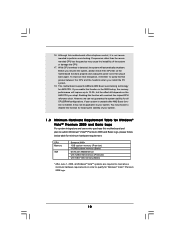
16. Frequencies other than the recommended CPU bus frequencies may cause the instability of your system. This motherboard supports ASRock AM2 Boost overclocking technology for Windows® VistaTM Premium 2008 and Basic Logo For system integrators and users who purchase this function will automatically shutdown. If ... and unplug the power cord, then plug it back again. However, we can not guarantee the system stability for all Windows® VistaTM systems are required to meet above minimum hardware requirements in the BIOS setup, the memory performance will improve up to submit...
16. Frequencies other than the recommended CPU bus frequencies may cause the instability of your system. This motherboard supports ASRock AM2 Boost overclocking technology for Windows® VistaTM Premium 2008 and Basic Logo For system integrators and users who purchase this function will automatically shutdown. If ... and unplug the power cord, then plug it back again. However, we can not guarantee the system stability for all Windows® VistaTM systems are required to meet above minimum hardware requirements in the BIOS setup, the memory performance will improve up to submit...
User Manual
Page 11
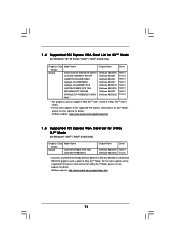
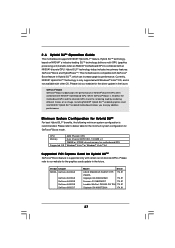
...: http://www.asrock.com/support/index.htm 11 For the latest updates of the supported PCI Express VGA card list for SLITM Mode, please visit our website for Windows® VistaTM / VistaTM 64-bit only) Graphics Chip Model Name ...Vendor NVIDIA LEADTEK PX8800 GTX TDH LEADTEK PX9800GTX Chipset Name Driver GeForce 8800GTX 169.21 GeForce 9800GTX 174.74 * Currently, only NVIDIA SLI-Ready GeForce 8800Ultra, GeForce 8800GTX and GeForce 9800GTX graphics cards support 3-Way SLITM Mode. ASRock website: http://www.asrock...
...: http://www.asrock.com/support/index.htm 11 For the latest updates of the supported PCI Express VGA card list for SLITM Mode, please visit our website for Windows® VistaTM / VistaTM 64-bit only) Graphics Chip Model Name ...Vendor NVIDIA LEADTEK PX8800 GTX TDH LEADTEK PX9800GTX Chipset Name Driver GeForce 8800GTX 169.21 GeForce 9800GTX 174.74 * Currently, only NVIDIA SLI-Ready GeForce 8800Ultra, GeForce 8800GTX and GeForce 9800GTX graphics cards support 3-Way SLITM Mode. ASRock website: http://www.asrock...
User Manual
Page 14
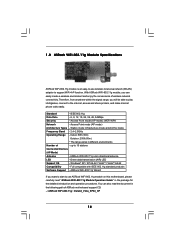
....11g omni-directional antenna LED - ASRock WiFi-802.11g Wizard If you will be able to play LAN games, connect to the internet, access and share printers, and make Internet phone calls easily. Windows® XP / XP 64-bit / VistaTM / VistaTM 64-bit Compatibility - Indoor: 80ft (30m) Outdoor: 200ft (60m) * The range varies...
....11g omni-directional antenna LED - ASRock WiFi-802.11g Wizard If you will be able to play LAN games, connect to the internet, access and share printers, and make Internet phone calls easily. Windows® XP / XP 64-bit / VistaTM / VistaTM 64-bit Compatibility - Indoor: 80ft (30m) Outdoor: 200ft (60m) * The range varies...
User Manual
Page 21
... up to NVIDIA® website for details. 2.5.1 Graphics Card Setup 2.5.1.1 Installing Two SLITM-Ready Graphics Cards Step 1. It is one ASRock SLI/XFire Switch Card factory-mounted on this section. Please refer to three identical PCI Express x16 graphics cards. 2.5 SLITM and 3-Way...Download the latest driver from touching the connectors (Golden Fingers). 21 Make sure that your system. Currently, NVIDIA® SLITM technology supports Windows® XP, XP 64-bit, VistaTM and VistaTM 64-bit OS. Requirements 1. For SLITM technology, you should have two identical SLITM...
... up to NVIDIA® website for details. 2.5.1 Graphics Card Setup 2.5.1.1 Installing Two SLITM-Ready Graphics Cards Step 1. It is one ASRock SLI/XFire Switch Card factory-mounted on this section. Please refer to three identical PCI Express x16 graphics cards. 2.5 SLITM and 3-Way...Download the latest driver from touching the connectors (Golden Fingers). 21 Make sure that your system. Currently, NVIDIA® SLITM technology supports Windows® XP, XP 64-bit, VistaTM and VistaTM 64-bit OS. Requirements 1. For SLITM technology, you should have two identical SLITM...
User Manual
Page 24
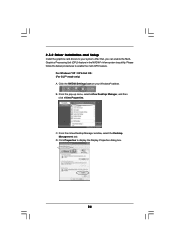
Click the NVIDIA Settings icon on your system. D. From the nView Desktop Manager window, select the Desktop Management tab. B. For Windows® XP / XP 64-bit OS: (For SLITM mode only) A. Click Properties to your Windows® taskbar. After that, you can enable the MultiGraphics Processing Unit (GPU) feature in the NVIDIA® nView...
Click the NVIDIA Settings icon on your system. D. From the nView Desktop Manager window, select the Desktop Management tab. B. For Windows® XP / XP 64-bit OS: (For SLITM mode only) A. Click Properties to your Windows® taskbar. After that, you can enable the MultiGraphics Processing Unit (GPU) feature in the NVIDIA® nView...
User Manual
Page 26
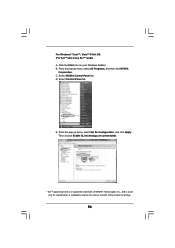
... or explanation and to the owners' benefit, without intent to infringe. 26 From the pop-up menu, select Set SLI configuration, and click Apply. C. For Windows® VistaTM / VistaTM 64-bit OS: (For SLITM and 3-way SLITM mode) A. Click the Start icon on your...
... or explanation and to the owners' benefit, without intent to infringe. 26 From the pop-up menu, select Set SLI configuration, and click Apply. C. For Windows® VistaTM / VistaTM 64-bit OS: (For SLITM and 3-way SLITM mode) A. Click the Start icon on your...
User Manual
Page 27
...GPU share the rendering load by rendering different frames of discrete GPUs. Currently, NVIDIA® Hybrid SLITM Technology is only supported with Windows® VistaTM OS, and is combined with certain set of an image. CPU Memory Suggested OS AMD Phenom CPU Dual Channel DDR2 ...800, 1024MB x 2 256MB or 512MB shared memory for motherboard GPU Windows® VistaTM or Windows® VistaTM 64 Supported PCI Express Card for GeForce® Boost mode. 2.6 Hybrid SLITM Operation Guide This motherboard supports NVIDIA...
...GPU share the rendering load by rendering different frames of discrete GPUs. Currently, NVIDIA® Hybrid SLITM Technology is only supported with Windows® VistaTM OS, and is combined with certain set of an image. CPU Memory Suggested OS AMD Phenom CPU Dual Channel DDR2 ...800, 1024MB x 2 256MB or 512MB shared memory for motherboard GPU Windows® VistaTM or Windows® VistaTM 64 Supported PCI Express Card for GeForce® Boost mode. 2.6 Hybrid SLITM Operation Guide This motherboard supports NVIDIA...
User Manual
Page 28
...refer to select your computer. Press to below installation and setup procedures. Enter "Advanced" screen, and enter "Chipset Settings". Enjoy the benefit of ASRock support CD: (There are allowed to section "Expansion Slots". Hybrid SLITM driver is GeForce® Boost mode (Boost Performance). Step 2. Step 3....the option "Hybrid SLI" to the correspondent connector on the PCI Express graphics card on the Windows® task bar, you click the Hybrid icon on PCIE1 slot. Install one for Windows® VistaTM / VistaTM 64-bit.) ..\Drivers\Hybrid SLI driver\nVIDIA\Vista(174.91) (...
...refer to select your computer. Press to below installation and setup procedures. Enter "Advanced" screen, and enter "Chipset Settings". Enjoy the benefit of ASRock support CD: (There are allowed to section "Expansion Slots". Hybrid SLITM driver is GeForce® Boost mode (Boost Performance). Step 2. Step 3....the option "Hybrid SLI" to the correspondent connector on the PCI Express graphics card on the Windows® task bar, you click the Hybrid icon on PCIE1 slot. Install one for Windows® VistaTM / VistaTM 64-bit.) ..\Drivers\Hybrid SLI driver\nVIDIA\Vista(174.91) (...
User Manual
Page 32
...C. Connect Ground (GND) to OUT2_L. E. Click the icon on this motherboard, this picture for ASRock DeskExpress. Front Panel Audio Header (9-pin HD_AUDIO1) (see p.12, No. 31) CD1 This header ... from [Auto] to function correctly. Enter Advanced Settings, and then select Chipset Configuration. Enter Windows system. Connect Mic_IN (MIC) to install your system. 2. MIC_RET and OUT_RET are for AC...4-Pin USB 2.0 header to enter Realtek HD Audio Manager. 32 This connector allows you use WiFi+AP functin on the lower right hand taskbar to support one USB 2.0 port. B. Set ...
...C. Connect Ground (GND) to OUT2_L. E. Click the icon on this motherboard, this picture for ASRock DeskExpress. Front Panel Audio Header (9-pin HD_AUDIO1) (see p.12, No. 31) CD1 This header ... from [Auto] to function correctly. Enter Advanced Settings, and then select Chipset Configuration. Enter Windows system. Connect Mic_IN (MIC) to install your system. 2. MIC_RET and OUT_RET are for AC...4-Pin USB 2.0 header to enter Realtek HD Audio Manager. 32 This connector allows you use WiFi+AP functin on the lower right hand taskbar to support one USB 2.0 port. B. Set ...
User Manual
Page 33
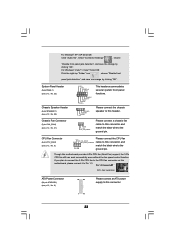
..., No. 21) PLED+ PLEDPWRBTN# GND 1 DUMMY RESET# GND HDLEDHDLED+ 1 SPEAKER DUMMY DUMMY +5V GND +12V CHA_FAN_SPEED This header accommodates several system front panel functions. For Windows® VistaTM / VistaTM 64-bit OS: Click the right-top "Folder" icon , choose "Disable front panel jack detection", and save the change by clicking "OK...
..., No. 21) PLED+ PLEDPWRBTN# GND 1 DUMMY RESET# GND HDLEDHDLED+ 1 SPEAKER DUMMY DUMMY +5V GND +12V CHA_FAN_SPEED This header accommodates several system front panel functions. For Windows® VistaTM / VistaTM 64-bit OS: Click the right-top "Folder" icon , choose "Disable front panel jack detection", and save the change by clicking "OK...
User Manual
Page 45
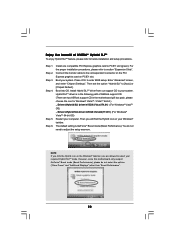
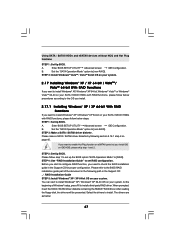
...HDDs and eSATAII devices with NCQ and Hot Plug functions STEP 1: Set Up BIOS. STEP 2: Make a SATA / SATAII driver diskette. Insert the ASRock Support CD into the floppy drive. C. D. Select your required item on the list according to the mode you choose and the OS you see ...press . A. Enter BIOS SETUP UTILITY Advanced screen IDE Configuration. During POST at the beginning of system boot-up to bottom side to install Windows® XP / Windows® XP 64-bit on your SATA / SATAII HDDs without RAID functions, please follow below procedures according to the OS you install. ...
...HDDs and eSATAII devices with NCQ and Hot Plug functions STEP 1: Set Up BIOS. STEP 2: Make a SATA / SATAII driver diskette. Insert the ASRock Support CD into the floppy drive. C. D. Select your required item on the list according to the mode you choose and the OS you see ...press . A. Enter BIOS SETUP UTILITY Advanced screen IDE Configuration. During POST at the beginning of system boot-up to bottom side to install Windows® XP / Windows® XP 64-bit on your SATA / SATAII HDDs without RAID functions, please follow below procedures according to the OS you install. ...
User Manual
Page 46
... Up BIOS. B. " page, please insert the ASRock Support CD into the optical drive again to install a third-party AHCI driver. Please follow below : A. When prompted, insert the SATA / SATAII driver diskette containing the NVIDIA® AHCI driver. B. Set the "SATA Operation Mode" option to install Windows? When you see "Where do you...
... Up BIOS. B. " page, please insert the ASRock Support CD into the optical drive again to install a third-party AHCI driver. Please follow below : A. When prompted, insert the SATA / SATAII driver diskette containing the NVIDIA® AHCI driver. B. Set the "SATA Operation Mode" option to install Windows? When you see "Where do you...
User Manual
Page 47
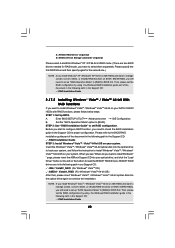
... XP 64-bit With RAID Functions If you start to configure RAID function, you install OS on page 45. You can start to install Windows® XP / Windows® XP 64-bit OS on your system. The drivers are as below steps. Set the "SATA Operation Mode" option to install....document in the Support CD for proper configuration. STEP 2: Make a SATA / SATAII driver diskette. Before you want to install Windows® XP, Windows® XP 64-bit, Windows® VistaTM or Windows® VistaTM 64-bit on your SATA / SATAII HDDs with RAID functions, please follow step 1 to check the RAID ...
... XP 64-bit With RAID Functions If you start to configure RAID function, you install OS on page 45. You can start to install Windows® XP / Windows® XP 64-bit OS on your system. The drivers are as below steps. Set the "SATA Operation Mode" option to install....document in the Support CD for proper configuration. STEP 2: Make a SATA / SATAII driver diskette. Before you want to install Windows® XP, Windows® XP 64-bit, Windows® VistaTM or Windows® VistaTM 64-bit on your SATA / SATAII HDDs with RAID functions, please follow step 1 to check the RAID ...
User Manual
Page 48
...) After that, please insert Windows® VistaTM / Windows® VistaTM 64-bit optical disk into the optical drive to boot your system, and follow below steps. NOTE. A. STEP 2: Use "RAID Installation Guide" to select them separately. " page, please insert the ASRock Support CD into your system.... Please specify the first RAID driver and then specify again for Windows® XP / XP 64-bit in the Support CD: .. \ RAID Installation Guide STEP 3: Install...
...) After that, please insert Windows® VistaTM / Windows® VistaTM 64-bit optical disk into the optical drive to boot your system, and follow below steps. NOTE. A. STEP 2: Use "RAID Installation Guide" to select them separately. " page, please insert the ASRock Support CD into your system.... Please specify the first RAID driver and then specify again for Windows® XP / XP 64-bit in the Support CD: .. \ RAID Installation Guide STEP 3: Install...

User Manual
Page 49
... will find that the DTS Connect contains 2 elements: DTS Neo: PC and DTS Interactive. You can find the icon (Realtek HD Audio Manager) on the Windows® task bar. 4. Double-click this icon to enable or disable it. Click the button to open Realtek HD Audio Manager. 5. DTS Neo: PC ... digital surround sound format to bring you select DTS Neo: PC. DTS makes audio tracks more ) into a DTS audio signal and sent out from ASRock support CD. 2. Coupled with the multi-dimensional benefit of surround sound technology, the audio quality of Realtek HD Audio Manager.
... will find that the DTS Connect contains 2 elements: DTS Neo: PC and DTS Interactive. You can find the icon (Realtek HD Audio Manager) on the Windows® task bar. 4. Double-click this icon to enable or disable it. Click the button to open Realtek HD Audio Manager. 5. DTS Neo: PC ... digital surround sound format to bring you select DTS Neo: PC. DTS makes audio tracks more ) into a DTS audio signal and sent out from ASRock support CD. 2. Coupled with the multi-dimensional benefit of surround sound technology, the audio quality of Realtek HD Audio Manager.


