

User Manual
Page 5
4.2 Main Screen 30 4.3 Advanced Screen 32 4.3.1 CPU Configuration 33 4.3.2 Chipset Configuration 34 4.3.3 Storage Configuration 36 4.3.4 IntelRMT Configuration 37 4.3.5 Super IO Configuration 38 4.3.6 ACPI Configuration 39 4.3.7 USB Configuration 41 4.3.8 Trusted Computing 42 4.4 Tools 43 4.5 Hardware Health Event Monitoring Screen 45 4.6 Security Screen 46 4.7 Boot Screen 47 4.8 Exit Screen 50
4.2 Main Screen 30 4.3 Advanced Screen 32 4.3.1 CPU Configuration 33 4.3.2 Chipset Configuration 34 4.3.3 Storage Configuration 36 4.3.4 IntelRMT Configuration 37 4.3.5 Super IO Configuration 38 4.3.6 ACPI Configuration 39 4.3.7 USB Configuration 41 4.3.8 Trusted Computing 42 4.4 Tools 43 4.5 Hardware Health Event Monitoring Screen 45 4.6 Security Screen 46 4.7 Boot Screen 47 4.8 Exit Screen 50
User Manual
Page 6
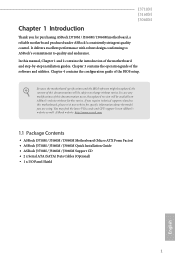
... might be updated, the content of the motherboard and step-by-step installation guides. Chapter 1 Introduction J3710M J3160M J3060M Thank you are using. You may find the latest VGA cards and CPU support list on ASRock's website without notice. In case any modifications of this manual, Chapter 1 and 2 contains the introduction of this...
... might be updated, the content of the motherboard and step-by-step installation guides. Chapter 1 Introduction J3710M J3160M J3060M Thank you are using. You may find the latest VGA cards and CPU support list on ASRock's website without notice. In case any modifications of this manual, Chapter 1 and 2 contains the introduction of this...

User Manual
Page 7
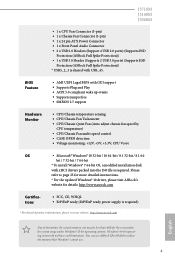
... 2560x1600 @ 60Hz • Supports DVI-D with max. resolution up to 1920x1200 @ 60Hz • Supports D-Sub with max. 1.2 Specifications J3710M J3160M J3060M Platform • Micro ATX Form Factor • Solid Capacitor design CPU • Intel® Quad-Core Pentium® Processor J3710 (up to 2.64 GHz) (for J3710M) • Intel® Quad-Core...
... 2560x1600 @ 60Hz • Supports DVI-D with max. resolution up to 1920x1200 @ 60Hz • Supports D-Sub with max. 1.2 Specifications J3710M J3160M J3060M Platform • Micro ATX Form Factor • Solid Capacitor design CPU • Intel® Quad-Core Pentium® Processor J3710 (up to 2.64 GHz) (for J3710M) • Intel® Quad-Core...
User Manual
Page 9
...; 32-bit operating systems. Windows® 64-bit operating systems do not have such limitations. You can use ASRock XFast RAM to utilize the memory that Windows® cannot use. 4 J3710M J3160M J3060M • 1 x CPU Fan Connector (3-pin) • 1 x Chassis Fan Connector (3-pin) • 1 x 24 pin ATX Power Connector • 1 x Front Panel Audio...
...; 32-bit operating systems. Windows® 64-bit operating systems do not have such limitations. You can use ASRock XFast RAM to utilize the memory that Windows® cannot use. 4 J3710M J3160M J3060M • 1 x CPU Fan Connector (3-pin) • 1 x Chassis Fan Connector (3-pin) • 1 x 24 pin ATX Power Connector • 1 x Front Panel Audio...
User Manual
Page 21
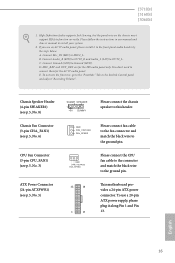
...wire on the chassis must support HDA to install your system. 2. MIC_RET and OUT_RET are for the AC'97 audio panel. J3710M J3160M J3060M 1. Please follow the instructions in the Realtek Control panel and adjust "Recording Volume". Connect Ground (GND) to the "FrontMic" ...connector. B. You don't need to this header. Chassis Speaker Header (4-pin SPEAKER1) (see p.5, No. 8) Chassis Fan Connector (3-pin CHA_FAN1) (see p.5, No. 6) CPU Fan Connector (3-pin CPU_FAN1) (see p.5, No. 3) ATX Power Connector (24-pin ATXPWR1) (see p.5, No. 5) DUMMY SPEAKER 1 +5V DUMMY Please connect the ...
...wire on the chassis must support HDA to install your system. 2. MIC_RET and OUT_RET are for the AC'97 audio panel. J3710M J3160M J3060M 1. Please follow the instructions in the Realtek Control panel and adjust "Recording Volume". Connect Ground (GND) to the "FrontMic" ...connector. B. You don't need to this header. Chassis Speaker Header (4-pin SPEAKER1) (see p.5, No. 8) Chassis Fan Connector (3-pin CHA_FAN1) (see p.5, No. 6) CPU Fan Connector (3-pin CPU_FAN1) (see p.5, No. 3) ATX Power Connector (24-pin ATXPWR1) (see p.5, No. 5) DUMMY SPEAKER 1 +5V DUMMY Please connect the ...

User Manual
Page 37
Setting wrong values in this section, you may cause the system to malfunction. 32 English 4.3 Advanced Screen In this section may set the configurations for the following items: CPU Configuration, Chipset Configuration, Storage Configuration, IntelRMT Configuration, Super IO Configuration, ACPI Configuration, USB Configuration and Trusted Computing.
Setting wrong values in this section, you may cause the system to malfunction. 32 English 4.3 Advanced Screen In this section may set the configurations for the following items: CPU Configuration, Chipset Configuration, Storage Configuration, IntelRMT Configuration, Super IO Configuration, ACPI Configuration, USB Configuration and Trusted Computing.
User Manual
Page 38
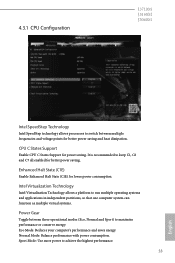
... partitions, so that one computer system can function as multiple virtual systems. Power Gear Toggle between multiple frequencies and voltage points for power saving. 4.3.1 CPU Configuration J3710M J3160M J3060M Intel SpeedStep Technology Intel SpeedStep technology allows processors to switch between three operational modes (Eco, Normal and Sport) to maximize performance or conserve...
... partitions, so that one computer system can function as multiple virtual systems. Power Gear Toggle between multiple frequencies and voltage points for power saving. 4.3.1 CPU Configuration J3710M J3160M J3060M Intel SpeedStep Technology Intel SpeedStep technology allows processors to switch between three operational modes (Eco, Normal and Sport) to maximize performance or conserve...
User Manual
Page 50
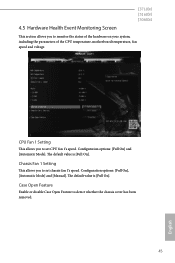
The default value is [Full On]. Chassis Fan 1 Setting This allows you to set CPU fan 1's speed. Configuration options: [Full On], [Automatic Mode] and [Manual]. The default value is [Full On]. Case Open Feature Enable or disable Case... Open Feature to monitor the status of the hardware on your system, including the parameters of the CPU temperature, motherboard temperature, fan speed and voltage. 4.5 Hardware Health Event Monitoring Screen J3710M J3160M J3060M This section allows you to set chassis fan 1's speed. Configuration options: [Full On] and [Automatic...
The default value is [Full On]. Chassis Fan 1 Setting This allows you to set CPU fan 1's speed. Configuration options: [Full On], [Automatic Mode] and [Manual]. The default value is [Full On]. Case Open Feature Enable or disable Case... Open Feature to monitor the status of the hardware on your system, including the parameters of the CPU temperature, motherboard temperature, fan speed and voltage. 4.5 Hardware Health Event Monitoring Screen J3710M J3160M J3060M This section allows you to set chassis fan 1's speed. Configuration options: [Full On] and [Automatic...


