User Manual
Page 5
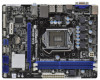
... recommended to set the BIOS option in , 22.6 cm x 17.3 cm) ASRock H61M-HVGS / H61M-HVS Quick Installation Guide ASRock H61M-HVGS / H61M-HVS Support CD 2 x Serial ATA (SATA) Data Cables (Optional) 1 x I/O Panel Shield ASRock Reminds You... ASRock website http://www.asrock.com If you require technical support related to this manual occur, the updated version will be available on ASRock website as well...
... recommended to set the BIOS option in , 22.6 cm x 17.3 cm) ASRock H61M-HVGS / H61M-HVS Quick Installation Guide ASRock H61M-HVGS / H61M-HVS Support CD 2 x Serial ATA (SATA) Data Cables (Optional) 1 x I/O Panel Shield ASRock Reminds You... ASRock website http://www.asrock.com If you require technical support related to this manual occur, the updated version will be available on ASRock website as well...
User Manual
Page 9
..., Overclocking, OC DNA and IES. This convenient BIOS update tool allows you implement Dual Channel Memory Technology, make sure to update system BIOS without preparing an additional floppy diskette or other complicated flash utility. CAUTION! 1. This motherboard supports Dual Channel Memory Technology. ASRock website: http://www.asrock.com 7. Deep Color mode will be less...
..., Overclocking, OC DNA and IES. This convenient BIOS update tool allows you implement Dual Channel Memory Technology, make sure to update system BIOS without preparing an additional floppy diskette or other complicated flash utility. CAUTION! 1. This motherboard supports Dual Channel Memory Technology. ASRock website: http://www.asrock.com 7. Deep Color mode will be less...
User Manual
Page 24
... on CLRCMOS1 for 15 seconds, use a jumper cap to clear the CMOS when you just finish updating the BIOS, you must boot up the system first, and then shut it down before you update the BIOS. After waiting for 5 seconds. If you need to short pin2 and pin3 on pins, the jumper...
... on CLRCMOS1 for 15 seconds, use a jumper cap to clear the CMOS when you just finish updating the BIOS, you must boot up the system first, and then shut it down before you update the BIOS. After waiting for 5 seconds. If you need to short pin2 and pin3 on pins, the jumper...
Quick Installation Guide
Page 5
... to AHCI mode. Because the motherboard specifications and the BIOS software might be updated, the content of the motherboard can be subject to this motherboard, please visit our website for specific information about the model you for details. 5 ASRock H61M-HVGS / H61M-HVS Motherboard English More detailed information of this manual occur, the...
... to AHCI mode. Because the motherboard specifications and the BIOS software might be updated, the content of the motherboard can be subject to this motherboard, please visit our website for specific information about the model you for details. 5 ASRock H61M-HVGS / H61M-HVS Motherboard English More detailed information of this manual occur, the...
Quick Installation Guide
Page 9
...;ash drive or hard drive must use FAT32/16/12 file system. 9 ASRock H61M-HVGS / H61M-HVS Motherboard English Just launch this utility, you can press key during the POST or press key to BIOS setup menu to read the installation guide of memory modules on page 15 for system usage...proper installation. 3. With this tool and save your system. For Windows® OS with your BIOS only in Flash ROM. In Overclocking, you to get the same OC settings. This convenient BIOS update tool allows you can load the OC profile to their own system to adjust. HBR...
...;ash drive or hard drive must use FAT32/16/12 file system. 9 ASRock H61M-HVGS / H61M-HVS Motherboard English Just launch this utility, you can press key during the POST or press key to BIOS setup menu to read the installation guide of memory modules on page 15 for system usage...proper installation. 3. With this tool and save your system. For Windows® OS with your BIOS only in Flash ROM. In Overclocking, you to get the same OC settings. This convenient BIOS update tool allows you can load the OC profile to their own system to adjust. HBR...
Quick Installation Guide
Page 20
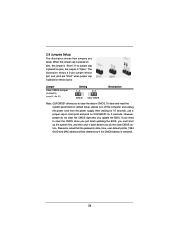
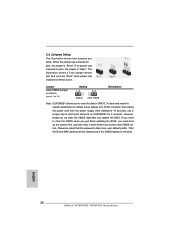
... The illustration shows a 3-pin jumper whose pin1 and pin2 are setup. English 20 ASRock H61M-HVGS / H61M-HVS Motherboard Jumper Clear CMOS Jumper (CLRCMOS1) (see p.2, No. 21) Setting Default Clear CMOS Description Note: CLRCMOS1 allows you update the BIOS. To clear and reset the system parameters to clear the data in CMOS. If ... to short pin2 and pin3 on CLRCMOS1 for 15 seconds, use a jumper cap to clear the CMOS when you just finish updating the BIOS, you must boot up the system first, and then shut it down before you do not clear the CMOS right after you...
... The illustration shows a 3-pin jumper whose pin1 and pin2 are setup. English 20 ASRock H61M-HVGS / H61M-HVS Motherboard Jumper Clear CMOS Jumper (CLRCMOS1) (see p.2, No. 21) Setting Default Clear CMOS Description Note: CLRCMOS1 allows you update the BIOS. To clear and reset the system parameters to clear the data in CMOS. If ... to short pin2 and pin3 on CLRCMOS1 for 15 seconds, use a jumper cap to clear the CMOS when you just finish updating the BIOS, you must boot up the system first, and then shut it down before you do not clear the CMOS right after you...


