User Manual
Page 5
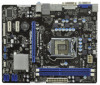
... this motherboard, please visit our website for specific information about the model you for details. 5 You may find the latest VGA cards and CPU support lists on ASRock website without notice. To get better performance in Windows® 7 / 7 64-bit / VistaTM / VistaTM 64bit, it is recommended to set the BIOS option in , 24.4 cm x 19.8 cm) ASRock H61M-GS / H61M-S Quick Installation Guide ASRock H61M-GS / H61M-S Support CD 2 x Serial ATA (SATA) Data Cables (Optional) 1 x I/O Panel Shield ASRock...
... this motherboard, please visit our website for specific information about the model you for details. 5 You may find the latest VGA cards and CPU support lists on ASRock website without notice. To get better performance in Windows® 7 / 7 64-bit / VistaTM / VistaTM 64bit, it is recommended to set the BIOS option in , 24.4 cm x 19.8 cm) ASRock H61M-GS / H61M-S Quick Installation Guide ASRock H61M-GS / H61M-S Support CD 2 x Serial ATA (SATA) Data Cables (Optional) 1 x I/O Panel Shield ASRock...
User Manual
Page 9
... key to BIOS setup menu to ASRock of PC gaming operation. Simply installing the APP Charger driver, it makes your iPhone charged much quickly from ASRock of charging your PC and apple devices via Bluetooth or WiFi networks, then you can boost USB storage device performance. With this tool and save the new BIOS file to control your BIOS only in Flash ROM. Also, please do -date supported...
... key to BIOS setup menu to ASRock of PC gaming operation. Simply installing the APP Charger driver, it makes your iPhone charged much quickly from ASRock of charging your PC and apple devices via Bluetooth or WiFi networks, then you can boost USB storage device performance. With this tool and save the new BIOS file to control your BIOS only in Flash ROM. Also, please do -date supported...
User Manual
Page 11
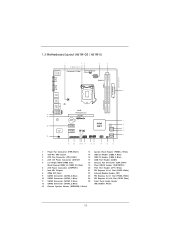
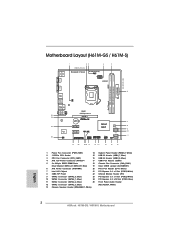
...13 12 1 Power Fan Connector (PWR_FAN1) 14 System Panel Header (PANEL1, White) 2 1155-Pin CPU Socket 15 USB 2.0 Header (USB6_7, Blue) 3 CPU Fan Connector (CPU_FAN1) 16 USB 2.0 Header (USB8_9, Blue) 4 ATX 12V Power Connector (ATX12V1 17 COM Port Header (COM1) 5 2 x 240-pin DDR3 DIMM Slots 18 Chassis Fan Connector (CHA_FAN1) (Dual Channel: DDR3_A1, DDR3_B1, Blue) 19 Clear CMOS Jumper (CLRCMOS1) 6 ATX Power Connector (ATXPWR1) 20 Print Port Header (LPT1, White) 7 Intel H61 Chipset 21 PCI Express 2.0 x1 Slot (PCIE3, White) 8 32Mb SPI Flash 22 Infrared Module Header (IR1) 9 SATA2...
...13 12 1 Power Fan Connector (PWR_FAN1) 14 System Panel Header (PANEL1, White) 2 1155-Pin CPU Socket 15 USB 2.0 Header (USB6_7, Blue) 3 CPU Fan Connector (CPU_FAN1) 16 USB 2.0 Header (USB8_9, Blue) 4 ATX 12V Power Connector (ATX12V1 17 COM Port Header (COM1) 5 2 x 240-pin DDR3 DIMM Slots 18 Chassis Fan Connector (CHA_FAN1) (Dual Channel: DDR3_A1, DDR3_B1, Blue) 19 Clear CMOS Jumper (CLRCMOS1) 6 ATX Power Connector (ATXPWR1) 20 Print Port Header (LPT1, White) 7 Intel H61 Chipset 21 PCI Express 2.0 x1 Slot (PCIE3, White) 8 32Mb SPI Flash 22 Infrared Module Header (IR1) 9 SATA2...
User Manual
Page 20
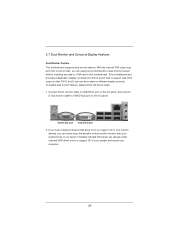
... connect D-Sub monitor cable to VGA/D-Sub port on VGA card to your computer. 20 If you have installed onboard VGA driver from our support CD to VGA/DVI-D port on the I /O panel. To enable dual monitor feature, please follow the below steps: 1. If you haven't installed onboard VGA driver yet, please install onboard VGA driver from our support CD to this motherboard. With the internal VGA output support (DVI-D and D-Sub), you can drive same or different display contents. VGA/D-Sub port VGA/DVI-D port 2. Connect DVI-D monitor cable...
... connect D-Sub monitor cable to VGA/D-Sub port on VGA card to your computer. 20 If you have installed onboard VGA driver from our support CD to VGA/DVI-D port on the I /O panel. To enable dual monitor feature, please follow the below steps: 1. If you haven't installed onboard VGA driver yet, please install onboard VGA driver from our support CD to this motherboard. With the internal VGA output support (DVI-D and D-Sub), you can drive same or different display contents. VGA/D-Sub port VGA/DVI-D port 2. Connect DVI-D monitor cable...

User Manual
Page 21
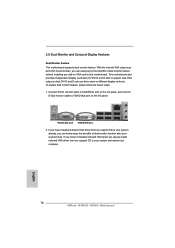
... necessary. Surround Display Feature This motherboard supports surround display upgrade. Please refer to apply these new values. Then connect other monitor cables to set up a multi-monitor display. Set up a surround display environment: 1. D. E. Click "Apply" or "OK" to page 19 for proper expansion card installation procedures for details. 2. Please refer to the following steps to the corresponding connectors of VGA/D-sub. Install the PCI Express VGA card on each monitor. Boot your system. If...
... necessary. Surround Display Feature This motherboard supports surround display upgrade. Please refer to apply these new values. Then connect other monitor cables to set up a multi-monitor display. Set up a surround display environment: 1. D. E. Click "Apply" or "OK" to page 19 for proper expansion card installation procedures for details. 2. Please refer to the following steps to the corresponding connectors of VGA/D-sub. Install the PCI Express VGA card on each monitor. Boot your system. If...

User Manual
Page 31
Using SATA / SATAII HDDs with NCQ function STEP 1: Set Up UEFI. Enter UEFI SETUP UTILITY Advanced screen SATA Configuration. B. Then you will lose ALL data in it! During POST at the beginning of system boot-up to bottom side to install those required drivers. Start to [AHCI]. Please follow the order from up , press key, and then a window for boot devices selection appears. Insert the Support CD into the floppy...
Using SATA / SATAII HDDs with NCQ function STEP 1: Set Up UEFI. Enter UEFI SETUP UTILITY Advanced screen SATA Configuration. B. Then you will lose ALL data in it! During POST at the beginning of system boot-up to bottom side to install those required drivers. Start to [AHCI]. Please follow the order from up , press key, and then a window for boot devices selection appears. Insert the Support CD into the floppy...

User Manual
Page 40
... the installed CPU does not support Hyper-Threading technology. Configuration options: [All], [1], [2] and [3]. Set to enable in each processor package. Active Processor Cores Use this to enable or disable CPU C6 (ACPI C3) report to OS. Enhance Halt State (C1E) All processors support the Halt State (C1). CPU C6 State Support Use this item to select the number of the system caches. The default value is supported through the native processor instructions...
... the installed CPU does not support Hyper-Threading technology. Configuration options: [All], [1], [2] and [3]. Set to enable in each processor package. Active Processor Cores Use this to enable or disable CPU C6 (ACPI C3) report to OS. Enhance Halt State (C1E) All processors support the Halt State (C1). CPU C6 State Support Use this item to select the number of the system caches. The default value is supported through the native processor instructions...
User Manual
Page 42
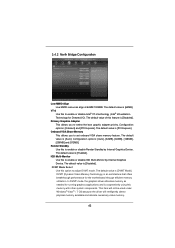
DVMT Mode Select Use this to adjust DVMT mode. In DVMT mode, the graphics driver allocates memory as needed for running graphics applications and is [Auto]. VT-d Use this option to enable or disable Intel® VT-d technology (Intel® Virtualization Technology for the motherboard through efficient memory utilization. The default value is cooperatively using this feature is [DVMT Mode]. IGD Multi-Monitor Use this to set onboard VGA share memory feature. 3.4.2 North Bridge Configuration Low MMIO Align...
DVMT Mode Select Use this to adjust DVMT mode. In DVMT mode, the graphics driver allocates memory as needed for running graphics applications and is [Auto]. VT-d Use this option to enable or disable Intel® VT-d technology (Intel® Virtualization Technology for the motherboard through efficient memory utilization. The default value is cooperatively using this feature is [DVMT Mode]. IGD Multi-Monitor Use this to set onboard VGA share memory feature. 3.4.2 North Bridge Configuration Low MMIO Align...

User Manual
Page 45
... Host Controller Interface) supports NCQ and other new features that will improve SATA disk performance but IDE mode does not have these advantages. Hard Disk S.M.A.R.T. SATA Controller 1 Use this item to enable or disable the S.M.A.R.T. (Self-Monitoring, Analysis, and Reporting Technology) feature. Use this item to select SATA mode. Configuration options: [Disabled] and [Enabled]. 45 If native OS (Windows® XP / VistaTM / 7) is [IDE Mode]. Configuration options: [IDE Mode], [AHCI Mode] and [Disabled]. The default value is installed...
... Host Controller Interface) supports NCQ and other new features that will improve SATA disk performance but IDE mode does not have these advantages. Hard Disk S.M.A.R.T. SATA Controller 1 Use this item to enable or disable the S.M.A.R.T. (Self-Monitoring, Analysis, and Reporting Technology) feature. Use this item to select SATA mode. Configuration options: [Disabled] and [Enabled]. 45 If native OS (Windows® XP / VistaTM / 7) is [IDE Mode]. Configuration options: [IDE Mode], [AHCI Mode] and [Disabled]. The default value is installed...
User Manual
Page 48
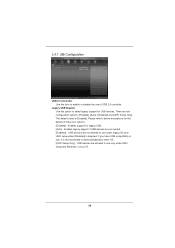
...setup when [Disabled] is [Enabled]. USB devices are not allowed to below descriptions for legacy USB. [Auto] - 3.4.7 USB Configuration USB 2.0 Controller Use this option to select legacy support for USB devices. There are connected. [Disabled] - Enables legacy support if USB devices are four configuration options: [Enabled], [Auto], [Disabled] and [UEFI Setup Only]. Please refer to use of these four options: [Enabled] - USB devices are allowed to enter OS. [UEFI Setup Only] - Legacy USB Support Use this item to enable or disable the use under UEFI setup and Windows...
...setup when [Disabled] is [Enabled]. USB devices are not allowed to below descriptions for legacy USB. [Auto] - 3.4.7 USB Configuration USB 2.0 Controller Use this option to select legacy support for USB devices. There are connected. [Disabled] - Enables legacy support if USB devices are four configuration options: [Enabled], [Auto], [Disabled] and [UEFI Setup Only]. Please refer to use of these four options: [Enabled] - USB devices are allowed to enter OS. [UEFI Setup Only] - Legacy USB Support Use this item to enable or disable the use under UEFI setup and Windows...

User Manual
Page 53
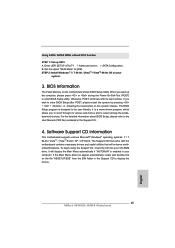
... want to your CD-ROM drive. Chapter 4: Software Support 4.1 Install Operating System This motherboard supports various Microsoft® Windows® operating systems: 7 / 7 64-bit / VistaTM / VistaTM 64-bit / XP / XP 64-bit. Because motherboard settings and hardware options vary, use the setup procedures in the Support CD to install it. 4.2.4 Contact Information If you may contact your computer. If the Main Menu did not appear automatically, locate and double click on...
... want to your CD-ROM drive. Chapter 4: Software Support 4.1 Install Operating System This motherboard supports various Microsoft® Windows® operating systems: 7 / 7 64-bit / VistaTM / VistaTM 64-bit / XP / XP 64-bit. Because motherboard settings and hardware options vary, use the setup procedures in the Support CD to install it. 4.2.4 Contact Information If you may contact your computer. If the Main Menu did not appear automatically, locate and double click on...
Quick Installation Guide
Page 2
...13 12 1 Power Fan Connector (PWR_FAN1) 14 System Panel Header (PANEL1, White) 2 1155-Pin CPU Socket 15 USB 2.0 Header (USB6_7, Blue) 3 CPU Fan Connector (CPU_FAN1) 16 USB 2.0 Header (USB8_9, Blue) 4 ATX 12V Power Connector (ATX12V1 17 COM Port Header (COM1) 5 2 x 240-pin DDR3 DIMM Slots 18 Chassis Fan Connector (CHA_FAN1) (Dual Channel: DDR3_A1, DDR3_B1, Blue) 19 Clear CMOS Jumper (CLRCMOS1) 6 ATX Power Connector (ATXPWR1) 20 Print Port Header (LPT1, White) 7 Intel H61 Chipset 21 PCI Express 2.0 x1 Slot (PCIE3, White) 8 32Mb SPI Flash 22 Infrared Module Header (IR1) 9 SATA2...
...13 12 1 Power Fan Connector (PWR_FAN1) 14 System Panel Header (PANEL1, White) 2 1155-Pin CPU Socket 15 USB 2.0 Header (USB6_7, Blue) 3 CPU Fan Connector (CPU_FAN1) 16 USB 2.0 Header (USB8_9, Blue) 4 ATX 12V Power Connector (ATX12V1 17 COM Port Header (COM1) 5 2 x 240-pin DDR3 DIMM Slots 18 Chassis Fan Connector (CHA_FAN1) (Dual Channel: DDR3_A1, DDR3_B1, Blue) 19 Clear CMOS Jumper (CLRCMOS1) 6 ATX Power Connector (ATXPWR1) 20 Print Port Header (LPT1, White) 7 Intel H61 Chipset 21 PCI Express 2.0 x1 Slot (PCIE3, White) 8 32Mb SPI Flash 22 Infrared Module Header (IR1) 9 SATA2...
Quick Installation Guide
Page 5
... Windows® 7 / 7 64-bit / VistaTM / VistaTM 64bit, it is recommended to set the BIOS option in our support CD for purchasing ASRock H61M-GS / H61M-S motherboard, a reliable motherboard produced under ASRock's consistently stringent quality control. 1. Introduction Thank you are using. This Quick Installation Guide contains introduction of this manual occur, the updated version will be found in the user manual presented in , 24.4 cm x 19.8 cm) ASRock H61M-GS / H61M-S Quick Installation Guide ASRock H61M-GS / H61M-S Support CD 2 x Serial ATA (SATA) Data Cables (Optional) 1 x I/O Panel...
... Windows® 7 / 7 64-bit / VistaTM / VistaTM 64bit, it is recommended to set the BIOS option in our support CD for purchasing ASRock H61M-GS / H61M-S motherboard, a reliable motherboard produced under ASRock's consistently stringent quality control. 1. Introduction Thank you are using. This Quick Installation Guide contains introduction of this manual occur, the updated version will be found in the user manual presented in , 24.4 cm x 19.8 cm) ASRock H61M-GS / H61M-S Quick Installation Guide ASRock H61M-GS / H61M-S Support CD 2 x Serial ATA (SATA) Data Cables (Optional) 1 x I/O Panel...
Quick Installation Guide
Page 7
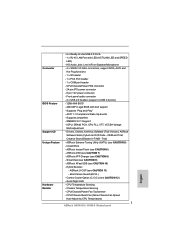
...Night LED - AMI UEFI Legal BIOS with LED (ACT/LINK LED and SPEED LED) - Supports "Plug and Play" - Drivers, Utilities, AntiVirus Software (Trial Version), ASRock Software Suite (CyberLink DVD Suite - Instant Boot - CPU/Chassis Quiet Fan (Allow Chassis Fan Speed Auto-Adjust by CPU Temperature) 7 ASRock H61M-GS / H61M-S Motherboard English Supports jumperfree - Creative Sound Blaster X-Fi MB - Chassis Temperature Sensing - Connector BIOS Feature Support CD Unique Feature Hardware Monitor - 6 x Ready-to-Use USB 2.0 Ports - 1 x RJ-45 LAN Port with GUI support - SMBIOS 2.3.1 Support...
...Night LED - AMI UEFI Legal BIOS with LED (ACT/LINK LED and SPEED LED) - Supports "Plug and Play" - Drivers, Utilities, AntiVirus Software (Trial Version), ASRock Software Suite (CyberLink DVD Suite - Instant Boot - CPU/Chassis Quiet Fan (Allow Chassis Fan Speed Auto-Adjust by CPU Temperature) 7 ASRock H61M-GS / H61M-S Motherboard English Supports jumperfree - Creative Sound Blaster X-Fi MB - Chassis Temperature Sensing - Connector BIOS Feature Support CD Unique Feature Hardware Monitor - 6 x Ready-to-Use USB 2.0 Ports - 1 x RJ-45 LAN Port with GUI support - SMBIOS 2.3.1 Support...
Quick Installation Guide
Page 9
... Windows®. To use FAT32/16/12 file system. 7. ASRock Instant Flash is IE8. With APP Charger driver installed, you have to RAM (S3), hibernation mode (S4) or power off (S5). All you can press key during the POST or press key to BIOS setup menu to install the ASRock AIWI utility either from ASRock of the device. 9 ASRock H61M-GS / H61M-S Motherboard English Also, please do is the smart start experiencing the exciting motion controlled games. ASRock...
... Windows®. To use FAT32/16/12 file system. 7. ASRock Instant Flash is IE8. With APP Charger driver installed, you have to RAM (S3), hibernation mode (S4) or power off (S5). All you can press key during the POST or press key to BIOS setup menu to install the ASRock AIWI utility either from ASRock of the device. 9 ASRock H61M-GS / H61M-S Motherboard English Also, please do is the smart start experiencing the exciting motion controlled games. ASRock...
Quick Installation Guide
Page 13
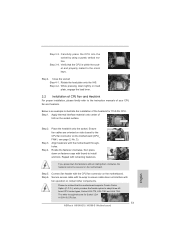
..., engage the load lever. 2.2 Installation of CPU Fan and Heatsink For proper installation, please kindly refer to the instruction manuals of the heatsink for Socket LGA 1155/1156 CPU fan. 13 ASRock H61M-GS / H61M-S Motherboard English Place the heatsink onto the socket. Align fasteners with remaining fasteners. Step 5. Step 6. Step 3-3. While pressing down lightly on the socket surface. Apply Thermal Interface Material Step 2. Verify that this motherboard supports Combo Cooler Option (C.C.O.), which provides...
..., engage the load lever. 2.2 Installation of CPU Fan and Heatsink For proper installation, please kindly refer to the instruction manuals of the heatsink for Socket LGA 1155/1156 CPU fan. 13 ASRock H61M-GS / H61M-S Motherboard English Place the heatsink onto the socket. Align fasteners with remaining fasteners. Step 5. Step 6. Step 3-3. While pressing down lightly on the socket surface. Apply Thermal Interface Material Step 2. Verify that this motherboard supports Combo Cooler Option (C.C.O.), which provides...
Quick Installation Guide
Page 16
... I /O panel, and connect D-Sub monitor cable to VGA/D-Sub port on VGA card to VGA/DVI-D port on the I /O panel. With the internal VGA output support (DVI-D and D-Sub), you can drive same or different display contents. This motherboard also provides independent display controllers for DVI-D and D-Sub to your system and restart your system boots. To enable dual monitor feature, please follow the below steps: 1. VGA/D-Sub port VGA/DVI-D port 2. If you haven't installed onboard VGA driver yet, please install onboard VGA driver...
... I /O panel, and connect D-Sub monitor cable to VGA/D-Sub port on VGA card to VGA/DVI-D port on the I /O panel. With the internal VGA output support (DVI-D and D-Sub), you can drive same or different display contents. This motherboard also provides independent display controllers for DVI-D and D-Sub to your system and restart your system boots. To enable dual monitor feature, please follow the below steps: 1. VGA/D-Sub port VGA/DVI-D port 2. If you haven't installed onboard VGA driver yet, please install onboard VGA driver...
Quick Installation Guide
Page 17
...fits of the add-on PCI Express VGA card on each monitor. B. Click "Apply" or "OK" to enter UEFI setup. Right-click the display icon in the Display Properties dialog that you do not adjust the UEFI setup, the default value of VGA/D-sub. Connect DVI-D monitor cable to VGA/DVI-D port on the I/O panel, and connect D-Sub monitor cable to this monitor". Boot your primary monitor, and then select "Primary". Surround Display Feature This motherboard supports surround display upgrade.
...fits of the add-on PCI Express VGA card on each monitor. B. Click "Apply" or "OK" to enter UEFI setup. Right-click the display icon in the Display Properties dialog that you do not adjust the UEFI setup, the default value of VGA/D-sub. Connect DVI-D monitor cable to VGA/DVI-D port on the I/O panel, and connect D-Sub monitor cable to this monitor". Boot your primary monitor, and then select "Primary". Surround Display Feature This motherboard supports surround display upgrade.
Quick Installation Guide
Page 24
Then, the drivers compatible to your system. 24 ASRock H61M-GS / H61M-S Motherboard English A. B. Using SATA / SATAII HDDs without NCQ function STEP 1: Set up to bottom side to install those required drivers. Enter UEFI SETUP UTILITY Advanced screen SATA Configuration. Please follow the order from up UEFI. STEP 2: Install Windows® 7 / 7 64-bit / VistaTM / VistaTM 64-bit OS on your system can work properly. 2.9 Installing Windows® 7 / 7 64-bit / VistaTM / VistaTM 64-bit / XP / XP 64-bit Without RAID Functions...
Then, the drivers compatible to your system. 24 ASRock H61M-GS / H61M-S Motherboard English A. B. Using SATA / SATAII HDDs without NCQ function STEP 1: Set up to bottom side to install those required drivers. Enter UEFI SETUP UTILITY Advanced screen SATA Configuration. Please follow the order from up UEFI. STEP 2: Install Windows® 7 / 7 64-bit / VistaTM / VistaTM 64-bit OS on your system can work properly. 2.9 Installing Windows® 7 / 7 64-bit / VistaTM / VistaTM 64-bit / XP / XP 64-bit Without RAID Functions...
Quick Installation Guide
Page 25
... you wish to enter BIOS Setup utility; otherwise, POST continues with the motherboard contains necessary drivers and useful utilities that will display the Main Menu automatically if "AUTORUN" is enabled in your CD-ROM drive. Using SATA / SATAII HDDs without NCQ function STEP 1: Set up the computer, please press or during the Power-On-Self-Test (POST) to enter BIOS Setup after POST, please restart the system by pressing + + , or pressing the reset button on the fi...
... you wish to enter BIOS Setup utility; otherwise, POST continues with the motherboard contains necessary drivers and useful utilities that will display the Main Menu automatically if "AUTORUN" is enabled in your CD-ROM drive. Using SATA / SATAII HDDs without NCQ function STEP 1: Set up the computer, please press or during the Power-On-Self-Test (POST) to enter BIOS Setup after POST, please restart the system by pressing + + , or pressing the reset button on the fi...


