Quick Installation Guide
Page 1
...damages (including damages for loss of profits, loss of business, loss of data, interruption of business and the like), even if ASRock has been advised of the possibility of such damages arising from any defect or error in the guide or product. "Perchlorate Material-special..., and (2) this device must accept any interference received, including interference that may appear in this guide. All rights reserved. 1 ASRock H55iCafe Motherboard English Products and corporate names appearing in this guide may or may not be registered trademarks or copyrights of their respective companies,...
...damages (including damages for loss of profits, loss of business, loss of data, interruption of business and the like), even if ASRock has been advised of the possibility of such damages arising from any defect or error in the guide or product. "Perchlorate Material-special..., and (2) this device must accept any interference received, including interference that may appear in this guide. All rights reserved. 1 ASRock H55iCafe Motherboard English Products and corporate names appearing in this guide may or may not be registered trademarks or copyrights of their respective companies,...

Quick Installation Guide
Page 2
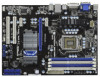
..., Blue) 15 Sixth SATAII Connector (SATAII_6, Blue) 31 PCI Express x1 Slot (PCIE1, White) 16 Fourth SATAII Connector (SATAII_4, Blue) 32 Power Fan Connector (PWR_FAN1) 2 ASRock H55iCafe Motherboard
..., Blue) 15 Sixth SATAII Connector (SATAII_6, Blue) 31 PCI Express x1 Slot (PCIE1, White) 16 Fourth SATAII Connector (SATAII_4, Blue) 32 Power Fan Connector (PWR_FAN1) 2 ASRock H55iCafe Motherboard
Quick Installation Guide
Page 3
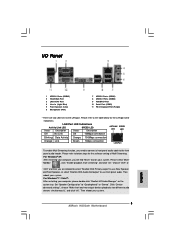
... LED indications. Then reboot your system. Choose "2CH" or "4CH" and then you will find "Mixer" tool on the system tray. Then reboot your system. 3 ASRock H55iCafe Motherboard English I/O Panel 1 USB 2.0 Ports (USB45) 2 VGA/D-Sub Port 3 LAN RJ-45 Port 4 Line In (Light Blue) 5 Front Speaker (Lime) 6 Microphone (Pink) 7 USB 2.0 Ports (USB01...
... LED indications. Then reboot your system. Choose "2CH" or "4CH" and then you will find "Mixer" tool on the system tray. Then reboot your system. 3 ASRock H55iCafe Motherboard English I/O Panel 1 USB 2.0 Ports (USB45) 2 VGA/D-Sub Port 3 LAN RJ-45 Port 4 Line In (Light Blue) 5 Front Speaker (Lime) 6 Microphone (Pink) 7 USB 2.0 Ports (USB01...
Quick Installation Guide
Page 4
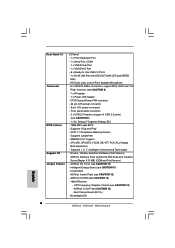
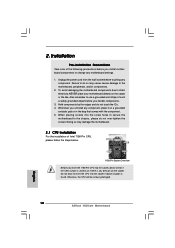
... motherboard specifications and the BIOS software might be updated, the content of the motherboard can be subject to quality and endurance. www.asrock.com/support/index.asp 1.1 Package Contents ASRock H55iCafe Motherboard (ATX Form Factor: 12.0-in x 8.8-in the Support CD. This Quick Installation Guide contains introduction of this motherboard, please visit our...
... motherboard specifications and the BIOS software might be updated, the content of the motherboard can be subject to quality and endurance. www.asrock.com/support/index.asp 1.1 Package Contents ASRock H55iCafe Motherboard (ATX Form Factor: 12.0-in x 8.8-in the Support CD. This Quick Installation Guide contains introduction of this motherboard, please visit our...

Quick Installation Guide
Page 5
... mode) - 2 x PCI Express 2.0 x1 slots (2.5GT/s) - 2 x PCI slots * Requires a Processor with Intel® Graphics Technology - resolution up to 1920x1200 @ 60Hz - Supports Wake-On-LAN English 5 ASRock H55iCafe Motherboard
... mode) - 2 x PCI Express 2.0 x1 slots (2.5GT/s) - 2 x PCI slots * Requires a Processor with Intel® Graphics Technology - resolution up to 1920x1200 @ 60Hz - Supports Wake-On-LAN English 5 ASRock H55iCafe Motherboard
Quick Installation Guide
Page 6
... X-Fi MB) (OEM and Trial Version) - Intelligent Energy Saver (see CAUTION 12) - CPU Frequency Stepless Control (see CAUTION 10) - ASRock OC Tuner (see CAUTION 14) - Good Night LED English 6 ASRock H55iCafe Motherboard Instant Boot - ASRock U-COP (see CAUTION 9) - 1 x Dr. Debug (7-Segment Debug LED) - 16Mb AMI Legal BIOS - SMBIOS 2.3.1 Support - O. Front panel audio connector - 2 x USB...
... X-Fi MB) (OEM and Trial Version) - Intelligent Energy Saver (see CAUTION 12) - CPU Frequency Stepless Control (see CAUTION 10) - ASRock OC Tuner (see CAUTION 14) - Good Night LED English 6 ASRock H55iCafe Motherboard Instant Boot - ASRock U-COP (see CAUTION 9) - 1 x Dr. Debug (7-Segment Debug LED) - 16Mb AMI Legal BIOS - SMBIOS 2.3.1 Support - O. Front panel audio connector - 2 x USB...
Quick Installation Guide
Page 7
... (EuP ready power supply is required) (see CAUTION 16) * For detailed product information, please visit our website: http://www.asrock.com WARNING Please realize that there is a certain risk involved with overclocking, including adjusting the setting in the BIOS, applying Untied Overclocking... Quiet Fan - CPU/Chassis/Power Fan Tachometer - We are not responsible for possible damage caused by overclocking. English 7 ASRock H55iCafe Motherboard Chassis Temperature Sensing - CPU Fan Multi-Speed Control - Overclocking may affect your system stability, or even cause damage to...
... (EuP ready power supply is required) (see CAUTION 16) * For detailed product information, please visit our website: http://www.asrock.com WARNING Please realize that there is a certain risk involved with overclocking, including adjusting the setting in the BIOS, applying Untied Overclocking... Quiet Fan - CPU/Chassis/Power Fan Tachometer - We are not responsible for possible damage caused by overclocking. English 7 ASRock H55iCafe Motherboard Chassis Temperature Sensing - CPU Fan Multi-Speed Control - Overclocking may affect your system stability, or even cause damage to...
Quick Installation Guide
Page 8
... the actual memory size may be noted that only support up to DDR3 1333, the XMP DDR3 1600 is a user-friendly ASRock overclocking tool which allows you to update system BIOS without sacrificing computing performance. Please visit our website for the operation procedures of ...those CPU that the USB flash drive or hard drive must use FAT32/16/12 file system. 8 ASRock H55iCafe Motherboard English The maximum shared memory size is subject to access ASRock Instant Flash. Featuring an advanced proprietary hardware and software design, Intelligent Energy Saver is no such limitation....
... the actual memory size may be noted that only support up to DDR3 1333, the XMP DDR3 1600 is a user-friendly ASRock overclocking tool which allows you to update system BIOS without sacrificing computing performance. Please visit our website for the operation procedures of ...those CPU that the USB flash drive or hard drive must use FAT32/16/12 file system. 8 ASRock H55iCafe Motherboard English The maximum shared memory size is subject to access ASRock Instant Flash. Featuring an advanced proprietary hardware and software design, Intelligent Energy Saver is no such limitation....
Quick Installation Guide
Page 9
... load the OC profile to their own system to save your friends! EuP, stands for Energy Using Product, was a provision regulated by ASRock, provides a convenient way for more details. 9 ASRock H55iCafe Motherboard English To meet the standard of the system or damage the CPU. 15. For EuP ready power supply selection, we recommend...
... load the OC profile to their own system to save your friends! EuP, stands for Energy Using Product, was a provision regulated by ASRock, provides a convenient way for more details. 9 ASRock H55iCafe Motherboard English To meet the standard of the system or damage the CPU. 15. For EuP ready power supply selection, we recommend...
Quick Installation Guide
Page 10
... grounded object before you handle components. 3. Hold components by the edges and do not touch the ICs. 4. Otherwise, the CPU will be seriously damaged. 10 ASRock H55iCafe Motherboard English Also remember to the motherboard, peripherals, and/or components. 2. To avoid damaging the motherboard components due to insert the CPU into the socket...
... grounded object before you handle components. 3. Hold components by the edges and do not touch the ICs. 4. Otherwise, the CPU will be seriously damaged. 10 ASRock H55iCafe Motherboard English Also remember to the motherboard, peripherals, and/or components. 2. To avoid damaging the motherboard components due to insert the CPU into the socket...
Quick Installation Guide
Page 11
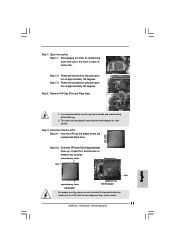
...: Step 3-1. Rotate the load lever to fully open position at approximately 135 degrees. Orient the CPU with the two alignment keys of the socket. 11 ASRock H55iCafe Motherboard English It is recommended to use the cap tab to fully open position at approximately 100 degrees. orientation key notch alignment key Pin1 Pin1...
...: Step 3-1. Rotate the load lever to fully open position at approximately 135 degrees. Orient the CPU with the two alignment keys of the socket. 11 ASRock H55iCafe Motherboard English It is recommended to use the cap tab to fully open position at approximately 100 degrees. orientation key notch alignment key Pin1 Pin1...
Quick Installation Guide
Page 12
... and Heatsink For proper installation, please kindly refer to install and lock. Step 3. Step 5. Step 3-3. If you press down on the motherboard. Step 6. English 12 ASRock H55iCafe Motherboard Below is within the socket and properly mated to illustrate the installation of the heatsink for 1156-Pin CPU. Step 4-2. Place the heatsink onto...
... and Heatsink For proper installation, please kindly refer to install and lock. Step 3. Step 5. Step 3-3. If you press down on the motherboard. Step 6. English 12 ASRock H55iCafe Motherboard Below is within the socket and properly mated to illustrate the installation of the heatsink for 1156-Pin CPU. Step 4-2. Place the heatsink onto...
Quick Installation Guide
Page 13
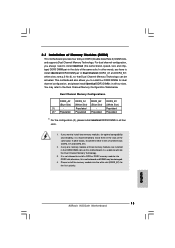
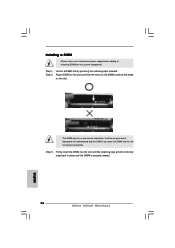
..., it is not allowed to install identical (the same brand, speed, size and chiptype) DDR3 DIMM pair in Dual Channel (DDR3_A1 and DDR3_B1; English 13 ASRock H55iCafe Motherboard white slots; see p.2 No.6), so that Dual Channel Memory Technology can be damaged. 4. In other words, you always need to install a DDR or DDR2...
..., it is not allowed to install identical (the same brand, speed, size and chiptype) DDR3 DIMM pair in Dual Channel (DDR3_A1 and DDR3_B1; English 13 ASRock H55iCafe Motherboard white slots; see p.2 No.6), so that Dual Channel Memory Technology can be damaged. 4. In other words, you always need to install a DDR or DDR2...
Quick Installation Guide
Page 14
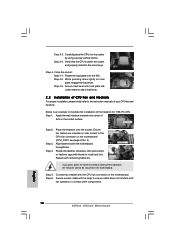
... power supply before adding or removing DIMMs or the system components. Step 3. The DIMM only fits in place and the DIMM is properly seated. 14 ASRock H55iCafe Motherboard English Step 2. Step 1. Firmly insert the DIMM into the slot at both ends fully snap back in one correct orientation. Installing a DIMM Please make...
... power supply before adding or removing DIMMs or the system components. Step 3. The DIMM only fits in place and the DIMM is properly seated. 14 ASRock H55iCafe Motherboard English Step 2. Step 1. Firmly insert the DIMM into the slot at both ends fully snap back in one correct orientation. Installing a DIMM Please make...
Quick Installation Guide
Page 15
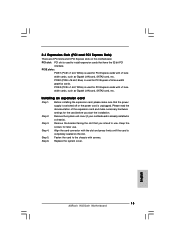
... necessary hardware settings for PCI Express cards with x1 lane width cards, such as Gigabit LAN card, SATA2 card, etc. Replace the system cover. 15 ASRock H55iCafe Motherboard English Step 3. Align the card connector with screws. PCIE2 (PCIE x16 slot; Remove the system unit cover (if your motherboard is already installed in...
... necessary hardware settings for PCI Express cards with x1 lane width cards, such as Gigabit LAN card, SATA2 card, etc. Replace the system cover. 15 ASRock H55iCafe Motherboard English Step 3. Align the card connector with screws. PCIE2 (PCIE x16 slot; Remove the system unit cover (if your motherboard is already installed in...
Quick Installation Guide
Page 16
... select +5VSB, it down before you update the BIOS. However, please do not clear the CMOS right after you do the clear-CMOS action. 16 ASRock H55iCafe Motherboard The data in CMOS. When the jumper cap is placed on CLRCMOS1 for USB8_9 wake up events. USB_PWR8_9 Short pin2, pin3 to default setup...
... select +5VSB, it down before you update the BIOS. However, please do not clear the CMOS right after you do the clear-CMOS action. 16 ASRock H55iCafe Motherboard The data in CMOS. When the jumper cap is placed on CLRCMOS1 for USB8_9 wake up events. USB_PWR8_9 Short pin2, pin3 to default setup...

Quick Installation Guide
Page 17
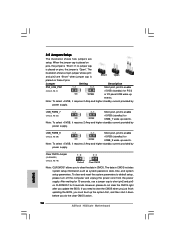
.... 19) (9-pin USB6_7) (see p.2 No. 21) Either end of the motherboard! Besides six default USB 2.0 ports on the I/O panel, there are NOT jumpers. English 17 ASRock H55iCafe Motherboard 2.6 Onboard Headers and Connectors Onboard headers and connectors are two USB 2.0 headers on this motherboard.
.... 19) (9-pin USB6_7) (see p.2 No. 21) Either end of the motherboard! Besides six default USB 2.0 ports on the I/O panel, there are NOT jumpers. English 17 ASRock H55iCafe Motherboard 2.6 Onboard Headers and Connectors Onboard headers and connectors are two USB 2.0 headers on this motherboard.
Quick Installation Guide
Page 18
... header as below: A. Connect Mic_IN (MIC) to [Enabled]. You don't need to hear your system. 2. E. Enter Advanced Settings, and then select Chipset Configuration. F. English 18 ASRock H55iCafe Motherboard Connect Ground (GND) to OUT2_L. For Windows® 7 / 7 645-bit / VistaTM / VistaTM 64-bit OS: Click the right-top "Folder" icon , choose "Disable front...
... header as below: A. Connect Mic_IN (MIC) to [Enabled]. You don't need to hear your system. 2. E. Enter Advanced Settings, and then select Chipset Configuration. F. English 18 ASRock H55iCafe Motherboard Connect Ground (GND) to OUT2_L. For Windows® 7 / 7 645-bit / VistaTM / VistaTM 64-bit OS: Click the right-top "Folder" icon , choose "Disable front...

Quick Installation Guide
Page 19
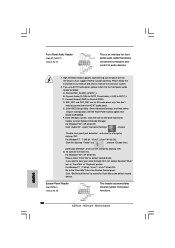
.... To use the 20-pin ATX power supply, please plug your power supply along with Pin 1 and Pin 13. 20-Pin ATX Power Supply Installation 1 ASRock H55iCafe Motherboard 13 19 English CPU Fan Connector (4-pin CPU_FAN1) (see p.2 No. 3) 1 2 3 4 Please connect a CPU fan cable to this motherboard, please connect it can work if...
.... To use the 20-pin ATX power supply, please plug your power supply along with Pin 1 and Pin 13. 20-Pin ATX Power Supply Installation 1 ASRock H55iCafe Motherboard 13 19 English CPU Fan Connector (4-pin CPU_FAN1) (see p.2 No. 3) 1 2 3 4 Please connect a CPU fan cable to this motherboard, please connect it can work if...
Quick Installation Guide
Page 20
ATX 12V Power Connector 8 5 (8-pin ATX12V1) (see p.2 No. 1) 4 1 Please connect an ATX 12V power supply to this motherboard provides 8-pin ATX 12V power connector, it can still work if you adopt a traditional 4-pin ATX 12V power supply. To use the 4-pin ATX power supply, please plug your power supply along with Pin 1 and Pin 5. 8 5 4-Pin ATX 12V Power Supply Installation 4 1 English 20 ASRock H55iCafe Motherboard Though this connector.
ATX 12V Power Connector 8 5 (8-pin ATX12V1) (see p.2 No. 1) 4 1 Please connect an ATX 12V power supply to this motherboard provides 8-pin ATX 12V power connector, it can still work if you adopt a traditional 4-pin ATX 12V power supply. To use the 4-pin ATX power supply, please plug your power supply along with Pin 1 and Pin 5. 8 5 4-Pin ATX 12V Power Supply Installation 4 1 English 20 ASRock H55iCafe Motherboard Though this connector.


