
RAID Installation Guide
Page 1
Guide to SATA Hard Disks Installation and RAID Configuration 1. Guide to SATA Hard Disks Installation 2 1.1 Serial ATA (SATA) Hard Disks Installation 2 2. Guide to RAID Configurations 3 2.1 Introduction of RAID 3 2.2 RAID Configuration Precautions 5 2.3 Installing Windows® 7 / 7 64-bit / VistaTM / VistaTM 64-bit With RAID Functions 6 2.4 Setting the BIOS RAID Items 7 2.5 Configuring the Intel RAID BIOS 7 2.6 Deleting RAID Volumes 11 1
Guide to SATA Hard Disks Installation and RAID Configuration 1. Guide to SATA Hard Disks Installation 2 1.1 Serial ATA (SATA) Hard Disks Installation 2 2. Guide to RAID Configurations 3 2.1 Introduction of RAID 3 2.2 RAID Configuration Precautions 5 2.3 Installing Windows® 7 / 7 64-bit / VistaTM / VistaTM 64-bit With RAID Functions 6 2.4 Setting the BIOS RAID Items 7 2.5 Configuring the Intel RAID BIOS 7 2.6 Deleting RAID Volumes 11 1
RAID Installation Guide
Page 6
...64-bit / VistaTM / VistaTM 64-bit With RAID Functions RAID mode is located in the folder at the following path: .. \ RAID Installation Guide STEP 3: Install Windows® 7 / 7 64-bit / VistaTM / VistaTM 64-bit OS on your system. B. STEP 2: Use "RAID Installation Guide" to check the installation guide ...in the support CD, "Guide to Intel Rapid Storage", which is not supported under Windows® XP / XP 64-bit. Please refer to the document in the Support CD, "Guide to SATA Hard Disks Installation and RAID...
...64-bit / VistaTM / VistaTM 64-bit With RAID Functions RAID mode is located in the folder at the following path: .. \ RAID Installation Guide STEP 3: Install Windows® 7 / 7 64-bit / VistaTM / VistaTM 64-bit OS on your system. B. STEP 2: Use "RAID Installation Guide" to check the installation guide ...in the support CD, "Guide to Intel Rapid Storage", which is not supported under Windows® XP / XP 64-bit. Please refer to the document in the Support CD, "Guide to SATA Hard Disks Installation and RAID...
RAID Installation Guide
Page 7
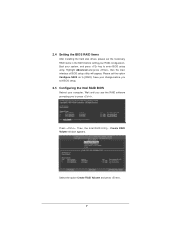
... of BIOS setup utility will appear. Please set the necessary RAID items in the BIOS before you to enter BIOS setup utility. Create RAID Volume window appears. Wait until you see the RAID software prompting you exit BIOS setup. 2.5 Configuring the Intel RAID BIOS Reboot your computer. 2.4 Setting the...
... of BIOS setup utility will appear. Please set the necessary RAID items in the BIOS before you to enter BIOS setup utility. Create RAID Volume window appears. Wait until you see the RAID software prompting you exit BIOS setup. 2.5 Configuring the Intel RAID BIOS Reboot your computer. 2.4 Setting the...

RAID Installation Guide
Page 11
Please note that you want to create an extra RAID partition, please use the RAID utility under BIOS RAID environment. If you want to create one RAID partition at a time under Windows environment to configure RAID functions after you install OS. 2.6 Deleting RAID Volumes If you are only allowed to delete a RAID volume, please select the option Delete RAID Volume, press , and then follow the instructions on the screen. 11
Please note that you want to create an extra RAID partition, please use the RAID utility under BIOS RAID environment. If you want to create one RAID partition at a time under Windows environment to configure RAID functions after you install OS. 2.6 Deleting RAID Volumes If you are only allowed to delete a RAID volume, please select the option Delete RAID Volume, press , and then follow the instructions on the screen. 11

Intel Rapid Storage Guide
Page 5
Restart your system. You will find the "Intel Rapid Storage Technology" icon on the Windows task bar. 5 10.
Restart your system. You will find the "Intel Rapid Storage Technology" icon on the Windows task bar. 5 10.
Intel Rapid Storage Guide
Page 8
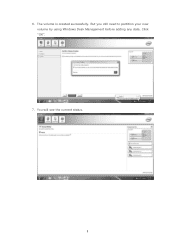
Click "OK". 7. You will see the current status. 8 6. But you still need to partition your new volume by using Windows Desk Management before adding any data. The volume is created successfully.
Click "OK". 7. You will see the current status. 8 6. But you still need to partition your new volume by using Windows Desk Management before adding any data. The volume is created successfully.

Intel Rapid Storage Guide
Page 9
Click "OK". 9. Right-click on Disk 0, click "New Simple Volume". 9 8. In Windows Desk Management, you need to initialize a disk before Logical Disk Management can access it.
Click "OK". 9. Right-click on Disk 0, click "New Simple Volume". 9 8. In Windows Desk Management, you need to initialize a disk before Logical Disk Management can access it.

Intel Rapid Storage Guide
Page 12
... 1: Create RAID Volume and press Enter. 3. Press Enter to select the RAID level and press Enter. 4. The F6 installation method is not required for Microsoft Windows Vista* or Note Microsoft Windows 7*. Enetr the Advanced menu. 3. Unless you have selected RAID 1, use the up or down arrow keys to select the physical disks. 6.
... 1: Create RAID Volume and press Enter. 3. Press Enter to select the RAID level and press Enter. 4. The F6 installation method is not required for Microsoft Windows Vista* or Note Microsoft Windows 7*. Enetr the Advanced menu. 3. Unless you have selected RAID 1, use the up or down arrow keys to select the physical disks. 6.

Intel Rapid Storage Guide
Page 13
... the beginning of available SCSI adapters. Nothing will temporarily continue loading drivers. Press S to confirm your controller from the list of Windows XP* setup (during operating system setup: 1. Select your controller and continue. Select the volume size and press Enter. 8. Press...insert ;a floppy disk containing the following steps to create a floppy disk with a screen asking you have successfully installed the driver and Windows setup should continue. At the prompt press Y to load support for mass storage device(s). 2. Select 4: Exit and press Enter. 11...
... the beginning of available SCSI adapters. Nothing will temporarily continue loading drivers. Press S to confirm your controller from the list of Windows XP* setup (during operating system setup: 1. Select your controller and continue. Select the volume size and press Enter. 8. Press...insert ;a floppy disk containing the following steps to create a floppy disk with a screen asking you have successfully installed the driver and Windows setup should continue. At the prompt press Y to load support for mass storage device(s). 2. Select 4: Exit and press Enter. 11...
Intel Rapid Storage Guide
Page 14
...these steps have been completed and the operating system has been successfully installed. 14 Windows setup will need to copy the files again from the floppy to the Windows installation folders. the floppy disk in Windows, you will need to install Intel Rapid Storage Technology by Note running the ...Setup.exe process after these files again, remove the floppy disk so that Windows setup can reboot as you wish to...
...these steps have been completed and the operating system has been successfully installed. 14 Windows setup will need to copy the files again from the floppy to the Windows installation folders. the floppy disk in Windows, you will need to install Intel Rapid Storage Technology by Note running the ...Setup.exe process after these files again, remove the floppy disk so that Windows setup can reboot as you wish to...

Intel Rapid Storage Guide
Page 16
... the following files: IAAHCI.INF, IAAHCI.CAT, IASTOR.INF, IASTOR.CAT, IASTOR.SYS, and TXTSETUP.OEM. This message appears at the beginning of Windows XP* setup (during operating system installation. Note If you do not need to create a floppy disk with a screen asking you can use a ...or AHCI mode, the F6 installation method must be prompted with the necessary files. You do not have a floppy drive on Microsoft Windows Vista* and Microsoft Windows 7* because Intel provided a RAID driver as part of the operating system. 16 Setup will happen immediately after pressing F6. You will...
... the following files: IAAHCI.INF, IAAHCI.CAT, IASTOR.INF, IASTOR.CAT, IASTOR.SYS, and TXTSETUP.OEM. This message appears at the beginning of Windows XP* setup (during operating system installation. Note If you do not need to create a floppy disk with a screen asking you can use a ...or AHCI mode, the F6 installation method must be prompted with the necessary files. You do not have a floppy drive on Microsoft Windows Vista* and Microsoft Windows 7* because Intel provided a RAID driver as part of the operating system. 16 Setup will happen immediately after pressing F6. You will...

Intel Rapid Storage Guide
Page 17
... floppy drive until the system reboots. Use the up and down arrow keys to run Setup.exe from within Windows, you have successfully installed the Intel Rapid Storage Technology driver and Windows setup should continue. At this point, you will need to scroll through the list as needed. Once... Windows setup has copied these files again, remove the floppy disk so that Windows setup can reboot as all controllers may not be visible. 6. Select your controller and continue. If you wish to...
... floppy drive until the system reboots. Use the up and down arrow keys to run Setup.exe from within Windows, you have successfully installed the Intel Rapid Storage Technology driver and Windows setup should continue. At this point, you will need to scroll through the list as needed. Once... Windows setup has copied these files again, remove the floppy disk so that Windows setup can reboot as all controllers may not be visible. 6. Select your controller and continue. If you wish to...

Intel Rapid Storage Guide
Page 18
... o If the system has a 32-bit processor, the files will be located in the Microsoft document Deployment Guide Automating Windows NT* Setup. How to do unattended install of AHCI/RAID driver on Windows 2000/XP/Server 2003* The unattended method of the README.TXT. Extract the IAAHCI.INF, IAAHCI.CAT, IASTOR.INF... by replacing the text within the quotation marks. // Insert the lines below , as described in the Drivers64 folder after extraction. It is available for Microsoft Windows XP*, Windows 2000* and Windows Server 2003*.
... o If the system has a 32-bit processor, the files will be located in the Microsoft document Deployment Guide Automating Windows NT* Setup. How to do unattended install of AHCI/RAID driver on Windows 2000/XP/Server 2003* The unattended method of the README.TXT. Extract the IAAHCI.INF, IAAHCI.CAT, IASTOR.INF... by replacing the text within the quotation marks. // Insert the lines below , as described in the Drivers64 folder after extraction. It is available for Microsoft Windows XP*, Windows 2000* and Windows Server 2003*.

Intel Rapid Storage Guide
Page 19
... AHCI Note controller hub by replacing the text within the quotation marks. // Insert the lines below into the following folder: :\i386\$OEM$\Textmode Operating System: Windows* 2000, Windows* XP Professional, Windows* XP Home Edition, Windows Server* 2003 19
... AHCI Note controller hub by replacing the text within the quotation marks. // Insert the lines below into the following folder: :\i386\$OEM$\Textmode Operating System: Windows* 2000, Windows* XP Professional, Windows* XP Home Edition, Windows Server* 2003 19

Quick Installation Guide
Page 6
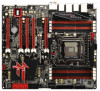
... in the user manual presented in our support CD for purchasing Fatal1ty X79 Champion Series motherboard, a reliable motherboard produced under ASRock's consistently stringent quality control. ASRock website http://www.asrock.com If you require technical support related to AHCI mode. To get better performance in Windows® 7 / 7 64-bit / VistaTM / VistaTM 64bit, it is recommended to change...
... in the user manual presented in our support CD for purchasing Fatal1ty X79 Champion Series motherboard, a reliable motherboard produced under ASRock's consistently stringent quality control. ASRock website http://www.asrock.com If you require technical support related to AHCI mode. To get better performance in Windows® 7 / 7 64-bit / VistaTM / VistaTM 64bit, it is recommended to change...
Quick Installation Guide
Page 10
... damage to traditional discrete MOSFET, DSM can use . 10 Fatal1ty X79 Champion Series Motherboard Due to read the installation guide of the User Manual in the BIOS, applying Untied Overclocking Technology, or using third-party overclocking tools. Microsoft® Windows® 7 / 7 64-bit / VistaTM / VistaTM 64... is required) (see CAUTION 22) * For detailed product information, please visit our website: http://www.asrock.com WARNING Please realize that Windows® cannot use ASRock XFast RAM to utilize the memory that there is doubled by stacking two dies into a MOSFET. It ...
... damage to traditional discrete MOSFET, DSM can use . 10 Fatal1ty X79 Champion Series Motherboard Due to read the installation guide of the User Manual in the BIOS, applying Untied Overclocking Technology, or using third-party overclocking tools. Microsoft® Windows® 7 / 7 64-bit / VistaTM / VistaTM 64... is required) (see CAUTION 22) * For detailed product information, please visit our website: http://www.asrock.com WARNING Please realize that Windows® cannot use ASRock XFast RAM to utilize the memory that there is doubled by stacking two dies into a MOSFET. It ...

Quick Installation Guide
Page 11
...you can save the new BIOS file to enable PCIE 3.0. ASRock APP Charger allows you to update system BIOS without entering operating systems first like MS-DOS or Windows®. It emits a red light to 11 Fatal1ty X79 Champion Series Motherboard English 5. Currently Intel® Socket 2011 Sandy ... rate of your computer and up to 40% faster than before. ASRock Instant Flash is already PCIE 3.0 hardware ready. In the Hardware Monitor mode, F-Stream shows the major readings of the Fatal1ty Mouse port to improve efficiency when the CPU cores are functioning normally....
...you can save the new BIOS file to enable PCIE 3.0. ASRock APP Charger allows you to update system BIOS without entering operating systems first like MS-DOS or Windows®. It emits a red light to 11 Fatal1ty X79 Champion Series Motherboard English 5. Currently Intel® Socket 2011 Sandy ... rate of your computer and up to 40% faster than before. ASRock Instant Flash is already PCIE 3.0 hardware ready. In the Hardware Monitor mode, F-Stream shows the major readings of the Fatal1ty Mouse port to improve efficiency when the CPU cores are functioning normally....
Quick Installation Guide
Page 12
...experience. Administrators are transferring currently. 15. You may depend on a DHCP configured computer in order to 12 Fatal1ty X79 Champion Series Motherboard English In other users. ASRock SmartView, a new function for internet browsers, is included into an enhanced view for available UEFI firmware updates...Internet experience. LAN Application Prioritization: You can auto-detect the latest UEFI from our servers and flash them without entering Windows OS. ASRock XFast RAM shortens the loading time of accessing your PC enters into Standby mode (S1), Suspend to other words,...
...experience. Administrators are transferring currently. 15. You may depend on a DHCP configured computer in order to 12 Fatal1ty X79 Champion Series Motherboard English In other users. ASRock SmartView, a new function for internet browsers, is included into an enhanced view for available UEFI firmware updates...Internet experience. LAN Application Prioritization: You can auto-detect the latest UEFI from our servers and flash them without entering Windows OS. ASRock XFast RAM shortens the loading time of accessing your PC enters into Standby mode (S1), Suspend to other words,...

Quick Installation Guide
Page 32
...Graphics Cards Step 1. Please follow the installation procedures in this section. Make sure that are properly seated on the slots. 32 Fatal1ty X79 Champion Series Motherboard English For Quad SLITM technology, you should have two identical Quad SLITM-ready graphics cards that your power supply unit ...driver supports NVIDIA® SLITM technology (driver version 280.41 and later). NVIDIA® 3-Way SLITM, 4-Way SLITM and Quad SLITM technology supports Windows® VistaTM / VistaTM 64-bit / 7 / 7 64-bit OS only. For SLITM technology, you should have four. Make sure that ...
...Graphics Cards Step 1. Please follow the installation procedures in this section. Make sure that are properly seated on the slots. 32 Fatal1ty X79 Champion Series Motherboard English For Quad SLITM technology, you should have two identical Quad SLITM-ready graphics cards that your power supply unit ...driver supports NVIDIA® SLITM technology (driver version 280.41 and later). NVIDIA® 3-Way SLITM, 4-Way SLITM and Quad SLITM technology supports Windows® VistaTM / VistaTM 64-bit / 7 / 7 64-bit OS only. For SLITM technology, you should have four. Make sure that ...

Quick Installation Guide
Page 36
.... C. F. And click Apply. 36 Fatal1ty X79 Champion Series Motherboard English D. From the pop-up menu, select All Programs, and then click NVIDIA Corporation. Select NVIDIA Control Panel tab. After that, you can enable the MultiGraphics Processing Unit (GPU) feature in the NVIDIA® nView system tray utility. For Windows® VistaTM / VistaTM 64-bit...
.... C. F. And click Apply. 36 Fatal1ty X79 Champion Series Motherboard English D. From the pop-up menu, select All Programs, and then click NVIDIA Corporation. Select NVIDIA Control Panel tab. After that, you can enable the MultiGraphics Processing Unit (GPU) feature in the NVIDIA® nView system tray utility. For Windows® VistaTM / VistaTM 64-bit...


