User Manual
Page 3
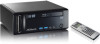
... HDD, ODD, memory and warranty seal) that have been damaged as a radiator. • Set up your system. • Do not use an extension cord, make sure that you follow all power, modem, and network cables from the power outlets before you use this product in the documentation before cleaning the system. • If you encounter the following safety instructions. No disassembly NOTE...
... HDD, ODD, memory and warranty seal) that have been damaged as a radiator. • Set up your system. • Do not use an extension cord, make sure that you follow all power, modem, and network cables from the power outlets before you use this product in the documentation before cleaning the system. • If you encounter the following safety instructions. No disassembly NOTE...
User Manual
Page 7
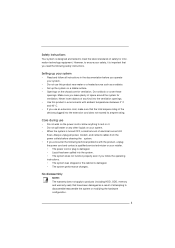
... Contents ASRock CoreHT Series ASRock Support CD ASRock Quick Start Guide One AC Power Cord One AC/DC Adapter One HDMI to quality and endurance. Because the hardware specifications and the BIOS software might be updated, the content of this product, please visit our website for purchasing ASRock CoreHT Series, a reliable product produced under ASRock's consistently stringent quality control. You may find the latest VGA cards and CPU support lists on ASRock website...
... Contents ASRock CoreHT Series ASRock Support CD ASRock Quick Start Guide One AC Power Cord One AC/DC Adapter One HDMI to quality and endurance. Because the hardware specifications and the BIOS software might be updated, the content of this product, please visit our website for purchasing ASRock CoreHT Series, a reliable product produced under ASRock's consistently stringent quality control. You may find the latest VGA cards and CPU support lists on ASRock website...

User Manual
Page 8
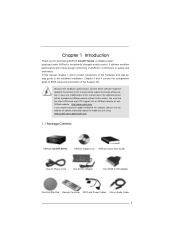
... Mobile Intel® HD Graphics 3000 HDD Supports 2.5" SATA HDD ODD Front I/O Rear I/O Sound BD Combo or DVD SuperMulti 2 x USB 3.0, 1 x MIC, 1 x Head Phone 1 x HDMI, 1 x D-Sub, 4 x USB 2.0, 5 Audio Jack with 1 x S/PDIF, 1 x eSATA3.0*2, 2 x USB 3.0 7.1 Ch HD Audio with THX TruStudio ProTM LAN Gigabit LAN WiFi Remote Controller 2T2R 802.11b/g/n wireless LAN Support MCE function Power 90W/19V Adapter Dimension 195mm(W)x70mm(H)x186m(L) Volume (liters) 2.5L *1 DDR3 1600 is supported in the BIOS, or using the third-party overclocking...
... Mobile Intel® HD Graphics 3000 HDD Supports 2.5" SATA HDD ODD Front I/O Rear I/O Sound BD Combo or DVD SuperMulti 2 x USB 3.0, 1 x MIC, 1 x Head Phone 1 x HDMI, 1 x D-Sub, 4 x USB 2.0, 5 Audio Jack with 1 x S/PDIF, 1 x eSATA3.0*2, 2 x USB 3.0 7.1 Ch HD Audio with THX TruStudio ProTM LAN Gigabit LAN WiFi Remote Controller 2T2R 802.11b/g/n wireless LAN Support MCE function Power 90W/19V Adapter Dimension 195mm(W)x70mm(H)x186m(L) Volume (liters) 2.5L *1 DDR3 1600 is supported in the BIOS, or using the third-party overclocking...

User Manual
Page 10
NOTE. 1. SATA and Power Connections SATA & Power Connections HDD ODD Connect to ODD Connect to HDD Connect to SATA Connector (11) Connect to ATX5V Power Connector (12) Connect to SATA Connector (13) 2. Fan Connection Fan connector Ground +12V Rotation Fan connector Ground +5V Rotation item 4 item 6 10
NOTE. 1. SATA and Power Connections SATA & Power Connections HDD ODD Connect to ODD Connect to HDD Connect to SATA Connector (11) Connect to ATX5V Power Connector (12) Connect to SATA Connector (13) 2. Fan Connection Fan connector Ground +12V Rotation Fan connector Ground +5V Rotation item 4 item 6 10
User Manual
Page 22
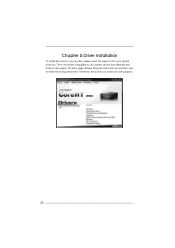
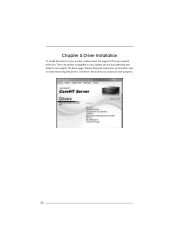
Please follow the order from up to bottom side to your optical drive first. Therefore, the drivers you install can be auto-detected and listed on the support CD driver page. Chapter 5 Driver Installation To install the drivers to your system, please insert the support CD to install those required drivers. Then, the drivers compatible to your system can work properly. 22
Please follow the order from up to bottom side to your optical drive first. Therefore, the drivers you install can be auto-detected and listed on the support CD driver page. Chapter 5 Driver Installation To install the drivers to your system, please insert the support CD to install those required drivers. Then, the drivers compatible to your system can work properly. 22
User Manual
Page 24
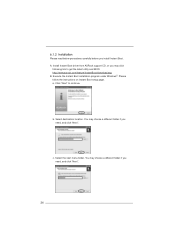
... location. a. b. You may click following link to continue. 6.1.2 Installation Please read below procedures carefully before you need , and click "Next". 24 You may choose a different folder if you may choose a different folder if you install Instant Boot. A. Select the start menu folder. Click "Next" to get the latest utility and BIOS: http://www.asrock.com/feature/InstantBoot/download.asp B. c. Install Instant Boot driver from ASRock support...
... location. a. b. You may click following link to continue. 6.1.2 Installation Please read below procedures carefully before you need , and click "Next". 24 You may choose a different folder if you may choose a different folder if you install Instant Boot. A. Select the start menu folder. Click "Next" to get the latest utility and BIOS: http://www.asrock.com/feature/InstantBoot/download.asp B. c. Install Instant Boot driver from ASRock support...
User Manual
Page 25
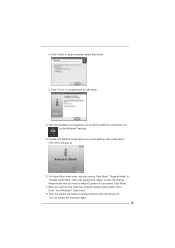
... Windows® "Start menu". G. After reentering into OS, the system will restart once automatically. After the installation is completed, you can choose "Fast Mode", "Regular Mode" or "Disable Instant Boot". E. Now, the system will shutdown again. 25 d. Click "Finish" to begin installing Instant Boot driver. On Instant Boot main menu, you will find an ASRock Instant Boot icon on the desktop, then Instant Boot main menu will...
... Windows® "Start menu". G. After reentering into OS, the system will restart once automatically. After the installation is completed, you can choose "Fast Mode", "Regular Mode" or "Disable Instant Boot". E. Now, the system will shutdown again. 25 d. Click "Finish" to begin installing Instant Boot driver. On Instant Boot main menu, you will find an ASRock Instant Boot icon on the desktop, then Instant Boot main menu will...
User Manual
Page 27
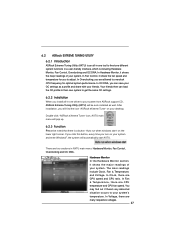
... same OC settings. 6.2.2 Installation When you are CPU speed and CPU ratio. Double-click "ASRock eXtreme Tuner" icon, AXTU main menu will find the icon "ASRock eXtreme Tuner" on the lower right corner. The main readings include Clock, Fan & Temperature, and Voltage. In Voltage, there are four sections in a user-friendly interface, which is a button "Auto run when windows start AXTU. In Hardware Monitor, it...
... same OC settings. 6.2.2 Installation When you are CPU speed and CPU ratio. Double-click "ASRock eXtreme Tuner" icon, AXTU main menu will find the icon "ASRock eXtreme Tuner" on the lower right corner. The main readings include Clock, Fan & Temperature, and Voltage. In Voltage, there are four sections in a user-friendly interface, which is a button "Auto run when windows start AXTU. In Hardware Monitor, it...

User Manual
Page 33
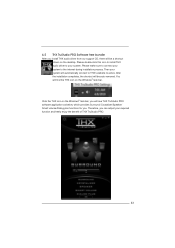
..., you will be auto-removed. Please make sure to connect your system to active. Click the THX icon on the Windows® task bar. 6.5 THX TruStudio PRO Software free bundle After you can adjust your required function and freely enjoy the benefit of THX TruStudio PRO. 33 Therefore, you install THX audio driver from our support CD, there will...
..., you will be auto-removed. Please make sure to connect your system to active. Click the THX icon on the Windows® task bar. 6.5 THX TruStudio PRO Software free bundle After you can adjust your required function and freely enjoy the benefit of THX TruStudio PRO. 33 Therefore, you install THX audio driver from our support CD, there will...
User Manual
Page 46
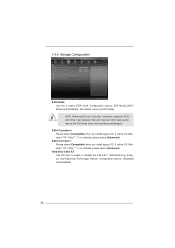
... Controller Interface) supports NCQ and other new features that will improve SATA disk performance but IDE mode does not have these advantages. SATA Controller 0 Please select [Compatible] when you install legacy OS. If native OS (Windows® XP / VistaTM / 7) is [AHCI Mode]. The default value is installed, please select [Enhanced]. Configuration options: [Disabled] and [Enabled]. 46 7.4.4 Storage Configuration SATA Mode Use this item to select SATA mode. Use this to enable or disable...
... Controller Interface) supports NCQ and other new features that will improve SATA disk performance but IDE mode does not have these advantages. SATA Controller 0 Please select [Compatible] when you install legacy OS. If native OS (Windows® XP / VistaTM / 7) is [AHCI Mode]. The default value is installed, please select [Enhanced]. Configuration options: [Disabled] and [Enabled]. 46 7.4.4 Storage Configuration SATA Mode Use this item to select SATA mode. Use this to enable or disable...
User Manual
Page 54
... about ASRock, welcome to activate the devices. 8.2.3 Utilities Menu The Utilities Menu shows the applications software that enhance the system features. 8.2.1 Running The Support CD To begin using the support CD, insert the CD into your computer. Chapter 8 Software Support 8.1 Install Operating System This system supports various Microsoft® Windows® operating systems: 7 / 7 64-bit / VistaTM / VistaTM 64-bit / XP / XP 64-bit. Refer to display the menus. 8.2.2 Drivers Menu The Drivers Menu...
... about ASRock, welcome to activate the devices. 8.2.3 Utilities Menu The Utilities Menu shows the applications software that enhance the system features. 8.2.1 Running The Support CD To begin using the support CD, insert the CD into your computer. Chapter 8 Software Support 8.1 Install Operating System This system supports various Microsoft® Windows® operating systems: 7 / 7 64-bit / VistaTM / VistaTM 64-bit / XP / XP 64-bit. Refer to display the menus. 8.2.2 Drivers Menu The Drivers Menu...

User Manual (CoreHT Server Series)
Page 3
... follow all power, modem, and network cables from the power outlets before you operate your safety, it . • Do not spill water or any kind into the ventilation openings. • Use this product near water or a heated source such as a result of attempting to disassemble/reassemble the system or modifying the hardware configuration. 3 Always unplug all instructions in...
... follow all power, modem, and network cables from the power outlets before you operate your safety, it . • Do not spill water or any kind into the ventilation openings. • Use this product near water or a heated source such as a result of attempting to disassemble/reassemble the system or modifying the hardware configuration. 3 Always unplug all instructions in...

User Manual (CoreHT Server Series)
Page 10
Fan Connection Fan connector Ground +12V Rotation Fan connector Ground +5V Rotation item 4 item 6 10 SATA and Power Connections SATA & Power Connections HDD ODD Connect to ODD Connect to HDD Connect to SATA Connector (11) Connect to ATX5V Power Connector (12) Connect to SATA Connector (13) 2. NOTE. 1.
Fan Connection Fan connector Ground +12V Rotation Fan connector Ground +5V Rotation item 4 item 6 10 SATA and Power Connections SATA & Power Connections HDD ODD Connect to ODD Connect to HDD Connect to SATA Connector (11) Connect to ATX5V Power Connector (12) Connect to SATA Connector (13) 2. NOTE. 1.
User Manual (CoreHT Server Series)
Page 22
Chapter 5 Driver Installation To install the drivers to your system, please insert the support CD to your system can work properly. 22 Please follow the order from up to bottom side to your optical drive first. Then, the drivers compatible to install those required drivers. Therefore, the drivers you install can be auto-detected and listed on the support CD driver page.
Chapter 5 Driver Installation To install the drivers to your system, please insert the support CD to your system can work properly. 22 Please follow the order from up to bottom side to your optical drive first. Then, the drivers compatible to install those required drivers. Therefore, the drivers you install can be auto-detected and listed on the support CD driver page.

User Manual (CoreHT Server Series)
Page 24
... to continue. Select destination location. Install Instant Boot driver from ASRock support CD, or you install Instant Boot. c. You may choose a different folder if you need , and click "Next". Execute the Instant Boot installation program under Windows®. Click "Next" to get the latest utility and BIOS: http://www.asrock.com/feature/InstantBoot/download.asp B. b. Please follow the instructions on Instant Boot setup page. A. Select the start menu folder. a. You may...
... to continue. Select destination location. Install Instant Boot driver from ASRock support CD, or you install Instant Boot. c. You may choose a different folder if you need , and click "Next". Execute the Instant Boot installation program under Windows®. Click "Next" to get the latest utility and BIOS: http://www.asrock.com/feature/InstantBoot/download.asp B. b. Please follow the instructions on Instant Boot setup page. A. Select the start menu folder. a. You may...

User Manual (CoreHT Server Series)
Page 25
... the change. e. C. After the installation is completed, you select "Fast Mode". E. Please notice that , please click "Apply" to keep AC power on the Windows® desktop. G. Now, the system will find an ASRock Instant Boot icon on if you will restart once automatically. d. When you can choose "Fast Mode", "Regular Mode" or "Disable Instant Boot". Click "Install" to complete and exit the setup.
... the change. e. C. After the installation is completed, you select "Fast Mode". E. Please notice that , please click "Apply" to keep AC power on the Windows® desktop. G. Now, the system will find an ASRock Instant Boot icon on if you will restart once automatically. d. When you can choose "Fast Mode", "Regular Mode" or "Disable Instant Boot". Click "Install" to complete and exit the setup.

User Manual (CoreHT Server Series)
Page 27
... that there is including Hardware Monitor, Fan Control, Overclocking and OC DNA. In Clock, there are four sections in AXTU main menu: Hardware Monitor, Fan Control, Overclocking and OC DNA. 6.2 ASRock EXTREME TUNING UTILITY 6.2.1 Introduction ASRock Extreme Tuning Utility (AXTU) is an all -in-one tool to fine-tune different system functions in a user-friendly interface, which is a button "Auto run when windows start AXTU. The main...
... that there is including Hardware Monitor, Fan Control, Overclocking and OC DNA. In Clock, there are four sections in AXTU main menu: Hardware Monitor, Fan Control, Overclocking and OC DNA. 6.2 ASRock EXTREME TUNING UTILITY 6.2.1 Introduction ASRock Extreme Tuning Utility (AXTU) is an all -in-one tool to fine-tune different system functions in a user-friendly interface, which is a button "Auto run when windows start AXTU. The main...
User Manual (CoreHT Server Series)
Page 33
... will automatically connect to THX's website to active. Click the THX icon on the Windows® task bar. Therefore, you can adjust your system will be a shortcut shown on the desktop. Please double-click this icon to install THX audio driver to the internet during installation process. 6.5 THX TruStudio PRO Software free bundle After you install THX audio driver from our support CD, there...
... will automatically connect to THX's website to active. Click the THX icon on the Windows® task bar. Therefore, you can adjust your system will be a shortcut shown on the desktop. Please double-click this icon to install THX audio driver to the internet during installation process. 6.5 THX TruStudio PRO Software free bundle After you install THX audio driver from our support CD, there...

User Manual (CoreHT Server Series)
Page 49
... Mode], [AHCI Mode], [RAID Mode] and [Disabled]. If native OS (Windows® XP / VistaTM / 7) is [AHCI Mode]. SATA Controller 1 Please select [Compatible] when you install legacy OS. Hard Disk S.M.A.R.T. Configuration options: [Disabled] and [Enabled]. 49 SATA Controller 0 Please select [Compatible] when you install legacy OS. The default value is installed, please select [Enhanced]. If native OS (Windows® XP / VistaTM / 7) is installed, please select [Enhanced]. Use this to enable or disable the S.M.A.R.T. (Self-Monitoring...
... Mode], [AHCI Mode], [RAID Mode] and [Disabled]. If native OS (Windows® XP / VistaTM / 7) is [AHCI Mode]. SATA Controller 1 Please select [Compatible] when you install legacy OS. Hard Disk S.M.A.R.T. Configuration options: [Disabled] and [Enabled]. 49 SATA Controller 0 Please select [Compatible] when you install legacy OS. The default value is installed, please select [Enhanced]. If native OS (Windows® XP / VistaTM / 7) is installed, please select [Enhanced]. Use this to enable or disable the S.M.A.R.T. (Self-Monitoring...

User Manual (CoreHT Server Series)
Page 57
... more about ASRock, welcome to your computer. The CD automatically displays the Main Menu if "AUTORUN" is enabled in the Support CD to activate the devices. 8.2.3 Utilities Menu The Utilities Menu shows the applications software that enhance the system features. 8.2.1 Running The Support CD To begin using the support CD, insert the CD into your CD-ROM drive. Chapter 8 Software Support 8.1 Install Operating System This system supports various Microsoft® Windows® operating systems...
... more about ASRock, welcome to your computer. The CD automatically displays the Main Menu if "AUTORUN" is enabled in the Support CD to activate the devices. 8.2.3 Utilities Menu The Utilities Menu shows the applications software that enhance the system features. 8.2.1 Running The Support CD To begin using the support CD, insert the CD into your CD-ROM drive. Chapter 8 Software Support 8.1 Install Operating System This system supports various Microsoft® Windows® operating systems...


