RAID Installation Guide
Page 1
... Windows XP / XP 64-bit With RAID Funtions 3 1.3.2 Installing Windows Vista / Vista 64-bit With RAID Funtions 4 1.4 Create Disk Array 5 2. AMD RAID Installation Guide 1. AMD BIOS RAID Installation Guide 2 1.1 Introduction to RAIDXpert from the Internet 17 2.9 Running RAIDXpert without Network Connection 17 1
... Windows XP / XP 64-bit With RAID Funtions 3 1.3.2 Installing Windows Vista / Vista 64-bit With RAID Funtions 4 1.4 Create Disk Array 5 2. AMD RAID Installation Guide 1. AMD BIOS RAID Installation Guide 2 1.1 Introduction to RAIDXpert from the Internet 17 2.9 Running RAIDXpert without Network Connection 17 1
RAID Installation Guide
Page 2
...JBOD JBOD stands for improved performance plus resiliency. RAID 10 (Stripe Mirroring) RAID 0 drives can start to use the onboard FastBuild BIOS utility to configure RAID. 1.1 Introduction to RAID The term "RAID" stands for you to configure RAID functions by following the detailed... instruction of the data in RAIDXpert, 2 After you can be mirrored using the onboard FastBuild BIOS utility under BIOS environment. AMD BIOS RAID Installation Guide AMD BIOS RAID Installation Guide is called data striping that copies and maintains an identical image of data from ...
...JBOD JBOD stands for improved performance plus resiliency. RAID 10 (Stripe Mirroring) RAID 0 drives can start to use the onboard FastBuild BIOS utility to configure RAID. 1.1 Introduction to RAID The term "RAID" stands for you to configure RAID functions by following the detailed... instruction of the data in RAIDXpert, 2 After you can be mirrored using the onboard FastBuild BIOS utility under BIOS environment. AMD BIOS RAID Installation Guide AMD BIOS RAID Installation Guide is called data striping that copies and maintains an identical image of data from ...
RAID Installation Guide
Page 4
...into your optical drive to boot your system. (There are two ASRock Support CD in this document for Windows XP / XP 64-bit.) B. During POST at the beginning of system boot-up BIOS. Please refer to the BIOS RAID installation guide part in the motherboard gift box pack, please ... to set the RAID configuration by using the Windows RAID installation guide in this RAID installation guide for boot devices selection appears. A. Enter BIOS SETUP UTILITY → Advanced screen →IDE Configuration. Select your required driver to install according to the OS you still need to check...
...into your optical drive to boot your system. (There are two ASRock Support CD in this document for Windows XP / XP 64-bit.) B. During POST at the beginning of system boot-up BIOS. Please refer to the BIOS RAID installation guide part in the motherboard gift box pack, please ... to set the RAID configuration by using the Windows RAID installation guide in this RAID installation guide for boot devices selection appears. A. Enter BIOS SETUP UTILITY → Advanced screen →IDE Configuration. Select your required driver to install according to the OS you still need to check...
RAID Installation Guide
Page 5
...Windows Vista or Windows Vista 64-bit on the bottom to the BIOS RAID installation guide part in the motherboard gift box pack, please choose the one for proper configuration. page, please insert the ASRock Support CD into the optical drive again to continue the installation. ...Enter BIOS SETUP UTILITY → Advanced screen →IDE Configuration. B. If you install Windows Vista / Windows Vista...
...Windows Vista or Windows Vista 64-bit on the bottom to the BIOS RAID installation guide part in the motherboard gift box pack, please choose the one for proper configuration. page, please insert the ASRock Support CD into the optical drive again to continue the installation. ...Enter BIOS SETUP UTILITY → Advanced screen →IDE Configuration. B. If you install Windows Vista / Windows Vista...

User Manual
Page 4
... 44 3.1 Introduction 44 3.1.1 BIOS Menu Bar 44 3.1.2 Navigation Keys 45 3.2 Main Screen 45 3.3 Advanced Screen 46 3.3.1 CPU Configuration 46 3.3.2 Chipset Configuration 51 3.3.3 ACPI Configuration 53 3.3.4 IDE Configuration 54 3.3.5 PCIPnP ...
... 44 3.1 Introduction 44 3.1.1 BIOS Menu Bar 44 3.1.2 Navigation Keys 45 3.2 Main Screen 45 3.3 Advanced Screen 46 3.3.1 CPU Configuration 46 3.3.2 Chipset Configuration 51 3.3.3 ACPI Configuration 53 3.3.4 IDE Configuration 54 3.3.5 PCIPnP ...

User Manual
Page 5
.... Because the motherboard specifications and the BIOS software might be updated, the content of this manual will be subject to change without further notice. www.asrock.com/support/index.asp 1.1 Package Contents 1 x ASRock A780FullDisplayPort Motherboard (Micro ATX Form Factor: 9.6-in x 9.6-in, 24.4 cm x 24.4 cm) 1 x ASRock A780FullDisplayPort Quick Installation Guide 2 x ASRock A780FullDisplayPort Support CD 1 x Ultra ATA 66/100...
.... Because the motherboard specifications and the BIOS software might be updated, the content of this manual will be subject to change without further notice. www.asrock.com/support/index.asp 1.1 Package Contents 1 x ASRock A780FullDisplayPort Motherboard (Micro ATX Form Factor: 9.6-in x 9.6-in, 24.4 cm x 24.4 cm) 1 x ASRock A780FullDisplayPort Quick Installation Guide 2 x ASRock A780FullDisplayPort Support CD 1 x Ultra ATA 66/100...
User Manual
Page 7
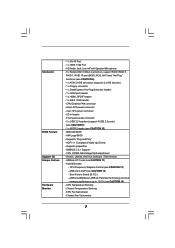
... - 2 x USB 2.0 headers (support 4 USB 2.0 ports) (see CAUTION 9) - 1 x WiFi/E header (see CAUTION 14) - ACPI 1.1 Compliance Wake Up Events - ASRock AM2 Boost: ASRock Patented Technology to boost memory performance up to 12.5% (see CAUTION 10) - 8Mb AMI BIOS - Drivers, Utilities, AntiVirus Software (Trial Version) - CPU/Chassis FAN connector - 24 pin ATX power connector - 4 pin 12V...
... - 2 x USB 2.0 headers (support 4 USB 2.0 ports) (see CAUTION 9) - 1 x WiFi/E header (see CAUTION 14) - ACPI 1.1 Compliance Wake Up Events - ASRock AM2 Boost: ASRock Patented Technology to boost memory performance up to 12.5% (see CAUTION 10) - 8Mb AMI BIOS - Drivers, Utilities, AntiVirus Software (Trial Version) - CPU/Chassis FAN connector - 24 pin ATX power connector - 4 pin 12V...

User Manual
Page 8
... (BD) / HD-DVD playback support on this motherboard requires the proper hardware configuration. This motherboard supports Dual Channel Memory Technology. ASRock website http://www.asrock.com 4. There are on the AM2+ CPU you want to adopt DDR2 1066 memory module on this motherboard, please refer to ...than 4GB for the reservation for the minimum hardware requirement and the passed 1080p Blu-ray (BD) / HD-DVD films in the BIOS, applying Untied Overclocking Technology, or using the thirdparty overclocking tools. If you adopt. The maximum shared memory size is defined by ...
... (BD) / HD-DVD playback support on this motherboard requires the proper hardware configuration. This motherboard supports Dual Channel Memory Technology. ASRock website http://www.asrock.com 4. There are on the AM2+ CPU you want to adopt DDR2 1066 memory module on this motherboard, please refer to ...than 4GB for the reservation for the minimum hardware requirement and the passed 1080p Blu-ray (BD) / HD-DVD films in the BIOS, applying Untied Overclocking Technology, or using the thirdparty overclocking tools. If you adopt. The maximum shared memory size is defined by ...

User Manual
Page 9
...: http://www.asrock.com 12. Although this function will overclock the chipset/CPU reference clock. 8. Before you resume the system, please check if the CPU fan on the AM2 CPU you adopt. If you to disable this function in the BIOS setup, the memory performance will automatically shutdown.... Please visit our website for keeping the stability of ASRock WiFi-802.11g or WiFi-802.11n module. You may choose to create a wireless ...
...: http://www.asrock.com 12. Although this function will overclock the chipset/CPU reference clock. 8. Before you resume the system, please check if the CPU fan on the AM2 CPU you adopt. If you to disable this function in the BIOS setup, the memory performance will automatically shutdown.... Please visit our website for keeping the stability of ASRock WiFi-802.11g or WiFi-802.11n module. You may choose to create a wireless ...
User Manual
Page 13
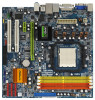
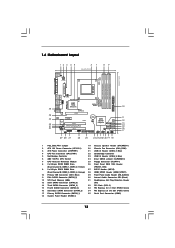
...: MIC IN LAN PHY 1 COM1 CPU_FAN1 Gigabit LAN AMD 780G Chipset PCI EXPRESS PCIE1 RoHS AUDIO CODEC PCIE2 Super I/O PCI1 1394a IR1 A780FullDisplayPort 1 CD1 1 HD_AUDIO1 1 HDMI_SPDIF1 WIFI/E 1 PCI2 FRONT_1394 1 FLOPPY1 FSB2.6GHz PCI Express 2.0 Dual Channel DDR2 800 IDE1 SATAII RAID ...CMOS BATTERY CLRCMOS1 1 AMD SB700 Chipset 8Mb BIOS SATAII_5 SATAII_6 USB8_9 1 CHA_FAN1 USB6_7 1 SATAII_3 SATAII_4 SATAII_1 SATAII_2 SPEAKER1 1 PANEL 1 PLED PWRBTN 1 HDLED RESET 29 28 27 26 25...
...: MIC IN LAN PHY 1 COM1 CPU_FAN1 Gigabit LAN AMD 780G Chipset PCI EXPRESS PCIE1 RoHS AUDIO CODEC PCIE2 Super I/O PCI1 1394a IR1 A780FullDisplayPort 1 CD1 1 HD_AUDIO1 1 HDMI_SPDIF1 WIFI/E 1 PCI2 FRONT_1394 1 FLOPPY1 FSB2.6GHz PCI Express 2.0 Dual Channel DDR2 800 IDE1 SATAII RAID ...CMOS BATTERY CLRCMOS1 1 AMD SB700 Chipset 8Mb BIOS SATAII_5 SATAII_6 USB8_9 1 CHA_FAN1 USB6_7 1 SATAII_3 SATAII_4 SATAII_1 SATAII_2 SPEAKER1 1 PANEL 1 PLED PWRBTN 1 HDLED RESET 29 28 27 26 25...

User Manual
Page 23
...PCI Express VGA card driver (if you select is my main monitor" and "Extend the desktop onto this monitor". Click the "Identify" button to enter BIOS setup. Click "Extend my Windows desktop onto this motherboard. 4. Set the "Screen Resolution" and "Color Quality" as Secondary. A. Click the number "2" ...adjust the memory capability to [32MB], [64MB], [128MB] [256MB] or [512MB] to install them again. 5. If you do not adjust the BIOS setup, the default value of the multi-monitor according to save your card, one , two, three and four. Right-click the display icon and ...
...PCI Express VGA card driver (if you select is my main monitor" and "Extend the desktop onto this monitor". Click the "Identify" button to enter BIOS setup. Click "Extend my Windows desktop onto this motherboard. 4. Set the "Screen Resolution" and "Color Quality" as Secondary. A. Click the number "2" ...adjust the memory capability to [32MB], [64MB], [128MB] [256MB] or [512MB] to install them again. 5. If you do not adjust the BIOS setup, the default value of the multi-monitor according to save your card, one , two, three and four. Right-click the display icon and ...
User Manual
Page 25
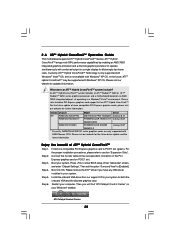
... or ATITM RadeonTM 3450 series graphics processor and a motherboard based on your system for further information. For the proper installation procedures, please refer to enter BIOS setup. Step 4. Boot into OS. Step 6. Restart your system. ATITM Hybrid CrossFireXTM brings multi-GPU performance capabilities by enabling an AMD 780G integrated graphics processor...
... or ATITM RadeonTM 3450 series graphics processor and a motherboard based on your system for further information. For the proper installation procedures, please refer to enter BIOS setup. Step 4. Boot into OS. Step 6. Restart your system. ATITM Hybrid CrossFireXTM brings multi-GPU performance capabilities by enabling an AMD 780G integrated graphics processor...
User Manual
Page 27
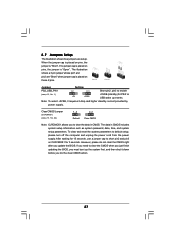
... setup information such as system password, date, time, and system setup parameters. If you need to clear the CMOS when you just finish updating the BIOS, you must boot up events. When the jumper cap is placed on these 2 pins. Clear CMOS Jumper (CLRCMOS1) (see p.13, No. 1) +5V +5VSB +5VSB (standby... CMOS. To clear and reset the system parameters to enable (see p.13, No. 24) 1_2 2_3 Default Clear CMOS Note: CLRCMOS1 allows you update the BIOS. Note: To select +5VSB, it down before you do not clear the CMOS right after you to short pin2 and pin3 on pins, the jumper...
... setup information such as system password, date, time, and system setup parameters. If you need to clear the CMOS when you just finish updating the BIOS, you must boot up events. When the jumper cap is placed on these 2 pins. Clear CMOS Jumper (CLRCMOS1) (see p.13, No. 1) +5V +5VSB +5VSB (standby... CMOS. To clear and reset the system parameters to enable (see p.13, No. 24) 1_2 2_3 Default Clear CMOS Note: CLRCMOS1 allows you update the BIOS. Note: To select +5VSB, it down before you do not clear the CMOS right after you to short pin2 and pin3 on pins, the jumper...
User Manual
Page 30
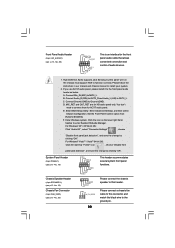
... cable to this header. Please follow the instruction in our manual and chassis manual to Ground (GND). B. Connect Ground (GND) to install your system. 2. Enter BIOS Setup Utility. D. Set the Front Panel Control option from [Auto] to this connector and match the black wire to enter Realtek HD Audio Manager. F. For...
... cable to this header. Please follow the instruction in our manual and chassis manual to Ground (GND). B. Connect Ground (GND) to install your system. 2. Enter BIOS Setup Utility. D. Set the Front Panel Control option from [Auto] to this connector and match the black wire to enter Realtek HD Audio Manager. F. For...
User Manual
Page 39
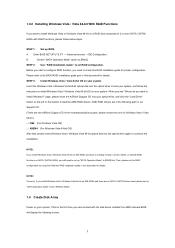
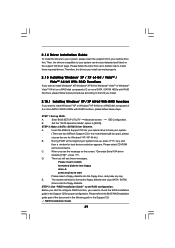
...proper configuration. Set the "SATA Operation Mode" option to set RAID configuration. STEP 2: Make a SATA / SATAII Driver Diskette. Insert the ASRock Support CD into the floppy drive, and press any key to start to configure RAID function, you start Please insert a floppy diskette into...With RAID Functions If you see these messages, Please insert a blank formatted diskette into floppy drive A: press any key. Enter BIOS SETUP UTILITY Advanced screen IDE Configuration. Please follow below procedures according to check the RAID installation guide in the Support CD for ...
...proper configuration. Set the "SATA Operation Mode" option to set RAID configuration. STEP 2: Make a SATA / SATAII Driver Diskette. Insert the ASRock Support CD into the floppy drive, and press any key to start to configure RAID function, you start Please insert a floppy diskette into...With RAID Functions If you see these messages, Please insert a blank formatted diskette into floppy drive A: press any key. Enter BIOS SETUP UTILITY Advanced screen IDE Configuration. Please follow below procedures according to check the RAID installation guide in the Support CD for ...
User Manual
Page 40
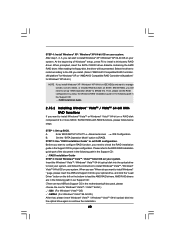
...bit optical disk into your optical drive, and click the "Load Driver" button on the left on your system. " page, please insert the ASRock Support CD into the optical drive to boot your system, and follow below steps. STEP 1: Set up "SATA Operation Mode" to manage (create,... you install Windows® XP / Windows® XP 64-bit on your system. Then, please set up BIOS. B. AMD RAID drivers are in the following path in our Support CD: (There are two ASRock Support CD in the Support CD: .. \ RAID Installation Guide STEP 3: Install Windows® VistaTM / VistaTM 64...
...bit optical disk into your optical drive, and click the "Load Driver" button on the left on your system. " page, please insert the ASRock Support CD into the optical drive to boot your system, and follow below steps. STEP 1: Set up "SATA Operation Mode" to manage (create,... you install Windows® XP / Windows® XP 64-bit on your system. Then, please set up BIOS. B. AMD RAID drivers are in the following path in our Support CD: (There are two ASRock Support CD in the Support CD: .. \ RAID Installation Guide STEP 3: Install Windows® VistaTM / VistaTM 64...
User Manual
Page 41
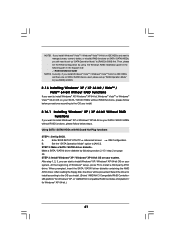
... (create, convert, delete, or rebuild) RAID functions on your system. At the beginning of Windows® setup, press F6 to [AHCI]. Enter BIOS SETUP UTILITY Advanced screen IDE Configuration. STEP 2: Make a SATA / SATAII driver diskette. When prompted, insert the SATA / SATAII driver diskette containing the...174; VistaTM 64-bit on IDE HDDs and there are no SATA / SATAII device used, please set the RAID configuration by following path in BIOS. 2.16 Installing Windows® XP / XP 64-bit / VistaTM / VistaTM 64-bit Without RAID Functions If you want to install Windows®...
... (create, convert, delete, or rebuild) RAID functions on your system. At the beginning of Windows® setup, press F6 to [AHCI]. Enter BIOS SETUP UTILITY Advanced screen IDE Configuration. STEP 2: Make a SATA / SATAII driver diskette. When prompted, insert the SATA / SATAII driver diskette containing the...174; VistaTM 64-bit on IDE HDDs and there are no SATA / SATAII device used, please set the RAID configuration by following path in BIOS. 2.16 Installing Windows® XP / XP 64-bit / VistaTM / VistaTM 64-bit Without RAID Functions If you want to install Windows®...
User Manual
Page 42
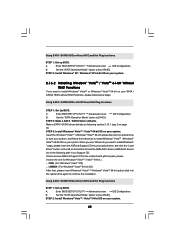
... system. A. Set the "SATA Operation Mode" option to [AHCI]. B. A. Enter BIOS SETUP UTILITY Advanced screen IDE Configuration. Set the "SATA Operation Mode" option to [non-RAID]. AMD AHCI drivers are two ASRock Support CD in the following section 2.15.1 step 2 on your system. 42 Using ...® VistaTM 64-bit on page 39. Using SATA / SATAII HDDs with NCQ and Hot Plug functions STEP 1: Set Up BIOS. " page, please insert the ASRock Support CD into the optical drive again to [non-RAID]. A. Using SATA / SATAII HDDs without NCQ and Hot Plug functions ...
... system. A. Set the "SATA Operation Mode" option to [AHCI]. B. A. Enter BIOS SETUP UTILITY Advanced screen IDE Configuration. Set the "SATA Operation Mode" option to [non-RAID]. AMD AHCI drivers are two ASRock Support CD in the following section 2.15.1 step 2 on your system. 42 Using ...® VistaTM 64-bit on page 39. Using SATA / SATAII HDDs with NCQ and Hot Plug functions STEP 1: Set Up BIOS. " page, please insert the ASRock Support CD into the optical drive again to [non-RAID]. A. Using SATA / SATAII HDDs without NCQ and Hot Plug functions ...
User Manual
Page 43
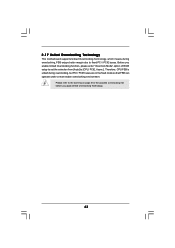
..., Async.]. Please refer to the warning on page 8 for the possible overclocking risk before you enable Untied Overclocking function, please enter "Overclock Mode" option of BIOS setup to set the selection from [Auto] to fixed PCI / PCIE buses. Before you apply Untied Overclocking Technology. 43 2.17 Untied Overclocking Technology This motherboard...
..., Async.]. Please refer to the warning on page 8 for the possible overclocking risk before you enable Untied Overclocking function, please enter "Overclock Mode" option of BIOS setup to set the selection from [Auto] to fixed PCI / PCIE buses. Before you apply Untied Overclocking Technology. 43 2.17 Untied Overclocking Technology This motherboard...
User Manual
Page 44
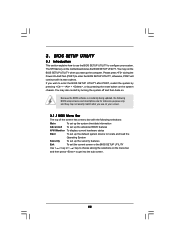
... load the Operating System Security To set up the computer. If you start up the security features Exit To exit the current screen or the BIOS SETUP UTILITY Use < > key or < > key to choose among the selections on the system chassis. You may not exactly match what you see ...on your system. The SPI Memory on . 3. BIOS SETUP UTILITY 3.1 Introduction This section explains how to use the BIOS SETUP UTILITY to get into the sub screen. 44 Because the BIOS software is constantly being updated, the following selections: Main To set up the system time...
... load the Operating System Security To set up the computer. If you start up the security features Exit To exit the current screen or the BIOS SETUP UTILITY Use < > key or < > key to choose among the selections on the system chassis. You may not exactly match what you see ...on your system. The SPI Memory on . 3. BIOS SETUP UTILITY 3.1 Introduction This section explains how to use the BIOS SETUP UTILITY to get into the sub screen. 44 Because the BIOS software is constantly being updated, the following selections: Main To set up the system time...


