RAID Installation Guide
Page 4
...BIOS SETUP UTILITY → Advanced screen →IDE Configuration. Please select CD-ROM as the boot device. After making a SATA / SATAII driver diskette and set the RAID configuration by using the Windows RAID installation guide in this document for details. 4 Then, please set RAID configuration, you can start Please insert a floppy diskette into your optical drive to install a third-party RAID driver. 1.3.1 Installing Windows XP / XP 64-bit With RAID Functions If you install. (Select "AMD AHCI Compatible RAID Controller-x86 platform" for Windows XP, or "AMD AHCI Compatible...
...BIOS SETUP UTILITY → Advanced screen →IDE Configuration. Please select CD-ROM as the boot device. After making a SATA / SATAII driver diskette and set the RAID configuration by using the Windows RAID installation guide in this document for details. 4 Then, please set RAID configuration, you can start Please insert a floppy diskette into your optical drive to install a third-party RAID driver. 1.3.1 Installing Windows XP / XP 64-bit With RAID Functions If you install. (Select "AMD AHCI Compatible RAID Controller-x86 platform" for Windows XP, or "AMD AHCI Compatible...
RAID Installation Guide
Page 5
... to install Windows Vista or Windows Vista 64-bit on a RAID disk composed of 2 or more SATA / SATAII HDDs with the disk drives installed, the AMD onboard BIOS will display the following path in our Support CD: (There are no SATA / SATAII device used, please set the RAID configuration by using the Windows RAID installation guide in BIOS. 1.4 Create Disk Array Power on your system. Enter BIOS SETUP UTILITY → Advanced screen →IDE Configuration. B. STEP 3: Install Windows Vista / Vista 64-bit OS on your optical drive, and click the "Load Driver" button on...
... to install Windows Vista or Windows Vista 64-bit on a RAID disk composed of 2 or more SATA / SATAII HDDs with the disk drives installed, the AMD onboard BIOS will display the following path in our Support CD: (There are no SATA / SATAII device used, please set the RAID configuration by using the Windows RAID installation guide in BIOS. 1.4 Create Disk Array Power on your system. Enter BIOS SETUP UTILITY → Advanced screen →IDE Configuration. B. STEP 3: Install Windows Vista / Vista 64-bit OS on your optical drive, and click the "Load Driver" button on...

RAID Installation Guide
Page 10
... drive maintenance, rebuild, and access to avoid incompatibility issues with any other JREs that exist anywhere on your Windows-based PC or Server. 1. Boot the PC or server, launch Windows, and log in order to access RAIDXpert over the network. 2.3 Installing RAIDXpert Follow these steps to work with AMD SB700 SATA RAID controllers. Double-click the Install CD's icon to configure RAID functions by using RAIDXpert RAID management software...
... drive maintenance, rebuild, and access to avoid incompatibility issues with any other JREs that exist anywhere on your Windows-based PC or Server. 1. Boot the PC or server, launch Windows, and log in order to access RAIDXpert over the network. 2.3 Installing RAIDXpert Follow these steps to work with AMD SB700 SATA RAID controllers. Double-click the Install CD's icon to configure RAID functions by using RAIDXpert RAID management software...
User Manual
Page 13
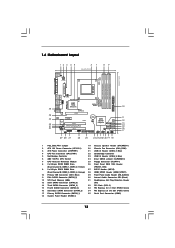
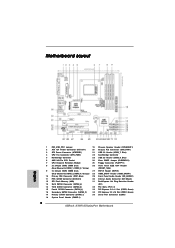
....6GHz PCI Express 2.0 Dual Channel DDR2 800 IDE1 SATAII RAID CMOS BATTERY CLRCMOS1 1 AMD SB700 Chipset 8Mb BIOS SATAII_5 SATAII_6 USB8_9 1 CHA_FAN1 USB6_7 1 SATAII_3 SATAII_4 SATAII_1 SATAII_2 SPEAKER1 1 PANEL 1 PLED PWRBTN 1 HDLED RESET 29 28 27 26 25 24 23 22 2120 19 18 10 11 12 13 14 15 16 17 1 PS2_USB_PW1 Jumper 19 Chassis Speaker Header (SPEAKER 1) 2 ATX 12V Power Connector (ATX12V1) 20 Chassis Fan Connector (CHA_FAN1) 3 ATX Power Connector (ATXPWR1) 21 USB 2.0 Header (USB6_7, Blue) 4 CPU Fan Connector...
....6GHz PCI Express 2.0 Dual Channel DDR2 800 IDE1 SATAII RAID CMOS BATTERY CLRCMOS1 1 AMD SB700 Chipset 8Mb BIOS SATAII_5 SATAII_6 USB8_9 1 CHA_FAN1 USB6_7 1 SATAII_3 SATAII_4 SATAII_1 SATAII_2 SPEAKER1 1 PANEL 1 PLED PWRBTN 1 HDLED RESET 29 28 27 26 25 24 23 22 2120 19 18 10 11 12 13 14 15 16 17 1 PS2_USB_PW1 Jumper 19 Chassis Speaker Header (SPEAKER 1) 2 ATX 12V Power Connector (ATX12V1) 20 Chassis Fan Connector (CHA_FAN1) 3 ATX Power Connector (ATXPWR1) 21 USB 2.0 Header (USB6_7, Blue) 4 CPU Fan Connector...
User Manual
Page 22
... monitors. ASRock DisplayPort Card PCIE1 slot ASRock DisplayPort Card 22 In the motherboard giftbox package, you want this motherboard, your motherboard will be able to use dual monitor function on PCI Express VGA card. As long as you can find one of the two monitors instead of surround display feature. You can start to support DisplayPort devices. Therefore, you can also choose to install the ATITM PCI Express VGA card on this motherboard to support DisplayPort devices, please install ASRock DisplayPort Card on PCI Express VGA card...
... monitors. ASRock DisplayPort Card PCIE1 slot ASRock DisplayPort Card 22 In the motherboard giftbox package, you want this motherboard, your motherboard will be able to use dual monitor function on PCI Express VGA card. As long as you can find one of the two monitors instead of surround display feature. You can start to support DisplayPort devices. Therefore, you can also choose to install the ATITM PCI Express VGA card on this motherboard to support DisplayPort devices, please install ASRock DisplayPort Card on PCI Express VGA card...
User Manual
Page 29
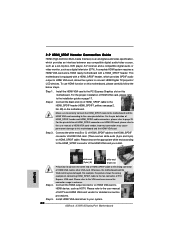
... six default USB 2.0 ports on the I/O panel, there are two USB 2.0 headers on each drive. USB 2.0 Headers (9-pin USB8_9) (see p.13 No. 23) (9-pin USB6_7) (see p.13 No. 30) CD1 CD-L GND GND CD-R 29 This header supports the Hot Plug detection function for proper installation. Serial ATA (SATA) Power Cable (Optional) connect to the SATA HDD power connector connect to the power supply Please connect the black end of SATA power cable to receive stereo audio input from sound sources such as a 4-Pin USB 2.0 header to...
... six default USB 2.0 ports on the I/O panel, there are two USB 2.0 headers on each drive. USB 2.0 Headers (9-pin USB8_9) (see p.13 No. 23) (9-pin USB6_7) (see p.13 No. 30) CD1 CD-L GND GND CD-R 29 This header supports the Hot Plug detection function for proper installation. Serial ATA (SATA) Power Cable (Optional) connect to the SATA HDD power connector connect to the power supply Please connect the black end of SATA power cable to receive stereo audio input from sound sources such as a 4-Pin USB 2.0 header to...
User Manual
Page 33
... installation guide on page 20. Step 3. For example, this motherboard. Connect the black end (A) of PCI Express VGA card. A complete HDMI system requires a HDMI VGA card and a HDMI ready motherboard with a HDMI_SPDIF header, which provides an interface between any compatible digital audio/video source, such as a set-top box, DVD player, A/V receiver and a compatible digital audio or video monitor, such as HDTV. For the proper installation of HDMI VGA card, please refer to the fan connector of HDMI_SPDIF cable to the PCI Express Graphics slot...
... installation guide on page 20. Step 3. For example, this motherboard. Connect the black end (A) of PCI Express VGA card. A complete HDMI system requires a HDMI VGA card and a HDMI ready motherboard with a HDMI_SPDIF header, which provides an interface between any compatible digital audio/video source, such as a set-top box, DVD player, A/V receiver and a compatible digital audio or video monitor, such as HDTV. For the proper installation of HDMI VGA card, please refer to the fan connector of HDMI_SPDIF cable to the PCI Express Graphics slot...
User Manual
Page 39
Enter BIOS SETUP UTILITY Advanced screen IDE Configuration. During POST at the beginning of system boot-up, press key, and then a window for Windows® XP / XP 64-bit.) B. Therefore, the drivers you install can be auto-detected and listed on the support CD driver page. When you need to format the floppy diskette and copy SATA / SATAII drivers into the floppy drive, and press any key. Then, the drivers compatible to your system can work properly. 2.15 Installing Windows®...
Enter BIOS SETUP UTILITY Advanced screen IDE Configuration. During POST at the beginning of system boot-up, press key, and then a window for Windows® XP / XP 64-bit.) B. Therefore, the drivers you install can be auto-detected and listed on the support CD driver page. When you need to format the floppy diskette and copy SATA / SATAII drivers into the floppy drive, and press any key. Then, the drivers compatible to your system can work properly. 2.15 Installing Windows®...
User Manual
Page 40
... IDE HDDs and want to install Windows? When prompted, insert the SATA / SATAII driver diskette containing the AMD RAID driver. Enter BIOS SETUP UTILITY Advanced screen IDE Configuration. Please refer to set up BIOS. If you install Windows® XP / Windows® XP 64-bit on a RAID disk composed of 2 or more SATA / SATAII HDDs with RAID functions, please follow the instruction to [RAID]. AMD RAID drivers are two ASRock Support CD in the Support CD for proper configuration. Before you start to check the RAID installation guide in the motherboard...
... IDE HDDs and want to install Windows? When prompted, insert the SATA / SATAII driver diskette containing the AMD RAID driver. Enter BIOS SETUP UTILITY Advanced screen IDE Configuration. Please refer to set up BIOS. If you install Windows® XP / Windows® XP 64-bit on a RAID disk composed of 2 or more SATA / SATAII HDDs with RAID functions, please follow the instruction to [RAID]. AMD RAID drivers are two ASRock Support CD in the Support CD for proper configuration. Before you start to check the RAID installation guide in the motherboard...
User Manual
Page 41
... set the RAID configuration by following path in BIOS first. Using SATA / SATAII HDDs with NCQ and Hot Plug functions STEP 1: Set Up BIOS. B. STEP 3: Install Windows® XP / Windows® XP 64-bit OS on SATA / SATAII HDDs, you install Windows® VistaTM / Windows® VistaTM 64-bit on IDE HDDs and want to install Windows® XP / Windows® XP 64-bit OS on your system. After step 1, 2, 3, you install. (Select "AMD AHCI Compatible RAID Controller- After reading the floppy disk, the driver...
... set the RAID configuration by following path in BIOS first. Using SATA / SATAII HDDs with NCQ and Hot Plug functions STEP 1: Set Up BIOS. B. STEP 3: Install Windows® XP / Windows® XP 64-bit OS on SATA / SATAII HDDs, you install Windows® VistaTM / Windows® VistaTM 64-bit on IDE HDDs and want to install Windows® XP / Windows® XP 64-bit OS on your system. After step 1, 2, 3, you install. (Select "AMD AHCI Compatible RAID Controller- After reading the floppy disk, the driver...

User Manual
Page 54
... the following instruction, which can not be applied to power on SATA / SATAII HDDs, please select [RAID]. Configuration options: [AHCI], [RAID] and [non-RAID]. * If you plan to use the "IDE1 Master" as well. 54 We will use this motherboard to enable or disable ACPI HPET Table. ACPI HPET Table Use this option to [Enabled] if you select [RAID] mode, SATA / SATAII HDDs can be accessed until you finish configuring RAID functions in NVIDIA BIOS / Windows RAID Utility. IDE Device Configuration You may set this...
... the following instruction, which can not be applied to power on SATA / SATAII HDDs, please select [RAID]. Configuration options: [AHCI], [RAID] and [non-RAID]. * If you plan to use the "IDE1 Master" as well. 54 We will use this motherboard to enable or disable ACPI HPET Table. ACPI HPET Table Use this option to [Enabled] if you select [RAID] mode, SATA / SATAII HDDs can be accessed until you finish configuring RAID functions in NVIDIA BIOS / Windows RAID Utility. IDE Device Configuration You may set this...
User Manual
Page 56
.... PCI IDE BusMaster Use this item to keep the default value unless the installed PCI expansion cards' specifications require other settings. PCI Latency Timer The default value is recommended to enable or disable the S.M.A.R.T. (Self-Monitoring, Analysis, and Reporting Technology) feature. Use this item to malfunction. Configuration options: [Disabled], [Auto], [Enabled]. 32Bit Data Transfer Use this item to enable 32-bit access to maximize the IDE hard disk data transfer rate. 3.3.5 PCIPnP Configuration BIOS SETUP UTILITY Advanced Advanced PCI / PnP Settings PCI Latency Timer PCI IDE...
.... PCI IDE BusMaster Use this item to keep the default value unless the installed PCI expansion cards' specifications require other settings. PCI Latency Timer The default value is recommended to enable or disable the S.M.A.R.T. (Self-Monitoring, Analysis, and Reporting Technology) feature. Use this item to malfunction. Configuration options: [Disabled], [Auto], [Enabled]. 32Bit Data Transfer Use this item to enable 32-bit access to maximize the IDE hard disk data transfer rate. 3.3.5 PCIPnP Configuration BIOS SETUP UTILITY Advanced Advanced PCI / PnP Settings PCI Latency Timer PCI IDE...
User Manual
Page 58
... To enable or disable the onboard USB controllers. +F1 F9 F10 ESC Select Screen Select Item Change Option General Help Load Defaults Save and Exit Exit v02.54 (C) Copyright 1985-2003, American Megatrends, Inc. USB devices are four configuration options: [Enabled], [Auto], [Disabled] and [BIOS Setup Only]. The default value is recommended to select [Disabled] to use only under legacy OS and BIOS setup when [Disabled] is selected. Enables legacy support if USB devices are not allowed to enter OS. [BIOS Setup Only] - USB devices are connected. [Disabled] - USB Controller Use...
... To enable or disable the onboard USB controllers. +F1 F9 F10 ESC Select Screen Select Item Change Option General Help Load Defaults Save and Exit Exit v02.54 (C) Copyright 1985-2003, American Megatrends, Inc. USB devices are four configuration options: [Enabled], [Auto], [Disabled] and [BIOS Setup Only]. The default value is recommended to select [Disabled] to use only under legacy OS and BIOS setup when [Disabled] is selected. Enables legacy support if USB devices are not allowed to enter OS. [BIOS Setup Only] - USB devices are connected. [Disabled] - USB Controller Use...
User Manual
Page 63
... about ASRock, welcome to your CD-ROM drive. Click on the file "ASSETUP.EXE" from the BIN folder in the Support CD to know more information. 4.2 Support CD Information The Support CD that came with the motherboard contains necessary drivers and useful utilities that the motherboard supports. Software Support 4.1 Install Operating System This motherboard supports various Microsoft® Windows® operating systems: XP / XP Media Center / XP 64-bit / VistaTM...
... about ASRock, welcome to your CD-ROM drive. Click on the file "ASSETUP.EXE" from the BIN folder in the Support CD to know more information. 4.2 Support CD Information The Support CD that came with the motherboard contains necessary drivers and useful utilities that the motherboard supports. Software Support 4.1 Install Operating System This motherboard supports various Microsoft® Windows® operating systems: XP / XP Media Center / XP 64-bit / VistaTM...
Quick Installation Guide
Page 2
...(SPEAKER 1) 2 ATX 12V Power Connector (ATX12V1) 20 Chassis Fan Connector (CHA_FAN1) 3 ATX Power Connector (ATXPWR1) 21 USB 2.0 Header (USB6_7, Blue) 4 CPU Fan Connector (CPU_FAN1) 22 Southbridge Controller 5 Northbridge Controller 23 USB 2.0 Header (USB8_9, Blue) 6 AM2 940-Pin CPU Socket 24 Clear CMOS Jumper (CLRCMOS1) 7 CPU Heatsink Retention Module 25 Floppy Connector (FLOPPY1) 8 2 x 240-pin DDR2 DIMM Slots 26 Front Panel IEEE 1394 Header (Dual Channel A: DDRII_1, DDRII_2; Orange) 28 HDMI_SPDIF Header (HDMI_SPDIF1) 10 Primary IDE Connector (IDE1, Blue) 29 Front Panel Audio...
...(SPEAKER 1) 2 ATX 12V Power Connector (ATX12V1) 20 Chassis Fan Connector (CHA_FAN1) 3 ATX Power Connector (ATXPWR1) 21 USB 2.0 Header (USB6_7, Blue) 4 CPU Fan Connector (CPU_FAN1) 22 Southbridge Controller 5 Northbridge Controller 23 USB 2.0 Header (USB8_9, Blue) 6 AM2 940-Pin CPU Socket 24 Clear CMOS Jumper (CLRCMOS1) 7 CPU Heatsink Retention Module 25 Floppy Connector (FLOPPY1) 8 2 x 240-pin DDR2 DIMM Slots 26 Front Panel IEEE 1394 Header (Dual Channel A: DDRII_1, DDRII_2; Orange) 28 HDMI_SPDIF Header (HDMI_SPDIF1) 10 Primary IDE Connector (IDE1, Blue) 29 Front Panel Audio...

Quick Installation Guide
Page 19
...This motherboard supports surround display upgrade. In the motherboard giftbox package, you want this motherboard. If you can start to use dual monitor function on this motherboard also supports DisplayPort output option. VGA/DVI-D port DVI-to set up a surround display environment: 1. If you haven't installed onboard VGA driver yet, please install onboard VGA driver from our support CD to support DisplayPort devices. If you have installed onboard VGA driver from our support CD to support DisplayPort devices, please install ASRock DisplayPort Card on PCI Express VGA card...
...This motherboard supports surround display upgrade. In the motherboard giftbox package, you want this motherboard. If you can start to use dual monitor function on this motherboard also supports DisplayPort output option. VGA/DVI-D port DVI-to set up a surround display environment: 1. If you haven't installed onboard VGA driver yet, please install onboard VGA driver from our support CD to support DisplayPort devices. If you have installed onboard VGA driver from our support CD to support DisplayPort devices, please install ASRock DisplayPort Card on PCI Express VGA card...
Quick Installation Guide
Page 30
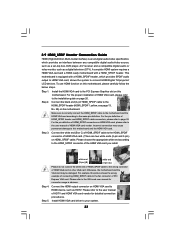
... wrong connector of HDMI VGA card, please refer to the VGA card user manual for detailed connection procedures. Please refer to connect HDMI Digital TV/projector/ LCD devices. This motherboard is an all-digital audio/video specification, which provides SPDIF audio output to HDMI VGA card, allows the system to the user manual of HDMI_SPDIF connectors on this motherboard, please carefully follow the below steps. •Step 1. For the proper installation of HDMI VGA card or other VGA card. 2.9 HDMI_SPDIF Header Connection Guide HDMI (High-Definition...
... wrong connector of HDMI VGA card, please refer to the VGA card user manual for detailed connection procedures. Please refer to connect HDMI Digital TV/projector/ LCD devices. This motherboard is an all-digital audio/video specification, which provides SPDIF audio output to HDMI VGA card, allows the system to the user manual of HDMI_SPDIF connectors on this motherboard, please carefully follow the below steps. •Step 1. For the proper installation of HDMI VGA card or other VGA card. 2.9 HDMI_SPDIF Header Connection Guide HDMI (High-Definition...

Quick Installation Guide
Page 33
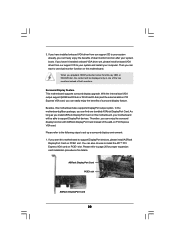
... boot device. Before you start Please insert a floppy diskette into your system. (There are two ASRock Support CD in the motherboard gift box pack, please choose the one for Windows® XP / XP 64-bit.) B. Enter BIOS SETUP UTILITY Advanced screen IDE Configuration. Insert the ASRock Support CD into the floppy drive, and press any key. E. Then, the drivers compatible to the BIOS RAID installation guide part of the document in the following path in the Support CD: .. \ RAID Installation Guide 33 ASRock A780FullDisplayPort Motherboard...
... boot device. Before you start Please insert a floppy diskette into your system. (There are two ASRock Support CD in the motherboard gift box pack, please choose the one for Windows® XP / XP 64-bit.) B. Enter BIOS SETUP UTILITY Advanced screen IDE Configuration. Insert the ASRock Support CD into the floppy drive, and press any key. E. Then, the drivers compatible to the BIOS RAID installation guide part of the document in the following path in the Support CD: .. \ RAID Installation Guide 33 ASRock A780FullDisplayPort Motherboard...
Quick Installation Guide
Page 34
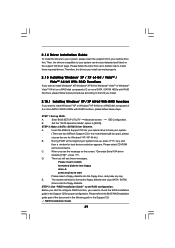
... the BIOS RAID installation guide part of the document in the following path in the Support CD: .. \ RAID Installation Guide 2.14.2 Installing Windows® VistaTM / VistaTM 64-bit With RAID Functions If you install. (Select "AMD AHCI Compatible RAID Controllerx86 platform" for Windows® XP, or "AMD AHCI Compatible RAID Controller-x64 platform" for proper configuration. " page, please insert the ASRock Support CD into the optical drive again to continue the installation. 34 ASRock A780FullDisplayPort Motherboard English STEP 1: Set up "SATA Operation Mode" to [RAID] first...
... the BIOS RAID installation guide part of the document in the following path in the Support CD: .. \ RAID Installation Guide 2.14.2 Installing Windows® VistaTM / VistaTM 64-bit With RAID Functions If you install. (Select "AMD AHCI Compatible RAID Controllerx86 platform" for Windows® XP, or "AMD AHCI Compatible RAID Controller-x64 platform" for proper configuration. " page, please insert the ASRock Support CD into the optical drive again to continue the installation. 34 ASRock A780FullDisplayPort Motherboard English STEP 1: Set up "SATA Operation Mode" to [RAID] first...
Quick Installation Guide
Page 35
... / Windows® XP 64-bit OS on IDE HDDs and there are no SATA / SATAII device used, please set up "SATA Operation Mode" to [RAID] in the Support CD: .. \ RAID Installation Guide NOTE2. When prompted, insert the SATA / SATAII driver diskette containing the AMD AHCI driver. x86 platform" for Windows® XP, or "AMD AHCI Compatible RAID Controller-x64 platform" for Windows® XP 64-bit.) English 35 ASRock A780FullDisplayPort Motherboard Enter BIOS SETUP UTILITY Advanced screen IDE Configuration. Set the "SATA Operation Mode" option to install a third-party AHCI driver. At...
... / Windows® XP 64-bit OS on IDE HDDs and there are no SATA / SATAII device used, please set up "SATA Operation Mode" to [RAID] in the Support CD: .. \ RAID Installation Guide NOTE2. When prompted, insert the SATA / SATAII driver diskette containing the AMD AHCI driver. x86 platform" for Windows® XP, or "AMD AHCI Compatible RAID Controller-x64 platform" for Windows® XP 64-bit.) English 35 ASRock A780FullDisplayPort Motherboard Enter BIOS SETUP UTILITY Advanced screen IDE Configuration. Set the "SATA Operation Mode" option to install a third-party AHCI driver. At...


