User Manual
Page 17
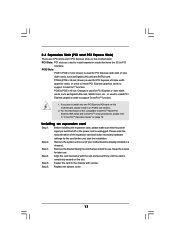
... off or the power cord is used to install expansion cards that you intend to support CrossFireTM function. Installing an expansion card Step 1. Step 2. Align the card connector with x1 lane width cards, such as Gigabit LAN card, SATA2 card, etc., or used to install PCI Express graphics cards to use . Green) is unplugged. Orange) is completely seated...
... off or the power cord is used to install expansion cards that you intend to support CrossFireTM function. Installing an expansion card Step 1. Step 2. Align the card connector with x1 lane width cards, such as Gigabit LAN card, SATA2 card, etc., or used to install PCI Express graphics cards to use . Green) is unplugged. Orange) is completely seated...

User Manual
Page 18
Currently CrossFireTM feature is supported with Windows® XP with CrossFireTM? What graphics cards work with Service Pack 2 and VistaTM OS. For Windows® XP Vendor Chipset Model Driver ATI Radeon 4850...Radeon HD 2600PRO MSI RX2600PRO-T2D256EZ Catalyst 8.9 18 A complete CrossFireTM system requires a CrossFireTM Ready motherboard, a CrossFireTM Edition graphics card and a compatible standard Radeon (CrossFireTM Ready) graphics card from ATITM or any 3D application. Please refer to below table for ATITM CrossFireTM driver updates. CrossFireTM technology offers the ...
Currently CrossFireTM feature is supported with Windows® XP with CrossFireTM? What graphics cards work with Service Pack 2 and VistaTM OS. For Windows® XP Vendor Chipset Model Driver ATI Radeon 4850...Radeon HD 2600PRO MSI RX2600PRO-T2D256EZ Catalyst 8.9 18 A complete CrossFireTM system requires a CrossFireTM Ready motherboard, a CrossFireTM Edition graphics card and a compatible standard Radeon (CrossFireTM Ready) graphics card from ATITM or any 3D application. Please refer to below table for ATITM CrossFireTM driver updates. CrossFireTM technology offers the ...

User Manual
Page 19
...the proper installation procedures, please refer to your graphics card vendor for detailed installation guide. Step 3. Please refer to section "Expansion Slots". 1. Step 1. Connect two Radeon graphics cards by installing two CrossFireTM Bridge on CrossFireTM Bridge ...graphics card to PCIE3 slot. Install the other CrossFireTM cards that ATITM has released or will not see the performance benefits of Radeon graphics cards. (CrossFireTM Bridge is provided with the graphics card you pair a 12-pipe CrossFireTM Edition card with this motherboard. For other Radeon graphics card...
...the proper installation procedures, please refer to your graphics card vendor for detailed installation guide. Step 3. Please refer to section "Expansion Slots". 1. Step 1. Connect two Radeon graphics cards by installing two CrossFireTM Bridge on CrossFireTM Bridge ...graphics card to PCIE3 slot. Install the other CrossFireTM cards that ATITM has released or will not see the performance benefits of Radeon graphics cards. (CrossFireTM Bridge is provided with the graphics card you pair a 12-pipe CrossFireTM Edition card with this motherboard. For other Radeon graphics card...
User Manual
Page 20
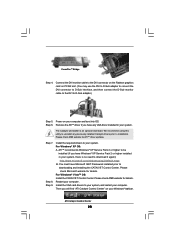
Connect the DVI monitor cable to the DVI connector on the Radeon graphics card on PCIE2 slot. (You may use the DVI to D-Sub adapter to convert the DVI connector to D-Sub interface, and then connect the D-Sub monitor ..., there is an optional download. Restart your computer. Step 6. We recommend using this utility to your system, and restart your computer. Step 9. Install the VGA card drivers to uninstall any VGA driver installed in your Windows® taskbar. Then you have Windows® XP Service Pack 2 or higher installed in your...
Connect the DVI monitor cable to the DVI connector on the Radeon graphics card on PCIE2 slot. (You may use the DVI to D-Sub adapter to convert the DVI connector to D-Sub interface, and then connect the D-Sub monitor ..., there is an optional download. Restart your computer. Step 6. We recommend using this utility to your system, and restart your computer. Step 9. Install the VGA card drivers to uninstall any VGA driver installed in your Windows® taskbar. Then you have Windows® XP Service Pack 2 or higher installed in your...

User Manual
Page 28
...follow the below steps. •Step 1. For the proper installation of HDMI VGA card, please refer to the installation guide on this picture shows the wrong example of connecting HDMI_SPDIF cable to the PCI Express Graphics slot on page 17. Make sure to correctly connect the HDMI_SPDIF cable to the ...motherboard and the HDMI VGA card according to your system. 28 Install the HDMI VGA card to the fan connector of HDTV and HDMI VGA...
...follow the below steps. •Step 1. For the proper installation of HDMI VGA card, please refer to the installation guide on this picture shows the wrong example of connecting HDMI_SPDIF cable to the PCI Express Graphics slot on page 17. Make sure to correctly connect the HDMI_SPDIF cable to the ...motherboard and the HDMI VGA card according to your system. 28 Install the HDMI VGA card to the fan connector of HDTV and HDMI VGA...
User Manual
Page 48
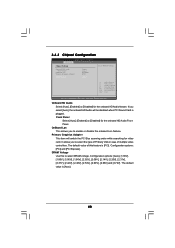
If you select [Auto], the onboard HD Audio will switch the PCI Bus scanning order while searching for video card. Configuration options: [Auto], [1.80V], [1.85V], [1.90V], [1.96V], [2.02V], [2.08V], [2.14V], [2.20V], [2.31V], [2.37V], [2.42V], [2.48V], [2.54V], [2.60V], [2.66V] ...]. Configuration options: [PCI] and [PCI Express]. 3.4.3 Chipset Configuration BIOS SETUP UTILITY Advanced Chipset Settings Onboard HD Audio Front Panel OnBoard Lan Primary Graphics Adapter DRAM Voltage [Auto] [Auto] [Enabled] [PCI] [Auto] To set DRAM Voltage. +F1 F9 F10 ESC Select Screen Select Item Change...
If you select [Auto], the onboard HD Audio will switch the PCI Bus scanning order while searching for video card. Configuration options: [Auto], [1.80V], [1.85V], [1.90V], [1.96V], [2.02V], [2.08V], [2.14V], [2.20V], [2.31V], [2.37V], [2.42V], [2.48V], [2.54V], [2.60V], [2.66V] ...]. Configuration options: [PCI] and [PCI Express]. 3.4.3 Chipset Configuration BIOS SETUP UTILITY Advanced Chipset Settings Onboard HD Audio Front Panel OnBoard Lan Primary Graphics Adapter DRAM Voltage [Auto] [Auto] [Enabled] [PCI] [Auto] To set DRAM Voltage. +F1 F9 F10 ESC Select Screen Select Item Change...
Quick Installation Guide
Page 14
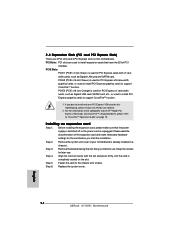
... you intend to support CrossFireTM function. Step 2. Fasten the card to the chassis with the slot and press firmly until the card is used to install PCI Express graphics cards to use . Replace the system cover. 14 ASRock A770DE+ Motherboard English For the information of the expansion card and make sure that you plan to "CrossFireTM Operation...
... you intend to support CrossFireTM function. Step 2. Fasten the card to the chassis with the slot and press firmly until the card is used to install PCI Express graphics cards to use . Replace the system cover. 14 ASRock A770DE+ Motherboard English For the information of the expansion card and make sure that you plan to "CrossFireTM Operation...
Quick Installation Guide
Page 15
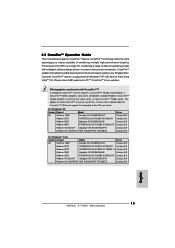
A complete CrossFireTM system requires a CrossFireTM Ready motherboard, a CrossFireTM Edition graphics card and a compatible standard Radeon (CrossFireTM Ready) graphics card from ATITM or any 3D application. This applies to the OS you install. Combining... 8.9 English 15 ASRock A770DE+ Motherboard Currently CrossFireTM feature is supported with Windows® XP with CrossFireTM? CrossFireTM technology offers the most advantageous means available of its partners. Please refer to below table for ATITM CrossFireTM driver updates. What graphics cards work with Service Pack...
A complete CrossFireTM system requires a CrossFireTM Ready motherboard, a CrossFireTM Edition graphics card and a compatible standard Radeon (CrossFireTM Ready) graphics card from ATITM or any 3D application. This applies to the OS you install. Combining... 8.9 English 15 ASRock A770DE+ Motherboard Currently CrossFireTM feature is supported with Windows® XP with CrossFireTM? CrossFireTM technology offers the most advantageous means available of its partners. Please refer to below table for ATITM CrossFireTM driver updates. What graphics cards work with Service Pack...

Quick Installation Guide
Page 16
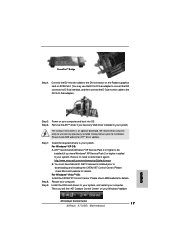
... system they will operate as the example graphics card. All three CrossFireTM components, a CrossFireTM Ready graphics card, a CrossFireTM Ready motherboard and a CrossFireTM Edition co-processor graphics card, must be installed correctly to section "Expansion Slots". For other Radeon graphics card to ATITM graphics card manuals for details.) 16 ASRock A770DE+ Motherboard Install the other CrossFireTM cards that ATITM has released or will release...
... system they will operate as the example graphics card. All three CrossFireTM components, a CrossFireTM Ready graphics card, a CrossFireTM Ready motherboard and a CrossFireTM Edition co-processor graphics card, must be installed correctly to section "Expansion Slots". For other Radeon graphics card to ATITM graphics card manuals for details.) 16 ASRock A770DE+ Motherboard Install the other CrossFireTM cards that ATITM has released or will release...
Quick Installation Guide
Page 17
... to your system, and restart your computer. Connect the DVI monitor cable to the DVI connector on the Radeon graphics card on PCIE2 slot. (You may use the DVI to D-Sub adapter to convert the DVI connector to D-Sub interface, and then connect the D-Sub monitor ....mspx B. You must have Windows® XP Service Pack 2 or higher installed in your system, there is an optional download. ATI Catalyst Control Center 17 ASRock A770DE+ Motherboard English Remove the ATITM driver if you will find "ATI Catalyst Control Center" on your system. We recommend using this utility to uninstall any...
... to your system, and restart your computer. Connect the DVI monitor cable to the DVI connector on the Radeon graphics card on PCIE2 slot. (You may use the DVI to D-Sub adapter to convert the DVI connector to D-Sub interface, and then connect the D-Sub monitor ....mspx B. You must have Windows® XP Service Pack 2 or higher installed in your system, there is an optional download. ATI Catalyst Control Center 17 ASRock A770DE+ Motherboard English Remove the ATITM driver if you will find "ATI Catalyst Control Center" on your system. We recommend using this utility to uninstall any...


