

RAID Installation Guide
Page 1
AMD Windows RAID Installation Guide 16 1 AMD RAID Installation Guide 1. AMD BIOS RAID Installation Guide ...2 1.1 Introduction to RAID...2 1.2 RAID Configurations Precautions 4 1.3 Legacy RAID ROM Configuration (for AMD X370, B350, and A320 Chipsets 5 1.4 UEFI RAID Configuration (for AMD X399, X370, B350, and A320 Chipsets 11 2.
AMD Windows RAID Installation Guide 16 1 AMD RAID Installation Guide 1. AMD BIOS RAID Installation Guide ...2 1.1 Introduction to RAID...2 1.2 RAID Configurations Precautions 4 1.3 Legacy RAID ROM Configuration (for AMD X370, B350, and A320 Chipsets 5 1.4 UEFI RAID Configuration (for AMD X399, X370, B350, and A320 Chipsets 11 2.

RAID Installation Guide
Page 8
E. During Windows installation process, when Disk selection page show up, please click . D. During system boot, press or key to finish the configuration. A. B. STEP 3.1: Copy RAID driver to a ... the USB port. Go to find the driver inside your USB flash disk. STEP 4: Windows installation A. B. Plug a USB drive into the DVD-ROM drive. Please download the "SATA Floppy Imaged driver" from ASRock's website A. STEP 3.2: Download driver from ASRock's website and unzip the file into your USB flash drive. 8 Click to Tools...
E. During Windows installation process, when Disk selection page show up, please click . D. During system boot, press or key to finish the configuration. A. B. STEP 3.1: Copy RAID driver to a ... the USB port. Go to find the driver inside your USB flash disk. STEP 4: Windows installation A. B. Plug a USB drive into the DVD-ROM drive. Please download the "SATA Floppy Imaged driver" from ASRock's website A. STEP 3.2: Download driver from ASRock's website and unzip the file into your USB flash drive. 8 Click to Tools...

RAID Installation Guide
Page 9
For 32bit OS, the driver is under /I386 directory. D. Select "AMD-RAID Bottom Device" and then click . F. Click again to find the driver inside your USB flash drive. 9 Click again to find the driver inside your Windows version (Windows 10). E. C. Select "AMD-RAID Controller storport" and then click . Please select the correct driver for your USB flash drive. G. For 64bit OS, the driver is under /AMD64 directly.
For 32bit OS, the driver is under /I386 directory. D. Select "AMD-RAID Bottom Device" and then click . F. Click again to find the driver inside your USB flash drive. 9 Click again to find the driver inside your Windows version (Windows 10). E. C. Select "AMD-RAID Controller storport" and then click . Please select the correct driver for your USB flash drive. G. For 64bit OS, the driver is under /AMD64 directly.

RAID Installation Guide
Page 10
H. Select "AMD-RAID Config Device" and then click . Please follow Windows installation instruction to finish the process. 10 After RAID driver is loaded, the RAID disk will show up. I. J.
H. Select "AMD-RAID Config Device" and then click . Please follow Windows installation instruction to finish the process. 10 After RAID driver is loaded, the RAID disk will show up. I. J.

RAID Installation Guide
Page 13
C. Please select the correct driver for your USB flash drive. Select "AMD-RAID Bottom Device" and then click . 13 During Windows installation process, when Disk selection page show up, please click . For 64bit OS, the driver is under /AMD64 directly. D. Click to find the driver inside your Windows version (Windows 10). For 32bit OS, the driver is under /I386 directory. B. STEP 3: Windows installation A.
C. Please select the correct driver for your USB flash drive. Select "AMD-RAID Bottom Device" and then click . 13 During Windows installation process, when Disk selection page show up, please click . For 64bit OS, the driver is under /AMD64 directly. D. Click to find the driver inside your Windows version (Windows 10). For 32bit OS, the driver is under /I386 directory. B. STEP 3: Windows installation A.

RAID Installation Guide
Page 15
After RAID driver is loaded, the RAID disk will show up. J. Please follow Windows installation instruction to finish the process. 15 I.
After RAID driver is loaded, the RAID disk will show up. J. Please follow Windows installation instruction to finish the process. 15 I.

RAID Installation Guide
Page 16
AMD Windows RAID Installation Guide Using RAIDXpert2 to Create RAID Array in the Windows Programs menu. 16 Execute RAIDXpert2 in Windows 1. 2.
AMD Windows RAID Installation Guide Using RAIDXpert2 to Create RAID Array in the Windows Programs menu. 16 Execute RAIDXpert2 in Windows 1. 2.
Quick Installation Guide
Page 13
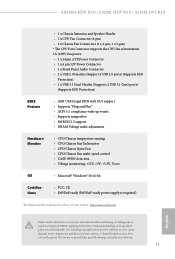
... Fan multi-speed control • CASE OPEN detection • Voltage monitoring: +12V, +5V, +3.3V, Vcore • Microsoft® Windows® 10 64-bit • FCC, CE • ErP/EuP ready (ErP/EuP ready power supply is required) * For detailed ... please visit our website: http://www.asrock.com Please realize that there is a certain risk involved with overclocking, including adjusting the setting in the BIOS, applying Untied Overclocking Technology, or using thirdparty overclocking tools. AB350M-HDV R3.0 / A320M-HDV R3.0 / A320M-DVS R3.0 BIOS Feature Hardware Monitor OS Certifications...
... Fan multi-speed control • CASE OPEN detection • Voltage monitoring: +12V, +5V, +3.3V, Vcore • Microsoft® Windows® 10 64-bit • FCC, CE • ErP/EuP ready (ErP/EuP ready power supply is required) * For detailed ... please visit our website: http://www.asrock.com Please realize that there is a certain risk involved with overclocking, including adjusting the setting in the BIOS, applying Untied Overclocking Technology, or using thirdparty overclocking tools. AB350M-HDV R3.0 / A320M-HDV R3.0 / A320M-DVS R3.0 BIOS Feature Hardware Monitor OS Certifications...

Quick Installation Guide
Page 49
...R3.0/A320M-HDV R3.0: • D-Sub 포트 1 개 • DVI-D 포트 1 개 • HDMI 포트 1 개 A320M-DVS R3...ASRock U.2 • COM 1 개 • TPM 헤더 1 1 개 • CPU 4 핀 ) 1 2 개 (1 x 4 핀 , 1 x 3 핀 ) * CPU 1A(12W) 인 CPU 24 핀 ATX 1 개 • 4 핀 12V 1 1 개 • USB 2.0 헤더 2 개 (USB 2.0 포트 4 ESD USB 3.1 Gen1 헤더 1 개 (USB 3.1 Gen1 포트 2 (ESD • Microsoft® Windows...
...R3.0/A320M-HDV R3.0: • D-Sub 포트 1 개 • DVI-D 포트 1 개 • HDMI 포트 1 개 A320M-DVS R3...ASRock U.2 • COM 1 개 • TPM 헤더 1 1 개 • CPU 4 핀 ) 1 2 개 (1 x 4 핀 , 1 x 3 핀 ) * CPU 1A(12W) 인 CPU 24 핀 ATX 1 개 • 4 핀 12V 1 1 개 • USB 2.0 헤더 2 개 (USB 2.0 포트 4 ESD USB 3.1 Gen1 헤더 1 개 (USB 3.1 Gen1 포트 2 (ESD • Microsoft® Windows...
Quick Installation Guide
Page 52
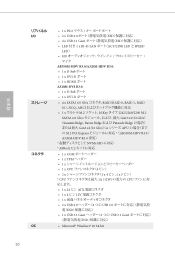
...; SPEED LEDʣ • HD ϚΠΫ AB350M-HDV R3.0/A320M-HDV R3.0: • 1 x D-Sub ϙʔτ • 1 x DVI-D ϙʔτ • 1 x HDMI ϙʔτ A320M-DVS R3.0: • 1 x D-Sub ϙʔτ • 1...675; Gen3 xʢ2 16 Gb/sʣʢA γϦʔζ APU ͷ M.2 PCI Express AB350M-HDV R3.0 / A320M-HDV R3.0 ઐ༻ʣ NVMe SSD ʹରԠ * ASRock U.2 • 1 x COM 1 x TPM 1 x 1 x CPU 4 ϐϯʣ • 2 ...; USB 3.1 Gen1 ESD • Microsoft® Windows® 10 64-bit 50
...; SPEED LEDʣ • HD ϚΠΫ AB350M-HDV R3.0/A320M-HDV R3.0: • 1 x D-Sub ϙʔτ • 1 x DVI-D ϙʔτ • 1 x HDMI ϙʔτ A320M-DVS R3.0: • 1 x D-Sub ϙʔτ • 1...675; Gen3 xʢ2 16 Gb/sʣʢA γϦʔζ APU ͷ M.2 PCI Express AB350M-HDV R3.0 / A320M-HDV R3.0 ઐ༻ʣ NVMe SSD ʹରԠ * ASRock U.2 • 1 x COM 1 x TPM 1 x 1 x CPU 4 ϐϯʣ • 2 ...; USB 3.1 Gen1 ESD • Microsoft® Windows® 10 64-bit 50

Quick Installation Guide
Page 55
...SPEED LED AB350M-HDV R3.0/A320M-HDV R3.0: • 1 x D-Sub 端口 • 1 x DVI-D 端口 • 1 x HDMI 端口 A320M-DVS R3.0: • 1 ...R3.0) * 支持 NVMe SSD U.2 套件 • 1 x COM 1 x TPM 接脚 • 1 x 1 x CPU 4 针 ) • 2 x 1 x 4 针 , 1 x 3 针) * CPU 1A (12W) 功率的 CPU 1 x 24 针 ATX 1 x 4 针 12V 1 x 2 x USB 2.0 4 个 USB 2.0 ESD 1 x USB 3.1 Gen1 2 个 USB 3.1 Gen1 ESD 保护) • Microsoft® Windows...
...SPEED LED AB350M-HDV R3.0/A320M-HDV R3.0: • 1 x D-Sub 端口 • 1 x DVI-D 端口 • 1 x HDMI 端口 A320M-DVS R3.0: • 1 ...R3.0) * 支持 NVMe SSD U.2 套件 • 1 x COM 1 x TPM 接脚 • 1 x 1 x CPU 4 针 ) • 2 x 1 x 4 针 , 1 x 3 针) * CPU 1A (12W) 功率的 CPU 1 x 24 针 ATX 1 x 4 针 12V 1 x 2 x USB 2.0 4 个 USB 2.0 ESD 1 x USB 3.1 Gen1 2 个 USB 3.1 Gen1 ESD 保护) • Microsoft® Windows...

Quick Installation Guide
Page 59
...x USB 3.1 Gen1 1 x RJ-45 LAN LED(ACT/LINK LED 及 SPEED LED) • HD AB350M-HDV R3.0/A320M-HDV R3.0: • 1 x D-Sub 1 x DVI-D 1 x HDMI 連接埠 A320M-DVS R3.0: • 1 x D-Sub 1 x DVI-D 連接埠 • 提供 4 x SATA3 6.0 Gb/s RAID...; M.2 PCI Express Gen3 x4 (32 Gb/s Summit Ridge、Raven Ridge 及 Pinnacle Ridge A 系列 APU Gen3 x2 (16 Gb/s AB350M-HDV R3.0 / A320M-HDV R3.0) * 支援 NVMe SSD U.2 套件 • 1 x COM 1 x TPM 排針 • 1 x 1 x CPU ...
...x USB 3.1 Gen1 1 x RJ-45 LAN LED(ACT/LINK LED 及 SPEED LED) • HD AB350M-HDV R3.0/A320M-HDV R3.0: • 1 x D-Sub 1 x DVI-D 1 x HDMI 連接埠 A320M-DVS R3.0: • 1 x D-Sub 1 x DVI-D 連接埠 • 提供 4 x SATA3 6.0 Gb/s RAID...; M.2 PCI Express Gen3 x4 (32 Gb/s Summit Ridge、Raven Ridge 及 Pinnacle Ridge A 系列 APU Gen3 x2 (16 Gb/s AB350M-HDV R3.0 / A320M-HDV R3.0) * 支援 NVMe SSD U.2 套件 • 1 x COM 1 x TPM 排針 • 1 x 1 x CPU ...

User Manual
Page 11
...are not responsible for possible damage caused by overclocking. English 6 It should be done at your system. OS Certifications • Microsoft® Windows® 10 64-bit • FCC, CE • ErP/EuP ready (ErP/EuP ready power supply is required) * For detailed product... information, please visit our website: http://www.asrock.com Please realize that there is a certain risk involved with overclocking, including adjusting the setting in the BIOS, applying Untied Overclocking Technology, or ...
...are not responsible for possible damage caused by overclocking. English 6 It should be done at your system. OS Certifications • Microsoft® Windows® 10 64-bit • FCC, CE • ErP/EuP ready (ErP/EuP ready power supply is required) * For detailed product... information, please visit our website: http://www.asrock.com Please realize that there is a certain risk involved with overclocking, including adjusting the setting in the BIOS, applying Untied Overclocking Technology, or ...

User Manual
Page 45
Click to select "Auto run at Windows Startup" if you want A-Tuning to be launched when you start up to the next speed level when the assigned temperature is met. The fans will automatically shift to five different fan speeds using the graph. FAN-Tastic Tuning Configure up the Windows operating system. 40 English Settings Configure ASRock A-Tuning.
Click to select "Auto run at Windows Startup" if you want A-Tuning to be launched when you start up to the next speed level when the assigned temperature is met. The fans will automatically shift to five different fan speeds using the graph. FAN-Tastic Tuning Configure up the Windows operating system. 40 English Settings Configure ASRock A-Tuning.

User Manual
Page 51
3.3.4 Setting In the "Setting" page, you can change the language, select the server location, and determine if you want to automatically run the ASRock Live Update & APP Shop on Windows startup. 46 English
3.3.4 Setting In the "Setting" page, you can change the language, select the server location, and determine if you want to automatically run the ASRock Live Update & APP Shop on Windows startup. 46 English

User Manual
Page 57
... last valid write operation and the next read -burst operation in the same chipselect in the same bank group. 52 English Four Activate Window (tFAW) The time window in different banks of clocks between the last valid write operation and the next read command to the clock in which CAS is asserted... Time (tWR) The amount of delay that must elapse after the completion of a first writeburst operation to the clock in memory clock cycles within a refresh window from the last clock of virtual CAS of the same rank.
... last valid write operation and the next read -burst operation in the same chipselect in the same bank group. 52 English Four Activate Window (tFAW) The time window in different banks of clocks between the last valid write operation and the next read command to the clock in which CAS is asserted... Time (tWR) The amount of delay that must elapse after the completion of a first writeburst operation to the clock in memory clock cycles within a refresh window from the last clock of virtual CAS of the same rank.

User Manual
Page 62
...value is [Enabled]. AMD fTPM Switch Use this to system stability or compatibility issue with some memory modules or power supplies. If you install Windows® OS and want to enable this function, please set to [Enabled]. Configuration options: [Enabled] and [Disabled]. 57 English Please note that... the additional hardware capabilities provided by AMD-V. Please set this item to enable or disable AMD's Cool 'n' QuietTM technology. AB350M-HDV R3.0 / A320M-HDV R3.0 / A320M-DVS R3.0 4.4.1 CPU Configuration Cool 'n' Quiet Use this item to [Disable] if above issue occurs.
...value is [Enabled]. AMD fTPM Switch Use this to system stability or compatibility issue with some memory modules or power supplies. If you install Windows® OS and want to enable this function, please set to [Enabled]. Configuration options: [Enabled] and [Disabled]. 57 English Please note that... the additional hardware capabilities provided by AMD-V. Please set this item to enable or disable AMD's Cool 'n' QuietTM technology. AB350M-HDV R3.0 / A320M-HDV R3.0 / A320M-DVS R3.0 4.4.1 CPU Configuration Cool 'n' Quiet Use this item to [Disable] if above issue occurs.


