

RAID Installation Guide
Page 2
... hard disk drives to read and write data in our support CD, then you make a SATA driver diskette, press or to enter BIOS setup to a second drive. For optimal performance, please install identical drives of a single disk alone while the two hard disks perform the same work as it will cause data damage or data loss. Although RAID 0 function can start to use the onboard RAID Option ROM Utility to configure RAID. 1.1 Introduction to RAID The term "RAID...
... hard disk drives to read and write data in our support CD, then you make a SATA driver diskette, press or to enter BIOS setup to a second drive. For optimal performance, please install identical drives of a single disk alone while the two hard disks perform the same work as it will cause data damage or data loss. Although RAID 0 function can start to use the onboard RAID Option ROM Utility to configure RAID. 1.1 Introduction to RAID The term "RAID...

RAID Installation Guide
Page 8
... the Support CD into one of the USB port. E. A. D. Please download the "SATA Floppy Imaged driver" from ASRock's website A. Click to find the driver inside your USB flash disk. C. B. Plug a USB drive into the DVD-ROM drive. STEP 3.2: Download driver from ASRock's website and unzip the file into your USB flash drive. 8 During Windows installation process, when Disk selection page show up, please click . During system boot, press or key to Tools Easy RAID Installer F. STEP 4: Windows installation A. Go to enter UEFI setup utility. Follow instructions to...
... the Support CD into one of the USB port. E. A. D. Please download the "SATA Floppy Imaged driver" from ASRock's website A. Click to find the driver inside your USB flash disk. C. B. Plug a USB drive into the DVD-ROM drive. STEP 3.2: Download driver from ASRock's website and unzip the file into your USB flash drive. 8 During Windows installation process, when Disk selection page show up, please click . During system boot, press or key to Tools Easy RAID Installer F. STEP 4: Windows installation A. Go to enter UEFI setup utility. Follow instructions to...

RAID Installation Guide
Page 12
.... H. Plug a USB drive into your USB flash disk. 12 Follow instructions to Tools Easy RAID Installer F. STEP 2.2: Download driver from ASRock's website and unzip the file into one of the USB port. G. C. E. Please install the DVD-ROM. Please download the "SATA Floppy Imaged driver" from ASRock's website A. Go to AdvancedRAIDXpert2 Configuration UtilityArray ManagementCreate Array Select Physical DisksCheck AllApply ChangesCreate Array. *Be sure to enter UEFI setup utility...
.... H. Plug a USB drive into your USB flash disk. 12 Follow instructions to Tools Easy RAID Installer F. STEP 2.2: Download driver from ASRock's website and unzip the file into one of the USB port. G. C. E. Please install the DVD-ROM. Please download the "SATA Floppy Imaged driver" from ASRock's website A. Go to AdvancedRAIDXpert2 Configuration UtilityArray ManagementCreate Array Select Physical DisksCheck AllApply ChangesCreate Array. *Be sure to enter UEFI setup utility...

Quick Installation Guide
Page 5
...-pin DDR4 DIMM Slots (DDR4_A1, DDR4_A2) 4 ATX Power Connector (ATXPWR1) 5 USB 3.1 Gen1 Header (USB3_5_6) 6 USB 2.0 Header (USB_3_4) 7 USB 2.0 Header (USB_5_6) 8 SATA3 Connector (SATA3_3) 9 SATA3 Connector (SATA3_4) 10 SATA3 Connector (SATA3_1) 11 SATA3 Connector (SATA3_2) 12 System Panel Header (PANEL1) 13 Chassis Intrusion and Speaker Header (SPK_CI1) 14 COM Port Header (COM1) 15 TPM Header (TPMS1) 16 Chassis Fan Connector (CHA_FAN2) 17 Clear CMOS Jumper (CLRCMOS1) 18 Front Panel Audio Header (HD_AUDIO1) 19 Chassis Fan Connector (CHA_FAN1) 3 English AB350M-HDV R3.0 / A320M-HDV R3.0 / A320M...
...-pin DDR4 DIMM Slots (DDR4_A1, DDR4_A2) 4 ATX Power Connector (ATXPWR1) 5 USB 3.1 Gen1 Header (USB3_5_6) 6 USB 2.0 Header (USB_3_4) 7 USB 2.0 Header (USB_5_6) 8 SATA3 Connector (SATA3_3) 9 SATA3 Connector (SATA3_4) 10 SATA3 Connector (SATA3_1) 11 SATA3 Connector (SATA3_2) 12 System Panel Header (PANEL1) 13 Chassis Intrusion and Speaker Header (SPK_CI1) 14 COM Port Header (COM1) 15 TPM Header (TPMS1) 16 Chassis Fan Connector (CHA_FAN2) 17 Clear CMOS Jumper (CLRCMOS1) 18 Front Panel Audio Header (HD_AUDIO1) 19 Chassis Fan Connector (CHA_FAN1) 3 English AB350M-HDV R3.0 / A320M-HDV R3.0 / A320M...
Quick Installation Guide
Page 9
...; 2 x Serial ATA (SATA) Data Cables (Optional) • 1 x I/O Panel Shield 7 English If you are using. You may find the latest VGA cards and CPU support list on ASRock's website without notice. It delivers excellent performance with robust design conforming to ASRock's commitment to change without further notice. In case any modifications of this manual occur, the updated version will be available on ASRock's website as well. AB350M-HDV R3.0 / A320M-HDV R3.0 / A320M-DVS R3.0 Chapter...
...; 2 x Serial ATA (SATA) Data Cables (Optional) • 1 x I/O Panel Shield 7 English If you are using. You may find the latest VGA cards and CPU support list on ASRock's website without notice. It delivers excellent performance with robust design conforming to ASRock's commitment to change without further notice. In case any modifications of this manual occur, the updated version will be available on ASRock's website as well. AB350M-HDV R3.0 / A320M-HDV R3.0 / A320M-DVS R3.0 Chapter...

Quick Installation Guide
Page 10
1.2 Specifications Platform • Micro ATX Form Factor • Solid Capacitor design CPU • Supports AMD Socket AM4 A-Series APUs (Bristol Ridge) and Ryzen Series CPUs (Summit Ridge, Raven Ridge and Pinnacle Ridge) • 6 Power Phase design • Supports CPU up to 105W Chipset • AMD Promontory B350 (AB350M-HDV R3.0) • AMD Promontory A320 (A320M-HDV R3.0 / A320M-DVS R3.0) Memory • Dual Channel DDR4 Memory Technology • 2 x DDR4 DIMM Slots • AMD Ryzen series CPUs (Pinnacle Ridge) support DDR4...
1.2 Specifications Platform • Micro ATX Form Factor • Solid Capacitor design CPU • Supports AMD Socket AM4 A-Series APUs (Bristol Ridge) and Ryzen Series CPUs (Summit Ridge, Raven Ridge and Pinnacle Ridge) • 6 Power Phase design • Supports CPU up to 105W Chipset • AMD Promontory B350 (AB350M-HDV R3.0) • AMD Promontory A320 (A320M-HDV R3.0 / A320M-DVS R3.0) Memory • Dual Channel DDR4 Memory Technology • 2 x DDR4 DIMM Slots • AMD Ryzen series CPUs (Pinnacle Ridge) support DDR4...

Quick Installation Guide
Page 12
...x PS/2 Mouse/Keyboard Port • 2 x USB 2.0 Ports (Supports ESD Protection) • 4 x USB 3.1 Gen1 Ports (Supports ESD Protection) • 1 x RJ-45 LAN Port with LED (ACT/LINK LED and SPEED LED) • HD Audio Jacks: Line in / Front Speaker / Microphone AB350M-HDV R3.0 / A320M-HDV R3.0: • 1 x D-Sub Port • 1 x DVI-D Port • 1 x HDMI Port A320M-DVS R3.0: • 1 x D-Sub Port • 1 x DVI-D Port Storage • 4 x SATA3 6.0 Gb/s Connectors, support RAID (RAID 0, RAID 1 and RAID 10), NCQ, AHCI and Hot Plug • 1 x Ultra M.2 Socket, supports M Key type 2242/2260...
...x PS/2 Mouse/Keyboard Port • 2 x USB 2.0 Ports (Supports ESD Protection) • 4 x USB 3.1 Gen1 Ports (Supports ESD Protection) • 1 x RJ-45 LAN Port with LED (ACT/LINK LED and SPEED LED) • HD Audio Jacks: Line in / Front Speaker / Microphone AB350M-HDV R3.0 / A320M-HDV R3.0: • 1 x D-Sub Port • 1 x DVI-D Port • 1 x HDMI Port A320M-DVS R3.0: • 1 x D-Sub Port • 1 x DVI-D Port Storage • 4 x SATA3 6.0 Gb/s Connectors, support RAID (RAID 0, RAID 1 and RAID 10), NCQ, AHCI and Hot Plug • 1 x Ultra M.2 Socket, supports M Key type 2242/2260...
Quick Installation Guide
Page 13
...devices of maximum 1A (12W) fan power. • 1 x 24 pin ATX Power Connector • 1 x 4 pin 12V Power Connector • 1 x Front Panel Audio Connector • 2 x USB 2.0 Headers (Support 4 USB 2.0 ports) (Supports ESD Protection) • 1 x USB 3.1 Gen1 Header (Supports 2 USB 3.1 Gen1 ports) (Supports ESD Protection) • AMI UEFI Legal BIOS with GUI support • Supports "Plug and Play" • ACPI 5.1 compliance wake up events • Supports jumperfree • SMBIOS 2.3 support • DRAM Voltage multi-adjustment • CPU/Chassis temperature sensing • CPU/Chassis...
...devices of maximum 1A (12W) fan power. • 1 x 24 pin ATX Power Connector • 1 x 4 pin 12V Power Connector • 1 x Front Panel Audio Connector • 2 x USB 2.0 Headers (Support 4 USB 2.0 ports) (Supports ESD Protection) • 1 x USB 3.1 Gen1 Header (Supports 2 USB 3.1 Gen1 ports) (Supports ESD Protection) • AMI UEFI Legal BIOS with GUI support • Supports "Plug and Play" • ACPI 5.1 compliance wake up events • Supports jumperfree • SMBIOS 2.3 support • DRAM Voltage multi-adjustment • CPU/Chassis temperature sensing • CPU/Chassis...

Quick Installation Guide
Page 18
... start the installation. PCIe slots: PCIE1 (PCIe 2.0 x1 slot) is used for PCI Express x1 lane width cards PCIE2 (PCIe 3.0 x16 slot) is unplugged. PCIe Slot Configurations CPU Ryzen series CPUs (Pinnacle Ridge) Ryzen series CPUs (Summit Ridge) Ryzen series CPUs (Raven Ridge) Athlon 200GE APU 7th A-Series APUs PCIE2 x16 x16 x8 x4 x8 For a better thermal environment, please connect a chassis fan to the motherboard's chassis fan connector (CHA_FAN1 or CHA_FAN2 ) when using multiple graphics cards. Before installing an expansion card...
... start the installation. PCIe slots: PCIE1 (PCIe 2.0 x1 slot) is used for PCI Express x1 lane width cards PCIE2 (PCIe 3.0 x16 slot) is unplugged. PCIe Slot Configurations CPU Ryzen series CPUs (Pinnacle Ridge) Ryzen series CPUs (Summit Ridge) Ryzen series CPUs (Raven Ridge) Athlon 200GE APU 7th A-Series APUs PCIE2 x16 x16 x8 x4 x8 For a better thermal environment, please connect a chassis fan to the motherboard's chassis fan connector (CHA_FAN1 or CHA_FAN2 ) when using multiple graphics cards. Before installing an expansion card...

Quick Installation Guide
Page 19
... to short the pins on the pins, the jumper is "Open". If you need to clear the data in CMOS includes system setup information such as system password, date, time, and system setup parameters. To clear and reset the system parameters to default setup, please turn off the computer and unplug the power cord, then use a jumper cap to remove the jumper cap after clearing the CMOS. AB350M-HDV R3.0 / A320M-HDV R3.0 / A320M-DVS R3.0 2.3 Jumpers Setup The...
... to short the pins on the pins, the jumper is "Open". If you need to clear the data in CMOS includes system setup information such as system password, date, time, and system setup parameters. To clear and reset the system parameters to default setup, please turn off the computer and unplug the power cord, then use a jumper cap to remove the jumper cap after clearing the CMOS. AB350M-HDV R3.0 / A320M-HDV R3.0 / A320M-DVS R3.0 2.3 Jumpers Setup The...

User Manual
Page 4
... 1 1.2 Specifications 2 1.3 Motherboard Layout 7 1.4 I/O Panel 10 Chapter 2 Installation 13 2.1 Installing the CPU 14 2.2 Installing the CPU Fan and Heatsink 16 2.3 Installing Memory Modules (DIMM) 24 2.4 Expansion Slots (PCI Express Slots) 27 2.5 Jumpers Setup 28 2.6 Onboard Headers and Connectors 29 2.7 M.2_SSD (NGFF) Module Installation Guide (for AB350M-HDV R3.0 / A320M-HDV R3.0 only) 33 Chapter 3 Software and Utilities Operation 37 3.1 Installing Drivers 37 3.2 A-Tuning 38 3.2.1 Installing A-Tuning 38 3.2.2 Using A-Tuning 38 3.3 ASRock Live Update & APP...
... 1 1.2 Specifications 2 1.3 Motherboard Layout 7 1.4 I/O Panel 10 Chapter 2 Installation 13 2.1 Installing the CPU 14 2.2 Installing the CPU Fan and Heatsink 16 2.3 Installing Memory Modules (DIMM) 24 2.4 Expansion Slots (PCI Express Slots) 27 2.5 Jumpers Setup 28 2.6 Onboard Headers and Connectors 29 2.7 M.2_SSD (NGFF) Module Installation Guide (for AB350M-HDV R3.0 / A320M-HDV R3.0 only) 33 Chapter 3 Software and Utilities Operation 37 3.1 Installing Drivers 37 3.2 A-Tuning 38 3.2.1 Installing A-Tuning 38 3.2.2 Using A-Tuning 38 3.3 ASRock Live Update & APP...

User Manual
Page 6
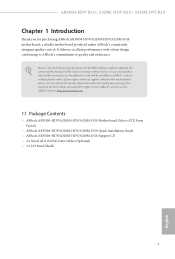
....0 Quick Installation Guide • ASRock AB350M-HDV R3.0 / A320M-HDV R3.0 / A320M-DVS R3.0 Support CD • 1 x I/O Panel Shield • 2 x Serial ATA (SATA) Data Cables (Optional) • 1 x Screw for M.2 Socket (Optional) (for purchasing ASRock AB350M-HDV R3.0 / A320M-HDV R3.0 / A320M-DVS R3.0 motherboard, a reliable motherboard produced under ASRock's consistently stringent quality control. In this manual will be subject to change without further notice. In case any modifications of this motherboard, please visit our website for specific information about the model you are using...
....0 Quick Installation Guide • ASRock AB350M-HDV R3.0 / A320M-HDV R3.0 / A320M-DVS R3.0 Support CD • 1 x I/O Panel Shield • 2 x Serial ATA (SATA) Data Cables (Optional) • 1 x Screw for M.2 Socket (Optional) (for purchasing ASRock AB350M-HDV R3.0 / A320M-HDV R3.0 / A320M-DVS R3.0 motherboard, a reliable motherboard produced under ASRock's consistently stringent quality control. In this manual will be subject to change without further notice. In case any modifications of this motherboard, please visit our website for specific information about the model you are using...

User Manual
Page 10
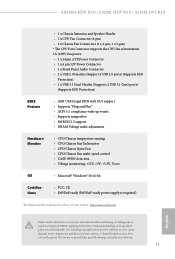
... x 24 pin ATX Power Connector • 1 x 4 pin 12V Power Connector • 1 x Front Panel Audio Connector • 2 x USB 2.0 Headers (Support 4 USB 2.0 ports) (Supports ESD Protection) • 1 x USB 3.1 Gen1 Header (Supports 2 USB 3.1 Gen1 ports) (Supports ESD Protection) BIOS Feature • AMI UEFI Legal BIOS with GUI support • Supports "Plug and Play" • ACPI 5.1 compliance wake up events • Supports jumperfree • SMBIOS 2.3 support • DRAM Voltage multi-adjustment Hardware Monitor • CPU/Chassis temperature sensing • CPU/Chassis Fan Tachometer...
... x 24 pin ATX Power Connector • 1 x 4 pin 12V Power Connector • 1 x Front Panel Audio Connector • 2 x USB 2.0 Headers (Support 4 USB 2.0 ports) (Supports ESD Protection) • 1 x USB 3.1 Gen1 Header (Supports 2 USB 3.1 Gen1 ports) (Supports ESD Protection) BIOS Feature • AMI UEFI Legal BIOS with GUI support • Supports "Plug and Play" • ACPI 5.1 compliance wake up events • Supports jumperfree • SMBIOS 2.3 support • DRAM Voltage multi-adjustment Hardware Monitor • CPU/Chassis temperature sensing • CPU/Chassis Fan Tachometer...

User Manual
Page 14
...-pin DDR4 DIMM Slots (DDR4_A1, DDR4_A2) 4 ATX Power Connector (ATXPWR1) 5 USB 3.1 Gen1 Header (USB3_5_6) 6 USB 2.0 Header (USB_3_4) 7 USB 2.0 Header (USB_5_6) 8 SATA3 Connector (SATA3_3) 9 SATA3 Connector (SATA3_4) 10 SATA3 Connector (SATA3_1) 11 SATA3 Connector (SATA3_2) 12 System Panel Header (PANEL1) 13 Chassis Intrusion and Speaker Header (SPK_CI1) 14 COM Port Header (COM1) 15 TPM Header (TPMS1) 16 Chassis Fan Connector (CHA_FAN2) 17 Clear CMOS Jumper (CLRCMOS1) 18 Front Panel Audio Header (HD_AUDIO1) 19 Chassis Fan Connector (CHA_FAN1) 9 English AB350M-HDV R3.0 / A320M-HDV R3.0 / A320M...
...-pin DDR4 DIMM Slots (DDR4_A1, DDR4_A2) 4 ATX Power Connector (ATXPWR1) 5 USB 3.1 Gen1 Header (USB3_5_6) 6 USB 2.0 Header (USB_3_4) 7 USB 2.0 Header (USB_5_6) 8 SATA3 Connector (SATA3_3) 9 SATA3 Connector (SATA3_4) 10 SATA3 Connector (SATA3_1) 11 SATA3 Connector (SATA3_2) 12 System Panel Header (PANEL1) 13 Chassis Intrusion and Speaker Header (SPK_CI1) 14 COM Port Header (COM1) 15 TPM Header (TPMS1) 16 Chassis Fan Connector (CHA_FAN2) 17 Clear CMOS Jumper (CLRCMOS1) 18 Front Panel Audio Header (HD_AUDIO1) 19 Chassis Fan Connector (CHA_FAN1) 9 English AB350M-HDV R3.0 / A320M-HDV R3.0 / A320M...

User Manual
Page 42
... If the Main Menu does not appear automatically, locate and double click on a specific item then follow the order from top to bottom to your CD-ROM drive. Click on the file "ASRSETUP.EXE" in your computer. Drivers Menu The drivers compatible to install those required drivers. Utilities Menu The Utilities Menu shows the application software that enhance the motherboard's features. AB350M-HDV R3.0 / A320M-HDV R3.0 / A320M-DVS R3.0 Chapter 3 Software and Utilities Operation 3.1 Installing Drivers The Support CD...
... If the Main Menu does not appear automatically, locate and double click on a specific item then follow the order from top to bottom to your CD-ROM drive. Click on the file "ASRSETUP.EXE" in your computer. Drivers Menu The drivers compatible to install those required drivers. Utilities Menu The Utilities Menu shows the application software that enhance the motherboard's features. AB350M-HDV R3.0 / A320M-HDV R3.0 / A320M-DVS R3.0 Chapter 3 Software and Utilities Operation 3.1 Installing Drivers The Support CD...

User Manual
Page 62
... to enable or disable AMD's Cool 'n' QuietTM technology. Please set to enable or disable AMD CPU fTPM. The default value is [Enabled]. Configuration options: [Enabled] and [Disabled]. Please note that enabling this item to system stability or compatibility issue with some memory modules or power supplies. AMD fTPM Switch Use this option is set this function may reduce CPU voltage and memory frequency, and lead to [Disable] if above issue occurs. SVM Mode When this to [Enabled], a VMM (Virtual Machine Architecture) can utilize the...
... to enable or disable AMD's Cool 'n' QuietTM technology. Please set to enable or disable AMD CPU fTPM. The default value is [Enabled]. Configuration options: [Enabled] and [Disabled]. Please note that enabling this item to system stability or compatibility issue with some memory modules or power supplies. AMD fTPM Switch Use this option is set this function may reduce CPU voltage and memory frequency, and lead to [Disable] if above issue occurs. SVM Mode When this to [Enabled], a VMM (Virtual Machine Architecture) can utilize the...

User Manual
Page 66
AB350M-HDV R3.0 / A320M-HDV R3.0 / A320M-DVS R3.0 4.4.5 Super IO Configuration Serial Port Enable or disable the Serial port. Serial Port Address Select the address of the Serial port. PS2 Y-Cable Enable the PS2 Y-Cable or set this option to Auto. 61 English
AB350M-HDV R3.0 / A320M-HDV R3.0 / A320M-DVS R3.0 4.4.5 Super IO Configuration Serial Port Enable or disable the Serial port. Serial Port Address Select the address of the Serial port. PS2 Y-Cable Enable the PS2 Y-Cable or set this option to Auto. 61 English

User Manual
Page 70
...-HDV R3.0 / A320M-HDV R3.0 / A320M-DVS R3.0 Opcache Control Enables or disables the Opcache. Freeze DF module queues on 1.400V SEV-ES ASID Space Limit SEV VMs using ASIDs below the SEV-ES ASID Space Limit must enable the SEV-ES feature. Once this option has been used to remove any cores, a POWER CYCLE is the number of cores to scrub memory. OC Mode OC1 - 16 cores/3.6GHz on...
...-HDV R3.0 / A320M-HDV R3.0 / A320M-DVS R3.0 Opcache Control Enables or disables the Opcache. Freeze DF module queues on 1.400V SEV-ES ASID Space Limit SEV VMs using ASIDs below the SEV-ES ASID Space Limit must enable the SEV-ES feature. Once this option has been used to remove any cores, a POWER CYCLE is the number of cores to scrub memory. OC Mode OC1 - 16 cores/3.6GHz on...

User Manual
Page 78
...-HDV R3.0 / A320M-HDV R3.0 / A320M-DVS R3.0 Easy RAID Installer Easy RAID Installer helps you can start installing the operating system in your USB pen drive before using this function. 73 English Instant Flash Save UEFI files in your USB storage device and run Instant Flash to plug in RAID mode. Please setup network configuration before using Internet Flash. *For BIOS backup and recovery purpose, it is recommended to update your USB storage device. After copying the drivers please change the SATA mode to RAID, then you to copy the RAID driver...
...-HDV R3.0 / A320M-HDV R3.0 / A320M-DVS R3.0 Easy RAID Installer Easy RAID Installer helps you can start installing the operating system in your USB pen drive before using this function. 73 English Instant Flash Save UEFI files in your USB storage device and run Instant Flash to plug in RAID mode. Please setup network configuration before using Internet Flash. *For BIOS backup and recovery purpose, it is recommended to update your USB storage device. After copying the drivers please change the SATA mode to RAID, then you to copy the RAID driver...

User Manual
Page 79
Internet Setting Enable or disable sound effects in the setup utility. Network Configuration Use this to download the UEFI firmware. 74 English UEFI Download Server Select a server to configure internet connection settings for Internet Flash.
Internet Setting Enable or disable sound effects in the setup utility. Network Configuration Use this to download the UEFI firmware. 74 English UEFI Download Server Select a server to configure internet connection settings for Internet Flash.


