
User Manual
Page 4
Software Support 52 4.1 Install Operating System 52 4.2 Support CD Information 52 4.2.1 Running Support CD 52 4.2.2 Drivers Menu 52 4.2.3 Utilities Menu 52 4.2.4 Contact Information 52 APPENDIX: AMD's Cool 'n' QuietTM Technology ...... 53 4 3.3.8 USB Configuration 48 3.4 Hardware Health Event Monitoring Screen 48 3.5 Boot Screen 49 3.5.1 Boot Settings Configuration 49 3.6 Security Screen 50 3.7 Exit Screen 51 4 .
Software Support 52 4.1 Install Operating System 52 4.2 Support CD Information 52 4.2.1 Running Support CD 52 4.2.2 Drivers Menu 52 4.2.3 Utilities Menu 52 4.2.4 Contact Information 52 APPENDIX: AMD's Cool 'n' QuietTM Technology ...... 53 4 3.3.8 USB Configuration 48 3.4 Hardware Health Event Monitoring Screen 48 3.5 Boot Screen 49 3.5.1 Boot Settings Configuration 49 3.6 Security Screen 50 3.7 Exit Screen 51 4 .
User Manual
Page 7
...® Windows® 2000 / XP / XP 64-bit compliant - Supports "Plug and Play" - Chassis Fan Tachometer - Voltage Monitoring: +12V, +5V, +3.3V, Vcore - Motherboard Temperature Sensing - Drivers, Utilities, AntiVirus Software - CPU Overheat Shutdown to Protect CPU Life - SLI/XFIRE power connector - Supports jumperfree -
...® Windows® 2000 / XP / XP 64-bit compliant - Supports "Plug and Play" - Chassis Fan Tachometer - Voltage Monitoring: +12V, +5V, +3.3V, Vcore - Motherboard Temperature Sensing - Drivers, Utilities, AntiVirus Software - CPU Overheat Shutdown to Protect CPU Life - SLI/XFIRE power connector - Supports jumperfree -

User Manual
Page 19
... your power supply unit (PSU) can provide at least the minimum power required by your graphics card driver supports the NVIDIA SLITM technology. Please refer to the goldfingers on this section. Download the latest driver from the NVIDIA website (www. Step 2. Adjust the jumpers on each graphics card. nvidia.com). 3. Make sure...
... your power supply unit (PSU) can provide at least the minimum power required by your graphics card driver supports the NVIDIA SLITM technology. Please refer to the goldfingers on this section. Download the latest driver from the NVIDIA website (www. Step 2. Adjust the jumpers on each graphics card. nvidia.com). 3. Make sure...
User Manual
Page 20
... power connector. Step7. Then, reboot your system. Click the NVIDIA Settings icon on your system. D. Install the graphics card drivers to your computer and boot into OS. C. Install the "SLI Enabled" driver of the graphics card that , you can enable the Multi-Graphics Processing Unit (GPU) feature in the NVIDIA nView system...
... power connector. Step7. Then, reboot your system. Click the NVIDIA Settings icon on your system. D. Install the graphics card drivers to your computer and boot into OS. C. Install the "SLI Enabled" driver of the graphics card that , you can enable the Multi-Graphics Processing Unit (GPU) feature in the NVIDIA nView system...

User Manual
Page 32
...remove the SATA / SATAII HDDs while the system is still power-on and in working condition. AHCI requires appropriate software support (e.g., an AHCI driver, which is Hot Swap Function? However, please note that enables you can be flush out when removing the eSATAII device. 32 AHCI also ...the OS has been installed into the SATA / SATAII HDD. 2.12 Hot Plug and Hot Swap Functions for SATA / SATAII HDDs and eSATAII Devices 939SLI-eSATA2 motherboard supports Hot Plug and Hot Swap functions for SATA / SATAII / eSATAII Devices in our support CD). If you obey "safely remove hardware"...
...remove the SATA / SATAII HDDs while the system is still power-on and in working condition. AHCI requires appropriate software support (e.g., an AHCI driver, which is Hot Swap Function? However, please note that enables you can be flush out when removing the eSATAII device. 32 AHCI also ...the OS has been installed into the SATA / SATAII HDD. 2.12 Hot Plug and Hot Swap Functions for SATA / SATAII HDDs and eSATAII Devices 939SLI-eSATA2 motherboard supports Hot Plug and Hot Swap functions for SATA / SATAII / eSATAII Devices in our support CD). If you obey "safely remove hardware"...

User Manual
Page 33
...RAID 5 configuration before you start the OS installation. Before you start to format the floppy diskette and copy SATA / SATAII drivers into the floppy drive. STEP 1: Insert the ASRock Support CD into your optical drive to boot your system. (Do NOT insert any floppy diskette into the floppy drive, ...and press . 2.13 Using SATA / SATAII HDDs With RAID Functions If you want to generate Serial ATA driver diskette [YN]?", press . ...
...RAID 5 configuration before you start the OS installation. Before you start to format the floppy diskette and copy SATA / SATAII drivers into the floppy drive. STEP 1: Insert the ASRock Support CD into your optical drive to boot your system. (Do NOT insert any floppy diskette into the floppy drive, ...and press . 2.13 Using SATA / SATAII HDDs With RAID Functions If you want to generate Serial ATA driver diskette [YN]?", press . ...

User Manual
Page 34
... OS on your SATA / SATAII HDDs without RAID functions, you are in BIOS setup to set the option from [RAID] to [AHCI]. 2. Make a SATA / SATAII driver diskette by following the proper steps of BIOS setup to set the selection from [Auto] to [CPU, PCIE, Async.]. Using SATA / SATAII HDDs Operating in...
... OS on your SATA / SATAII HDDs without RAID functions, you are in BIOS setup to set the option from [RAID] to [AHCI]. 2. Make a SATA / SATAII driver diskette by following the proper steps of BIOS setup to set the selection from [Auto] to [CPU, PCIE, Async.]. Using SATA / SATAII HDDs Operating in...

User Manual
Page 52
... Menu if "AUTORUN" is enabled in the Support CD to display the menus. 4.2.2 Drivers Menu The Drivers Menu shows the available devices drivers including ASRock Express GbL PCI Express LAN card driver if the system detects the installed devices. If the Main Menu did not appear automatically,... locate and double click on a specific item then follow the installation wizard to visit ASRock's website at http://www.asrock.com; Please install the necessary drivers to your OS documentation for more about ASRock, welcome to install it. 4.2.4 Contact Information If you may contact your CD-ROM...
... Menu if "AUTORUN" is enabled in the Support CD to display the menus. 4.2.2 Drivers Menu The Drivers Menu shows the available devices drivers including ASRock Express GbL PCI Express LAN card driver if the system detects the installed devices. If the Main Menu did not appear automatically,... locate and double click on a specific item then follow the installation wizard to visit ASRock's website at http://www.asrock.com; Please install the necessary drivers to your OS documentation for more about ASRock, welcome to install it. 4.2.4 Contact Information If you may contact your CD-ROM...

User Manual
Page 53
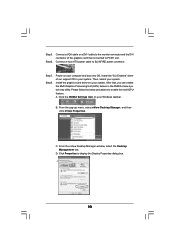
... under Windows system. APPENDIX: AMD's Cool 'n' QuietTM Technology For power-saving sake, it is strongly recommended to implement settings. 53 Switch to install "AMD Processor Driver" from the "Support CD" first. When using Windows 2000 / XP/ XP 64-bit operating system, please follow the instruction below to enable AMD's Cool 'n' QuietTM...
... under Windows system. APPENDIX: AMD's Cool 'n' QuietTM Technology For power-saving sake, it is strongly recommended to implement settings. 53 Switch to install "AMD Processor Driver" from the "Support CD" first. When using Windows 2000 / XP/ XP 64-bit operating system, please follow the instruction below to enable AMD's Cool 'n' QuietTM...


