
User Manual
Page 3
... 3.2 Main Menu 21 3.3 Advanced, Security, Power, Boot, and Exit Menus ...... 23 4 Software Support 24 4.1 Installing Operating System 24 4.2 Support CD Information 24 4.2.1 Running Support CD 24 4.2.2 Drivers Menu 24 4.2.3 Utilities Menu 24 4.2.4 ASRock "PC-DIY Live Demo" Program 24 4.2.5 "LGA 775 CPU Installation Live Demo" Program ... 24 4.2.6 Contact Information 24 Appendix 25 1. Exit Menu 32...
... 3.2 Main Menu 21 3.3 Advanced, Security, Power, Boot, and Exit Menus ...... 23 4 Software Support 24 4.1 Installing Operating System 24 4.2 Support CD Information 24 4.2.1 Running Support CD 24 4.2.2 Drivers Menu 24 4.2.3 Utilities Menu 24 4.2.4 ASRock "PC-DIY Live Demo" Program 24 4.2.5 "LGA 775 CPU Installation Live Demo" Program ... 24 4.2.6 Contact Information 24 Appendix 25 1. Exit Menu 32...

User Manual
Page 4
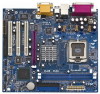
... find the latest memory and CPU support lists on ASRock website as well. ASRock website http://www.asrock.com 1.1 Package Contents ASRock 775i45GV Motherboard (Micro ATX form factor: 9.6" x 8.5", 24.4 x 21.6 cm) ASRock 775i45GV Quick Installation Guide ASRock Intel-Intel Support CD (including LGA 775 CPU Installation Live Demo) 1 Cable for IDE Devices (1 x ATA 66 / 100) 1 Cable for purchasing ASRock 775i45GV motherboard, a reliable motherboard produced...
... find the latest memory and CPU support lists on ASRock website as well. ASRock website http://www.asrock.com 1.1 Package Contents ASRock 775i45GV Motherboard (Micro ATX form factor: 9.6" x 8.5", 24.4 x 21.6 cm) ASRock 775i45GV Quick Installation Guide ASRock Intel-Intel Support CD (including LGA 775 CPU Installation Live Demo) 1 Cable for IDE Devices (1 x ATA 66 / 100) 1 Cable for purchasing ASRock 775i45GV motherboard, a reliable motherboard produced...

User Manual
Page 5
... Interface] slot (see CAUTION 3) AMR slot: 1 slot, supports ASRock MR card (Optional) USB 2.0: 4 default USB 2.0 ports and 1 extra set of header for advanced users' reference, see CAUTION 2); 1.2 Specifications Platform: Micro ATX form factor (9.6" x 8.5", 24.4 x 21.6 cm) CPU: 775-Pin Socket supporting Intel® Pentium® 4 / Celeron® processor (in 775-land LGA package) Chipsets...
... Interface] slot (see CAUTION 3) AMR slot: 1 slot, supports ASRock MR card (Optional) USB 2.0: 4 default USB 2.0 ports and 1 extra set of header for advanced users' reference, see CAUTION 2); 1.2 Specifications Platform: Micro ATX form factor (9.6" x 8.5", 24.4 x 21.6 cm) CPU: 775-Pin Socket supporting Intel® Pentium® 4 / Celeron® processor (in 775-land LGA package) Chipsets...

User Manual
Page 6
The AGI [ASRock Graphics Interface] slot is detected, the system will automatically shutdown. Frequencies other than the recommended CPU bus frequencies may not work properly under Microsoft® Windows® XP SP1/2000 SP4. About the setting of AGP VGA card, ... http://www.microsoft.com/whdc/hwdev/bus/USB/USB2support.mspx 5. For the information of the system or damage the CPU. 6 Although this motherboard offers stepless control, it is not recommended to the "Supported AGP VGA Cards List" on page 7 and page 8. CAUTION! 1. Power Management for USB 2.0 works fine under Microsoft...
The AGI [ASRock Graphics Interface] slot is detected, the system will automatically shutdown. Frequencies other than the recommended CPU bus frequencies may not work properly under Microsoft® Windows® XP SP1/2000 SP4. About the setting of AGP VGA card, ... http://www.microsoft.com/whdc/hwdev/bus/USB/USB2support.mspx 5. For the information of the system or damage the CPU. 6 Although this motherboard offers stepless control, it is not recommended to the "Supported AGP VGA Cards List" on page 7 and page 8. CAUTION! 1. Power Management for USB 2.0 works fine under Microsoft...

User Manual
Page 13
... the CPU into the socket by using a purely vertical motion. Step 3. Rotate the load plate onto the IHS. Remove PnP Cap (Pick and Place Cap): Use your left hand index finger and thumb to support the... load plate edge, engage PnP cap with right hand thumb and peel the cap from the socket while pressing on load plate, engage the load lever. Verify that the CPU is ... While pressing down lightly on center of PnP cap to match the two orientation key notches of the CPU with load plate tab under retention tab of the socket. Step 4-2. Step 4-3. It is within the...
... the CPU into the socket by using a purely vertical motion. Step 3. Rotate the load plate onto the IHS. Remove PnP Cap (Pick and Place Cap): Use your left hand index finger and thumb to support the... load plate edge, engage PnP cap with right hand thumb and peel the cap from the socket while pressing on load plate, engage the load lever. Verify that the CPU is ... While pressing down lightly on center of PnP cap to match the two orientation key notches of the CPU with load plate tab under retention tab of the socket. Step 4-2. Step 4-3. It is within the...

User Manual
Page 14
...the motherboard throughholes. Align fasteners with fan operation or contact other . Connect fan header with each other components. 14 Then connect the CPU fan to the CPU_FAN connector (CPU_FAN1, see page 9, No. 5). Rotate the fastener clockwise, then press down the fasteners without rotating ... Step 2. Ensure fan cables are securely fastened and in good contact with the CPU fan connector on the socket surface. Place the heatsink onto the socket. Ensure that supports Intel 775-Pin CPU. For proper installation, please kindly refer to the instruction manuals of heatsink and ...
...the motherboard throughholes. Align fasteners with fan operation or contact other . Connect fan header with each other components. 14 Then connect the CPU fan to the CPU_FAN connector (CPU_FAN1, see page 9, No. 5). Rotate the fastener clockwise, then press down the fasteners without rotating ... Step 2. Ensure fan cables are securely fastened and in good contact with the CPU fan connector on the socket surface. Place the heatsink onto the socket. Ensure that supports Intel 775-Pin CPU. For proper installation, please kindly refer to the instruction manuals of heatsink and ...

User Manual
Page 19
... 21) System panel Header (9-pin PANEL1) (see p.9 item 14) Chassis speaker Header (4-pin SPEAKER 1) (see p.9 item 16) Chassis fan connector (3-pin CHA_FAN1) (see p.9 item 13) CPU fan connector (4-pin CPU_FAN1) (see p.9 item 5) ATX power connector (20-pin ATXPWR1) (see p.9 No. 2) RRXD1 DDTR#1 DDSR#1 CCTS#1 1 RRI#1 RRTS#1 GND TTXD1 DDCD#1 This COM...
... 21) System panel Header (9-pin PANEL1) (see p.9 item 14) Chassis speaker Header (4-pin SPEAKER 1) (see p.9 item 16) Chassis fan connector (3-pin CHA_FAN1) (see p.9 item 13) CPU fan connector (4-pin CPU_FAN1) (see p.9 item 5) ATX power connector (20-pin ATXPWR1) (see p.9 No. 2) RRXD1 DDTR#1 DDSR#1 CCTS#1 1 RRI#1 RRTS#1 GND TTXD1 DDCD#1 This COM...

User Manual
Page 24
...775 CPU Installation Live Demo" Program This motherboard is equipped with Intel LGA 775 socket, which shows you how to install your own PC system step by improper handling, ASRock sincerely presents you need to contact ASRock or want to know more information. 4.2 Support CD Information The Support ... CD-ROM drive. To see this demo program, you may check this Live Demo, you start the installation of LGA 775 CPU in the motherboard's Support CD through the following path: ..\ MPEGAV \ LGA775INST.DAT 4.2.6 Contact Information If you a clear installation guide through the following path...
...775 CPU Installation Live Demo" Program This motherboard is equipped with Intel LGA 775 socket, which shows you how to install your own PC system step by improper handling, ASRock sincerely presents you need to contact ASRock or want to know more information. 4.2 Support CD Information The Support ... CD-ROM drive. To see this demo program, you may check this Live Demo, you start the installation of LGA 775 CPU in the motherboard's Support CD through the following path: ..\ MPEGAV \ LGA775INST.DAT 4.2.6 Contact Information If you a clear installation guide through the following path...

User Manual
Page 25
...[Disabled] for this feature, it requires a computer system with an Intel Pentium®4 processor that supports Hyper-Threading technology and an operating system that includes optimization for better system stability. Set to enable ... to [Auto] if using Microsoft® Windows® XP, or Linux kernel version 2.4.18 or higher. CPU Ratio Selection: CPU Ratio is determined by the installed processor. SDRAM Frequency: If [Auto] is selected, the motherboard will introduce...: This field should always be hidden if the current CPU does not support Hyper-Threading technology. 25
...[Disabled] for this feature, it requires a computer system with an Intel Pentium®4 processor that supports Hyper-Threading technology and an operating system that includes optimization for better system stability. Set to enable ... to [Auto] if using Microsoft® Windows® XP, or Linux kernel version 2.4.18 or higher. CPU Ratio Selection: CPU Ratio is determined by the installed processor. SDRAM Frequency: If [Auto] is selected, the motherboard will introduce...: This field should always be hidden if the current CPU does not support Hyper-Threading technology. 25

User Manual
Page 26
... active command and the precharge command. VERSION 3.31a Chipset Configuration [ Setup Help ] AGP Aperture Size ICH Delayed Transaction USB Controller USB Device Legacy Support CPU Thermal Throttling DRAM Write Throttling AGP/PCI Frequency ******** DRAM Timing ******** SDRAM CAS Latency Configure SDRAM Timing by SPD: SDRAM RAS# Precharge: This parameter...: Select [Enabled] will enable north bridge thermal management to emulate legacy I/O devices such as the AGP/PCI frequency. USB Device Legacy Support: Use this to enable or disable support to keep CPU from overheated. etc.
... active command and the precharge command. VERSION 3.31a Chipset Configuration [ Setup Help ] AGP Aperture Size ICH Delayed Transaction USB Controller USB Device Legacy Support CPU Thermal Throttling DRAM Write Throttling AGP/PCI Frequency ******** DRAM Timing ******** SDRAM CAS Latency Configure SDRAM Timing by SPD: SDRAM RAS# Precharge: This parameter...: Select [Enabled] will enable north bridge thermal management to emulate legacy I/O devices such as the AGP/PCI frequency. USB Device Legacy Support: Use this to enable or disable support to keep CPU from overheated. etc.

User Manual
Page 27
... execute code. No-Execution (NX) Memory Protection Technology is 32. Peripheral Configuration: Advanced AMIBIOS SETUP UTILITY - This option will be hidden if the current CPU does not support No-Excute Memory Protection. F1:Help Esc:Previous Menu :Select Item +/-:Change Values Enter:Select Sub-Menu F9:Setup Defaults F10:Save & Exit 27...
... execute code. No-Execution (NX) Memory Protection Technology is 32. Peripheral Configuration: Advanced AMIBIOS SETUP UTILITY - This option will be hidden if the current CPU does not support No-Excute Memory Protection. F1:Help Esc:Previous Menu :Select Item +/-:Change Values Enter:Select Sub-Menu F9:Setup Defaults F10:Save & Exit 27...


