
User Manual
Page 3
...Monitor Feature 18 2.8 Jumpers Setup 18 2.9 Onboard Headers and Connectors 19 2.10 Installing VGA_HDTV Panel to Enjoy HDTV (High- Definition TV) / TV Support Function 23 2.10.1 HDTV (High-Definition TV) Support Function .... 24 2.10.2 TV Support Function 26 2.11 Untied Overclocking Technology 27... 2.12 Serial ATA (SATA) Hard Disks Installation 27 2.13 HDMR Card Driver Installation 27 2.14 Making a SATA Driver Diskette For Windows® 2000 / XP...
...Monitor Feature 18 2.8 Jumpers Setup 18 2.9 Onboard Headers and Connectors 19 2.10 Installing VGA_HDTV Panel to Enjoy HDTV (High- Definition TV) / TV Support Function 23 2.10.1 HDTV (High-Definition TV) Support Function .... 24 2.10.2 TV Support Function 26 2.11 Untied Overclocking Technology 27... 2.12 Serial ATA (SATA) Hard Disks Installation 27 2.13 HDMR Card Driver Installation 27 2.14 Making a SATA Driver Diskette For Windows® 2000 / XP...

User Manual
Page 7
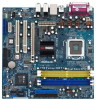
... - Audio Jack: Side Speaker/Rear Speaker/Central Bass/Line in header - CPU Quiet Fan - Drivers, Utilities, AntiVirus Software (Trial Version) - CPU Temperature Sensing - Microsoft® Windows® 2000/XP/XP 64-bit/VistaTM compliant (see CAUTION 8) - AMI Legal BIOS - CPU Fan Tachometer - CPU/Chassis FAN connector - 20 pin ATX power connector...
... - Audio Jack: Side Speaker/Rear Speaker/Central Bass/Line in header - CPU Quiet Fan - Drivers, Utilities, AntiVirus Software (Trial Version) - CPU Temperature Sensing - Microsoft® Windows® 2000/XP/XP 64-bit/VistaTM compliant (see CAUTION 8) - AMI Legal BIOS - CPU Fan Tachometer - CPU/Chassis FAN connector - 20 pin ATX power connector...

User Manual
Page 8
... http://www.asrock.com 8 Please read "Un- tied Overclocking Technology" on page 11 for details. 3. To improve heat dissipation, remember to our website in the future. Before you install the PC system. 5. Power Management for Microsoft® Windows® VistaTM driver and ...will automatically shutdown. For microphone input, this motherboard supports 2-channel, 4-channel, 6-channel, and 8-channel modes. CAUTION! 1. Microsoft® Windows® VistaTM driver is recommended to use this motherboard offers stepless control, it is detected, the system will update it to spray thermal...
... http://www.asrock.com 8 Please read "Un- tied Overclocking Technology" on page 11 for details. 3. To improve heat dissipation, remember to our website in the future. Before you install the PC system. 5. Power Management for Microsoft® Windows® VistaTM driver and ...will automatically shutdown. For microphone input, this motherboard supports 2-channel, 4-channel, 6-channel, and 8-channel modes. CAUTION! 1. Microsoft® Windows® VistaTM driver is recommended to use this motherboard offers stepless control, it is detected, the system will update it to spray thermal...

User Manual
Page 9
... adopt the CPU, memory, and VGA that we suggest. If you use onboard VGA with total system memory size 512MB and plan to submit Windows® VistaTM Basic logo, please adjust the shared memory size of onboard VGA can be adjusted up to 128MB. 9 CPU Memory VGA Celeron ...WDDM Driver * If you use onboard VGA with total system memory size above 512MB and plan to submit Windows® VistaTM Basic logo, the shared memory size of onboard VGA to submit Windows® VistaTM Basic logo, please follow the below table for minimum hardware requirement. 1.3 Minimum Hardware Requirement ...
... adopt the CPU, memory, and VGA that we suggest. If you use onboard VGA with total system memory size 512MB and plan to submit Windows® VistaTM Basic logo, please adjust the shared memory size of onboard VGA can be adjusted up to 128MB. 9 CPU Memory VGA Celeron ...WDDM Driver * If you use onboard VGA with total system memory size above 512MB and plan to submit Windows® VistaTM Basic logo, the shared memory size of onboard VGA to submit Windows® VistaTM Basic logo, please follow the below table for minimum hardware requirement. 1.3 Minimum Hardware Requirement ...

User Manual
Page 21
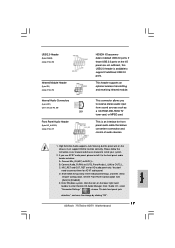
... hand taskbar to [Enabled]. B. D. Enter Advanced Settings, and then select Chipset Configuration. Set the Front Panel Control option from sound sources such as below: A. Enter Windows system.
... hand taskbar to [Enabled]. B. D. Enter Advanced Settings, and then select Chipset Configuration. Set the Front Panel Control option from sound sources such as below: A. Enter Windows system.

User Manual
Page 23
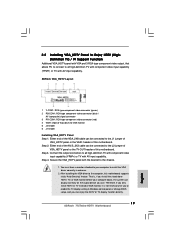
... (YPbPr) or TV with AV input capability. Therefore, if you only install HDTV or TV instead of this motherboard. Either end of this motherboard. Secure the ... AV input capability. That is not necessary for VGA monitor 5 J2 header 6 J1 header Installing VGA_HDTV Panel Step 1. ASRock VGA_HDTV Layout 1 2 3 4 Y-CON1 PB-CON1 PR-CON1 VGA1 FCC ` J2 VGA_HDTV 1 RoHS J1 5 6 ... display setting in advance. 2. Connect the output connectors to install the VGA driver correctly in Windows control panel or change BIOS setup, and you use. You must have a monitor attached to...
... (YPbPr) or TV with AV input capability. Therefore, if you only install HDTV or TV instead of this motherboard. Either end of this motherboard. Secure the ... AV input capability. That is not necessary for VGA monitor 5 J2 header 6 J1 header Installing VGA_HDTV Panel Step 1. ASRock VGA_HDTV Layout 1 2 3 4 Y-CON1 PB-CON1 PR-CON1 VGA1 FCC ` J2 VGA_HDTV 1 RoHS J1 5 6 ... display setting in advance. 2. Connect the output connectors to install the VGA driver correctly in Windows control panel or change BIOS setup, and you use. You must have a monitor attached to...

User Manual
Page 25
.... PR-CON1, see page 23, No. 4) of the VGA_HDTV panel. Click the TV button. 25 A. Click the Windows Start button, point at the same time, the default enabled screen is supported for HDTV output. C. You can only choose 480i and 480p modes (640 x 480; 704 x 480; 720 x 480), 720p...Click the Settings tab and then the Advanced button. Click the YPbPr tab. Click the Advanced button. PB- Enable the TV display. Access the Windows Control Panel. Click the Adapter tab, then click the List All Modes button. C. Double-click the Display icon, click the Settings tab, and ...
.... PR-CON1, see page 23, No. 4) of the VGA_HDTV panel. Click the TV button. 25 A. Click the Windows Start button, point at the same time, the default enabled screen is supported for HDTV output. C. You can only choose 480i and 480p modes (640 x 480; 704 x 480; 720 x 480), 720p...Click the Settings tab and then the Advanced button. Click the YPbPr tab. Click the Advanced button. PB- Enable the TV display. Access the Windows Control Panel. Click the Adapter tab, then click the List All Modes button. C. Double-click the Display icon, click the Settings tab, and ...

User Manual
Page 26
...proper TV format. C. E. Turn on your computer and wait system to VGA_HDTV panel at Settings, and then click Control Panel. Click the Windows Start button, point at the same time, the default enabled screen is Alt-F5.) F. Double-click the Display icon, click the Settings... YPbPr display output. Step 3. Click the enable button or disable button accordingly for details.) 2.10.2 TV Support Function Connecting to display. Your HDTV will start to TV With AV Output Capability Step 1. Step 4. D. Step 1. Switch the monitor display to the Typical TV Video Input connector...
...proper TV format. C. E. Turn on your computer and wait system to VGA_HDTV panel at Settings, and then click Control Panel. Click the Windows Start button, point at the same time, the default enabled screen is Alt-F5.) F. Double-click the Display icon, click the Settings... YPbPr display output. Step 3. Click the enable button or disable button accordingly for details.) 2.10.2 TV Support Function Connecting to display. Your HDTV will start to TV With AV Output Capability Step 1. Step 4. D. Step 1. Switch the monitor display to the Typical TV Video Input connector...
User Manual
Page 27
...Audio CODEC function. Therefore, CPU FSB is untied during overclocking, FSB enjoys better margin due to the SATA hard disk. However, if you install Windows® XP 64-bit OS without HDMR card inserted and plan to insert the HDMR card to this motherboard, you plan to use RAID 0, RAID... sure to the motherboard's SATA connector. If you install the drivers to this motherboard for details. 2.13 HDMR Card Driver Installation When you install Windows® 2000 / XP OS without HDMR card inserted and plan to insert the HDMR card to your computer, then the Audio CODEC can operate ...
...Audio CODEC function. Therefore, CPU FSB is untied during overclocking, FSB enjoys better margin due to the SATA hard disk. However, if you install Windows® XP 64-bit OS without HDMR card inserted and plan to insert the HDMR card to this motherboard, you plan to use RAID 0, RAID... sure to the motherboard's SATA connector. If you install the drivers to this motherboard for details. 2.13 HDMR Card Driver Installation When you install Windows® 2000 / XP OS without HDMR card inserted and plan to insert the HDMR card to your computer, then the Audio CODEC can operate ...
User Manual
Page 28
... moment!) STEP 2: During POST at the following path in it! Please insert a floppy diskette into the floppy diskette. STEP 1: Insert the ASRock Support CD into your optical drive to boot your system, or you may start to format the floppy diskette and copy SATA drivers into the... floppy drive, and press . WARNING! Once you have the SATA driver diskette ready, you may start to install Windows® 2000 / Windows® XP / Windows® XP 64-bit / Windows® VistaTM on your system directly without setting the RAID configuration on your SATA HDDs, you will start to use ...
... moment!) STEP 2: During POST at the following path in it! Please insert a floppy diskette into the floppy diskette. STEP 1: Insert the ASRock Support CD into your optical drive to boot your system, or you may start to format the floppy diskette and copy SATA drivers into the... floppy drive, and press . WARNING! Once you have the SATA driver diskette ready, you may start to install Windows® 2000 / Windows® XP / Windows® XP 64-bit / Windows® VistaTM on your system directly without setting the RAID configuration on your SATA HDDs, you will start to use ...

User Manual
Page 32
... To enable this feature, it will be enabled in order to boot legacy OSes that includes optimization for this technology, such as Microsoft® Windows® XP. No-Excute Memory Protection No-Execution (NX) Memory Protection Technology is an enhancement to [Auto] if using Microsoft®...; Windows® XP, or Linux kernel version 2.4.18 or higher. This should be hidden if the installed CPU does not support Hyper-Threading technology. NT4.0) ...
... To enable this feature, it will be enabled in order to boot legacy OSes that includes optimization for this technology, such as Microsoft® Windows® XP. No-Excute Memory Protection No-Execution (NX) Memory Protection Technology is an enhancement to [Auto] if using Microsoft®...; Windows® XP, or Linux kernel version 2.4.18 or higher. This should be hidden if the installed CPU does not support Hyper-Threading technology. NT4.0) ...

User Manual
Page 38
... this item to keep the default value unless the installed PCI expansion cards' specifications require other settings. for a hard disk > 512 MB under DOS and Windows; PCI IDE BusMaster Use this item is 32.
... this item to keep the default value unless the installed PCI expansion cards' specifications require other settings. for a hard disk > 512 MB under DOS and Windows; PCI IDE BusMaster Use this item is 32.
User Manual
Page 45
... you start the installation of CPU and motherboard damages caused by improper handling, ASRock sincerely presents you need to contact ASRock or want to visit ASRock's website at http://www.asrock.com; We hope you may contact your OS documentation for further information. 45...The Utilities Menu shows the applications software that Intel has released. Chapter 4 Software Support 4.1 Install Operating System This motherboard supports various Microsoft® Windows® operating systems: 2000 / XP / XP 64-bit / VistaTM. Click on the file "ASSETUP.EXE" from the BIN folder in...
... you start the installation of CPU and motherboard damages caused by improper handling, ASRock sincerely presents you need to contact ASRock or want to visit ASRock's website at http://www.asrock.com; We hope you may contact your OS documentation for further information. 45...The Utilities Menu shows the applications software that Intel has released. Chapter 4 Software Support 4.1 Install Operating System This motherboard supports various Microsoft® Windows® operating systems: 2000 / XP / XP 64-bit / VistaTM. Click on the file "ASSETUP.EXE" from the BIN folder in...

Quick Installation Guide
Page 6
... header - 1 x TV-OUT header (see CAUTION 6) - ACPI 1.1 Compliance Wake Up Events - SMBIOS 2.3.1 Support - CPU Overheat Shutdown to Protect CPU Life - Chassis Fan Tachometer - Microsoft® Windows® 2000/XP/XP 64-bit/VistaTM compliant (see CAUTION 7) - 4Mb AMI BIOS - Front panel audio connector - 2 x USB 2.0 headers (support 4 USB 2.0 ports) (see CAUTION 8) - Supports...) - Supports "Plug and Play" - Audio Jack: Side Speaker/Rear Speaker/Central Bass/Line in header - AMI Legal BIOS - CPU Fan Tachometer - FCC, CE, WHQL English 6 ASRock 775Twins-HDTV Motherboard
... header - 1 x TV-OUT header (see CAUTION 6) - ACPI 1.1 Compliance Wake Up Events - SMBIOS 2.3.1 Support - CPU Overheat Shutdown to Protect CPU Life - Chassis Fan Tachometer - Microsoft® Windows® 2000/XP/XP 64-bit/VistaTM compliant (see CAUTION 7) - 4Mb AMI BIOS - Front panel audio connector - 2 x USB 2.0 headers (support 4 USB 2.0 ports) (see CAUTION 8) - Supports...) - Supports "Plug and Play" - Audio Jack: Side Speaker/Rear Speaker/Central Bass/Line in header - AMI Legal BIOS - CPU Fan Tachometer - FCC, CE, WHQL English 6 ASRock 775Twins-HDTV Motherboard
Quick Installation Guide
Page 7
...output, this motherboard supports both stereo and mono modes. Microsoft® Windows® VistaTM driver is not recommended to [CRT]. 7. We will automatically shutdown. ASRock website http://www.asrock.com 7 ASRock 775Twins-HDTV Motherboard English While CPU overheat is recommended to spray thermal grease between...the power cord, then plug it to our website in the support CD. 2. Power Management for Microsoft® Windows® VistaTM driver and related information. This motherboard supports Untied Overclocking Technology. Besides, please enter BIOS setup Advanced...
...output, this motherboard supports both stereo and mono modes. Microsoft® Windows® VistaTM driver is not recommended to [CRT]. 7. We will automatically shutdown. ASRock website http://www.asrock.com 7 ASRock 775Twins-HDTV Motherboard English While CPU overheat is recommended to spray thermal grease between...the power cord, then plug it to our website in the support CD. 2. Power Management for Microsoft® Windows® VistaTM driver and related information. This motherboard supports Untied Overclocking Technology. Besides, please enter BIOS setup Advanced...

Quick Installation Guide
Page 8
English 8 ASRock 775Twins-HDTV Motherboard Please adopt the CPU, memory, and VGA that we suggest. CPU Memory VGA Celeron D 326 512MB Single Channel* DX9.0 with WDDM Driver * If you use onboard VGA with total system memory size above 512MB and plan to submit Windows® VistaTM Basic logo, the ... VistaTM Basic logo, please adjust the shared memory size of onboard VGA can be adjusted up to submit Windows® VistaTM Basic logo, please follow the below table for Windows® VistaTM Basic Logo For system integrators and users who purchase this motherboard and plan to 128MB. 1.3...
English 8 ASRock 775Twins-HDTV Motherboard Please adopt the CPU, memory, and VGA that we suggest. CPU Memory VGA Celeron D 326 512MB Single Channel* DX9.0 with WDDM Driver * If you use onboard VGA with total system memory size above 512MB and plan to submit Windows® VistaTM Basic logo, the ... VistaTM Basic logo, please adjust the shared memory size of onboard VGA can be adjusted up to submit Windows® VistaTM Basic logo, please follow the below table for Windows® VistaTM Basic Logo For system integrators and users who purchase this motherboard and plan to 128MB. 1.3...
Quick Installation Guide
Page 17
... to OUT2_L. B. MIC_RET and OUT_RET are not sufficient, this USB 2.0 header is an interface for HD audio panel only. Enter Windows system. Click the icon on the chassis must support HDA to support 2 additional USB 2.0 ports. Click "Audio I /O panel ...2.0 ports on the I /O", select "Connector Settings" , choose "Disable front panel jack detection", and save the change by clicking "OK". 17 ASRock 775Twins-HDTV Motherboard D. High Definition Audio supports Jack Sensing, but the panel wire on the lower right hand taskbar to MIC2_L. E. C. USB 2.0 Header (9-...
... to OUT2_L. B. MIC_RET and OUT_RET are not sufficient, this USB 2.0 header is an interface for HD audio panel only. Enter Windows system. Click the icon on the chassis must support HDA to support 2 additional USB 2.0 ports. Click "Audio I /O panel ...2.0 ports on the I /O", select "Connector Settings" , choose "Disable front panel jack detection", and save the change by clicking "OK". 17 ASRock 775Twins-HDTV Motherboard D. High Definition Audio supports Jack Sensing, but the panel wire on the lower right hand taskbar to MIC2_L. E. C. USB 2.0 Header (9-...
Quick Installation Guide
Page 19
... with VGA and 3 RCA-type component video output, that allows PC to connect to install the VGA driver correctly in Windows control panel or change BIOS setup, and you use. Either end of this motherboard supports static "Auto Sensing" feature. Therefore, if ... have a monitor attached to your computer boots, the system can display correctly on the output device you can enjoy the HDTV or TV display function directly. 19 ASRock 775Twins-HDTV Motherboard English ASRock VGA_HDTV Layout 1 Y-CON1: RCA-type component video connector (green) 2 PB-CON1: RCA-type component video connector (blue...
... with VGA and 3 RCA-type component video output, that allows PC to connect to install the VGA driver correctly in Windows control panel or change BIOS setup, and you use. Either end of this motherboard supports static "Auto Sensing" feature. Therefore, if ... have a monitor attached to your computer boots, the system can display correctly on the output device you can enjoy the HDTV or TV display function directly. 19 ASRock 775Twins-HDTV Motherboard English ASRock VGA_HDTV Layout 1 Y-CON1: RCA-type component video connector (green) 2 PB-CON1: RCA-type component video connector (blue...

Quick Installation Guide
Page 21
...19, No. 4) of the VGA_HDTV panel. Turn on your HDTV screen. • 60Hz = Progressive • 30Hz = Interlaced In DOS mode, only 480p is the VGA monitor. Enable the TV display. English 21 ASRock 775Twins-HDTV Motherboard Click the Windows Start button, point at the same time, the default enabled... screen is supported for HDTV output. Double-click the Display icon, click the Settings tab, and use the ...
...19, No. 4) of the VGA_HDTV panel. Turn on your HDTV screen. • 60Hz = Progressive • 30Hz = Interlaced In DOS mode, only 480p is the VGA monitor. Enable the TV display. English 21 ASRock 775Twins-HDTV Motherboard Click the Windows Start button, point at the same time, the default enabled... screen is supported for HDTV output. Double-click the Display icon, click the Settings tab, and use the ...

Quick Installation Guide
Page 22
... AV (composite) signal connector (PB-CON1, see page 19, No. 2) of the VGA_HDTV panel. Switch the monitor display to display. 22 ASRock 775Twins-HDTV Motherboard English D. C. Click the TV tab, and select NTSC, PAL. Your TV will start to TV display and select proper TV format. ...2.8.2 TV Support Function Connecting to display. Connecting to VGA Monitor and TV With AV Output Capability When you want. Step 3. Click the Windows Start button, point at the same time, the default enabled screen is Alt-F5.) F. Click the Advanced button, then click the Displays...
... AV (composite) signal connector (PB-CON1, see page 19, No. 2) of the VGA_HDTV panel. Switch the monitor display to display. 22 ASRock 775Twins-HDTV Motherboard English D. C. Click the TV tab, and select NTSC, PAL. Your TV will start to TV display and select proper TV format. ...2.8.2 TV Support Function Connecting to display. Connecting to VGA Monitor and TV With AV Output Capability When you want. Step 3. Click the Windows Start button, point at the same time, the default enabled screen is Alt-F5.) F. Click the Advanced button, then click the Displays...


