U2868PQU Data Sheet
Page 1
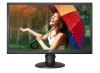
... 1 billion colors for Rich Details AOC's 4K Ultra HD display is a 28-inch professional monitor with sleek hairline texture, featuring two 3-watt speakers AOC Monitors 4K monitor 68 Series 28", 3840 x 2160 U2868PQU 28-inch 4K Ultra HD Professional Monitor for rich details • VGA, DVI with HDCP, HDMI (MHL), Display Port, USB 2.0 (2x), USB 3.0 (2x) connectivity • Fully adjustable tilt, swivel, pivot, height adjustments • Narrow border design with 3840 x 2160 Ultra HD Resolution, four...
... 1 billion colors for Rich Details AOC's 4K Ultra HD display is a 28-inch professional monitor with sleek hairline texture, featuring two 3-watt speakers AOC Monitors 4K monitor 68 Series 28", 3840 x 2160 U2868PQU 28-inch 4K Ultra HD Professional Monitor for rich details • VGA, DVI with HDCP, HDMI (MHL), Display Port, USB 2.0 (2x), USB 3.0 (2x) connectivity • Fully adjustable tilt, swivel, pivot, height adjustments • Narrow border design with 3840 x 2160 Ultra HD Resolution, four...
U2868PQU Data Sheet
Page 2
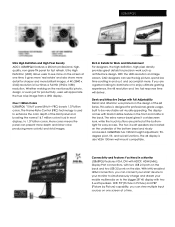
... the touch buttons are printed at a time. The display comes with two 3-watt speakers. With MHL-enabled HDMI connection, you are located on the underside of the 8-bit panel and boosting the normal 16.7 million colors foud in a Monitor U2868PQU features VGA, DVI with HDCP, HDMI (MHL), Display Port connections, with Full Adjustability Detail and attention was placed on the side. A 4K (3840 x 2160) resolution is also VESA 100mm wall-mount compatible...
... the touch buttons are printed at a time. The display comes with two 3-watt speakers. With MHL-enabled HDMI connection, you are located on the underside of the 8-bit panel and boosting the normal 16.7 million colors foud in a Monitor U2868PQU features VGA, DVI with HDCP, HDMI (MHL), Display Port connections, with Full Adjustability Detail and attention was placed on the side. A 4K (3840 x 2160) resolution is also VESA 100mm wall-mount compatible...
U2868PQU Data Sheet
Page 3
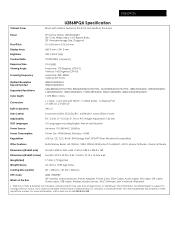
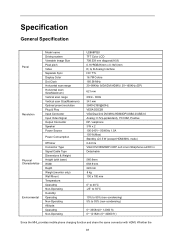
... Panel Pixel Pitch Display Area Brightness Contrast Ratio Response Time Viewing Angle Scanning Frequency Optimal Resolution Recommended Supported Resolutions Color Depth Connectors Built-In Speakers User Control Adjustability OSD Languages Power Source Power Consumption Regulations TFT Active Matrix, LED Backlight 28" Class Widescreen, 16:9 Aspect Ratio 28" Viewable Image Size, Diagonal 0.16 (H) mm x 0.16 (v) mm 620.9 mm x 341.2 mm 300 cd/m2 (typ) 70,000,000:1 (dynamic) 1ms (gtg) Horizontal: 170 Degrees (CR>10) Vertical: 160 Degrees (CR>10) Horizontal...
... Panel Pixel Pitch Display Area Brightness Contrast Ratio Response Time Viewing Angle Scanning Frequency Optimal Resolution Recommended Supported Resolutions Color Depth Connectors Built-In Speakers User Control Adjustability OSD Languages Power Source Power Consumption Regulations TFT Active Matrix, LED Backlight 28" Class Widescreen, 16:9 Aspect Ratio 28" Viewable Image Size, Diagonal 0.16 (H) mm x 0.16 (v) mm 620.9 mm x 341.2 mm 300 cd/m2 (typ) 70,000,000:1 (dynamic) 1ms (gtg) Horizontal: 170 Degrees (CR>10) Vertical: 160 Degrees (CR>10) Horizontal...
U2868PQU User Manual
Page 2
...Power ...5 Installation...6 Cleaning...7 Other ...8 Setup ...9 Contents in Box ...9 Setup Base ...10 Wall Mounting ...11 Adjusting Viewing Angle...12 Using "MHL(Mobile High-Definition Link)"...13 Connecting the Monitor...14 Adjusting ...16 Setting Optimal Resolution ...16 Windows Vista ...16 Windows ME/2000...17 Windows 8 ...18 Hotkeys ...20 OSD Setting...22 Luminance ...23 Image Setup ...24 Color Setup...25 Picture Boost ...26 OSD Setup ...27 PIP Setting...28 Extra ...29 Exit...30 LED Indicator ...31 Driver ...32 Monitor Driver ...32 Windows 8 ...32 Windows 7 ...36 Windows Vista ...40 Windows...
...Power ...5 Installation...6 Cleaning...7 Other ...8 Setup ...9 Contents in Box ...9 Setup Base ...10 Wall Mounting ...11 Adjusting Viewing Angle...12 Using "MHL(Mobile High-Definition Link)"...13 Connecting the Monitor...14 Adjusting ...16 Setting Optimal Resolution ...16 Windows Vista ...16 Windows ME/2000...17 Windows 8 ...18 Hotkeys ...20 OSD Setting...22 Luminance ...23 Image Setup ...24 Color Setup...25 Picture Boost ...26 OSD Setup ...27 PIP Setting...28 Extra ...29 Exit...30 LED Indicator ...31 Driver ...32 Monitor Driver ...32 Windows 8 ...32 Windows 7 ...36 Windows Vista ...40 Windows...
U2868PQU User Manual
Page 5
... of power source indicated on the label. The wall socket shall be installed near the equipment and shall be easily accessible. 5 Do not defeat the safety purpose of power supplied to your home, consult your outlet does not accommodate the three-wire plug, have an electrician install the correct outlet, or use an adapter to power surges. Do not overload power strips...
... of power source indicated on the label. The wall socket shall be installed near the equipment and shall be easily accessible. 5 Do not defeat the safety purpose of power supplied to your home, consult your outlet does not accommodate the three-wire plug, have an electrician install the correct outlet, or use an adapter to power surges. Do not overload power strips...
U2868PQU User Manual
Page 11
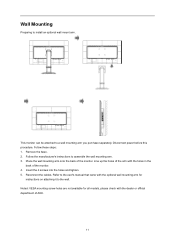
... cables. Wall Mounting Preparing to assemble the wall mounting arm. 3. Follow the manufacturer's instructions to install an optional wall mount arm. This monitor can be attached to the user's manual that came with the optional wall mounting arm for all models, please check with the holes in the back of the monitor. Line up the holes of the arm with the dealer or official department of AOC. 11 Remove the base...
... cables. Wall Mounting Preparing to assemble the wall mounting arm. 3. Follow the manufacturer's instructions to install an optional wall mount arm. This monitor can be attached to the user's manual that came with the optional wall mounting arm for all models, please check with the holes in the back of the monitor. Line up the holes of the arm with the dealer or official department of AOC. 11 Remove the base...

U2868PQU User Manual
Page 13
... the source button and switch to HDMI /MHL to enjoy videos and photos (imported from the mobile device) with a low Resolution is played on the product. Using "MHL(Mobile High-Definition Link)" 1."MHL" (Mobile High-Definition Link) This feature allows you need an MHL-certified mobile device. Connect the micro USB port on the mobile device. After about 3 seconds, the MHL screen...
... the source button and switch to HDMI /MHL to enjoy videos and photos (imported from the mobile device) with a low Resolution is played on the product. Using "MHL(Mobile High-Definition Link)" 1."MHL" (Mobile High-Definition Link) This feature allows you need an MHL-certified mobile device. Connect the micro USB port on the mobile device. After about 3 seconds, the MHL screen...
U2868PQU User Manual
Page 14
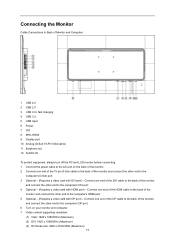
...'s D-Sub port. 3 Optional - (Requires a video card with HDMI port) - Connecting the Monitor Cable Connections In Back of Monitor and Computer: 1 USB 2.0 2 USB 2.0 3 USB 3.0+ fast charging 4 USB 3.0 5 USB input 6 Power 7 DVI 8 MHL-HDMI 9 Display port 10 Analog (D-Sub 15-Pin VGA cable) 11 Earphone out 12 AUDIO IN To protect equipment, always turn off the PC and LCD monitor before connecting. 1 Connect the power cable to the AC port on your monitor and computer. 7 Video content supporting resolution: (1) VGA: 1920 x 1080/60Hz (Maximum) (2) DVI: 1920 x 1080/60Hz (Maximum) (3) DVI Dual-Link...
...'s D-Sub port. 3 Optional - (Requires a video card with HDMI port) - Connecting the Monitor Cable Connections In Back of Monitor and Computer: 1 USB 2.0 2 USB 2.0 3 USB 3.0+ fast charging 4 USB 3.0 5 USB input 6 Power 7 DVI 8 MHL-HDMI 9 Display port 10 Analog (D-Sub 15-Pin VGA cable) 11 Earphone out 12 AUDIO IN To protect equipment, always turn off the PC and LCD monitor before connecting. 1 Connect the power cable to the AC port on your monitor and computer. 7 Video content supporting resolution: (1) VGA: 1920 x 1080/60Hz (Maximum) (2) DVI: 1920 x 1080/60Hz (Maximum) (3) DVI Dual-Link...
U2868PQU User Manual
Page 22
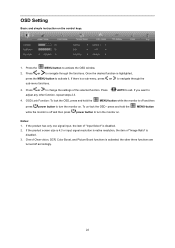
... control keys. 1. OSD Lock Function: To lock the OSD, press and hold the MENU-button while the monitor is native resolution, the item of the selected function. Notes: 1. If the product screen size is 4:3 or input signal resolution is off accordingly. 22 Press or to navigate through the functions. Press or to change the settings of "Image Ratio" is disabled. 2. the other function, repeat steps 2-3. to navigate through the 3. AUTO...
... control keys. 1. OSD Lock Function: To lock the OSD, press and hold the MENU-button while the monitor is native resolution, the item of the selected function. Notes: 1. If the product screen size is 4:3 or input signal resolution is off accordingly. 22 Press or to navigate through the functions. Press or to change the settings of "Image Ratio" is disabled. 2. the other function, repeat steps 2-3. to navigate through the 3. AUTO...
U2868PQU User Manual
Page 28
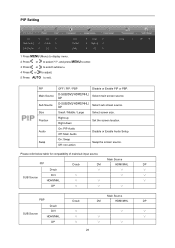
...-down Set the screen location. PIP Main Source Sub Source Size Position Audio Swap OFF / PIP / PBP Disable or Enable PIP or PBP. PIP Setting 1 Press MENU (Menu) to display menu. 2 Press or to select PIP, and press MENU to enter. 3 Press or to select submenu. 4 Press or to adjust. 5 Press AUTO to exit. Please refer below table for compatibility of main/sub input source. Main Source PIP D-sub DVI HDMI/MHL...
...-down Set the screen location. PIP Main Source Sub Source Size Position Audio Swap OFF / PIP / PBP Disable or Enable PIP or PBP. PIP Setting 1 Press MENU (Menu) to display menu. 2 Press or to select PIP, and press MENU to enter. 3 Press or to select submenu. 4 Press or to adjust. 5 Press AUTO to exit. Please refer below table for compatibility of main/sub input source. Main Source PIP D-sub DVI HDMI/MHL...
U2868PQU User Manual
Page 29
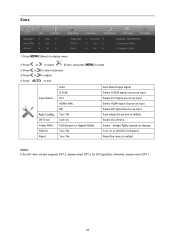
... Auto Detect input signal Select D-SUB signal source as input Select DVI signal source as input Select HDMI signal Source as input Select DP signal Source as input Auto adjust.the picture to default. otherwise, please select DP1.1. 29 Select image Ratio format for DP Capability; Select DC off DDC/CI Support. Notes: If the DP video content supports DP1.2, please select DP1.2 for display. Turn on or off time. Reset the menu to default. Input Select Auto Config. Extra 1 Press MENU (Menu) to display menu...
... Auto Detect input signal Select D-SUB signal source as input Select DVI signal source as input Select HDMI signal Source as input Select DP signal Source as input Auto adjust.the picture to default. otherwise, please select DP1.1. 29 Select image Ratio format for DP Capability; Select DC off DDC/CI Support. Notes: If the DP video content supports DP1.2, please select DP1.2 for display. Turn on or off time. Reset the menu to default. Input Select Auto Config. Extra 1 Press MENU (Menu) to display menu...
U2868PQU User Manual
Page 32
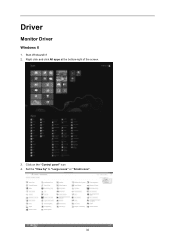
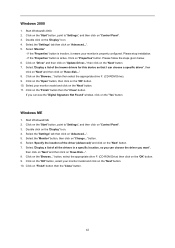
Right click and click All apps at the bottom-right of the screen. 3. Click on the "Control panel" icon 4. Driver Monitor Driver Windows 8 1. Start Windows® 8 2. Set the "View by" to "Large icons" or "Small icons". 32
Right click and click All apps at the bottom-right of the screen. 3. Click on the "Control panel" icon 4. Driver Monitor Driver Windows 8 1. Start Windows® 8 2. Set the "View by" to "Large icons" or "Small icons". 32
U2868PQU User Manual
Page 41
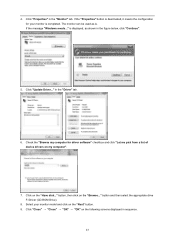
... for driver software" checkbox and click "Let me pick from a list of device drivers on the "Browse..." Click on the following screens displayed in the figure below, click "Continue". 5. Click "Close" → "Close" → "OK" → "OK" on the "Have disk..." If the message "Windows needs..." Check the "Browse my computer for your monitor model and click on the "Next" button. 9. button...
... for driver software" checkbox and click "Let me pick from a list of device drivers on the "Browse..." Click on the following screens displayed in the figure below, click "Continue". 5. Click "Close" → "Close" → "OK" → "OK" on the "Have disk..." If the message "Windows needs..." Check the "Browse my computer for your monitor model and click on the "Next" button. 9. button...
U2868PQU User Manual
Page 42
... on 'Change...' Select the 'Settings' tab then click on 'Finish' button then the 'Close' button. 42 Please follow the steps given below. 6. Select 'Display a list of the known drivers for this device so that I can see the 'Digital Signature Not Found' window, click on 'Control Panel'. 3. Select your monitor model and click on 'Have disk...'. 8. Click on 'Advanced...'. 5. Please stop installation. - Start Windows® Me...
... on 'Change...' Select the 'Settings' tab then click on 'Finish' button then the 'Close' button. 42 Please follow the steps given below. 6. Select 'Display a list of the known drivers for this device so that I can see the 'Digital Signature Not Found' window, click on 'Control Panel'. 3. Select your monitor model and click on 'Have disk...'. 8. Click on 'Advanced...'. 5. Please stop installation. - Start Windows® Me...
U2868PQU User Manual
Page 44
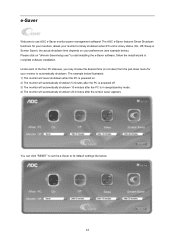
... (in sleep/stand-by mode. 4) The monitor will automatically shutdown 10 minutes after the screen saver appears. Please click on your monitor to timely shutdown when PC unit is in minutes) from the pull-down menu for your monitors, allows your monitor to automatically shutdown. The example below ). You can click "RESET" to set the e-Saver to use AOC e-Saver monitor power management software! The AOC e-Saver...
... (in sleep/stand-by mode. 4) The monitor will automatically shutdown 10 minutes after the screen saver appears. Please click on your monitor to timely shutdown when PC unit is in minutes) from the pull-down menu for your monitors, allows your monitor to automatically shutdown. The example below ). You can click "RESET" to set the e-Saver to use AOC e-Saver monitor power management software! The AOC e-Saver...
U2868PQU User Manual
Page 46
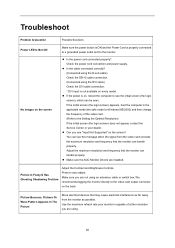
... the signal from the monitor as far away from the video card exceeds the maximum resolution and frequency that the monitor can handle properly. Make sure the AOC Monitor Drivers are installed. You can see "Input Not Supported" on the screen? Troubleshoot Problem & Question Power LED Is Not ON No images on the screen Possible Solutions Make sure the power button is ON and the Power Cord is capable of the video card. (Refer to auto adjust. Check the power cord connection and power supply...
... the signal from the monitor as far away from the video card exceeds the maximum resolution and frequency that the monitor can handle properly. Make sure the AOC Monitor Drivers are installed. You can see "Input Not Supported" on the screen? Troubleshoot Problem & Question Power LED Is Not ON No images on the screen Possible Solutions Make sure the power button is ON and the Power Cord is capable of the video card. (Refer to auto adjust. Check the power cord connection and power supply...
U2868PQU User Manual
Page 47
... Computer Video Card should be in its slot. Picture has color defects (white does not look white) Horizontal or vertical disturbances on the keyboard while observing the CAPS LOCK LED. Make sure your computer is properly connected to the computer. Missing one of the primary colors (RED, GREEN, or BLUE) Inspect the monitor's video cable and make sure no pin is not centered or sized properly Adjust H-Position and V-Position or press hot-key (AUTO). Monitor...
... Computer Video Card should be in its slot. Picture has color defects (white does not look white) Horizontal or vertical disturbances on the keyboard while observing the CAPS LOCK LED. Make sure your computer is properly connected to the computer. Missing one of the primary colors (RED, GREEN, or BLUE) Inspect the monitor's video cable and make sure no pin is not centered or sized properly Adjust H-Position and V-Position or press hot-key (AUTO). Monitor...
U2868PQU User Manual
Page 48
Display Color Dot Clock Horizontal scan range Horizontal scan Size(Maximum) Vertical scan range Vertical scan Size(Maximum) Optimal preset resolution Plug & Play Input Connector Input Video Signal Output Connector Speaker Power Source Power Consumption Off timer Connector Type Signal Cable Type Dimensions & Weight: Height (with base) Width Depth Weight (monitor only) Wall Mount Temperature: Operating Non-Operating Humidity: Operating Non-Operating Altitude: Operating Non-Operating U2868PQU TFT Color LCD 708.538 mm diagonal(16:9) 0.16*RGB(H)mm x 0.16(V)mm R, G, B Analog Interface H/V TTL 16.7M...
Display Color Dot Clock Horizontal scan range Horizontal scan Size(Maximum) Vertical scan range Vertical scan Size(Maximum) Optimal preset resolution Plug & Play Input Connector Input Video Signal Output Connector Speaker Power Source Power Consumption Off timer Connector Type Signal Cable Type Dimensions & Weight: Height (with base) Width Depth Weight (monitor only) Wall Mount Temperature: Operating Non-Operating Humidity: Operating Non-Operating Altitude: Operating Non-Operating U2868PQU TFT Color LCD 708.538 mm diagonal(16:9) 0.16*RGB(H)mm x 0.16(V)mm R, G, B Analog Interface H/V TTL 16.7M...
U2868PQU User Manual
Page 56
... heating or air conditioning or electrical powers failures, surges, or other irregularities This limited warranty does not cover any of the countries specified within one of the product firmware or hardware that you or any costs...service and support section on www.aoc-europe.com for the warranty instructions in your monitor well enough during transport due to improper packaging • Improper installation or maintenance other than ordinary commercial or industrial application • Adjustment by non-authorized source • Repair, modification, or installation of options or parts...
... heating or air conditioning or electrical powers failures, surges, or other irregularities This limited warranty does not cover any of the countries specified within one of the product firmware or hardware that you or any costs...service and support section on www.aoc-europe.com for the warranty instructions in your monitor well enough during transport due to improper packaging • Improper installation or maintenance other than ordinary commercial or industrial application • Adjustment by non-authorized source • Repair, modification, or installation of options or parts...
U2868PQU User Manual
Page 58
... refer to the service and support section on AOC's website for the warranty instructions in your monitor well enough during transport due to improper packaging • Improper installation or maintenance other then in accordance with AOC's user manual • Misuse • Neglect • Any cause other than ordinary commercial or industrial application • Adjustment by non-authorized source 58 As a Standard...
... refer to the service and support section on AOC's website for the warranty instructions in your monitor well enough during transport due to improper packaging • Improper installation or maintenance other then in accordance with AOC's user manual • Misuse • Neglect • Any cause other than ordinary commercial or industrial application • Adjustment by non-authorized source 58 As a Standard...


