Q2770PQU User Manual
Page 2
......7 Other ...8 Setup ...9 Content of the Box ...9 Setup Stand ...10 Adjusting Viewing Angle...11 Connecting the Monitor...12 Wall Mounting ...15 Adjusting ...16 Setting Optimal Resolution ...16 Windows Vista ...16 Windows XP ...18 Windows ME/2000...19 Windows 8 ...20 Hotkeys ...22 Clear Vision ...23 Using "MHL(Mobile... High-Definition Link)"(Optional 24 OSD Setting...25 Luminance ...26 Image Setup ...27 Color Setup...28 Picture Boost ...29 OSD Setup ...30 Extra ...31 Exit...32 LED Indicator ...33 ...
......7 Other ...8 Setup ...9 Content of the Box ...9 Setup Stand ...10 Adjusting Viewing Angle...11 Connecting the Monitor...12 Wall Mounting ...15 Adjusting ...16 Setting Optimal Resolution ...16 Windows Vista ...16 Windows XP ...18 Windows ME/2000...19 Windows 8 ...20 Hotkeys ...22 Clear Vision ...23 Using "MHL(Mobile... High-Definition Link)"(Optional 24 OSD Setting...25 Luminance ...26 Image Setup ...27 Color Setup...28 Picture Boost ...29 OSD Setup ...30 Extra ...31 Exit...32 LED Indicator ...33 ...
Q2770PQU User Manual
Page 17
5 Click Display Settings. 6 Set the resolution SLIDE-BAR to Optimal preset resolution 17
5 Click Display Settings. 6 Set the resolution SLIDE-BAR to Optimal preset resolution 17

Q2770PQU User Manual
Page 18
Windows XP For Windows XP: 1 Click START. 2 Click SETTINGS. 3 Click CONTROL PANEL. 4 Click Appearance and Themes. 5 Double click DISPLAY. 18
Windows XP For Windows XP: 1 Click START. 2 Click SETTINGS. 3 Click CONTROL PANEL. 4 Click Appearance and Themes. 5 Double click DISPLAY. 18
Q2770PQU User Manual
Page 19
6 Click SETTINGS. 7 Set the resolution SLIDE-BAR to Optimal preset resolution Windows ME/2000 For Windows ME/2000: 1 Click START. 2 Click SETTINGS. 3 Click CONTROL PANEL. 4 Double click DISPLAY. 5 Click SETTINGS. 6 Set the resolution SLIDE-BAR to Optimal preset resolution 19
6 Click SETTINGS. 7 Set the resolution SLIDE-BAR to Optimal preset resolution Windows ME/2000 For Windows ME/2000: 1 Click START. 2 Click SETTINGS. 3 Click CONTROL PANEL. 4 Double click DISPLAY. 5 Click SETTINGS. 6 Set the resolution SLIDE-BAR to Optimal preset resolution 19
Q2770PQU User Manual
Page 20
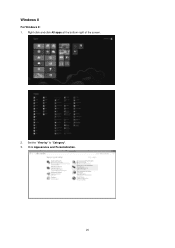
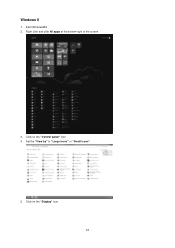
Windows 8 For Windows 8: 1. Set the "View by" to "Category". 3. Click Appearance and Personalization. 20 Right click and click All apps at the bottom-right of the screen. 2.
Windows 8 For Windows 8: 1. Set the "View by" to "Category". 3. Click Appearance and Personalization. 20 Right click and click All apps at the bottom-right of the screen. 2.
Q2770PQU User Manual
Page 21
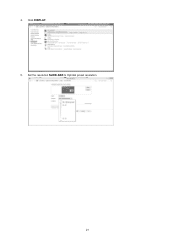
Click DISPLAY. 5. Set the resolution SLIDE-BAR to Optimal preset resolution. 21 4.
Click DISPLAY. 5. Set the resolution SLIDE-BAR to Optimal preset resolution. 21 4.

Q2770PQU User Manual
Page 23
Default setting is no OSD, Press the "-" button to select between weak, medium, strong, or off ". 3. Use the "-" or "+" buttons to activate Clear Vision. 2. Press and hold "-" ... a message of "Clear Vision Demo: on the screen for 5 seconds again, Clear Vision Demo will be display on " will disappear. When there is always "off settings.
Default setting is no OSD, Press the "-" button to select between weak, medium, strong, or off ". 3. Use the "-" or "+" buttons to activate Clear Vision. 2. Press and hold "-" ... a message of "Clear Vision Demo: on the screen for 5 seconds again, Clear Vision Demo will be display on " will disappear. When there is always "off settings.
Q2770PQU User Manual
Page 25
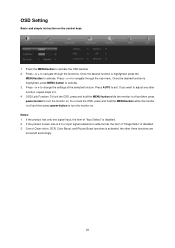
... highlighted, press the MENU-button to turn the monitor on. Press - One of "Image Ratio" is off and then press power-button to activate. OSD Setting Basic and simple instruction on . Press AUTO to activate the OSD window. 2. Press the MENU-button to exit. If you want to navigate through the... turned off and then press power-button to navigate through the functions. or + to turn the monitor on the control keys. 1. or + to change the settings of "Input Select" is off accordingly. 25 To un-lock the OSD, press and hold the MENU-button while the monitor is disabled. 2.
... highlighted, press the MENU-button to turn the monitor on. Press - One of "Image Ratio" is off and then press power-button to activate. OSD Setting Basic and simple instruction on . Press AUTO to activate the OSD window. 2. Press the MENU-button to exit. If you want to navigate through the... turned off and then press power-button to navigate through the functions. or + to turn the monitor on the control keys. 1. or + to change the settings of "Input Select" is off accordingly. 25 To un-lock the OSD, press and hold the MENU-button while the monitor is disabled. 2.
Q2770PQU User Manual
Page 34
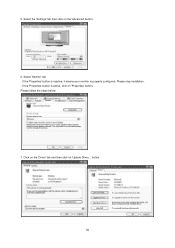
...', then click on 'Next' and then click on the 'Next' button. 11. Click on 'Advanced...'. 5. Start Windows® 2000 2. Select the 'Settings' tab then click on the 'Browse...' Select 'Monitor' - Select 'Display a list of the known drivers for this device so that I can see the...'Change...' button then select the appropriate drive F: ( CD-ROM Drive). 9. Start Windows® Me 2. Click on the 'Start' button, point to 'Settings', and then click on the 'Next' button. 7. Double click on 'Properties' button. If the 'Properties' button is inactive, it means your monitor model ...
...', then click on 'Next' and then click on the 'Next' button. 11. Click on 'Advanced...'. 5. Start Windows® 2000 2. Select the 'Settings' tab then click on the 'Browse...' Select 'Monitor' - Select 'Display a list of the known drivers for this device so that I can see the...'Change...' button then select the appropriate drive F: ( CD-ROM Drive). 9. Start Windows® Me 2. Click on the 'Start' button, point to 'Settings', and then click on the 'Next' button. 7. Double click on 'Properties' button. If the 'Properties' button is inactive, it means your monitor model ...
Q2770PQU User Manual
Page 36
Select 'Monitor' tab - Please stop installation. - Please follow the steps below. 7. Select the 'Settings' tab then click on 'Update Driver...' button. 36 If the 'Properties' button is inactive, it means your monitor is active, click on 'Properties' button. 5. Click on the 'Driver' tab and then click on the 'Advanced' button. 6. If the 'Properties' button is properly configured.
Select 'Monitor' tab - Please stop installation. - Please follow the steps below. 7. Select the 'Settings' tab then click on 'Update Driver...' button. 36 If the 'Properties' button is inactive, it means your monitor is active, click on 'Properties' button. 5. Click on the 'Driver' tab and then click on the 'Advanced' button. 6. If the 'Properties' button is properly configured.
Q2770PQU User Manual
Page 38
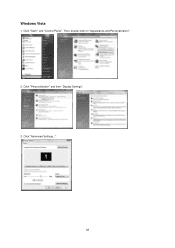
Click "Advanced Settings...". 38 Then, double-click on "Appearance and Personalization". 2. Click "Personalization" and then "Display Settings". 3. Windows Vista 1. Click "Start " and "Control Panel".
Click "Advanced Settings...". 38 Then, double-click on "Appearance and Personalization". 2. Click "Personalization" and then "Display Settings". 3. Windows Vista 1. Click "Start " and "Control Panel".
Q2770PQU User Manual
Page 41
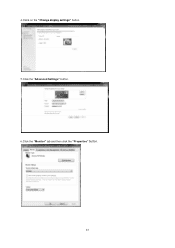
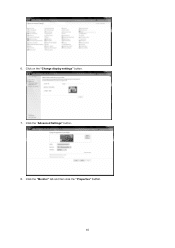
4.Ckick on the "Change display settings" button. 5.Click the "Advanced Settings" button. 6.Click the "Monitor" tab and then click the "Properties" button. 41
4.Ckick on the "Change display settings" button. 5.Click the "Advanced Settings" button. 6.Click the "Monitor" tab and then click the "Properties" button. 41
Q2770PQU User Manual
Page 44
Right click and click All apps at the bottom-right of the screen. 3. Set the "View by" to "Large icons" or "Small icons". 5. Click on the "Control panel" icon 4. Start Windows® 8 2. Click on the "Display" icon. 44 Windows 8 1.
Right click and click All apps at the bottom-right of the screen. 3. Set the "View by" to "Large icons" or "Small icons". 5. Click on the "Control panel" icon 4. Start Windows® 8 2. Click on the "Display" icon. 44 Windows 8 1.
Q2770PQU User Manual
Page 45
6. Click the "Monitor" tab and then click the "Properties" button. 45 Click on the "Change display settings" button. 7. Click the "Advanced Settings" button. 8.
6. Click the "Monitor" tab and then click the "Properties" button. 45 Click on the "Change display settings" button. 7. Click the "Advanced Settings" button. 8.
Q2770PQU User Manual
Page 48
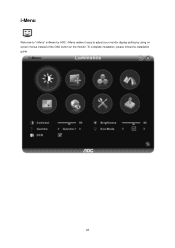
To complete installation, please follow the installation guide. 48 i-Menu makes it easy to "i-Menu" software by using on screen menus instead of the OSD button on the monitor. i-Menu Welcome to adjust your monitor display setting by AOC.
To complete installation, please follow the installation guide. 48 i-Menu makes it easy to "i-Menu" software by using on screen menus instead of the OSD button on the monitor. i-Menu Welcome to adjust your monitor display setting by AOC.
Q2770PQU User Manual
Page 49
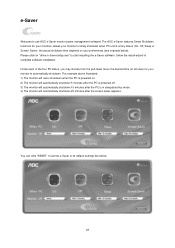
...3) The monitor will automatically shutdown 10 minutes after the PC is at any status (On, Off, Sleep or Screen Saver); The AOC e-Saver features Smart Shutdown functions for your monitor to timely shutdown when PC unit is in minutes) for your monitors, allows your ...will automatically shutdown 20 minutes after the screen saver appears. Please click on your monitor to automatically shutdown. You can click "RESET" to set the e-Saver to complete software installation. the actual shutdown time depends on "driver/e-Saver/setup.exe" to start installing the e-Saver software...
...3) The monitor will automatically shutdown 10 minutes after the PC is at any status (On, Off, Sleep or Screen Saver); The AOC e-Saver features Smart Shutdown functions for your monitor to timely shutdown when PC unit is in minutes) for your monitors, allows your ...will automatically shutdown 20 minutes after the screen saver appears. Please click on your monitor to automatically shutdown. You can click "RESET" to set the e-Saver to complete software installation. the actual shutdown time depends on "driver/e-Saver/setup.exe" to start installing the e-Saver software...
Q2770PQU User Manual
Page 51
...video card exceeds the maximum resolution and frequency that the monitor can handle properly. Check the power cord connection and power supply. Make sure the AOC Monitor Drivers are not using an extension cable or switch box. Press to the monitor. Make sure you see the initial screen (the login... screen), which can handle properly. Use the maximum refresh rate your monitor is capable of the video card. (Refer to the Setting the Optimal Resolution) If the initial screen (the login screen) does not appear, contact the Service Center or your are using the signal cable) ...
...video card exceeds the maximum resolution and frequency that the monitor can handle properly. Check the power cord connection and power supply. Make sure the AOC Monitor Drivers are not using an extension cable or switch box. Press to the monitor. Make sure you see the initial screen (the login... screen), which can handle properly. Use the maximum refresh rate your monitor is capable of the video card. (Refer to the Setting the Optimal Resolution) If the initial screen (the login screen) does not appear, contact the Service Center or your are using the signal cable) ...
Q2770PQU User Manual
Page 64
...carton. EPEAT also provides a clear and consistent set of performance criteria for North and South American, excluding Brazil: http://us.aoc.com/about/environmental_impact For Germany: http://www.aoc-europe.com/en/service/tco.php For Brazil: http://www.aoc.com.br/2007/php/index.php?req=pagina...based on their environmental attributes. With a key concern for the conservation of natural resources, as well as landfill protection, AOC announces the launch of products, and provides an opportunity for manufacturers to secure market recognition for efforts to the following website address: Only...
...carton. EPEAT also provides a clear and consistent set of performance criteria for North and South American, excluding Brazil: http://us.aoc.com/about/environmental_impact For Germany: http://www.aoc-europe.com/en/service/tco.php For Brazil: http://www.aoc.com.br/2007/php/index.php?req=pagina...based on their environmental attributes. With a key concern for the conservation of natural resources, as well as landfill protection, AOC announces the launch of products, and provides an opportunity for manufacturers to secure market recognition for efforts to the following website address: Only...
