731Fw Manual
Page 1
..., and they are as follows: NOTE: A NOTE indicates important information that helps you make better use the monitor. Drivers: provides driver installation instructions for Windows. Technical Support : provides tips and solutions for common problems. Product Information: lists the technical specifications of the warning is subject to avoid the problem. WARNING: A WARNING indicates the potential for bodily harm and tells you...
..., and they are as follows: NOTE: A NOTE indicates important information that helps you make better use the monitor. Drivers: provides driver installation instructions for Windows. Technical Support : provides tips and solutions for common problems. Product Information: lists the technical specifications of the warning is subject to avoid the problem. WARNING: A WARNING indicates the potential for bodily harm and tells you...
731Fw Manual
Page 2
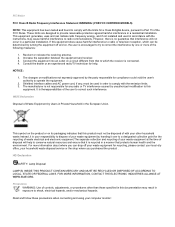
..., and if not installed and used in exposure to shock, electrical hazards, and/or mechanical hazards. FCC Notice FCC Class B Radio Frequency Interference Statement WARNING: (FOR FCC CERTIFIED MODELS) NOTE: This equipment has been tested and found to comply with the limits for a Class B digital device, pursuant to Part 15 of the user to correct such interference...
..., and if not installed and used in exposure to shock, electrical hazards, and/or mechanical hazards. FCC Notice FCC Class B Radio Frequency Interference Statement WARNING: (FOR FCC CERTIFIED MODELS) NOTE: This equipment has been tested and found to comply with the limits for a Class B digital device, pursuant to Part 15 of the user to correct such interference...
731Fw Manual
Page 3
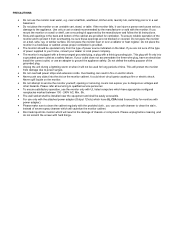
... and shall be sure these openings are provided for monitors with power adapter). Please make sure to clean the cabinet regularly with UL listed computers which have an electrician install the correct outlet, or use an adapter to service the monitor yourself; If you to your home, consult your outlet does not accommodate the three-wire plug, have UL,CSA listed...
... and shall be sure these openings are provided for monitors with power adapter). Please make sure to clean the cabinet regularly with UL listed computers which have an electrician install the correct outlet, or use an adapter to service the monitor yourself; If you to your home, consult your outlet does not accommodate the three-wire plug, have UL,CSA listed...
731Fw Manual
Page 4
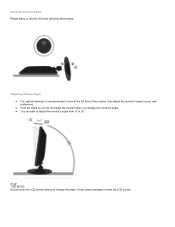
NOTE: Do not touch the LCD screen when you change the angle. Adjusting Viewing Angle For optimal viewing it is recommended to look at the full face of the monitor, then adjust the monitor's angle to your own preference. Hold the stand so you do not topple the monitor when you change the monitor's angle. You are able to adjust the monitor's angle from -5°to 20 °. Setup the stand and base Please setup or remove the base following below steps. It may cause damage or break the LCD screen.
NOTE: Do not touch the LCD screen when you change the angle. Adjusting Viewing Angle For optimal viewing it is recommended to look at the full face of the monitor, then adjust the monitor's angle to your own preference. Hold the stand so you do not topple the monitor when you change the monitor's angle. You are able to adjust the monitor's angle from -5°to 20 °. Setup the stand and base Please setup or remove the base following below steps. It may cause damage or break the LCD screen.
731Fw Manual
Page 5
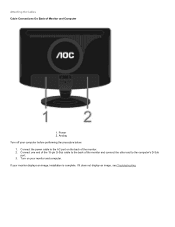
Turn on the back of Monitor and Computer 1. If it does not display an image, see Troubleshooting. Connect the power cable to the computer's D-Sub port. 3. If your monitor and computer. Power 2. Connect one end of the 15-pin D-Sub cable to the back of the monitor and connect the other end to the AC port on your monitor displays an image, installation is complete. Analog Turn off your computer before performing the procedure below. 1. Attaching the Cables Cable Connections On Back of the monitor. 2.
Turn on the back of Monitor and Computer 1. If it does not display an image, see Troubleshooting. Connect the power cable to the computer's D-Sub port. 3. If your monitor and computer. Power 2. Connect one end of the 15-pin D-Sub cable to the back of the monitor and connect the other end to the AC port on your monitor displays an image, installation is complete. Analog Turn off your computer before performing the procedure below. 1. Attaching the Cables Cable Connections On Back of the monitor. 2.
731Fw Manual
Page 6
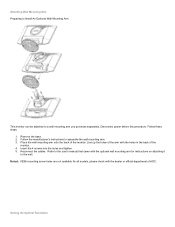
... models, please check with the optional wall mounting arm for instructions on attaching it to the user's manual that came with the dealer or official department of AOC. Setting the Optimal Resolution Place the wall mounting arm onto the back of the monitor. 4. Insert the 4 screws into the holes and tighten. 5. Reconnect the cables. Disconnect power before this procedure. Refer to the wall. Remove the base. 2. Attaching Wall Mounting Arm Preparing to Install...
... models, please check with the optional wall mounting arm for instructions on attaching it to the user's manual that came with the dealer or official department of AOC. Setting the Optimal Resolution Place the wall mounting arm onto the back of the monitor. 4. Insert the 4 screws into the holes and tighten. 5. Reconnect the cables. Disconnect power before this procedure. Refer to the wall. Remove the base. 2. Attaching Wall Mounting Arm Preparing to Install...
731Fw Manual
Page 7
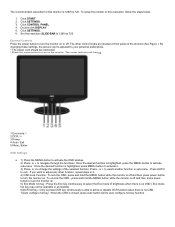
...-lock the OSD - Click SETTINGS. 3. Press AUTO to change the settings of the monitor (See Figure ). Set the resolution SLIDE-BAR to activate the OSD window. 2) Press- The other function, repeat steps 2-3. 4) OSD Lock Function: To lock the OSD, press and hold the MENU button while the monitor is able to turn on or off and then press power button to this monitor is closed, press Auto button will light up. 1 Eco mode / 2 DCR / + 3 Power 4 Auto / Exit 5 Menu / Enter OSD Settings...
...-lock the OSD - Click SETTINGS. 3. Press AUTO to change the settings of the monitor (See Figure ). Set the resolution SLIDE-BAR to activate the OSD window. 2) Press- The other function, repeat steps 2-3. 4) OSD Lock Function: To lock the OSD, press and hold the MENU button while the monitor is able to turn on or off and then press power button to this monitor is closed, press Auto button will light up. 1 Eco mode / 2 DCR / + 3 Power 4 Auto / Exit 5 Menu / Enter OSD Settings...
731Fw Manual
Page 8
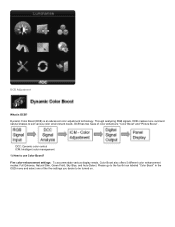
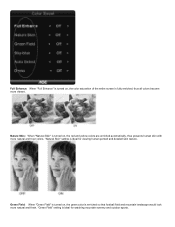
... needs. Five color-enhancement settings: To accommodate various display needs, Color Boost also offers 5 different color enhancement modes: Full Enhance, Natural Skin, Green Field, Sky Blue, and Auto-Detect. DCB has two types of the five settings you desire to be turned on. Through analyzing RGB signals, DCB creates more vivid and natural images to use Color Boost? Please go to the fourth icon labeled "Color Boost" in the OSD menu...
... needs. Five color-enhancement settings: To accommodate various display needs, Color Boost also offers 5 different color enhancement modes: Full Enhance, Natural Skin, Green Field, Sky Blue, and Auto-Detect. DCB has two types of the five settings you desire to be turned on. Through analyzing RGB signals, DCB creates more vivid and natural images to use Color Boost? Please go to the fourth icon labeled "Color Boost" in the OSD menu...
731Fw Manual
Page 9
... Skin: When "Natural Skin" is turned on , the green color is ideal for watching mountain scenery and outdoor sports. Green Field: When "Green Field" is fully enriched, thus all colors become more vibrant. Full Enhance: When "Full Enhance" is turned on, the color saturation of the entire screen is turned on , the red and yellow colors are enriched automatically, thus presents human...
... Skin: When "Natural Skin" is turned on , the green color is ideal for watching mountain scenery and outdoor sports. Green Field: When "Green Field" is fully enriched, thus all colors become more vibrant. Full Enhance: When "Full Enhance" is turned on, the color saturation of the entire screen is turned on , the red and yellow colors are enriched automatically, thus presents human...
731Fw Manual
Page 10
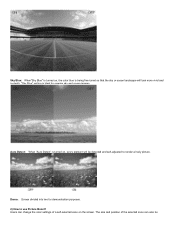
Auto Detect: When "Auto Detect" is turned on the screen. Demo: Screen divided into two for viewing sky and ocean images. The size and position of the selected zone can change the color settings of a self-selected zone on , every pigment will look more vivid and in-depth. Users can also be detected and self-adjusted to use Picture Boost? Sky Blue: When"Sky Blue" is turned on, the color blue is ideal for demonstration purposes. 2) How to render a lively picture. "Sky Blue" setting is being fine-tuned so that the sky or ocean landscape will be
Auto Detect: When "Auto Detect" is turned on the screen. Demo: Screen divided into two for viewing sky and ocean images. The size and position of the selected zone can change the color settings of a self-selected zone on , every pigment will look more vivid and in-depth. Users can also be detected and self-adjusted to use Picture Boost? Sky Blue: When"Sky Blue" is turned on, the color blue is ideal for demonstration purposes. 2) How to render a lively picture. "Sky Blue" setting is being fine-tuned so that the sky or ocean landscape will be
731Fw Manual
Page 11
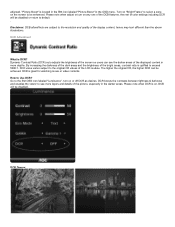
... OSD icon labeled "Luminance", turn on the screen to the resolution and quality of color settings including DCR will be achieved. How to see the darker areas of the displayed content in more layers and details of the screen so users can be disabled. The higher the original CR, the higher DCR can see more depths. DCR boosts the contrasts between lightness...
... OSD icon labeled "Luminance", turn on the screen to the resolution and quality of color settings including DCR will be achieved. How to see the darker areas of the displayed content in more layers and details of the screen so users can be disabled. The higher the original CR, the higher DCR can see more depths. DCR boosts the contrasts between lightness...
731Fw Manual
Page 12
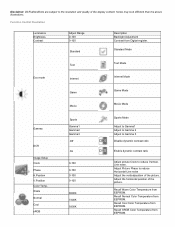
... picture. Recall Warm Color Temperature from EEPROM. Adjust the horizontal position of the picture. Standard Mode Text Mode Text Eco mode Internet Internet Mode Game Game Mode Movie Movie Mode Gamma DCR Image Setup Clock Phase H.Position V.Position Color Temp. Recall Normal Color Temperature from EEPROM. Disclaimer: DCR aftereffects are subject to reduce VerticalLine noise. Function Control Illustration Luminance Brightness Contrast Adjust Range 0-100 0-100 Standard Description Backlight Adjustment Contrast from EEPROM. Recall Cool Color Temperature from Digital...
... picture. Recall Warm Color Temperature from EEPROM. Adjust the horizontal position of the picture. Standard Mode Text Mode Text Eco mode Internet Internet Mode Game Game Mode Movie Movie Mode Gamma DCR Image Setup Clock Phase H.Position V.Position Color Temp. Recall Normal Color Temperature from EEPROM. Disclaimer: DCR aftereffects are subject to reduce VerticalLine noise. Function Control Illustration Luminance Brightness Contrast Adjust Range 0-100 0-100 Standard Description Backlight Adjustment Contrast from EEPROM. Recall Cool Color Temperature from Digital...

731Fw Manual
Page 13
position V.position on or off Mode LED Color Green or Blue Orange or red How to adjust. 3)One of "Image Ratio" is disalbe to use i-menu software Installation Blue Gain from Digital-register Green Gain Digital-register. User Color Boost Full Enhance Nature Skin Green Field Sky-blue AutoDetect Demo Picture Boost Frame Size Brightness Contrast Hue Saturation Position Bright Frame OSD Setup H.Position V.Position Timeout Transparence Language Extra Input Select Auto Config Image Ratio DDC-CI Information Reset Reset Exit Exit Red Green Blue on or off on or off on...
position V.position on or off Mode LED Color Green or Blue Orange or red How to adjust. 3)One of "Image Ratio" is disalbe to use i-menu software Installation Blue Gain from Digital-register Green Gain Digital-register. User Color Boost Full Enhance Nature Skin Green Field Sky-blue AutoDetect Demo Picture Boost Frame Size Brightness Contrast Hue Saturation Position Bright Frame OSD Setup H.Position V.Position Timeout Transparence Language Extra Input Select Auto Config Image Ratio DDC-CI Information Reset Reset Exit Exit Red Green Blue on or off on or off on...
731Fw Manual
Page 14
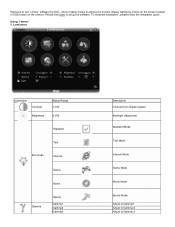
... your monitor display setting by AOC. Please click here to Gamma 3 To complete installation , please follow the installation guide . Backlight Adjustment Standard Mode Text Mode Internet Mode Game Mode Movie Mode Sports Mode Adjust to Gamma1 Adjust to Gamma 2 Adjust to setup the software. Using "i-menu" 1. Luminance Luminance Contrast Brightness Adjust Range 0-100 0-100 Standard Text Eco mode Internet Game Movie Gamma Sports Gamma1 Gamma2 Gamma3 Description Contrast from Digital-register. Welcome to use "i-menu" software by menus on the screen instead of OSD button...
... your monitor display setting by AOC. Please click here to Gamma 3 To complete installation , please follow the installation guide . Backlight Adjustment Standard Mode Text Mode Internet Mode Game Mode Movie Mode Sports Mode Adjust to Gamma1 Adjust to Gamma 2 Adjust to setup the software. Using "i-menu" 1. Luminance Luminance Contrast Brightness Adjust Range 0-100 0-100 Standard Text Eco mode Internet Game Movie Gamma Sports Gamma1 Gamma2 Gamma3 Description Contrast from Digital-register. Welcome to use "i-menu" software by menus on the screen instead of OSD button...
731Fw Manual
Page 15
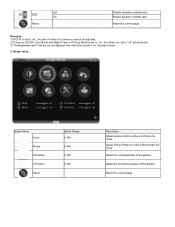
... ", the others are set to reduce Vertical-Line noise. Image setup Image Setup Clock Phase H.Position V.Position Reset Adjust Range 0-100 0-100 0-100 0-100 Description Adjust picture Clock to "off" automatically. 3) The Brightness and Contrast can be adjusted. 2) If anyone of DCR, Color Boost and Bright Frame of the picture. Reset the current page Adjust Picture Phase to reduce Horizontal-Line noise Adjust the verticalposition of Picture Boost is set to "on "standard mode". 2. Adjust the horizontal position of the picture.
... ", the others are set to reduce Vertical-Line noise. Image setup Image Setup Clock Phase H.Position V.Position Reset Adjust Range 0-100 0-100 0-100 0-100 Description Adjust picture Clock to "off" automatically. 3) The Brightness and Contrast can be adjusted. 2) If anyone of DCR, Color Boost and Bright Frame of the picture. Reset the current page Adjust Picture Phase to reduce Horizontal-Line noise Adjust the verticalposition of Picture Boost is set to "on "standard mode". 2. Adjust the horizontal position of the picture.
731Fw Manual
Page 16
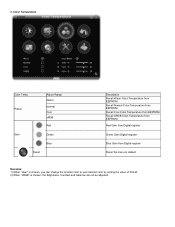
... menu to default Remarks: 1) When "User" is chosen, you can change the monitor color to your desired color by setting the value of R-G-B. 2) When "sRGB" is chosen, the Brightness, Contrast and Gamma can not be adjusted. Blue Gain from EEPROM. Red Gain from EEPROM. Recall Normal Color Temperature from Digital-register Green Gain Digital-register. Recall Cool Color Temperature from EEPROM. 3. Color Temperature Color Temp. Preset Adjust Range Warm Normal Cool sRGB Red User Green Blue Reset...
... menu to default Remarks: 1) When "User" is chosen, you can change the monitor color to your desired color by setting the value of R-G-B. 2) When "sRGB" is chosen, the Brightness, Contrast and Gamma can not be adjusted. Blue Gain from EEPROM. Red Gain from EEPROM. Recall Normal Color Temperature from Digital-register Green Gain Digital-register. Recall Cool Color Temperature from EEPROM. 3. Color Temperature Color Temp. Preset Adjust Range Warm Normal Cool sRGB Red User Green Blue Reset...

731Fw Manual
Page 18
position V.position Reset Adjust Range on or off 14-100 0-100 0-100 0-100 0-100 Description Disable or Enable Bright Frame Adjust Frame Size Adjust Frame Brightness Adjust Frame Contrast Adjust Frame horizontal Position Adjust Frame vertical Position Reset the menu to default Remarks: 1) Only when Bright Frame is set to "on", the other 5 items can be adjusted. 2) If anyone of DCR, Color Boost and Bright Frame of Picture Boost is set to "on", the others are set to "off" automatically. Picture Boost Picture Boost Bright Frame Frame Size Brightness Contrast H. 5.
position V.position Reset Adjust Range on or off 14-100 0-100 0-100 0-100 0-100 Description Disable or Enable Bright Frame Adjust Frame Size Adjust Frame Brightness Adjust Frame Contrast Adjust Frame horizontal Position Adjust Frame vertical Position Reset the menu to default Remarks: 1) Only when Bright Frame is set to "on", the other 5 items can be adjusted. 2) If anyone of DCR, Color Boost and Bright Frame of Picture Boost is set to "on", the others are set to "off" automatically. Picture Boost Picture Boost Bright Frame Frame Size Brightness Contrast H. 5.
731Fw Manual
Page 21
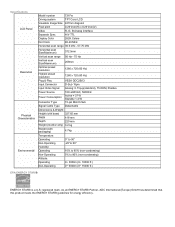
... Horizontal scan Size(Maximum) 372.5mm Vertical scan range 56 Hz - 75 Hz Vertical scan Size(Maximum) 209mm Optimal preset resolution 1280 x 720 (60 Hz) Highest preset resolution 1280 x 720 (60 Hz) Plug & Play VESA DDC2B/CI Input Connector D-Sub 15pin Input Video Signal Analog: 0.7Vp-p(standard), 75 OHM, Positive Power Source 100~240VAC, 50/60Hz Power Consumption Active < 37 W Standby < 2 W Connector Type 15-pin Mini D-Sub Signal Cable Type Detachable Dimensions & Weight: Height (with base...
... Horizontal scan Size(Maximum) 372.5mm Vertical scan range 56 Hz - 75 Hz Vertical scan Size(Maximum) 209mm Optimal preset resolution 1280 x 720 (60 Hz) Highest preset resolution 1280 x 720 (60 Hz) Plug & Play VESA DDC2B/CI Input Connector D-Sub 15pin Input Video Signal Analog: 0.7Vp-p(standard), 75 OHM, Positive Power Source 100~240VAC, 50/60Hz Power Consumption Active < 37 W Standby < 2 W Connector Type 15-pin Mini D-Sub Signal Cable Type Detachable Dimensions & Weight: Height (with base...
731Fw Manual
Page 22
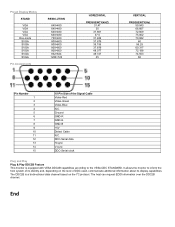
The DDC2B is equipped with VESA DDC2B capabilities according to inform the host system of the Signal Cable Video-Red Video-Green Video-Blue N.C. The host can request EDID information over the DDC2B channel. DDC-Serial data H-sync V-sync DDC-Serial clock Plug and Play Plug & Play DDC2B Feature This monitor is a bi-directional data channel based on the level of DDC used, communicate additional information about its identity...
The DDC2B is equipped with VESA DDC2B capabilities according to inform the host system of the Signal Cable Video-Red Video-Green Video-Blue N.C. The host can request EDID information over the DDC2B channel. DDC-Serial data H-sync V-sync DDC-Serial clock Plug and Play Plug & Play DDC2B Feature This monitor is a bi-directional data channel based on the level of DDC used, communicate additional information about its identity...
731Fw Spec Sheet
Page 1
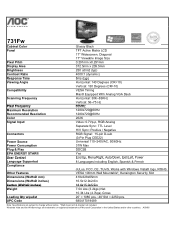
731Fw Cabinet Color Panel Pixel Pitch Display Area Brightness Contrast Ratio Response Time Viewing Angle Compatibility Scanning Frequency Pixel Frequency Maximum Resolution Recommended Resolution Color Signal Input Connectors Power Source Power Consumption Plug & Play EPA ENERGY STAR® User Control Language Supported Compliance Other Features Dimensions (WxHxD mm) Dimensions (WxHxD inches) Carton (WxHxD inches) Weight Loading Qty w/pallet UPC Code Glossy Black TFT Active Matrix LCD 17" Widescreen, Diagonal 17" Viewable Image Size 0.291mm x0.291mm 372.5mm x 209.5mm 250 cd/m2 (typ) 4000:1 ...
731Fw Cabinet Color Panel Pixel Pitch Display Area Brightness Contrast Ratio Response Time Viewing Angle Compatibility Scanning Frequency Pixel Frequency Maximum Resolution Recommended Resolution Color Signal Input Connectors Power Source Power Consumption Plug & Play EPA ENERGY STAR® User Control Language Supported Compliance Other Features Dimensions (WxHxD mm) Dimensions (WxHxD inches) Carton (WxHxD inches) Weight Loading Qty w/pallet UPC Code Glossy Black TFT Active Matrix LCD 17" Widescreen, Diagonal 17" Viewable Image Size 0.291mm x0.291mm 372.5mm x 209.5mm 250 cd/m2 (typ) 4000:1 ...


