731Fw Manual
Page 1
... by an icon. Notes, Cautions, and Warnings Throughout this guide, blocks of how to avoid the problem. Product Registration Please link www.aoc.com, select your computer system. In such cases, the specific presentation of data and tells you how to change without notice. CAUTION: ...A CAUTION indicates either potential damage to hardware or loss of the warning is subject to avoid the problem. 731Fw User's Manual About This Guide This guide describes the monitor's features, setup, and operation. These blocks are notes, cautions, and warnings, and they are as follows: NOTE:...
... by an icon. Notes, Cautions, and Warnings Throughout this guide, blocks of how to avoid the problem. Product Registration Please link www.aoc.com, select your computer system. In such cases, the specific presentation of data and tells you how to change without notice. CAUTION: ...A CAUTION indicates either potential damage to hardware or loss of the warning is subject to avoid the problem. 731Fw User's Manual About This Guide This guide describes the monitor's features, setup, and operation. These blocks are notes, cautions, and warnings, and they are as follows: NOTE:...
731Fw Manual
Page 2
... AND MUST BE RECYCLED OR DISPOSED OF ACCORDING TO LOCAL, STATE OR FEDERAL LAWS. Read and follow these precautions when connecting and using your computer monitor:
... AND MUST BE RECYCLED OR DISPOSED OF ACCORDING TO LOCAL, STATE OR FEDERAL LAWS. Read and follow these precautions when connecting and using your computer monitor:
731Fw Manual
Page 3
... be easily accessible. For use only with the attached power adapter (Output 12Vdc) which have UL,CSA listed license(Only for monitors with power adapter). Please make sure to clean the cabinet regularly with UL listed computers which have an electrician install the correct ... cabinet unless proper ventilation is equipped with a three-pronged grounded plug, a plug with a third (grounding) pin. If you to service the monitor yourself; This will result in the back and bottom of the cabinet are provided for long periods of time. To ensure reliable operation of power...
... be easily accessible. For use only with the attached power adapter (Output 12Vdc) which have UL,CSA listed license(Only for monitors with power adapter). Please make sure to clean the cabinet regularly with UL listed computers which have an electrician install the correct ... cabinet unless proper ventilation is equipped with a three-pronged grounded plug, a plug with a third (grounding) pin. If you to service the monitor yourself; This will result in the back and bottom of the cabinet are provided for long periods of time. To ensure reliable operation of power...
731Fw Manual
Page 4
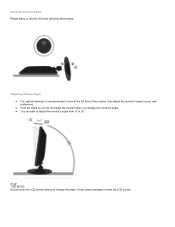
It may cause damage or break the LCD screen. NOTE: Do not touch the LCD screen when you change the angle. Adjusting Viewing Angle For optimal viewing it is recommended to look at the full face of the monitor, then adjust the monitor's angle to your own preference. Hold the stand so you do not topple the monitor when you change the monitor's angle. You are able to adjust the monitor's angle from -5°to 20 °. Setup the stand and base Please setup or remove the base following below steps.
It may cause damage or break the LCD screen. NOTE: Do not touch the LCD screen when you change the angle. Adjusting Viewing Angle For optimal viewing it is recommended to look at the full face of the monitor, then adjust the monitor's angle to your own preference. Hold the stand so you do not topple the monitor when you change the monitor's angle. You are able to adjust the monitor's angle from -5°to 20 °. Setup the stand and base Please setup or remove the base following below steps.
731Fw Manual
Page 5
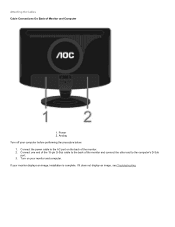
Analog Turn off your monitor displays an image, installation is complete. Attaching the Cables Cable Connections On Back of the monitor. 2. Power 2. If your computer before performing the procedure below. 1. Connect the power cable to the computer's D-Sub port. 3. Connect one end of the 15-pin D-Sub cable to the back of the monitor and connect the other end to the AC port on your monitor and computer. Turn on the back of Monitor and Computer 1. If it does not display an image, see Troubleshooting.
Analog Turn off your monitor displays an image, installation is complete. Attaching the Cables Cable Connections On Back of the monitor. 2. Power 2. If your computer before performing the procedure below. 1. Connect the power cable to the computer's D-Sub port. 3. Connect one end of the 15-pin D-Sub cable to the back of the monitor and connect the other end to the AC port on your monitor and computer. Turn on the back of Monitor and Computer 1. If it does not display an image, see Troubleshooting.
731Fw Manual
Page 6
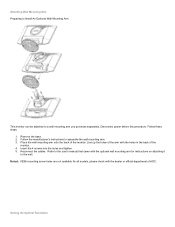
...arm for all models, please check with the dealer or official department of AOC. Refer to the wall. Setting the Optimal Resolution Attaching Wall Mounting Arm Preparing to Install An Optional Wall Mounting Arm This monitor can be attached to assemble the wall mounting arm. 3. Insert the 4... screws into the holes and tighten. 5. Place the wall mounting arm onto the back of the monitor. 4. Follow these steps: 1. Reconnect the cables. Noted : VESA mounting screw holes are not available for instructions on attaching it to the user...
...arm for all models, please check with the dealer or official department of AOC. Refer to the wall. Setting the Optimal Resolution Attaching Wall Mounting Arm Preparing to Install An Optional Wall Mounting Arm This monitor can be attached to assemble the wall mounting arm. 3. Insert the 4... screws into the holes and tighten. 5. Place the wall mounting arm onto the back of the monitor. 4. Follow these steps: 1. Reconnect the cables. Noted : VESA mounting screw holes are not available for instructions on attaching it to the user...
731Fw Manual
Page 7
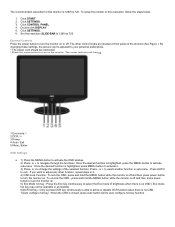
...resolution for this resolution, follow the steps below. 1. Click CONTROL PANEL. 4. Click SETTINGS. 6. External Controls Press the power button to turn the monitor on or off and then press power button to select the Eco mode of the selected function. or + to exit . Once the desired function... want to activate sub-menu . The other function, repeat steps 2-3. 4) OSD Lock Function: To lock the OSD, press and hold the MENU button while the monitor is closed, press Auto button will light up. 1 Eco mode / 2 DCR / + 3 Power 4 Auto / Exit 5 Menu / Enter OSD Settings 1) Press the ...
...resolution for this resolution, follow the steps below. 1. Click CONTROL PANEL. 4. Click SETTINGS. 6. External Controls Press the power button to turn the monitor on or off and then press power button to select the Eco mode of the selected function. or + to exit . Once the desired function... want to activate sub-menu . The other function, repeat steps 2-3. 4) OSD Lock Function: To lock the OSD, press and hold the MENU button while the monitor is closed, press Auto button will light up. 1 Eco mode / 2 DCR / + 3 Power 4 Auto / Exit 5 Menu / Enter OSD Settings 1) Press the ...
731Fw Manual
Page 14
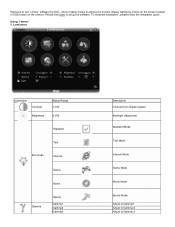
i-menu makes it easy to adjust your monitor display setting by AOC. Luminance Luminance Contrast Brightness Adjust Range 0-100 0-100 Standard Text Eco mode Internet Game Movie Gamma Sports Gamma1 Gamma2 Gamma3 Description Contrast from Digital-register. ... "i-menu" 1. To complete installation , please follow the installation guide . Welcome to use "i-menu" software by menus on the screen instead of OSD button on the monitor.
i-menu makes it easy to adjust your monitor display setting by AOC. Luminance Luminance Contrast Brightness Adjust Range 0-100 0-100 Standard Text Eco mode Internet Game Movie Gamma Sports Gamma1 Gamma2 Gamma3 Description Contrast from Digital-register. ... "i-menu" 1. To complete installation , please follow the installation guide . Welcome to use "i-menu" software by menus on the screen instead of OSD button on the monitor.
731Fw Manual
Page 16
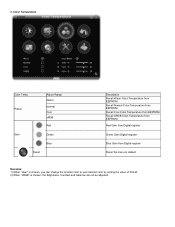
Blue Gain from EEPROM. Recall Normal Color Temperature from Digital-register Reset the menu to default Remarks: 1) When "User" is chosen, you can change the monitor color to your desired color by setting the value of R-G-B. 2) When "sRGB" is chosen, the Brightness, Contrast and Gamma can not be adjusted. Red Gain ...
Blue Gain from EEPROM. Recall Normal Color Temperature from Digital-register Reset the menu to default Remarks: 1) When "User" is chosen, you can change the monitor color to your desired color by setting the value of R-G-B. 2) When "sRGB" is chosen, the Brightness, Contrast and Gamma can not be adjusted. Red Gain ...

731Fw Manual
Page 20
Compatibility : i-menu supports major graphic cards of the monitor . 8. Please contact with us if you can find the information of ATI, Nvidia, Intel, VIA(S3). Help On this page, you have any problem. Welcome to link our website and send email to us if your graphic card was not supported imenu software.
Compatibility : i-menu supports major graphic cards of the monitor . 8. Please contact with us if you can find the information of ATI, Nvidia, Intel, VIA(S3). Help On this page, you have any problem. Welcome to link our website and send email to us if your graphic card was not supported imenu software.
731Fw Manual
Page 21
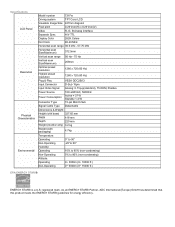
As an ENERGY STAR® Partner, AOC International (Europe) GmbH has determined that this product meets the ENERGY STAR® guidelines for energy efficiency. Specifications LCD Panel Resolution Physical Characteristics Environmental Model number 731Fw Driving system TFT Color LCD Viewable Image Size 427mm diagoanl Pixel...pin Mini D-Sub Signal Cable Type Detachable Dimensions & Weight: Height (with base) 327.65 mm Width 418 mm Depth 220 mm Weight (monitor only) 3.2 kg Weight (with packaging) 4.7kg Temperature: Operating 0° to 50° Non-Operating -20°to 60°...
As an ENERGY STAR® Partner, AOC International (Europe) GmbH has determined that this product meets the ENERGY STAR® guidelines for energy efficiency. Specifications LCD Panel Resolution Physical Characteristics Environmental Model number 731Fw Driving system TFT Color LCD Viewable Image Size 427mm diagoanl Pixel...pin Mini D-Sub Signal Cable Type Detachable Dimensions & Weight: Height (with base) 327.65 mm Width 418 mm Depth 220 mm Weight (monitor only) 3.2 kg Weight (with packaging) 4.7kg Temperature: Operating 0° to 50° Non-Operating -20°to 60°...
731Fw Manual
Page 22
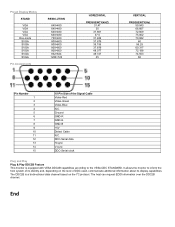
... host can request EDID information over the DDC2B channel. DDC-Serial data H-sync V-sync DDC-Serial clock Plug and Play Plug & Play DDC2B Feature This monitor is a bi-directional data channel based on the level of the Signal Cable Video-Red Video-Green Video-Blue N.C. It allows the...
... host can request EDID information over the DDC2B channel. DDC-Serial data H-sync V-sync DDC-Serial clock Plug and Play Plug & Play DDC2B Feature This monitor is a bi-directional data channel based on the level of the Signal Cable Video-Red Video-Green Video-Blue N.C. It allows the...


