AOC 919Swa1 Support and Manuals
Get Help and Manuals for this AOC item

Popular AOC 919Swa1 Manual Pages
919S1 Manual - Page 2

... FCC Rules.
Note: If necessary, shielded interface cables and AC power cord must use a grounded power supply cord and the provided shielded video interface cable with the limits for purchasing this guide thoroughly before installation. FCC RADIO FREQUENCY INTERFERENCE STATEMENT WARNING: (FOR FCC CERTIFIED MODELS)
This monitor has been tested and found compliant with bonded ferrite cores...
919S1 Manual - Page 3

English
Content
Safety Precautions 1 First Setup 2 Quick Installation 2-5 Front View of the Product 6 Rear View of the Product 6 Using On Screen Display (OSD) Functions 7-9 Supporting Timing Modes 10 Technical Information 11 Care and Maintenance 12 Troubleshooting 12-13
919S1 Manual - Page 4
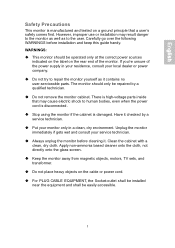
..., motors, TV sets, and transformer. Do not remove the monitor cabinet.
Carefully go over the following WARNINGS before cleaning it contains no user-serviceable parts. Do not try to repair the monitor yourself as to the monitor as well as it .
However, improper use or installation may cause electric shock to human bodies, even when the power cord is...
919S1 Manual - Page 5

Quick Installation
Installing & Removing the Base
Install
Remove
2
D-Sub cable. User guide. Quick Start Guide. English
First Setup
Congratulation for purchasing this monitor of high performance! This monitor comes with the following accessories :
Power cable.
919S1 Manual - Page 6

Remove the stand.
3 Lay the monitor face down on a soft surface. 1. English
Preparing To Install The Optional Wall Mount Arm (Not Included)
This monitor can purchase separately. Turn the power OFF then dis-connect the cables from the monitor before performing the procedure below. Remove the 4 screws holding the stand to a wall mounting arm you can be attached to the hinge. 2.
919S1 Manual - Page 7

Refer to the user's manual that came with the most current revision of the VESA 100mm Flat Panel Monitor Physical Mounting Interface (FPMPMI standard).
4
Insert ...installing the wall mounting arm: 1. English
Attaching The Optional Wall Mount Arm (not supplied)
Follow these steps to the wall. Reconnect the cables. Place the wall mounting arm onto the back of the monitor. 2. NOTE
The AOC...
919S1 Manual - Page 8

... the Windows desktop > Properties > Settings > "Desktop Area". Refresh Rate (vertical frequency) See your graphic card's user guide for instructions. Connect the video cable ( D-Sub cable) to the computer, then to the monitor.
2. Connect Analog video cable (D-Sub cable) Make sure both monitor and computer are powered OFF. Connect Power cord Connect the power cord to a properly grounded AC...
919S1 Manual - Page 9

Front View of the Product
English
➊ OSD TURN ON/OFF ➋ SCROLL DOWN/DECREASE ➌ SCROLL UP/INCREASE
➍ CONFIRM SELECTION ➎ POWER ON/OFF ➏ LED INDICATOR
Rear View of the Product
➐
➑
➐ POWER INPUT ➑ VGA INPUT
6
919S1 Manual - Page 10

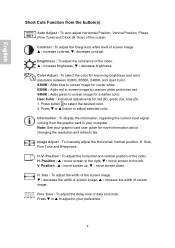
Exit from OSD menu. Select the desired item when in OSD menu)
Main Menu
7 Power Lock (when not in OSD menu) OSD Lock (when not in OSD menu. English
Using On Screen Display (OSD) Functions
1 2
V or W
▼ + ▲ 1 + ▼ 1 + ▲
...
919S1 Manual - Page 11
... of screen image, V : increase the width of the video. H./V. Size) of the screen. V : increase contrast, W: decrease contrast. Press W or V button to your graphic card user guide for red (R), green (G), blue (B). 1.
Image Adjust : To manually adjust the Horizontal/ Vertical position, H.
919S1 Manual - Page 12

Setup Menu : To set the best quality for the image. OSD Position : Press 2 button to the left. Memory Recall : To recall factory settings for the image.
V : move OSD to the right, W :...
9 Choose "Disable" : It will show a window to remind you set the best quality for the image if the resolution is to remind you set up , W : move OSD up Language Select, Resolution Notice, OSD ...
919S1 Manual - Page 13

English
Supporting Timing Modes
VGA VGA MAC VESA VESA VESA VESA VESA MAC VESA VESA VESA VESA VESA VESA VESA VESA VESA
720 x 400 @ ... @ 75Hz 1152 x 864 @ 75Hz 1280 x 960 @ 60Hz 1280 x 1024 @ 60Hz 1280 x 1024 @ 75Hz 1440 x 900 @ 60Hz 1440 x 900 @ 75Hz
Warning : Do not set the graphic card in permanent damage to exceed these maximum refresh rates. Doing so may result in your computer to your...
919S1 Manual - Page 14
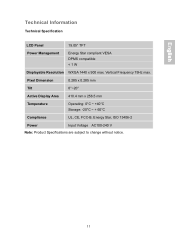
...~ +40°C Storage: -20°C ~ + 60°C
Compliance
UL, CE, FCC-B, Energy Star, ISO 13406-2
Power
Input Voltage AC100-240 V
Note: Product Specifications are subject to change without notice.
11 English
Technical Information
Technical Specification
LCD Panel
19.05" TFT
Power Management
Energy Star compliant VESA DPMS compatible < 1 W
Displayable Resolution WXGA 1440 x 900 max.
919S1 Manual - Page 15

... base from the sun to reduce glare. Always call your monitor. Put your monitor is supplying proper voltage. Make certain your monitor in a clean and moisture-free area. Never try to repair your monitor cabinet. Troubleshooting
No power Make sure A/C power cord is securely connected to the power adapter and the power supply is for packing the unit to a small size for...
919Swa1 Spec Sheet - Page 1

...
Note: Specifications are subject to change without notice. *Wall mount arm & bracket not included. A05/08 919Swa1
Cabinet Color Panel
Pixel Pitch Display Area Brightness Contrast Ratio Response Time Viewing Angle
Compatibility
Scanning Frequency
Pixel Frequency Maximum Resolution Recommended Resolution Resolutions Supported
Color Signal Input
Connectors
ENERGY STAR® Power Source ENERGY...
AOC 919Swa1 Reviews
We have not received any reviews for AOC yet.