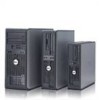
Dell OptiPlex GX520 Support Question
Dell OptiPlex GX520 Support Question
Find answers below for this question about Dell OptiPlex GX520.Need a Dell OptiPlex GX520 manual? We have 1 online manual for this item!
Question posted by pmosau on April 6th, 2014
How To Replace And Remove A Power Supply On A Dell Optiplex Gx520 Tower
The person who posted this question about this Dell product did not include a detailed explanation. Please use the "Request More Information" button to the right if more details would help you to answer this question.
Current Answers
Related Dell OptiPlex GX520 Manual Pages
Quick Reference Guide - Page 2
... marks and names or their products. Abbreviations and Acronyms
For a complete list of abbreviations and acronyms, see the Glossary in this text: Dell, OptiPlex, and the DELL logo are trademarks of Dell Inc.;
Intel and Pentium are not applicable.
is subject to Microsoft® Windows® operating systems are registered trademarks of Intel Corporation...
Quick Reference Guide - Page 3

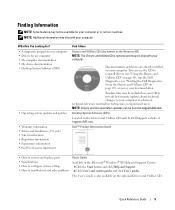
... 15 Back-Panel Connectors 16
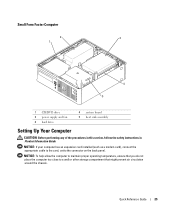
Removing the Computer Cover 18 Before You Begin 18 Mini Tower Computer 19 Desktop Computer 21 Small Form Factor Computer 22
Inside Your Computer 23 Mini Tower Computer 23 Desktop Computer 24 Small Form Factor Computer 25
Setting Up Your Computer 25
Solving Problems 28 Dell Diagnostics 28 System Lights 31...
Quick Reference Guide - Page 5
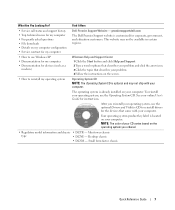
...8226; Drivers for my computer • My computer documentation • My device documentation • Desktop System Software (DSS)
• Operating system updates and patches
• Warranty information • ...technical-reference material for technicians or experienced users. Dell™ Product Information Guide
• How to remove and replace parts • Specifications • How to ...
Quick Reference Guide - Page 7
... computer. See your online User's Guide for my computer
Dell Premier Support Website - Mini tower chassis
type
• DCNE - Small form factor chassis
...on my computer configuration • Service contract for instructions. NOTE: The color of your computer. Desktop chassis
• DCSM - This website may not ship with your computer. After you ordered.
•...
Quick Reference Guide - Page 12
... fingers around the outside of your online User's Guide.
Use the microphone connector to attach headphones and most kinds of the badge. www.dell.com | support.dell.com
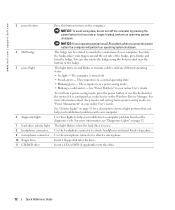
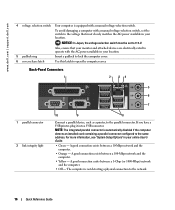
3 power button
4 Dell badge 5 power light
6 diagnostic lights 7 hard-drive activity light 8 headphone connector 9 microphone connector 10 floppy drive 11 CD/DVD drive
Press this button to...
Quick Reference Guide - Page 14
...: If your operating system has ACPI enabled, when you press the power button the computer will perform an operating system shutdown.
3 Dell badge
The badge can also rotate the badge using the slot provided near...panel for 6 seconds or longer.
Instead, perform an operating system shutdown. www.dell.com | support.dell.com
Small Form Factor Computer - Press this button to help you use .
14...
Quick Reference Guide - Page 16
... -
Also, ensure that most closely matches the AC power available in your online User's Guide.
• Green - www.dell.com | support.dell.com
4 voltage selection switch Your computer is not detecting... 100-Mbps network and the computer.
• Yellow - The computer is equipped with the AC power available in your location. If you have a USB printer, plug it into a USB connector....
Quick Reference Guide - Page 18
...are turned off . Also, before you connect a cable, ensure that is not authorized by Dell is not covered by your warranty. To avoid damaging the computer, perform the following safety guidelines....
1 Turn off your computer from the computer.
18
Quick Reference Guide
www.dell.com | support.dell.com
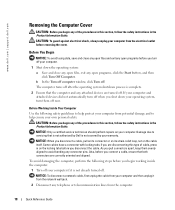
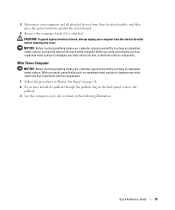
Removing the Computer Cover
CAUTION: Before you begin any of the procedures in this section...
Quick Reference Guide - Page 19
...computer. 3 Disconnect your computer from their electrical outlets, and then press the power button to ground the system board.
4 Remove the computer stand, if it is attached. CAUTION: To guard against electrical ... that could harm internal components.
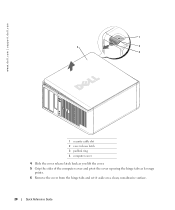
Mini Tower Computer
NOTICE: Before touching anything inside your computer, ground yourself by touching an unpainted metal surface....
Quick Reference Guide - Page 20
www.dell.com | support.dell.com
1
2
1
3 4
2
3
1 security cable slot 2 cover release latch 3 padlock ring 4 computer cover
4 Slide the cover release latch back as you lift the cover. 5 Grip the sides of the computer cover and pivot the cover up using the hinge tabs as leverage
points. 6 Remove the cover from the hinge tabs and...
Quick Reference Guide - Page 22
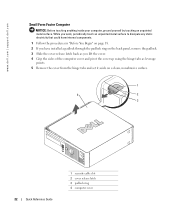
...sides of the computer cover and pivot the cover up using the hinge tabs as leverage
points. 5 Remove the cover from the hinge tabs and set it aside on a clean, nonabrasive surface.
1
4... security cable slot 2 cover release latch 3 padlock ring 4 computer cover www.dell.com | support.dell.com
Small Form Factor Computer
NOTICE: Before touching anything inside your computer, ground yourself by touching...
Quick Reference Guide - Page 24
www.dell.com | support.dell.com
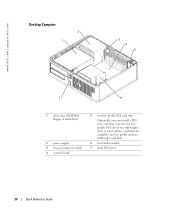
Desktop Computer
2 1
3 4 5
7
6
1 drives bay (CD/DVD, floppy, or hard drive)
2 power supply 3 chassis intrusion switch 4 system board
5 two low-profile PCI card slots
Optionally, you can install a PCI riser card that converts one low-profile and two ...
Quick Reference Guide - Page 25
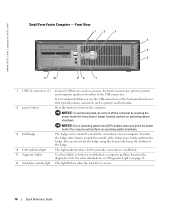
Small Form Factor Computer
2
3
1
4 5
1 CD/DVD drive 2 power supply and fan 3 hard drive
4 system board 5 heat sink assembly
Setting Up Your Computer
CAUTION: Before performing any of the procedures in this section, follow the ...
Quick Reference Guide - Page 26
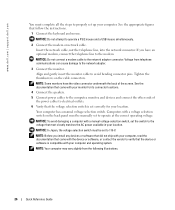
...device or software is set correctly for its connector locations.
4 Connect the speakers. 5 Connect power cables to the computer, monitor, and devices and connect the other ends of the screen. ... underneath the back of
the power cables to electrical outlets. 6 Verify that most closely matches the AC power available in your location. www.dell.com | support.dell.com
You must complete all the...
Quick Reference Guide - Page 28
...
CAUTION: Before you experience a problem with your computer, perform the checks in the Product Information Guide. www.dell.com | support.dell.com
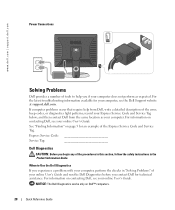
Power Connections
Solving Problems
Dell provides a number of tools to Use the Dell Diagnostics
If you begin any of the procedures in this section, follow the safety instructions in "Solving Problems" of your...
Quick Reference Guide - Page 30
...the instructions on your computer or all devices from the Drivers and Utilities CD (optional), remove the CD.
5 Close the test screen to return to your part.
Option Express Test
... Help Configuration
Parameters
Function
Displays the results of devices. www.dell.com | support.dell.com
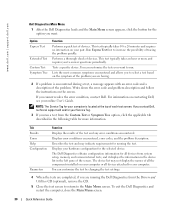
Dell Diagnostics Main Menu
1 After the Dell Diagnostics loads and the Main Menu screen appears, click the ...
Quick Reference Guide - Page 31
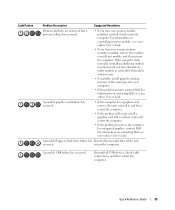
... incorrectly installed.
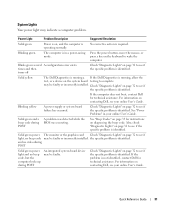
may be faulty or incorrectly installed. For information on diagnosing the beep code. Blinking yellow
A power supply or system board failure has occurred. See "Beep Codes" on page 35 for instructions on contacting Dell, see if the specific problem is operating normally. Check "Diagnostic Lights" on , and the computer is identified...
Quick Reference Guide - Page 32
... computer into a working
condition, or a possible pre-BIOS failure electrical outlet and press the power
has occurred. When the computer starts normally, the patterns or codes on the front or back... panel.
If the POST portion of the problem.
www.dell.com | support.dell.com
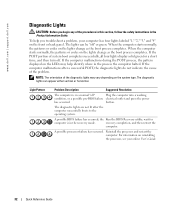
Diagnostic Lights
CAUTION: Before you troubleshoot a problem, your online User's Guide.
...
Quick Reference Guide - Page 33
For information on contacting Dell, see your online User's Guide. A possible USB failure has occurred. Reinstall all power and data cables and
occurred... computer. For information on contacting Dell, see your computer.
• If the problem persists, contact Dell.
Continue until you have two or more memory modules installed, remove the modules, reinstall one memory module...
Quick Reference Guide - Page 43
...Installation Guide, 7 reinstalling Windows XP, 38
P
power light diagnosing problems with, 31 patterns, 9, 12, 15
problems. See troubleshooting
Index
43 Index
B
beep codes, 35
C
CDs drivers and utilities, 7 operating system, 7
conflicts software and hardware incompatibilities, 36
cover removing, 18
D
Dell Premier Support website, 7 support site, 6
Dell Diagnostics, 28 Desktop System Software.
Similar Questions


What's The Max Memory I Can Install On Optiplex Gx520
(Posted by vjp67 10 years ago)

How To Remove Power Supply From Dell Inspiron 660s
I can't find a way to take out the old power supply in my Inspiron 660s. It's loose but there I no r...
I can't find a way to take out the old power supply in my Inspiron 660s. It's loose but there I no r...
(Posted by sfishesfish 10 years ago)