Dell OptiPlex GX520 Support Question
Dell OptiPlex GX520 Support Question
Find answers below for this question about Dell OptiPlex GX520.Need a Dell OptiPlex GX520 manual? We have 1 online manual for this item!
Question posted by ndrderekb on August 22nd, 2014
How To Remove Cpu From Optiplex 520
The person who posted this question about this Dell product did not include a detailed explanation. Please use the "Request More Information" button to the right if more details would help you to answer this question.
Current Answers
Related Dell OptiPlex GX520 Manual Pages
Quick Reference Guide - Page 2
... computer, any manner whatsoever without notice. © 2005-2006 Dell Inc. Microsoft and Windows are registered trademarks of Dell Inc. Information in this text: Dell, OptiPlex, and the DELL logo are not applicable. Notes, Notices, and Cautions
NOTE: A NOTE indicates important information that helps you make better use of Dell Inc.;
Quick Reference Guide - Page 3

...
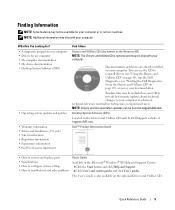
Finding Information 5
System Views 8 Mini Tower Computer - Front View 8 Mini Tower Computer - Front View 11 Desktop Computer - Back View 15 Back-Panel Connectors 16
Removing the Computer Cover 18 Before You Begin 18 Mini Tower Computer 19 Desktop Computer 21 Small Form Factor Computer 22
Inside Your Computer 23 Mini Tower Computer 23...
Quick Reference Guide - Page 5
...Quick Reference Guide
5 Dell™ Product Information Guide
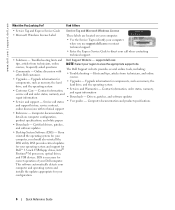
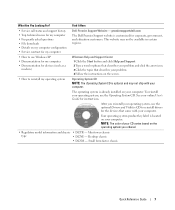
• How to remove and replace parts • Specifications • How to configure system settings &#... • Drivers for my computer • My computer documentation • My device documentation • Desktop System Software (DSS)
• Operating system updates and patches
• Warranty information • Terms ...
Quick Reference Guide - Page 6
... and support - courses, frequently asked questions
The Dell Support website provides several online tools, including:
• Community - Certified drivers, patches, and software updates
• Desktop System Software (DSS) -
Service call and order status, warranty, and
• Services and Warranties - Upgrade information for your Dell computer. If you use support.dell...
Quick Reference Guide - Page 7
... based on your online User's Guide for the devices that describes your problem. 4 Follow the instructions on your operating system, use the Operating System CD. Desktop chassis
• DCSM -
Find It Here
• Service call status and support history • Top technical issues for my computer • Frequently asked questions •...
Quick Reference Guide - Page 13
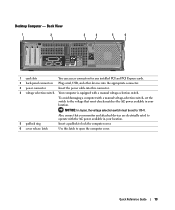
Desktop Computer - Also, ensure that most closely matches the AC power available in your location.
NOTICE: In Japan, the voltage selection switch must be set the ...
Quick Reference Guide - Page 17
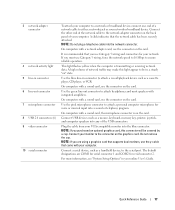
... blue line-in connector to attach a record/playback device such as a handheld device, to either a network jack or your network or broadband device.
Do not remove the cap. Connect a serial device, such as a cassette player, CD player, or VCR. The default designations are using a graphics card that you are COM1 for...
Quick Reference Guide - Page 18
... cover.
www.dell.com | support.dell.com
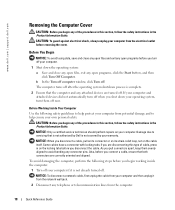
Removing the Computer Cover
CAUTION: Before you begin any of cable, press in the Product Information Guide. b In the Turn off computer window, click Turn off . ...
Quick Reference Guide - Page 19
...unpainted metal surface.
While you have installed a padlock through the padlock ring on the back panel, remove the
padlock. 3 Lay the computer on its side as the metal at the back of the ...18. 2 If you work, periodically touch an unpainted metal surface to ground the system board.
4 Remove the computer stand, if it is attached. While you work, periodically touch an unpainted metal surface to...
Quick Reference Guide - Page 20
... back as you lift the cover. 5 Grip the sides of the computer cover and pivot the cover up using the hinge tabs as leverage
points. 6 Remove the cover from the hinge tabs and set it aside on a clean, nonabrasive surface.
20
Quick Reference Guide
Quick Reference Guide - Page 21
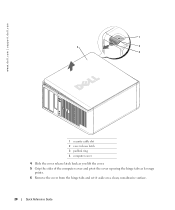
... on page 18. 2 If you have installed a padlock through the padlock ring on the back panel, remove the padlock. 3 Slide the cover release latch back as you lift the cover. 4 Grip the sides ...of the computer cover and pivot the cover up using the hinge tabs as leverage points. 5 Remove the cover from the hinge tabs and set it aside on a clean, nonabrasive surface.
1 4
2 3
1 security...
Quick Reference Guide - Page 22
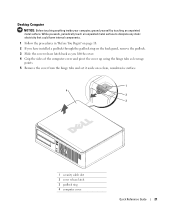
... on page 18. 2 If you have installed a padlock through the padlock ring on the back panel, remove the padlock. 3 Slide the cover release latch back as you lift the cover. 4 Grip the sides of... the computer cover and pivot the cover up using the hinge tabs as leverage
points. 5 Remove the cover from the hinge tabs and set it aside on a clean, nonabrasive surface.
1
4
2
3
22
...
Quick Reference Guide - Page 24
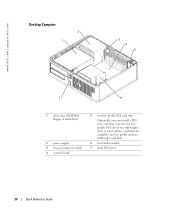
A total of three card slots are available: one lowprofile PCI slot to two full-height slots. www.dell.com | support.dell.com
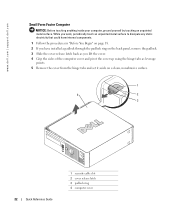
Desktop Computer
2 1
3 4 5
7
6
1 drives bay (CD/DVD, floppy, or hard drive)
2 power supply 3 chassis intrusion switch 4 system board
5 two low-profile PCI card slots
Optionally, you can ...
Quick Reference Guide - Page 29
...computer's configuration information, and ensure that the device you see the Microsoft® Windows® desktop. If you wait too long and the Windows logo appears, continue to wait until you want...Utilities CD" on (or restart) your Drivers and Utilities CD (optional) (see the Windows desktop.
When the DELL logo appears, press immediately. NOTE: The next steps change the boot ...
Quick Reference Guide - Page 30
... internal tests, and it displays the information in the device list in the following table for all devices from the Drivers and Utilities CD (optional), remove the CD.
5 Close the test screen to return to the Main Menu screen. The device list may indicate requirements for the selected device.
Quick Reference Guide - Page 33
...your online User's Guide.
• If you have two or more memory modules installed, remove the modules, reinstall one memory module installed, reinstall it , and then restart the computer...Guide.
A possible graphics card failure has occurred.
• If the computer has a graphics card, remove the card, reinstall it and restart the computer. A possible floppy or hard drive failure has Reseat ...
Quick Reference Guide - Page 34

... the computer. For information on contacting Dell, see your online User's Guide. This pattern also displays when you have two or more memory modules installed, remove the modules, reinstall one memory module installed, reinstall it and restart the computer. For information on your online User's Guide. Memory modules are detected, but...
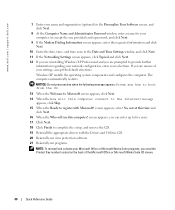
Quick Reference Guide - Page 39
... click Next. NOTICE: The Operating System CD provides options for your current Windows XP data, type r to select the repair option, and remove the CD.
4 If you see the Windows desktop, and then shut down the computer and try again.
5 Press the arrow keys to select CD-ROM, and press . 6 When the...
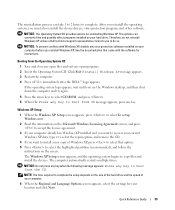
Quick Reference Guide - Page 40
... CD.
13 When the Welcome to Microsoft screen appears, click Next. 14 When the How will use this computer connect to complete the setup, and remove the CD. 19 Reinstall the appropriate drivers with Microsoft? screen appears, select No, not at this time and
click Next. 16 When the Who will...
Quick Reference Guide - Page 43
... patterns, 9, 12, 15
problems. See troubleshooting
Index
43 Index
B
beep codes, 35
C
CDs drivers and utilities, 7 operating system, 7
conflicts software and hardware incompatibilities, 36
cover removing, 18
D
Dell Premier Support website, 7 support site, 6
Dell Diagnostics, 28 Desktop System Software.


