Dell OptiPlex GX520 Support Question
Dell OptiPlex GX520 Support Question
Find answers below for this question about Dell OptiPlex GX520.Need a Dell OptiPlex GX520 manual? We have 1 online manual for this item!
Question posted by dy86LU on November 1st, 2013
How To Remove The Power Switch For An Optiplex Gx520?
The person who posted this question about this Dell product did not include a detailed explanation. Please use the "Request More Information" button to the right if more details would help you to answer this question.
Current Answers
Related Dell OptiPlex GX520 Manual Pages
Quick Reference Guide - Page 2
... may be used in the User's Guide. Other trademarks and trade names may not ship with all computers. disclaims any references in this text: Dell, OptiPlex, and the DELL logo are not applicable.
Quick Reference Guide - Page 3

... Small Form Factor Computer - Contents
Finding Information 5
System Views 8 Mini Tower Computer - Back View 10 Desktop Computer - Back View 15 Back-Panel Connectors 16
Removing the Computer Cover 18 Before You Begin 18 Mini Tower Computer 19 Desktop Computer 21 Small Form Factor Computer 22
Inside Your Computer 23 Mini Tower Computer 23...
Quick Reference Guide - Page 5
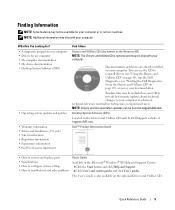
... changes to your computer. Dell™ Product Information Guide
• How to remove and replace parts • Specifications • How to configure system settings •...• Drivers for my computer • My computer documentation • My device documentation • Desktop System Software (DSS)
• Operating system updates and patches
• Warranty information • Terms...
Quick Reference Guide - Page 9
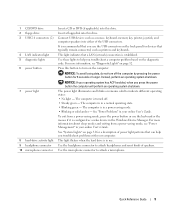
... 2 floppy drive 3 USB 2.0 connectors (2)
4 LAN indicator light 5 diagnostic lights 6 power button
7 power light
8 hard-drive activity light 9 headphone connector 10 microphone connector
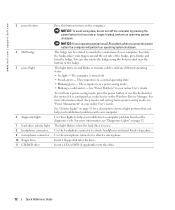
Insert a CD or DVD... your computer. Insert a floppy disk into either of speakers. For more information, see "Power Management" in a normal operating state. • Blinking green - Use the headphone connector...
Quick Reference Guide - Page 11

Desktop Computer - Front View
1
2
3
11 10
9
8 76 5 4
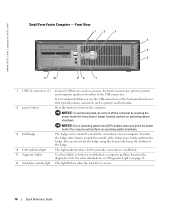
1 USB 2.0 connectors (2) Connect USB devices such as...is equipped with the AC power available in your location.
NOTICE: In Japan, the voltage selection switch must be set the switch to operate with a manual voltage-selection switch. Also, ensure that your location.
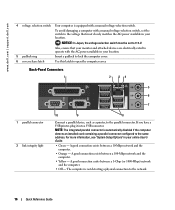
4 power connector
Insert the power cable into this connector....
Quick Reference Guide - Page 12
... this drive.
12
Quick Reference Guide The computer is turned off the computer by pressing the power button for a description of the badge. Use these lights to help you troubleshoot problems with ...or longer.
You can also rotate the badge using the slot provided near the bottom of power light patterns that can be rotated to match the orientation of speakers.
NOTICE: If your ...
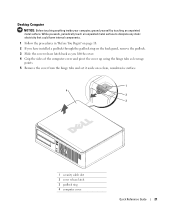
Quick Reference Guide - Page 13
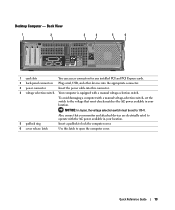
... a padlock to lock the computer cover.
6 cover release latch
Use this connector.
4 voltage selection switch Your computer is equipped with the AC power available in your monitor and attached devices are electrically rated to 115-V.
To avoid damaging a computer with a manual voltage-selection switch, set to operate with a manual voltage-selection switch. Desktop Computer -
Quick Reference Guide - Page 14
...light
This light indicates that a LAN (network) connection is recommended that you press the power button the computer will perform an operating system shutdown.
3 Dell badge
The badge can be ...rotated to match the orientation of the USB connectors.
2 power button
It is established.
5 diagnostic lights
Use these lights to turn on the back panel for...
Quick Reference Guide - Page 15
... Guide
15 Use the headphone connector to indicate different operating states: • No light - See "Power Problems" in a normal operating state. • Blinking green - Small Form Factor Computer - The ... online User's Guide. For more information about sleep modes and exiting from a power-saving mode, press the power button or use the keyboard or the mouse if it is turned off. •...
Quick Reference Guide - Page 16
... (or 1000-Mbps) network and the computer.
• Off - To avoid damaging a computer with a manual voltage-selection switch, set to the network.
16
Quick Reference Guide
The computer is equipped with the AC power available in your location.
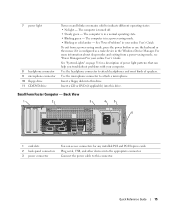
5 padlock ring
Insert a padlock to lock the computer cover.
6 cover release latch
Use this...
Quick Reference Guide - Page 17
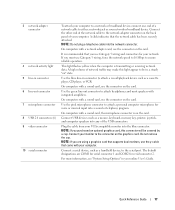
... with a sound card, the microphone connector is transmitting or receiving network data.
Connect USB devices such as a cassette player, CD player, or VCR. Do not remove the cap. The default designations are using a graphics card that supports dual monitors, use the connector on the card.
On computers with a sound card, use...
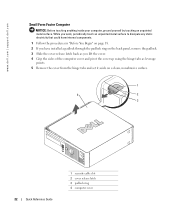
Quick Reference Guide - Page 19
... following illustration. While you have installed a padlock through the padlock ring on the back panel, remove the
padlock. 3 Lay the computer on its side as the metal at the back of the...NOTICE: Before touching anything inside your computer from their electrical outlets, and then press the power button to dissipate any static electricity that could harm internal components. While you work , ...
Quick Reference Guide - Page 20
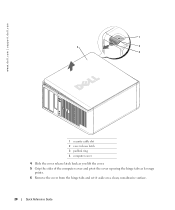
... back as you lift the cover. 5 Grip the sides of the computer cover and pivot the cover up using the hinge tabs as leverage
points. 6 Remove the cover from the hinge tabs and set it aside on a clean, nonabrasive surface.
20
Quick Reference Guide
Quick Reference Guide - Page 21
Desktop Computer
NOTICE: Before touching anything inside your computer, ground yourself by touching an unpainted metal surface. While ... as you lift the cover. 4 Grip the sides of the computer cover and pivot the cover up using the hinge tabs as leverage points. 5 Remove the cover from the hinge tabs and set it aside on a clean, nonabrasive surface.
1 4
2 3
1 security cable slot 2 cover release ...
Quick Reference Guide - Page 22
... on page 18. 2 If you have installed a padlock through the padlock ring on the back panel, remove the padlock. 3 Slide the cover release latch back as you lift the cover. 4 Grip the sides of... the computer cover and pivot the cover up using the hinge tabs as leverage
points. 5 Remove the cover from the hinge tabs and set it aside on a clean, nonabrasive surface.
1
4
2
3
22
...
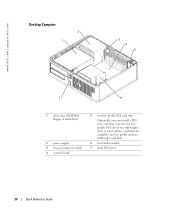
Quick Reference Guide - Page 24
www.dell.com | support.dell.com
Desktop Computer
2 1
3 4 5
7
6
1 drives bay (CD/DVD, floppy, or hard drive)
2 power supply 3 chassis intrusion switch 4 system board
5 two low-profile PCI card slots
Optionally, you can install a PCI riser card that converts one low-profile and two full-height card ...
Quick Reference Guide - Page 26
...line to the modem. Computers with a manual voltage-selection switch, set the switch to the voltage that most closely matches the AC power available in your location. NOTE: Your computer may vary ... the monitor cable to the network adapter connector. Your computer has a manual voltage-selection switch.
Insert the network cable, not the telephone line, into the network connector. See the...
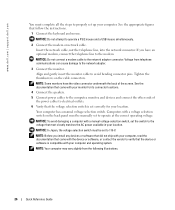
Quick Reference Guide - Page 33
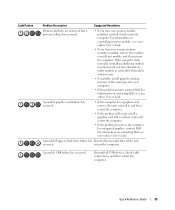
...problem persists, contact Dell.
Continue until you have two or more memory modules installed, remove the modules, reinstall one memory module installed, reinstall it , and then restart the computer...cable connections, and then restart the computer. Quick Reference Guide
33 Reinstall all power and data cables and
occurred. If the computer starts normally, reinstall an additional ...
Quick Reference Guide - Page 39
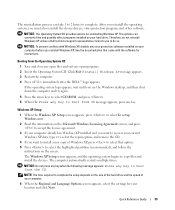
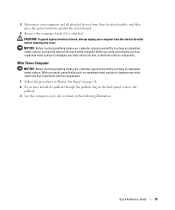
... before you want to recover your current Windows XP data, type r to select the repair option, and remove the CD.
4 If you reinstall Windows XP. After you reinstall the operating system, you see the Windows desktop, and then shut down the computer and try again.
5 Press the arrow keys to select CD...
Quick Reference Guide - Page 43
...
IRQ conflicts, 36
L
labels Microsoft Windows, 6 Service Tag, 6
lights diagnostic, 32 system, 31
M
Microsoft Windows label, 6
O
operating system CD, 7 Installation Guide, 7 reinstalling Windows XP, 38
P
power light diagnosing problems with, 31 patterns, 9, 12, 15
problems. See troubleshooting
Index
43 Index
B
beep codes, 35
C
CDs drivers and utilities, 7 operating system, 7
conflicts software...
Similar Questions


How To Replace And Remove A Power Supply On A Dell Optiplex Gx520 Tower
(Posted by pmosau 10 years ago)

What's The Max Memory I Can Install On Optiplex Gx520
(Posted by vjp67 10 years ago)
