Operating Guide
Page 3
... swimming pool. 7. Transporting Product A product and cart combination should use can help you get many years of power source indicated on or pinched by the manufacturer. 8. Power Sources This product should be operated only from overheating, and these openings must not be blocked by the manufacturer,... force, and uneven surfaces may cause hazards. 10. Ventilation Slots and openings in installation such as they exit from battery power, or other similar surface. The openings should be followed. 3. This product should be placed in a built-in the cabinet are built ...
... swimming pool. 7. Transporting Product A product and cart combination should use can help you get many years of power source indicated on or pinched by the manufacturer. 8. Power Sources This product should be operated only from overheating, and these openings must not be blocked by the manufacturer,... force, and uneven surfaces may cause hazards. 10. Ventilation Slots and openings in installation such as they exit from battery power, or other similar surface. The openings should be followed. 3. This product should be placed in a built-in the cabinet are built ...
Operating Guide
Page 4
... be fatal. 17. f. If the product exhibits a distinct change in fire, electric shock, or other hazards. 22. If the power-supply cord or plug is left unattended and unused for the grounding electrode. d. Unauthorized substitutions may touch dangerous voltage points or short-out... parts that produce heat. 206-3652 4 National Electrical Code Power Service Grounding Electrode System (NEC Art 250, Part H) 15. Outdoor Antenna Grounding If an outside antenna system should be taken to...
... be fatal. 17. f. If the product exhibits a distinct change in fire, electric shock, or other hazards. 22. If the power-supply cord or plug is left unattended and unused for the grounding electrode. d. Unauthorized substitutions may touch dangerous voltage points or short-out... parts that produce heat. 206-3652 4 National Electrical Code Power Service Grounding Electrode System (NEC Art 250, Part H) 15. Outdoor Antenna Grounding If an outside antenna system should be taken to...
Operating Guide
Page 6
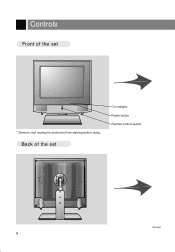
Controls Front of the set tv/video menu enter vol vol ch ch power * Remove vinyl coating for protection from staining before using. Back of the set On indicator Power button Remote control sensor 206-3652 6
Controls Front of the set tv/video menu enter vol vol ch ch power * Remove vinyl coating for protection from staining before using. Back of the set On indicator Power button Remote control sensor 206-3652 6
Operating Guide
Page 8
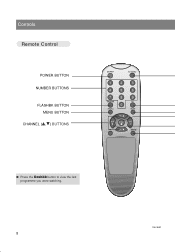
Controls Remote Control POWER BUTTON NUMBER BUTTONS FLASHBK BUTTON MENU BUTTON CHANNEL (D,E) BUTTONS power tv/video 1 2 3 4 5 6 7 8 flashbk 0 menu 9 cc mute ch vol enter vol ch sleep q Press the flashbk button to view the last programme you were watching. 206-3652 8
Controls Remote Control POWER BUTTON NUMBER BUTTONS FLASHBK BUTTON MENU BUTTON CHANNEL (D,E) BUTTONS power tv/video 1 2 3 4 5 6 7 8 flashbk 0 menu 9 cc mute ch vol enter vol ch sleep q Press the flashbk button to view the last programme you were watching. 206-3652 8
Operating Guide
Page 10
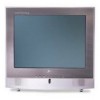
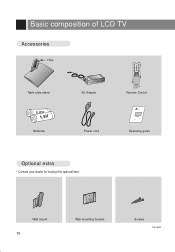
Wall mount 10 Wall mounting bracket Screws 206-3652 Basic composition of LCD TV Accessories Hole power tv/video flashbk cc menu mute ch vol enter vol ch sleep Table style stand AC Adaptor Remote Control 1.5V 1.5V Batteries Power cord Zenith AS mark Operating guide Optional extra * Contact your dealer for buying this optional item.
Wall mount 10 Wall mounting bracket Screws 206-3652 Basic composition of LCD TV Accessories Hole power tv/video flashbk cc menu mute ch vol enter vol ch sleep Table style stand AC Adaptor Remote Control 1.5V 1.5V Batteries Power cord Zenith AS mark Operating guide Optional extra * Contact your dealer for buying this optional item.
Operating Guide
Page 11
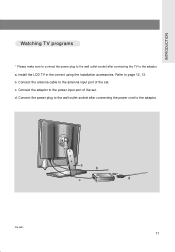
b. d. Connect the power plug to the wall outlet socket after connecting the TV to page 12, 13. Connect the adaptor to the adaptor. 206-3652 a b c d 11 c. INTRODUCTION Watching TV programs * Please make sure to connect the power plug to the wall outlet socket after connecting the power cord to the power input port of the set . Refer to the adaptor. Install the LCD TV in the correct using the installation accessories. Connect the antenna cable to the antenna input port of the set . a.
b. d. Connect the power plug to the wall outlet socket after connecting the TV to page 12, 13. Connect the adaptor to the adaptor. 206-3652 a b c d 11 c. INTRODUCTION Watching TV programs * Please make sure to connect the power plug to the wall outlet socket after connecting the power cord to the power input port of the set . Refer to the adaptor. Install the LCD TV in the correct using the installation accessories. Connect the antenna cable to the antenna input port of the set . a.

Operating Guide
Page 13
Put the set in the position you assemble the TV set with table style stand, please match the stick of the joint. 206-3652 13 b. INTRODUCTION 2 Installation on the table tv/video menu enter vol vol ch ch power a. Place the table installer in the table installer. * When you wish to install the set to the hole of the table style stand so as not to allow movement of TV set .
Put the set in the position you assemble the TV set with table style stand, please match the stick of the joint. 206-3652 13 b. INTRODUCTION 2 Installation on the table tv/video menu enter vol vol ch ch power a. Place the table installer in the table installer. * When you wish to install the set to the hole of the table style stand so as not to allow movement of TV set .
Operating Guide
Page 22
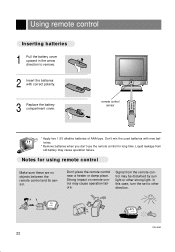
... control Inserting batteries 1 Pull the battery cover upward in the arrow direction to other strong light. tv/video menu enter vol vol ch ch power remote control sensor power tv/video flashbk cc menu mute ch vol enter vol ch sleep * Apply two 1.5V alkaline batteries of AAA type. Don't mix the...
... control Inserting batteries 1 Pull the battery cover upward in the arrow direction to other strong light. tv/video menu enter vol vol ch ch power remote control sensor power tv/video flashbk cc menu mute ch vol enter vol ch sleep * Apply two 1.5V alkaline batteries of AAA type. Don't mix the...

Operating Guide
Page 23
...PM 2 Press the channel (D,E) or number buttons to select a channel you want after memorizing received broadcasting signals in a few seconds. 1 Press the power button to memorize channels. power tv/video 1 2 3 4 5 6 7 8 flashbk 0 menu 9 cc mute ch vol enter vol ch sleep BASIC FUNCTIONS 3 Adjust Volume level.... q Direct selecting channels Press number of the program as one or two digits with the adaptor. * Press the power button and you will get stable picture and sound in the local area. Turning on . q Volume (F) button decreas- es the level ...
...PM 2 Press the channel (D,E) or number buttons to select a channel you want after memorizing received broadcasting signals in a few seconds. 1 Press the power button to memorize channels. power tv/video 1 2 3 4 5 6 7 8 flashbk 0 menu 9 cc mute ch vol enter vol ch sleep BASIC FUNCTIONS 3 Adjust Volume level.... q Direct selecting channels Press number of the program as one or two digits with the adaptor. * Press the power button and you will get stable picture and sound in the local area. Turning on . q Volume (F) button decreas- es the level ...

Operating Guide
Page 27
... DEF G And A CAPTION TEXT4 4 Press the enter (A) button. Language Captions Caption/Text Parental Ctl English Off CC1 Use DEF G And A q Each time you switch the POWER off. 206-3652 27
... DEF G And A CAPTION TEXT4 4 Press the enter (A) button. Language Captions Caption/Text Parental Ctl English Off CC1 Use DEF G And A q Each time you switch the POWER off. 206-3652 27
Operating Guide
Page 32
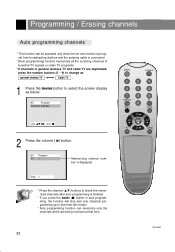
power tv/video 1 2 3 4 5 6 7 8 flashbk 0 menu 9 cc mute ch vol enter vol ch sleep 206-3652 32 EZ Program Channel Add/Del Use DEF G And A 2 Press the ...
power tv/video 1 2 3 4 5 6 7 8 flashbk 0 menu 9 cc mute ch vol enter vol ch sleep 206-3652 32 EZ Program Channel Add/Del Use DEF G And A 2 Press the ...

Operating Guide
Page 34
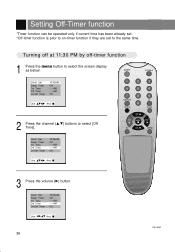
Clock Set Sleep Timer On Time Off Time On/Off Timer --:--AM Off --:--AM --:--AM Off Use DEF G And A power tv/video 1 2 3 4 5 6 7 8 flashbk 0 menu 9 cc mute ch vol enter vol ch sleep 3 Press the volume ( G) button. Clock Set Sleep Timer On Time Off Time On/... On/Off Timer 00:00AM Off --:--AM --:--AM Off Use F G DE And A 34 206-3652 Setting current time * If current time setting is erased by power failure or TV is unplugged, reset it. To set current time as 10:30 AM 1 Press the menu button to select [Clock Set].
Clock Set Sleep Timer On Time Off Time On/Off Timer --:--AM Off --:--AM --:--AM Off Use DEF G And A power tv/video 1 2 3 4 5 6 7 8 flashbk 0 menu 9 cc mute ch vol enter vol ch sleep 3 Press the volume ( G) button. Clock Set Sleep Timer On Time Off Time On/... On/Off Timer 00:00AM Off --:--AM --:--AM Off Use F G DE And A 34 206-3652 Setting current time * If current time setting is erased by power failure or TV is unplugged, reset it. To set current time as 10:30 AM 1 Press the menu button to select [Clock Set].
Operating Guide
Page 36
power tv/video 1 2 3 4 5 6 7 8 flashbk 0 menu 9 cc mute ch vol enter vol ch sleep Clock Set Sleep Timer On Time Off Time On/Off Timer 10:30AM ...
power tv/video 1 2 3 4 5 6 7 8 flashbk 0 menu 9 cc mute ch vol enter vol ch sleep Clock Set Sleep Timer On Time Off Time On/Off Timer 10:30AM ...
Operating Guide
Page 40
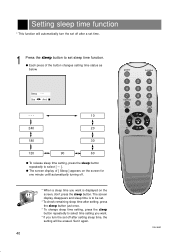
Setting sleep time function * This function will be set sleep time function. Set it again. 40 power tv/video 1 2 3 4 5 6 7 8 flashbk 0 menu 9 cc mute ch vol enter vol ch sleep 206-3652 The screen display disappears and sleep time is displayed on the ...
Setting sleep time function * This function will be set sleep time function. Set it again. 40 power tv/video 1 2 3 4 5 6 7 8 flashbk 0 menu 9 cc mute ch vol enter vol ch sleep 206-3652 The screen display disappears and sleep time is displayed on the ...
Operating Guide
Page 43
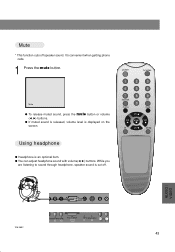
q If muted sound is released, volume level is an optional item. power tv/video 1 2 3 4 5 6 7 8 flashbk 0 menu 9 cc mute ch vol enter vol ch sleep Using headphone q Headphone is displayed on the screen. AUDIO / VIDEO 206-3652 PONENT ...
q If muted sound is released, volume level is an optional item. power tv/video 1 2 3 4 5 6 7 8 flashbk 0 menu 9 cc mute ch vol enter vol ch sleep Using headphone q Headphone is displayed on the screen. AUDIO / VIDEO 206-3652 PONENT ...
Operating Guide
Page 44
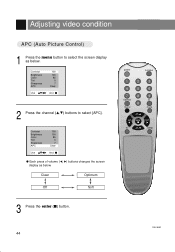
Contrast Brightness Color Tint Sharpness APC 100 100 85 0 7 Clear Use DEF G And A q Each press of volume (F, G) buttons changes the screen display as below . Adjusting video condition APC (Auto Picture Control) 1 Press the menu button to select [APC]. Contrast Brightness Color Tint Sharpness APC 100 100 85 0 7 Clear Use DEF G And A 2 Press the channel (D,E) buttons to select the screen display as below . Clear Optimum Off Soft power tv/video 1 2 3 4 5 6 7 8 flashbk 0 menu 9 cc mute ch vol enter vol ch sleep 3 Press the enter (A) button. 44 206-3652
Contrast Brightness Color Tint Sharpness APC 100 100 85 0 7 Clear Use DEF G And A q Each press of volume (F, G) buttons changes the screen display as below . Adjusting video condition APC (Auto Picture Control) 1 Press the menu button to select [APC]. Contrast Brightness Color Tint Sharpness APC 100 100 85 0 7 Clear Use DEF G And A 2 Press the channel (D,E) buttons to select the screen display as below . Clear Optimum Off Soft power tv/video 1 2 3 4 5 6 7 8 flashbk 0 menu 9 cc mute ch vol enter vol ch sleep 3 Press the enter (A) button. 44 206-3652
Operating Guide
Page 46
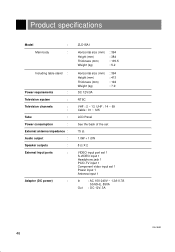
... : External antenna impedance : Audio output : Speaker outputs : External input ports : Adaptor (DC power) : ZLD15A1 Horizontal size (mm) Height (mm) Thickness (mm) Weight (kg) : 394 : 384 : 105.5 : 5.2 Horizontal size (mm) Height (mm) Thickness (mm) Weight (kg) : 394 : 413 : 194 : 7.9 DC ... back of the set 75 Ω 1.0W + 1.0W 8ΩX2 VIDEO input port set 1 S-VIDEO input 1 Headphone jack 1 PC/D-TV input 1 Component video input set 1 Power input 1 Antenna input 1 In : AC 100-240V ~ 1.3A-0.7A 50/60Hz, 85VA Out : DC 12V, 3A 206-3652 46
... : External antenna impedance : Audio output : Speaker outputs : External input ports : Adaptor (DC power) : ZLD15A1 Horizontal size (mm) Height (mm) Thickness (mm) Weight (kg) : 394 : 384 : 105.5 : 5.2 Horizontal size (mm) Height (mm) Thickness (mm) Weight (kg) : 394 : 413 : 194 : 7.9 DC ... back of the set 75 Ω 1.0W + 1.0W 8ΩX2 VIDEO input port set 1 S-VIDEO input 1 Headphone jack 1 PC/D-TV input 1 Component video input set 1 Power input 1 Antenna input 1 In : AC 100-240V ~ 1.3A-0.7A 50/60Hz, 85VA Out : DC 12V, 3A 206-3652 46
