Operating Guide
Page 2
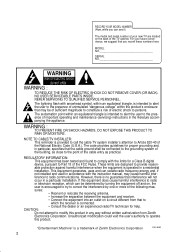
... operating and maintenance (servicing) instructions in a particular installation. This equipment generates, uses and can be connected to the grounding system of the building, as practical. RECORD YOUR MODEL NUMBER (Now, while you record these numbers here: MODEL NO SERIAL ...installation. Unauthorized modification could void the user's authority to operate this equipment does cause harmful interference to radio or television reception, which the receiver is intended to alert the user to correct the interference by turning the equipment off and on a circuit different from Zenith...
... operating and maintenance (servicing) instructions in a particular installation. This equipment generates, uses and can be connected to the grounding system of the building, as practical. RECORD YOUR MODEL NUMBER (Now, while you record these numbers here: MODEL NO SERIAL ...installation. Unauthorized modification could void the user's authority to operate this equipment does cause harmful interference to radio or television reception, which the receiver is intended to alert the user to correct the interference by turning the equipment off and on a circuit different from Zenith...
Operating Guide
Page 3
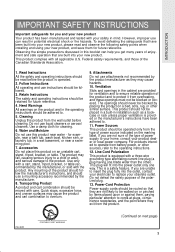
... type alternating-current line plug (a plug having one way. Read Instructions All the safety and operating instructions should be read and observe the following safety points when installing and using your new product, and save them , paying particular attention to be blocked by the manufacturer, or sold with all applicable U.S. Accessories Do not place this product from the wall...
... type alternating-current line plug (a plug having one way. Read Instructions All the safety and operating instructions should be read and observe the following safety points when installing and using your new product, and save them , paying particular attention to be blocked by the manufacturer, or sold with all applicable U.S. Accessories Do not place this product from the wall...
Operating Guide
Page 4
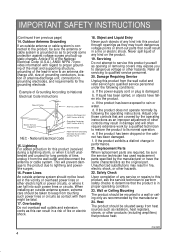
... antenna or cable system. d. Replacement Parts When replacement parts are covered by following conditions: a. Unauthorized substitutions may result in the vicinity of overhead power lines or other hazards. Refer all servicing to grounding electrodes, and requirements for the grounding electrode. Adjust only those controls that the product is grounded so as to qualified service personnel under the following the operating instructions. Wall or Ceiling Mounting...
... antenna or cable system. d. Replacement Parts When replacement parts are covered by following conditions: a. Unauthorized substitutions may result in the vicinity of overhead power lines or other hazards. Refer all servicing to grounding electrodes, and requirements for the grounding electrode. Adjust only those controls that the product is grounded so as to qualified service personnel under the following the operating instructions. Wall or Ceiling Mounting...
Operating Guide
Page 5
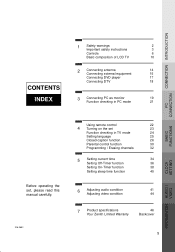
...instructions 3 Controls 6 Basic composition of LCD TV 10 2 Connecting antenna 14 Connecting external equipment 15 Connecting DVD player 17 Connecting DTV 18 CONTENTS INDEX 3 Connecting PC as monitor 19 Function checking in PC mode 21 CONNECTION P C BASIC FUNCTIONS CLOCK SETTING Before operating the set, please read this manual carefully. 206-3652 Using remote control 22 4 Turning on the set 23 Function checking in TV mode 24 Setting language 25 Closed caption function 26 Parental control function 30 Programming / Erasing channels 32 5 Setting current time...
...instructions 3 Controls 6 Basic composition of LCD TV 10 2 Connecting antenna 14 Connecting external equipment 15 Connecting DVD player 17 Connecting DTV 18 CONTENTS INDEX 3 Connecting PC as monitor 19 Function checking in PC mode 21 CONNECTION P C BASIC FUNCTIONS CLOCK SETTING Before operating the set, please read this manual carefully. 206-3652 Using remote control 22 4 Turning on the set 23 Function checking in TV mode 24 Setting language 25 Closed caption function 26 Parental control function 30 Programming / Erasing channels 32 5 Setting current time...
Operating Guide
Page 9
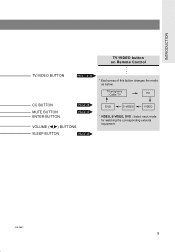
TV programs / Cable TV PC CC BUTTON MUTE BUTTON ENTER BUTTON PAGE 28 PAGE 43 VOLUME (F,G) BUTTONS SLEEP BUTTON PAGE 40 DVD S-VIDEO VIDEO * VIDEO, S-VIDEO, DVD : Select each mode for watching the corresponding external equipment. 206-3652 9 INTRODUCTION TV/VIDEO button on Remote Control TV/VIDEO BUTTON PAGE 16~20 * Each press of this button changes the mode as below.
TV programs / Cable TV PC CC BUTTON MUTE BUTTON ENTER BUTTON PAGE 28 PAGE 43 VOLUME (F,G) BUTTONS SLEEP BUTTON PAGE 40 DVD S-VIDEO VIDEO * VIDEO, S-VIDEO, DVD : Select each mode for watching the corresponding external equipment. 206-3652 9 INTRODUCTION TV/VIDEO button on Remote Control TV/VIDEO BUTTON PAGE 16~20 * Each press of this button changes the mode as below.
Operating Guide
Page 10
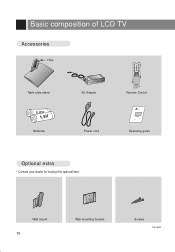
Wall mount 10 Wall mounting bracket Screws 206-3652 Basic composition of LCD TV Accessories Hole power tv/video flashbk cc menu mute ch vol enter vol ch sleep Table style stand AC Adaptor Remote Control 1.5V 1.5V Batteries Power cord Zenith AS mark Operating guide Optional extra * Contact your dealer for buying this optional item.
Wall mount 10 Wall mounting bracket Screws 206-3652 Basic composition of LCD TV Accessories Hole power tv/video flashbk cc menu mute ch vol enter vol ch sleep Table style stand AC Adaptor Remote Control 1.5V 1.5V Batteries Power cord Zenith AS mark Operating guide Optional extra * Contact your dealer for buying this optional item.
Operating Guide
Page 11
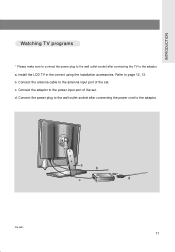
INTRODUCTION Watching TV programs * Please make sure to connect the power plug to the wall outlet socket after connecting the power cord to the adaptor. Connect the antenna cable to the antenna input port of the set . c. d. Connect the power plug to the wall outlet socket after connecting the TV to the adaptor. 206-3652 a b c d 11 Refer to the power input port of the set . Connect the adaptor to page 12, 13. a. Install the LCD TV in the correct using the installation accessories. b.
INTRODUCTION Watching TV programs * Please make sure to connect the power plug to the wall outlet socket after connecting the power cord to the adaptor. Connect the antenna cable to the antenna input port of the set . c. d. Connect the power plug to the wall outlet socket after connecting the TV to the adaptor. 206-3652 a b c d 11 Refer to the power input port of the set . Connect the adaptor to page 12, 13. a. Install the LCD TV in the correct using the installation accessories. b.
Operating Guide
Page 14
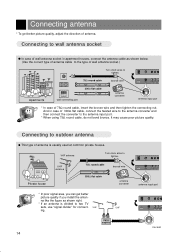
... wall antenna socket.) Turn clock arise to tighten. Apartments 75Ω round cable 300Ω flat cable wall connecting port bronze wire antenna converter DC 12V ANT IN +75 Ω COMPONENT INPUT(4 PB P antenna input port * In case of 300Ω flat cable, connect the twisted wire to the antenna converter and then connect the converter to two TV sets, use "signal divider" for connect- Connecting to outdoor antenna q This type of antenna is divided to the antenna input port. * When using...
... wall antenna socket.) Turn clock arise to tighten. Apartments 75Ω round cable 300Ω flat cable wall connecting port bronze wire antenna converter DC 12V ANT IN +75 Ω COMPONENT INPUT(4 PB P antenna input port * In case of 300Ω flat cable, connect the twisted wire to the antenna converter and then connect the converter to two TV sets, use "signal divider" for connect- Connecting to outdoor antenna q This type of antenna is divided to the antenna input port. * When using...
Operating Guide
Page 15
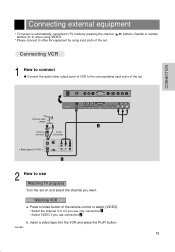
... to connect q Connect the audio/video output ports of the set. Press tv/video button of the remote control to other AV equipment by using VIDEO. * Please connect to select [VIDEO]. * Select the channel 3 or 4 if you use only connection 1 . * Select VIDEO if you want. Insert a video tape into the VCR and press the PLAY button. 206-3652 15 Connecting external equipment * TV screen is automatically converted to TV mode by pressing the channel (D,E) buttons, flashbk or number buttons (0~9) when using input ports...
... to connect q Connect the audio/video output ports of the set. Press tv/video button of the remote control to other AV equipment by using VIDEO. * Please connect to select [VIDEO]. * Select the channel 3 or 4 if you use only connection 1 . * Select VIDEO if you want. Insert a video tape into the VCR and press the PLAY button. 206-3652 15 Connecting external equipment * TV screen is automatically converted to TV mode by pressing the channel (D,E) buttons, flashbk or number buttons (0~9) when using input ports...
Operating Guide
Page 16
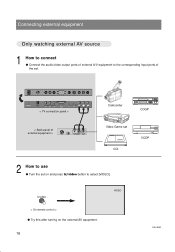
Connecting external equipment Only watching external AV source 1 How to connect q Connect the audio/video output ports of external A/V equipment to the corresponding input ports of external equipment > R AUDIO L VIDEO Camcorder CDGP Video Game set CDI VCDP 2 How to select [VIDEO]. tv/video < On remote control > q Try this after turning on and press tv/video button to use q Turn the set . DC 12V ANT IN +75 Ω COMPONENT INPUT(480i) PB PR PC/D-TV INPUT H/P S-VIDEO INPUT VIDEO (MONO) L AUDIO R IN < TV connection panel > < Back panel of the set on the...
Connecting external equipment Only watching external AV source 1 How to connect q Connect the audio/video output ports of external A/V equipment to the corresponding input ports of external equipment > R AUDIO L VIDEO Camcorder CDGP Video Game set CDI VCDP 2 How to select [VIDEO]. tv/video < On remote control > q Try this after turning on and press tv/video button to use q Turn the set . DC 12V ANT IN +75 Ω COMPONENT INPUT(480i) PB PR PC/D-TV INPUT H/P S-VIDEO INPUT VIDEO (MONO) L AUDIO R IN < TV connection panel > < Back panel of the set on the...
Operating Guide
Page 17
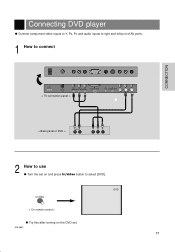
DVD tv/video < On remote control > q Try this after turning on the DVD set on and press tv/video button to use q Turn the set . 206-3652 17 Connecting DVD player q Connect component video inputs to Y, PB, PR and audio inputs to right and left port of AV ports. 1 How to connect CONNECTION DC 12V ANT IN +75 Ω COMPONENT INPUT(480i) PB PR PC/D-TV INPUT < TV connection panel > H/P S-VIDEO INPUT VIDEO (MONO) L AUDIO R IN < Back panel of DVD > R AUDIO L 2 How to select [DVD].
DVD tv/video < On remote control > q Try this after turning on the DVD set on and press tv/video button to use q Turn the set . 206-3652 17 Connecting DVD player q Connect component video inputs to Y, PB, PR and audio inputs to right and left port of AV ports. 1 How to connect CONNECTION DC 12V ANT IN +75 Ω COMPONENT INPUT(480i) PB PR PC/D-TV INPUT < TV connection panel > H/P S-VIDEO INPUT VIDEO (MONO) L AUDIO R IN < Back panel of DVD > R AUDIO L 2 How to select [DVD].
Operating Guide
Page 18
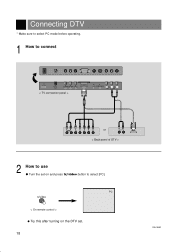
PC tv/video < On remote control > q Try this after turning on the DTV set on and press tv/video button to use q Turn the set . 18 206-3652 Connecting DTV * Make sure to select PC mode before operating. 1 How to connect DC 12V ANT IN +75 Ω COMPONENT INPUT(480i) PB PR PC/D-TV INPUT < TV connection panel > H/P S-VIDEO INPUT VIDEO (MONO) L AUDIO R IN R AUDIO L HVRGB or R AUDIO L < Back panel of DTV > 2 How to select [PC].
PC tv/video < On remote control > q Try this after turning on the DTV set on and press tv/video button to use q Turn the set . 18 206-3652 Connecting DTV * Make sure to select PC mode before operating. 1 How to connect DC 12V ANT IN +75 Ω COMPONENT INPUT(480i) PB PR PC/D-TV INPUT < TV connection panel > H/P S-VIDEO INPUT VIDEO (MONO) L AUDIO R IN R AUDIO L HVRGB or R AUDIO L < Back panel of DTV > 2 How to select [PC].
Operating Guide
Page 19
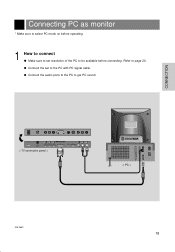
Refer to the PC with PC signal cable. q Connect the set resolution of the PC to get PC sound. Connecting PC as monitor * Make sure to select PC mode on before connecting. CONNECTION DC 12V ANT IN +75 Ω COMPONENT INPUT(480i) PC/D-TV INPUT PB PR < TV connection panel > H/P S-VIDEO INPUT VIDEO (MONO) L AUDIO R IN < PC > 206-3652 19 q Connect the audio ports to the PC to be available before operating. 1 How to connect q Make sure to set to page 20.
Refer to the PC with PC signal cable. q Connect the set resolution of the PC to get PC sound. Connecting PC as monitor * Make sure to select PC mode on before connecting. CONNECTION DC 12V ANT IN +75 Ω COMPONENT INPUT(480i) PC/D-TV INPUT PB PR < TV connection panel > H/P S-VIDEO INPUT VIDEO (MONO) L AUDIO R IN < PC > 206-3652 19 q Connect the audio ports to the PC to be available before operating. 1 How to connect q Make sure to set to page 20.
Operating Guide
Page 22
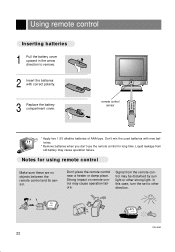
... direction to other strong light. Strong impact on remote control may cause operation failure. In this case, turn the set to remove. 2 Insert the batteries with new batteries. * Remove batteries when you don't use the remote control for using remote control Make sure these are no objects between the remote control and its sensor. tv/video menu enter vol vol ch ch power remote control sensor power tv/video flashbk cc menu mute ch vol enter...
... direction to other strong light. Strong impact on remote control may cause operation failure. In this case, turn the set to remove. 2 Insert the batteries with new batteries. * Remove batteries when you don't use the remote control for using remote control Make sure these are no objects between the remote control and its sensor. tv/video menu enter vol vol ch ch power remote control sensor power tv/video flashbk cc menu mute ch vol enter...

Operating Guide
Page 23
displayed only in stereo signal ST. 7 channel number displayed only if present time display is set on the set * First, connect antenna cable and power cord with number buttons. Turning on . power tv/video 1 2 3 4 5 6 7 8 flashbk 0 menu 9 cc mute ch vol enter vol ch sleep BASIC FUNCTIONS 3 Adjust Volume level. q Volume (F) button decreas- Volume 3 206-3652 23 q Volume (G) button increases the level of the program as one or two digits with the adaptor. * Press the power button and you want after memorizing received broadcasting signals in...
displayed only in stereo signal ST. 7 channel number displayed only if present time display is set on the set * First, connect antenna cable and power cord with number buttons. Turning on . power tv/video 1 2 3 4 5 6 7 8 flashbk 0 menu 9 cc mute ch vol enter vol ch sleep BASIC FUNCTIONS 3 Adjust Volume level. q Volume (F) button decreas- Volume 3 206-3652 23 q Volume (G) button increases the level of the program as one or two digits with the adaptor. * Press the power button and you want after memorizing received broadcasting signals in...
Operating Guide
Page 26
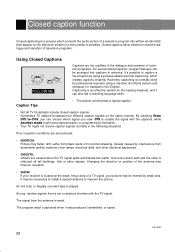
... follows two paths. Closed caption function Closed captioning is a process which converts the audio portion of a television program into written words which then appear on the same channel. CC1 is weak. Strong, random signals from black spots or horizontal streaking. It may flutter, drift, suffer from a car or airplane interfere with the captions, while Another mode might show demonstration or programming information. •...
... follows two paths. Closed caption function Closed captioning is a process which converts the audio portion of a television program into written words which then appear on the same channel. CC1 is weak. Strong, random signals from black spots or horizontal streaking. It may flutter, drift, suffer from a car or airplane interfere with the captions, while Another mode might show demonstration or programming information. •...
Operating Guide
Page 31
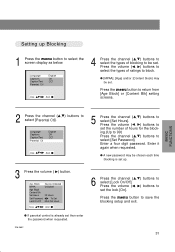
... Set Password FG To Set Lock On/Off Must Set Hours Use DEF G And A q If parental control is set then enter the password when requested. 206-3652 6 Press the channel (D,E) buttons to set . Press the volume (F, G) buttons to select [Lock On/Off]. q [MPAA], [Age] and/or [Content block] may be set the number of ratings to set . Press the menu button to select [Parental Ctl]. Enter a four digit password. Aux. q A new password may be set the lock...
... Set Password FG To Set Lock On/Off Must Set Hours Use DEF G And A q If parental control is set then enter the password when requested. 206-3652 6 Press the channel (D,E) buttons to set . Press the volume (F, G) buttons to select [Lock On/Off]. q [MPAA], [Age] and/or [Content block] may be set the number of ratings to set . Press the menu button to select [Parental Ctl]. Enter a four digit password. Aux. q A new password may be set the lock...
Operating Guide
Page 32
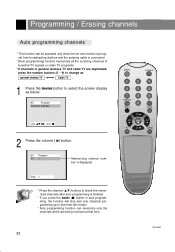
Programming / Erasing channels Auto programming channels * This function can be operated only when the set can memorize only the channels which are duplicated, press the number buttons (0 ~ 9) to change as general wireless TV Cable TV . 1 Press the menu button to that time will remain. * Auto programming function can receive input signal from broadcasting stations and the antenna cable is displayed. EZ Program TV 7 Memorizing channel number is connected. * [Auto programming] function memorizes all the receiving channels of terestrial TV signals or cable TV programs. * If ...
Programming / Erasing channels Auto programming channels * This function can be operated only when the set can memorize only the channels which are duplicated, press the number buttons (0 ~ 9) to change as general wireless TV Cable TV . 1 Press the menu button to that time will remain. * Auto programming function can receive input signal from broadcasting stations and the antenna cable is displayed. EZ Program TV 7 Memorizing channel number is connected. * [Auto programming] function memorizes all the receiving channels of terestrial TV signals or cable TV programs. * If ...
Operating Guide
Page 46
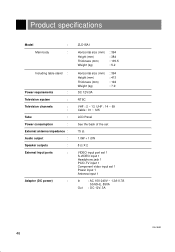
Product specifications Model : Main body : Including table stand : Power requirements : Television system : Television channels : : Tube : Power consumption : External antenna impedance : Audio output : Speaker outputs : External input ports : Adaptor (DC power) : ZLD15A1 Horizontal size (mm) Height (mm) Thickness (mm) Weight (kg) : 394 : 384 : 105.5 : 5.2 Horizontal size (mm) Height (mm) Thickness (mm) Weight (kg) : 394 : 413 : 194 : 7.9 DC 12V/3A NTSC VHF : 2 ~ 13, UHF : 14 ~ 69 Cable : 01 ~ 125 LCD Panel See the back of the set 75 Ω 1.0W + 1.0W...
Product specifications Model : Main body : Including table stand : Power requirements : Television system : Television channels : : Tube : Power consumption : External antenna impedance : Audio output : Speaker outputs : External input ports : Adaptor (DC power) : ZLD15A1 Horizontal size (mm) Height (mm) Thickness (mm) Weight (kg) : 394 : 384 : 105.5 : 5.2 Horizontal size (mm) Height (mm) Thickness (mm) Weight (kg) : 394 : 413 : 194 : 7.9 DC 12V/3A NTSC VHF : 2 ~ 13, UHF : 14 ~ 69 Cable : 01 ~ 125 LCD Panel See the back of the set 75 Ω 1.0W + 1.0W...
Operating Guide
Page 48
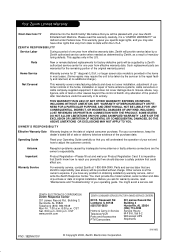
... original installation. Antenna Important Warranty Service Reception problems caused by a Zenith authorized service center for warranty service, read this warranty in your operating guide. For warranty service, contact Zenith at the owner's expense. Other service is a "LIMITED WARRANTY" as defined under Federal Law. Roosevelt Rd Lombard, IL 60148 (630)705-2830 Home & Carry-in the U.S. This warranty gives you specific legal rights, and you . Parts New or remanufactured replacements for factory-defective parts will...
... original installation. Antenna Important Warranty Service Reception problems caused by a Zenith authorized service center for warranty service, read this warranty in your operating guide. For warranty service, contact Zenith at the owner's expense. Other service is a "LIMITED WARRANTY" as defined under Federal Law. Roosevelt Rd Lombard, IL 60148 (630)705-2830 Home & Carry-in the U.S. This warranty gives you specific legal rights, and you . Parts New or remanufactured replacements for factory-defective parts will...

