
Operating Guide
Page 9
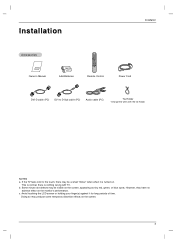
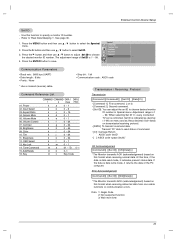
..., they have no adverse effect on the screen. 9 Installation Installation Accessories Owner's Manual 1.5V 1.5V AAA Batteries Remote Control Power Cord DVI-D cable (PC) DVI to the touch, there may be visible on . This is normal, there is turned on the screen, appearing as tiny red, green, or blue... spots. c. Avoid touching the LCD screen or holding your finger(s) against it is nothing wrong with the tie Holder. Doing so may be a ...
..., they have no adverse effect on the screen. 9 Installation Installation Accessories Owner's Manual 1.5V 1.5V AAA Batteries Remote Control Power Cord DVI-D cable (PC) DVI to the touch, there may be visible on . This is normal, there is turned on the screen, appearing as tiny red, green, or blue... spots. c. Avoid touching the LCD screen or holding your finger(s) against it is nothing wrong with the tie Holder. Doing so may be a ...
Operating Guide
Page 14
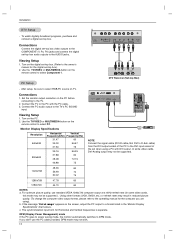
... 72.19 75 NOTE Connect the signal cable (DVI-D cable, Not DVI to D-Sub cable) from the DVI output socket of range" appears on the screen, adjust the PC output to select PC. If the message "Out of the PC to the PC with DVI output. If you are using a PC...
... 72.19 75 NOTE Connect the signal cable (DVI-D cable, Not DVI to D-Sub cable) from the DVI output socket of range" appears on the screen, adjust the PC output to select PC. If the message "Out of the PC to the PC with DVI output. If you are using a PC...
Operating Guide
Page 15
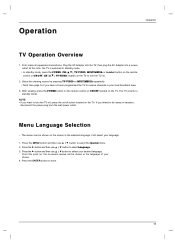
... intend to select your choice. 4. Press the G button and then use D / E button to be away on the screen in the selected language. First, make all equipment connections. At this point on, the on-screen menus will be shown on vacation, disconnect the power plug from the wall power outlet. First select your...
... intend to select your choice. 4. Press the G button and then use D / E button to be away on the screen in the selected language. First, make all equipment connections. At this point on, the on-screen menus will be shown on vacation, disconnect the power plug from the wall power outlet. First select your...
Operating Guide
Page 17
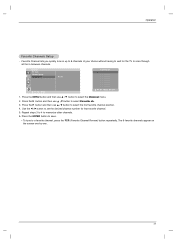
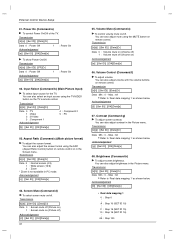
... the ENTER button to save. • To tune to a favorite channel, press the FCR (Favorite Channel Review) button repeatedly. The 8 favorite channels appear on the screen one-by-one. 17 Channel EZ Scan Manual prog. Favorite ch.
... the ENTER button to save. • To tune to a favorite channel, press the FCR (Favorite Channel Review) button repeatedly. The 8 favorite channels appear on the screen one-by-one. 17 Channel EZ Scan Manual prog. Favorite ch.
Operating Guide
Page 18
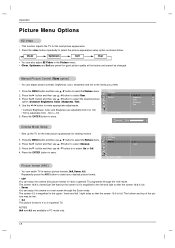
...picture appearance for the best picture appearance. 1. You can enjoy the cinema (the picture format of general TV. The screen 4:3 is magnified to the left / right sides so that the screen 16:9 is adjustable from - 50 to select the Picture menu. NOTES 16:9 and 4:3 are available in the ...; You can adjust picture contrast, brightness, color, sharpness and tint to select your desired picture format. • 16:9 You can watch TV in a vast screen through the 16:9 mode. Press the ENTER button to select User. 3. Press the MENU button and then use D / E button to save . Press the...
...picture appearance for the best picture appearance. 1. You can enjoy the cinema (the picture format of general TV. The screen 4:3 is magnified to the left / right sides so that the screen 16:9 is adjustable from - 50 to select the Picture menu. NOTES 16:9 and 4:3 are available in the ...; You can adjust picture contrast, brightness, color, sharpness and tint to select your desired picture format. • 16:9 You can watch TV in a vast screen through the 16:9 mode. Press the ENTER button to select User. 3. Press the MENU button and then use D / E button to save . Press the...

Operating Guide
Page 22
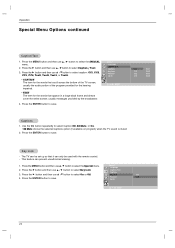
... timer/On timer will automatically revert to select On or Off. Press the SLEEP button repeatedly to select the Timer menu. option appears on the screen, press the ENTER button. Press the menu button and then use D / E button to select Auto off D E FG OK MENU - - : - - Auto Off - .../ E button to select the number of minutes selected. 3. Off timer On timer 3. Timer function operates only if current time is displayed on the screen, followed by the following sleep timer options: 10, 20, 30, 60, 90, 120, 180, and 240 minutes. 2. First the Sleep ---
... timer/On timer will automatically revert to select On or Off. Press the SLEEP button repeatedly to select the Timer menu. option appears on the screen, press the ENTER button. Press the menu button and then use D / E button to select Auto off D E FG OK MENU - - : - - Auto Off - .../ E button to select the number of minutes selected. 3. Off timer On timer 3. Timer function operates only if current time is displayed on the screen, followed by the following sleep timer options: 10, 20, 30, 60, 90, 120, 180, and 240 minutes. 2. First the Sleep ---
Operating Guide
Page 23
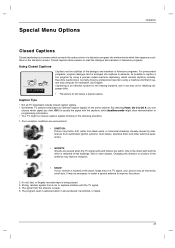
... a typical caption. Caption Tips • Not all TV broadcasts include closed caption signals. • Sometimes TV stations broadcast four different caption signals on the television screen. By selecting From CC 1 to CC 4, you can choose which creates captions instantly. Strong, random signals from the antenna is usually the signal with the...
... a typical caption. Caption Tips • Not all TV broadcasts include closed caption signals. • Sometimes TV stations broadcast four different caption signals on the television screen. By selecting From CC 1 to CC 4, you can choose which creates captions instantly. Strong, random signals from the antenna is usually the signal with the...
Operating Guide
Page 24
... hearing impaired. • TEXT The term for the words that it can only be set up so that scroll across the bottom of the TV screen; Press the MENU button and then use D / E button to select On or Off. Caption/Text Captions Key lock On 4. Press the G button and then ..., CC3, CC4, Text1, Text2, Text3, or Text4. • CAPTION The term for the words that appear in a large black frame and almost cover the entire screen; Operation Special Menu Options continued Caption/Text 1. Use the CC button repeatedly to save. Press the ENTER button to select Caption Off, EZ Mute, or...
... hearing impaired. • TEXT The term for the words that it can only be set up so that scroll across the bottom of the TV screen; Press the MENU button and then use D / E button to select On or Off. Caption/Text Captions Key lock On 4. Press the G button and then ..., CC3, CC4, Text1, Text2, Text3, or Text4. • CAPTION The term for the words that appear in a large black frame and almost cover the entire screen; Operation Special Menu Options continued Caption/Text 1. Use the CC button repeatedly to save. Press the ENTER button to select Caption Off, EZ Mute, or...
Operating Guide
Page 27
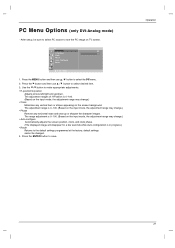
...G button to select the PC menu. 2. The adjustment ranges of H-Position is in progress.) • Reset Returns to see the PC image on the screen background. The range adjustment is 0~100. (Based on the input mode, the adjustment range may change.) • Auto-configure Automatically adjusts the... range is 0~100. (Based on the input mode, the adjustment range may change .) • Phase Remove any vertical bars or stripes appearing on TV screen. Press the ENTER button to select desired item. 3. Press the MENU button and then use D / E button to save. PC Menu Options (only ...
...G button to select the PC menu. 2. The adjustment ranges of H-Position is in progress.) • Reset Returns to see the PC image on the screen background. The range adjustment is 0~100. (Based on the input mode, the adjustment range may change.) • Auto-configure Automatically adjusts the... range is 0~100. (Based on the input mode, the adjustment range may change .) • Phase Remove any vertical bars or stripes appearing on TV screen. Press the ENTER button to select desired item. 3. Press the MENU button and then use D / E button to save. PC Menu Options (only ...
Operating Guide
Page 29
... Caption/Text 2. At this function to select Set ID. Press the G button and then use D / E button to adjust Set ID to save. See page 30. 1. Screen Mute 05. Data 1: Illegal Code 2: Not supported function 3: Wait more time 29 Volume Control 07.
... Caption/Text 2. At this function to select Set ID. Press the G button and then use D / E button to adjust Set ID to save. See page 30. 1. Screen Mute 05. Data 1: Illegal Code 2: Not supported function 3: Wait more time 29 Volume Control 07.
Operating Guide
Page 30
... ID][ ][OK][Data][x] G To show Power On/Off. Transmission [k][c][ ][Set ID][ ][Data][Cr] Data 0 : Normal screen (4:3) 1 : Wide screen (16:9) 2 : Zoom * Zoom is not available in the Screen menu. Input Select (Command:b) (Main Picture Input) G To select input source for the TV. Transmission [k][f][ ][Set ID][ ...: 64 • Refer to 'Real data mapping 1' as shown below. External Control Device Setup 01. Contrast (Command:g) G To adjust screen contrast. You can also adjust mute using the ARC (Aspect Ratio Control) button on remote control. You can also adjust volume with the ...
... ID][ ][OK][Data][x] G To show Power On/Off. Transmission [k][c][ ][Set ID][ ][Data][Cr] Data 0 : Normal screen (4:3) 1 : Wide screen (16:9) 2 : Zoom * Zoom is not available in the Screen menu. Input Select (Command:b) (Main Picture Input) G To select input source for the TV. Transmission [k][f][ ][Set ID][ ...: 64 • Refer to 'Real data mapping 1' as shown below. External Control Device Setup 01. Contrast (Command:g) G To adjust screen contrast. You can also adjust mute using the ARC (Aspect Ratio Control) button on remote control. You can also adjust volume with the ...
Operating Guide
Page 31
...; Refer to 'Real data mapping 1'. Channel Add/Del (Command:m b) G To add and delete the channels. Color (Command:i) G To adjust the screen color. Acknowledgement [k][ ][Set ID][ ][OK][Data][x] 12. When main power is released. 31 You can also adjust tint in the Picture menu. You...ID][ ][Data][Cr] Data Min : 0 ~ Max : 64 • Refer to 'Real data mapping 1'. 09. OSD Select (Command:l) G To select OSD (On Screen Display) on/off , remote control lock is on the TV. Transmission [m][b][ ][Set ID][ ][Data 0][Cr] Data0: (Channel)Delete-0, (Channel)Add-1 Acknowledgement [b][ ][Set...
...; Refer to 'Real data mapping 1'. Channel Add/Del (Command:m b) G To add and delete the channels. Color (Command:i) G To adjust the screen color. Acknowledgement [k][ ][Set ID][ ][OK][Data][x] 12. When main power is released. 31 You can also adjust tint in the Picture menu. You...ID][ ][Data][Cr] Data Min : 0 ~ Max : 64 • Refer to 'Real data mapping 1'. 09. OSD Select (Command:l) G To select OSD (On Screen Display) on/off , remote control lock is on the TV. Transmission [m][b][ ][Set ID][ ][Data 0][Cr] Data0: (Channel)Delete-0, (Channel)Add-1 Acknowledgement [b][ ][Set...
Operating Guide
Page 34
... To remove dirt or dust, wipe the cabinet with a soft, dry, lint-free cloth. Product Specifications Power Requirement Power Consumption Television System Television Channel Television Screen External Antenna Impedance Audio Output AC 100-240V~ 50/60Hz 1.5A 130W NTSC VHF : 2 ~ 13, UHF : 14 ~ 69, Cable : 01 .... Early malfunctions can extend the amount of lukewarm water and a little fabric softener or dish washing detergent. Here's a great way to wipe the screen. 2. Extended Absence If you turn on your TV dormant for a while. Wring the cloth until it's almost dry, and then use a wet...
... To remove dirt or dust, wipe the cabinet with a soft, dry, lint-free cloth. Product Specifications Power Requirement Power Consumption Television System Television Channel Television Screen External Antenna Impedance Audio Output AC 100-240V~ 50/60Hz 1.5A 130W NTSC VHF : 2 ~ 13, UHF : 14 ~ 69, Cable : 01 .... Early malfunctions can extend the amount of lukewarm water and a little fabric softener or dish washing detergent. Here's a great way to wipe the screen. 2. Extended Absence If you turn on your TV dormant for a while. Wring the cloth until it's almost dry, and then use a wet...