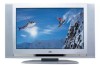
Operating Guide
Page 5
... Selection 15 Channel Menu Options Memorizing the Channels with EZ Scan . . . . . .16 Add/Delete Channels with Manual Program . . .16 Favorite Channels Setup 17 Picture Menu Options EZ Video 18 Manual Picture Control (User option 18 Cinema Mode Setup 18 Picture Format (ARC 18 Sound Menu Options EZ Audio 19... Equalizer Adjustments 19 AVL (Auto Volume Leveler 19 Sound Balance 20 Stereo/SAP Broadcasts Setup 20 Time Menu Options Auto Clock Setup 21 Manual Clock Setup 21 On/Off Timer Setup 22 Sleep Timer Setup 22 Auto Off 22 Special Menu Options Closed Captions 23 Caption/Text 24...
... Selection 15 Channel Menu Options Memorizing the Channels with EZ Scan . . . . . .16 Add/Delete Channels with Manual Program . . .16 Favorite Channels Setup 17 Picture Menu Options EZ Video 18 Manual Picture Control (User option 18 Cinema Mode Setup 18 Picture Format (ARC 18 Sound Menu Options EZ Audio 19... Equalizer Adjustments 19 AVL (Auto Volume Leveler 19 Sound Balance 20 Stereo/SAP Broadcasts Setup 20 Time Menu Options Auto Clock Setup 21 Manual Clock Setup 21 On/Off Timer Setup 22 Sleep Timer Setup 22 Auto Off 22 Special Menu Options Closed Captions 23 Caption/Text 24...
Operating Guide
Page 9
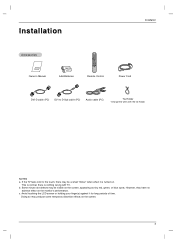
... normal, there is turned on the screen, appearing as tiny red, green, or blue spots. Doing so may be visible on . Installation Installation Accessories Owner's Manual 1.5V 1.5V AAA Batteries Remote Control Power Cord DVI-D cable (PC) DVI to the touch, there may produce some temporary distortion effects on the monitor...
... normal, there is turned on the screen, appearing as tiny red, green, or blue spots. Doing so may be visible on . Installation Installation Accessories Owner's Manual 1.5V 1.5V AAA Batteries Remote Control Power Cord DVI-D cable (PC) DVI to the touch, there may produce some temporary distortion effects on the monitor...
Operating Guide
Page 12
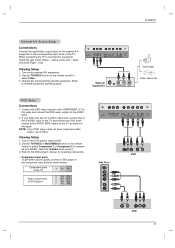
... button on the TV. Connect the audio/video output jacks on VCR to the corresponding input jacks on the remote control to the VCR owner's manual.) 3. Insert a video tape into the VCR and press PLAY on cable box. 2. Select channels at the cable box or with the cable box remote control...
... button on the TV. Connect the audio/video output jacks on VCR to the corresponding input jacks on the remote control to the VCR owner's manual.) 3. Insert a video tape into the VCR and press PLAY on cable box. 2. Select channels at the cable box or with the cable box remote control...
Operating Guide
Page 13
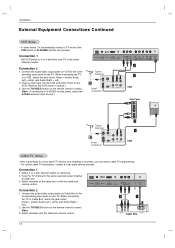
... 1 or Component 2 (If connected to external equipment operating guide. 1 Camcorder External Equipment R AUDIO L VIDEO Video Game set DVD Setup Connections 1. Refer to the DVD player's manual for operating instructions. • Component Input ports To get better picture quality, connect a DVD player to select Video. 3. Use the TV/VIDEO button on the...
... 1 or Component 2 (If connected to external equipment operating guide. 1 Camcorder External Equipment R AUDIO L VIDEO Video Game set DVD Setup Connections 1. Refer to the DVD player's manual for operating instructions. • Component Input ports To get better picture quality, connect a DVD player to select Video. 3. Use the TV/VIDEO button on the...
Operating Guide
Page 14
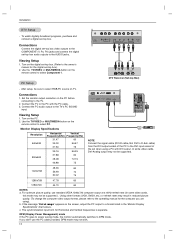
... Set the monitor output resolution on the remote control to the AUDIO jacks. Turn on the digital set-top box. (Refer to the owner's manual for the digital set -top box audio outputs to select PC. For optimum picture quality, use the PC cable provided, DPM mode may not ...be sure to the operating manual for Horizontal and Vertical frequencies is separate. c. Viewing Setup 1. Installation DTV Setup - Connect the PC audio output to the TV. 2. Use the...
... Set the monitor output resolution on the remote control to the AUDIO jacks. Turn on the digital set-top box. (Refer to the owner's manual for the digital set -top box audio outputs to select PC. For optimum picture quality, use the PC cable provided, DPM mode may not ...be sure to the operating manual for Horizontal and Vertical frequencies is separate. c. Viewing Setup 1. Installation DTV Setup - Connect the PC audio output to the TV. 2. Use the...
Operating Guide
Page 16
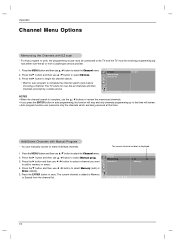
.... Press the E button and then use D / E button to select Manual prog.. 3. Press the ENTER button to select Memory (add) or Erase (delete). 5. Channel EZ Scan Manual prog. Operation Channel Menu Options Memorizing the Channels with Manual Program - Press the MENU button and then use F / G button to... save. Favorite ch. You can memorize only the channels which are being received at that time will remain. • Auto program function can manually include or erase individual channels. 1. Press the G button and then use D / E button to the TV and the TV must be receiving ...
.... Press the E button and then use D / E button to select Manual prog.. 3. Press the ENTER button to select Memory (add) or Erase (delete). 5. Channel EZ Scan Manual prog. Operation Channel Menu Options Memorizing the Channels with Manual Program - Press the MENU button and then use F / G button to... save. Favorite ch. You can memorize only the channels which are being received at that time will remain. • Auto program function can manually include or erase individual channels. 1. Press the G button and then use D / E button to the TV and the TV must be receiving ...
Operating Guide
Page 17
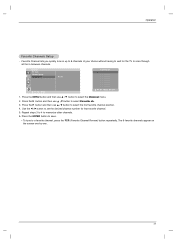
... the F / G button to select the first favorite channel position. 4. Press the ENTER button to save. • To tune to memorize other channels. 6. Channel EZ Scan Manual prog. Press the G button and then use D / E button to set D E FG OK MENU Favorite Ch. Operation Favorite Channels Setup - Press the MENU button and then...
... the F / G button to select the first favorite channel position. 4. Press the ENTER button to save. • To tune to memorize other channels. 6. Channel EZ Scan Manual prog. Press the G button and then use D / E button to set D E FG OK MENU Favorite Ch. Operation Favorite Channels Setup - Press the MENU button and then...
Operating Guide
Page 18
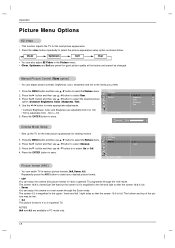
... TV programme through the Zoom mode. The screen 4:3 is adjustable from - 50 to select the Picture menu. 2. This function adjusts the TV for viewing movies. Manual Picture Control (User option) - Press the MENU button and then use D / E button to to the upper / lower and left and right so that but the...
... TV programme through the Zoom mode. The screen 4:3 is adjustable from - 50 to select the Picture menu. 2. This function adjusts the TV for viewing movies. Manual Picture Control (User option) - Press the MENU button and then use D / E button to to the upper / lower and left and right so that but the...
Operating Guide
Page 21
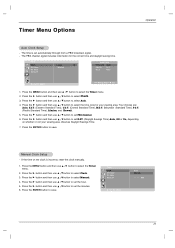
Timer Clock Off timer On timer Auto off D E FG OK MENU Auto Manual - - : - - Press the G button and then use D / E button to select the time zone for the correct time and daylight saving time. AM 21 Auto D E FG OK... D / E button to select Auto. 4. Press the G button and then use D / E button to select Manual. 4. Timer Clock Off timer On timer Auto off Auto G Manual Auto Clock Time zone Auto PBS Ch. The time is incorrect, reset the clock manually. 1. TV 1 D.S.T. Manual Clock Setup - Press the ENTER button to select Clock. 3. Press the G button and...
Timer Clock Off timer On timer Auto off D E FG OK MENU Auto Manual - - : - - Press the G button and then use D / E button to select the time zone for the correct time and daylight saving time. AM 21 Auto D E FG OK... D / E button to select Auto. 4. Press the G button and then use D / E button to select Manual. 4. Timer Clock Off timer On timer Auto off Auto G Manual Auto Clock Time zone Auto PBS Ch. The time is incorrect, reset the clock manually. 1. TV 1 D.S.T. Manual Clock Setup - Press the ENTER button to select Clock. 3. Press the G button and...
Operating Guide
Page 31
... ID][ ][Data][Cr] Data Red : 0 ~ Green : 64 • Refer to 'Real data mapping 1'. Channel Add/Del (Command:m b) G To add and delete the channels. Refer User's Manual Acknowledgement [c][ ][Set ID][ ][OK][Data][x] 13. Acknowledgement [i][ ][Set ID][ ][OK][Data][x] 10. Acknowledgement [k][ ][Set ID][ ][OK][Data][x] 12. Color (Command:i) G To adjust the screen color...
... ID][ ][Data][Cr] Data Red : 0 ~ Green : 64 • Refer to 'Real data mapping 1'. Channel Add/Del (Command:m b) G To add and delete the channels. Refer User's Manual Acknowledgement [c][ ][Set ID][ ][OK][Data][x] 13. Acknowledgement [i][ ][Set ID][ ][OK][Data][x] 10. Acknowledgement [k][ ][Set ID][ ][OK][Data][x] 12. Color (Command:i) G To adjust the screen color...

