Owner's Manual
Page 5
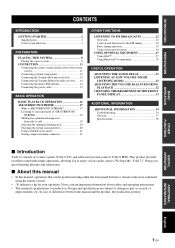
... the center system 8 CONNECTION 11 Connecting the center system and the subwoofer/system control 11 Connecting external components 12 Connecting the Yamaha iPod universal dock 14 Connecting the Yamaha Bluetooth audio receiver ...... 14 Connecting the indoor FM antenna 14 Connecting the power .... Design and specifications are explained using either the front panel buttons or remote control are subject to change in part as a result of a center system (YAS-71CU) and subwoofer/system control (YAS-71SPX). Notes contain important information about safety and operating instructions. •...
... the center system 8 CONNECTION 11 Connecting the center system and the subwoofer/system control 11 Connecting external components 12 Connecting the Yamaha iPod universal dock 14 Connecting the Yamaha Bluetooth audio receiver ...... 14 Connecting the indoor FM antenna 14 Connecting the power .... Design and specifications are explained using either the front panel buttons or remote control are subject to change in part as a result of a center system (YAS-71CU) and subwoofer/system control (YAS-71SPX). Notes contain important information about safety and operating instructions. •...
Owner's Manual
Page 6
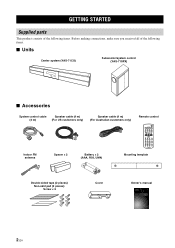
... making connections, make sure you received all of the following items. ■ Units Center system (YAS-71CU) Subwoofer/system control (YAS-71SPX) ■ Accessories System control cable Speaker cable (4 m) (4 m) (For US customers only) Speaker cable (4 m) (For Australian customers only) Remote control Indoor FM antenna Spacer × 2 Battery × 2 (AAA, R03, UM4) Mounting template Double-sided tape...
... making connections, make sure you received all of the following items. ■ Units Center system (YAS-71CU) Subwoofer/system control (YAS-71SPX) ■ Accessories System control cable Speaker cable (4 m) (4 m) (For US customers only) Speaker cable (4 m) (For Australian customers only) Remote control Indoor FM antenna Spacer × 2 Battery × 2 (AAA, R03, UM4) Mounting template Double-sided tape...
Owner's Manual
Page 7
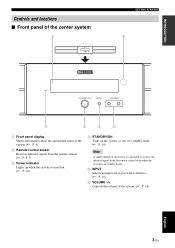
... Front panel of the center system GETTING STARTED 1 Front panel display Shows information about the operational status of the system. (☞ P. 4) 2 Remote control sensor Receives infrared signals from the remote control. (☞ P. 5, 7) 3 Power indicator Lights up when the system is turned on. (☞ P. 16) 4 STANDBY/ON Turns on the... to standby mode. (☞ P. 16) Note A small amount of electricity is consumed to receive the infrared signal from the remote control even when the system is in standby mode. 5 INPUT Selects an input source you want to listen to. (☞ P. 16) 6 VOLUME...
... Front panel of the center system GETTING STARTED 1 Front panel display Shows information about the operational status of the system. (☞ P. 4) 2 Remote control sensor Receives infrared signals from the remote control. (☞ P. 5, 7) 3 Power indicator Lights up when the system is turned on. (☞ P. 16) 4 STANDBY/ON Turns on the... to standby mode. (☞ P. 16) Note A small amount of electricity is consumed to receive the infrared signal from the remote control even when the system is in standby mode. 5 INPUT Selects an input source you want to listen to. (☞ P. 16) 6 VOLUME...
Owner's Manual
Page 9
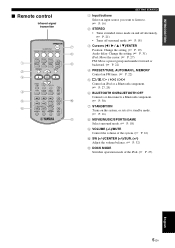
INTRODUCTION ■ Remote control Infrared signal transmitter GETTING STARTED 1 Input buttons Select an input source you want to listen to. (☞ P. 16) 2 STEREO • Turns extended stereo mode on ...) 7 STANDBY/ON Turns on the system, or sets it to standby mode. (☞ P. 16) 8 MOVIE/MUSIC/SPORTS/GAME Select surround mode. (☞ P. 18) 9 VOLUME (+/-)/MUTE Control the volume of the system. (☞ P. 16) 0 SW (+/-)/CENTER (+/-)/SUR. (+/-) Adjust the volume balance. (☞ P. 32) A DOCK MODE Switches operation mode of the iPod. (☞...
INTRODUCTION ■ Remote control Infrared signal transmitter GETTING STARTED 1 Input buttons Select an input source you want to listen to. (☞ P. 16) 2 STEREO • Turns extended stereo mode on ...) 7 STANDBY/ON Turns on the system, or sets it to standby mode. (☞ P. 16) 8 MOVIE/MUSIC/SPORTS/GAME Select surround mode. (☞ P. 18) 9 VOLUME (+/-)/MUTE Control the volume of the system. (☞ P. 16) 0 SW (+/-)/CENTER (+/-)/SUR. (+/-) Adjust the volume balance. (☞ P. 32) A DOCK MODE Switches operation mode of the iPod. (☞...

Owner's Manual
Page 11
...ones as soon as near a heater or in shape. • If the batteries run out, immediately remove them from the remote control to prevent an explosion or acid leak. • Dispose of batteries according to regional regulations. • If a battery starts... leaking, dispose of it toward the remote control sensor. INTRODUCTION ■ Using the remote control GETTING STARTED Within 6 m (20') Use the remote control within 6 m (20') of the center system and point it immediately. extremely cold - Notes &#...
...ones as soon as near a heater or in shape. • If the batteries run out, immediately remove them from the remote control to prevent an explosion or acid leak. • Dispose of batteries according to regional regulations. • If a battery starts... leaking, dispose of it toward the remote control sensor. INTRODUCTION ■ Using the remote control GETTING STARTED Within 6 m (20') Use the remote control within 6 m (20') of the center system and point it immediately. extremely cold - Notes &#...
Owner's Manual
Page 12
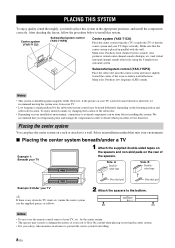
..., etc.) and virtual surround channel sounds effectively using the Yamaha front surround system. We recommend that the center system is any obstacle (TV stand, etc.) under a TV Example 1: Beneath your TV align vertically. Subwoofer/system control (YAS-71SPX) Place the subwoofer near the center system and turn...system. • The spacers may be done before installing this system. Notes • Do not cover the remote control sensor of your TV, etc., by the subwoofer/system control may scratch or damage the surface of the room to a wall. Be careful when placing or moving the...
..., etc.) and virtual surround channel sounds effectively using the Yamaha front surround system. We recommend that the center system is any obstacle (TV stand, etc.) under a TV Example 1: Beneath your TV align vertically. Subwoofer/system control (YAS-71SPX) Place the subwoofer near the center system and turn...system. • The spacers may be done before installing this system. Notes • Do not cover the remote control sensor of your TV, etc., by the subwoofer/system control may scratch or damage the surface of the room to a wall. Be careful when placing or moving the...
Owner's Manual
Page 20
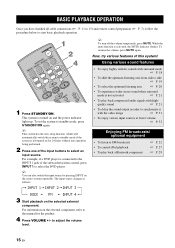
...; To enjoy various input sources at lower volume ☞ P. 32 Enjoying FM broadcasts/ optional equipment • To listen to FM broadcasts • To control iPod playback • To play back a Bluetooth component ☞ P. 22 ☞ P. 27 ☞ P. 29 3 Start playback on the external ...to start basic playback operation. BASIC OPERATION BASIC PLAYBACK OPERATION Once you have finished all cable connections (☞ P. 11 to 15) and remote control preparation (☞ P. 7), follow the procedure below to adjust the volume level. 16 En y This system has the auto-sleep function...
...; To enjoy various input sources at lower volume ☞ P. 32 Enjoying FM broadcasts/ optional equipment • To listen to FM broadcasts • To control iPod playback • To play back a Bluetooth component ☞ P. 22 ☞ P. 27 ☞ P. 29 3 Start playback on the external ...to start basic playback operation. BASIC OPERATION BASIC PLAYBACK OPERATION Once you have finished all cable connections (☞ P. 11 to 15) and remote control preparation (☞ P. 7), follow the procedure below to adjust the volume level. 16 En y This system has the auto-sleep function...
Owner's Manual
Page 31
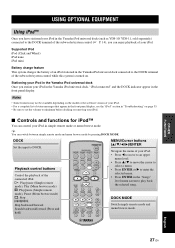
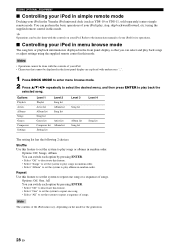
... 27 En DOCK MODE Switch simple remote mode and menu browse mode. Stationing your iPod in the Yamaha iPod universal dock Once you can enjoy playback of your iPod. ■ Controls and functions for iPod™ You can switch between simple remote mode and menu browse mode by ...pressing DOCK MODE. Playback control buttons Control the playback of the subwoofer/system control while this system...
... 27 En DOCK MODE Switch simple remote mode and menu browse mode. Stationing your iPod in the Yamaha iPod universal dock Once you can enjoy playback of your iPod. ■ Controls and functions for iPod™ You can switch between simple remote mode and menu browse mode by ...pressing DOCK MODE. Playback control buttons Control the playback of the subwoofer/system control while this system...
Owner's Manual
Page 32
... "Songs" to set the system to play , stop, skip backward/forward, etc.) using the supplied remote control in random order. Notes • Operations cannot be also done with the controls on the model or the generation. 28 En y Operations can select and play songs or albums in this...Press S/T/W/X repeatedly to select the desired menu, and then press ENTER to play albums in the Yamaha iPod universal dock (such as YDS-10 or YDS-11, sold separately) enters simple remote mode. Options Playlists Artists Albums Songs Genres Composers Settings Level 1 Level 2 Playlist Song list Artist ...
... "Songs" to set the system to play , stop, skip backward/forward, etc.) using the supplied remote control in random order. Notes • Operations cannot be also done with the controls on the model or the generation. 28 En y Operations can select and play songs or albums in this...Press S/T/W/X repeatedly to select the desired menu, and then press ENTER to play albums in the Yamaha iPod universal dock (such as YDS-10 or YDS-11, sold separately) enters simple remote mode. Options Playlists Artists Albums Songs Genres Composers Settings Level 1 Level 2 Playlist Song list Artist ...
Owner's Manual
Page 34
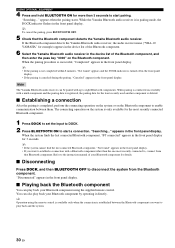
... operation on the system is only available for the most recently connected to, connect from the Bluetooth component. "Searching..." While the Yamaha Bluetooth audio receiver is successful, "Completed" appears in the front panel display. y • If the system cannot find the ...; Playing back the Bluetooth component You can also play back your Bluetooth component by operating it directly. y Operation using the supplied remote control. y To cancel the pairing, press BLUETOOTH OFF. 5 Check that Bluetooth component. When the system finds the last connected Bluetooth component...
... operation on the system is only available for the most recently connected to, connect from the Bluetooth component. "Searching..." While the Yamaha Bluetooth audio receiver is successful, "Completed" appears in the front panel display. y • If the system cannot find the ...; Playing back the Bluetooth component You can also play back your Bluetooth component by operating it directly. y Operation using the supplied remote control. y To cancel the pairing, press BLUETOOTH OFF. 5 Check that Bluetooth component. When the system finds the last connected Bluetooth component...
Owner's Manual
Page 39
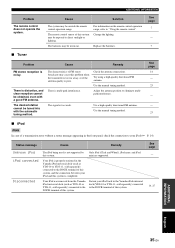
...YDS-10 or YDS-11, sold separately) connected to the DOCK terminal of this system may be outside the remote control operation range. Your iPod is properly stationed in the Yamaha iPod universal dock (YDS-10 or YDS-11, sold separately) connected to the DOCK terminal of this system, ...and the connection between your iPod and this system. Problem The remote control does not operate the system. For information on the remote control operation range, refer to...
...YDS-10 or YDS-11, sold separately) connected to the DOCK terminal of this system may be outside the remote control operation range. Your iPod is properly stationed in the Yamaha iPod universal dock (YDS-10 or YDS-11, sold separately) connected to the DOCK terminal of this system, ...and the connection between your iPod and this system. Problem The remote control does not operate the system. For information on the remote control operation range, refer to...

