Owner's Manual
Page 7
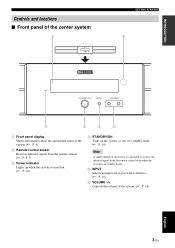
...; P. 16) Note A small amount of electricity is consumed to receive the infrared signal from the remote control even when the system is in standby mode. 5 INPUT Selects an input source you want to listen to. (☞ P. 16) 6 VOLUME -/+ Controls the volume of the system. (☞ P. 16) 3 En English
...; P. 16) Note A small amount of electricity is consumed to receive the infrared signal from the remote control even when the system is in standby mode. 5 INPUT Selects an input source you want to listen to. (☞ P. 16) 6 VOLUME -/+ Controls the volume of the system. (☞ P. 16) 3 En English
Owner's Manual
Page 8
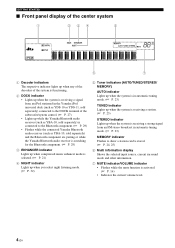
... of the system is functioning. 2 DOCK indicator • Lights up when the system is receiving a signal from an iPod stationed in the Yamaha iPod universal dock (such as YDS-10 or YDS-11, sold separately) connected to the DOCK terminal of the subwoofer/system control. (☞...mode. (☞ P. 23) MEMORY indicator Flashes to show a station can be stored. (☞ P. 24, 25) 6 Multi information display Shows the selected input source, current surround mode and other information. 7 MUTE indicator/VOLUME indicator • Flashes while the mute function is activated. (☞ P. 16) • ...
... of the system is functioning. 2 DOCK indicator • Lights up when the system is receiving a signal from an iPod stationed in the Yamaha iPod universal dock (such as YDS-10 or YDS-11, sold separately) connected to the DOCK terminal of the subwoofer/system control. (☞...mode. (☞ P. 23) MEMORY indicator Flashes to show a station can be stored. (☞ P. 24, 25) 6 Multi information display Shows the selected input source, current surround mode and other information. 7 MUTE indicator/VOLUME indicator • Flashes while the mute function is activated. (☞ P. 16) • ...
Owner's Manual
Page 9
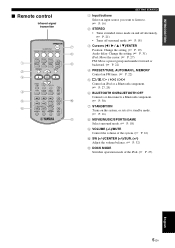
INTRODUCTION ■ Remote control Infrared signal transmitter GETTING STARTED 1 Input buttons Select an input source you want to listen to. (☞ P. 16) 2 STEREO • Turns extended stereo mode on and off alternately. (☞ P. 21) • Turns off surround mode. (&#...
INTRODUCTION ■ Remote control Infrared signal transmitter GETTING STARTED 1 Input buttons Select an input source you want to listen to. (☞ P. 16) 2 STEREO • Turns extended stereo mode on and off alternately. (☞ P. 21) • Turns off surround mode. (&#...
Owner's Manual
Page 16
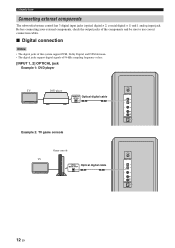
... jacks of this system support PCM, Dolby Digital, and DTS bitstream. • The digital jacks support digital signals of 96 kHz sampling frequency or less. [INPUT 1, 2] OPTICAL jack Example 1: DVD player TV DVD player Optical digital cable Example 2: TV game console Game console TV Optical digital cable 12 En CONNECTION Connecting...
... jacks of this system support PCM, Dolby Digital, and DTS bitstream. • The digital jacks support digital signals of 96 kHz sampling frequency or less. [INPUT 1, 2] OPTICAL jack Example 1: DVD player TV DVD player Optical digital cable Example 2: TV game console Game console TV Optical digital cable 12 En CONNECTION Connecting...
Owner's Manual
Page 20
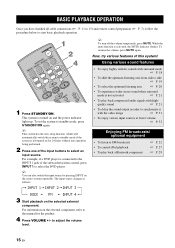
...P. 32 Enjoying FM broadcasts/ optional equipment • To listen to select the DVD player. y You can also switch the input source by pressing INPUT on the external component, refer to start basic playback operation. For example, if a DVD player is left turned on the selected... For information on the center system repeatedly. quality sound ☞ P. 21 • To delay the sound output in order to select an input source. BASIC OPERATION BASIC PLAYBACK OPERATION Once you have finished all cable connections (☞ P. 11 to 15) and remote control preparation (☞...
...P. 32 Enjoying FM broadcasts/ optional equipment • To listen to select the DVD player. y You can also switch the input source by pressing INPUT on the external component, refer to start basic playback operation. For example, if a DVD player is left turned on the selected... For information on the center system repeatedly. quality sound ☞ P. 21 • To delay the sound output in order to select an input source. BASIC OPERATION BASIC PLAYBACK OPERATION Once you have finished all cable connections (☞ P. 11 to 15) and remote control preparation (☞...
Owner's Manual
Page 22
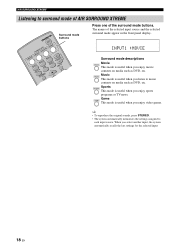
...media such as DVD, etc. When you listen to surround mode of AIR SURROUND XTREME Surround mode buttons Press one of the selected input source and the selected surround mode appear in the front panel display. Sports This mode is useful when you enjoy sports programs or TV...XTREME Listening to music contents on media such as DVD, etc. Game This mode is useful when you select another input, the system automatically recalls the last settings for the selected input. 18 En y • To reproduce the original sounds, press STEREO. • The system automatically memorizes the ...
...media such as DVD, etc. When you listen to surround mode of AIR SURROUND XTREME Surround mode buttons Press one of the selected input source and the selected surround mode appear in the front panel display. Sports This mode is useful when you enjoy sports programs or TV...XTREME Listening to music contents on media such as DVD, etc. Game This mode is useful when you select another input, the system automatically recalls the last settings for the selected input. 18 En y • To reproduce the original sounds, press STEREO. • The system automatically memorizes the ...
Owner's Manual
Page 23
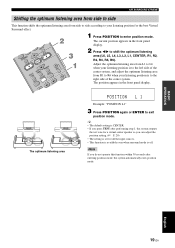
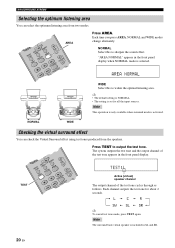
... 19 En y • The default setting is CENTER. • If you press TEST after performing step 1, the system outputs the test tone for all the input sources. • This function is available even when surround mode is to the right side of the center system. The optimum listening area Example: "POSITION...
... 19 En y • The default setting is CENTER. • If you press TEST after performing step 1, the system outputs the test tone for all the input sources. • This function is available even when surround mode is to the right side of the center system. The optimum listening area Example: "POSITION...
Owner's Manual
Page 24
... WIDE Checking the virtual surround effect You can select the optimum listening area from the speakers. Each channel outputs the test tone for all the input sources. Note The surround back virtual speaker is set for about 2 seconds. AREA Press AREA. Note This operation is only available when surround mode is...
... WIDE Checking the virtual surround effect You can select the optimum listening area from the speakers. Each channel outputs the test tone for all the input sources. Note The surround back virtual speaker is set for about 2 seconds. AREA Press AREA. Note This operation is only available when surround mode is...
Owner's Manual
Page 25
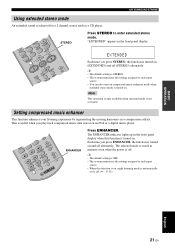
...alternately. Note This operation is only available when surround mode is achieved for a 2 channel source such as a CD player. STEREO Press STEREO to each input source. • When this function is turned on , night listening mode is STEREO. • The system memorizes the settings assigned to enter extended stereo... mode An extended sound is not activated. y • The default setting is OFF. • The system memorizes the settings assigned to each input source. • You can also turn on compressed music enhancer mode when extended stereo mode is off (STEREO) alternately.
...alternately. Note This operation is only available when surround mode is achieved for a 2 channel source such as a CD player. STEREO Press STEREO to each input source. • When this function is turned on , night listening mode is STEREO. • The system memorizes the settings assigned to enter extended stereo... mode An extended sound is not activated. y • The default setting is OFF. • The system memorizes the settings assigned to each input source. • You can also turn on compressed music enhancer mode when extended stereo mode is off (STEREO) alternately.
Owner's Manual
Page 26
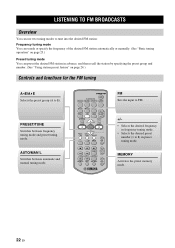
FM Sets the input to 8) in preset tuning mode. MEMORY Activates the preset memory mode. 22 En AUTO/MAN'L Switches between frequency tuning mode and preset tuning mode. OTHER ...
FM Sets the input to 8) in preset tuning mode. MEMORY Activates the preset memory mode. 22 En AUTO/MAN'L Switches between frequency tuning mode and preset tuning mode. OTHER ...

Owner's Manual
Page 27
... mode. (☞ P. 24) 3 Press +/- Lights up and the frequency of the desired station. repeatedly to specify the frequency of the received station is set the input to a station, the TUNED indicator lights up No colon (:) y If a colon (:) appears, the system is weak, you can tune into the desired station by specifying...
... mode. (☞ P. 24) 3 Press +/- Lights up and the frequency of the desired station. repeatedly to specify the frequency of the received station is set the input to a station, the TUNED indicator lights up No colon (:) y If a colon (:) appears, the system is weak, you can tune into the desired station by specifying...
Owner's Manual
Page 28
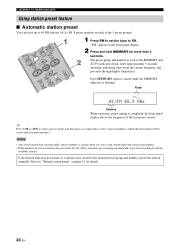
... you store a new station under a preset number is completed, the front panel display shows the frequency of the 5 preset groups). 1 Press FM to set the input to FM. y Press A_E or A`E to "Manual station preset" on page 25 for details. 24 En The preset group and number as well as the...
... you store a new station under a preset number is completed, the front panel display shows the frequency of the 5 preset groups). 1 Press FM to set the input to FM. y Press A_E or A`E to "Manual station preset" on page 25 for details. 24 En The preset group and number as well as the...
Owner's Manual
Page 31
...is turned on. DOCK MODE Switch simple remote mode and menu browse mode. DOCK Set the input to DOCK. Playback control buttons Control the playback of your iPod. Stationing your iPod in the Yamaha iPod universal dock Once you can enjoy playback of the connected iPod. Notes • Some ...the "Songs" level menu screen to play back the selected song. USING OPTIONAL EQUIPMENT Using iPod™ Once you have stationed your iPod in the Yamaha iPod universal dock (such as YDS-10/ YDS-11, sold separately) connected to the DOCK terminal of the subwoofer/system control (☞ P. 14...
...is turned on. DOCK MODE Switch simple remote mode and menu browse mode. DOCK Set the input to DOCK. Playback control buttons Control the playback of your iPod. Stationing your iPod in the Yamaha iPod universal dock Once you can enjoy playback of the connected iPod. Notes • Some ...the "Songs" level menu screen to play back the selected song. USING OPTIONAL EQUIPMENT Using iPod™ Once you have stationed your iPod in the Yamaha iPod universal dock (such as YDS-10/ YDS-11, sold separately) connected to the DOCK terminal of the subwoofer/system control (☞ P. 14...
Owner's Manual
Page 33
...if the registered pairing data has been deleted. p: Play e: Pause s: Stop b/a: Skip backward/forward OTHER FUNCTIONS ■ Pairing the Yamaha Bluetooth™ audio receiver and your Bluetooth component for the pairing operation. "Pairing" refers to the system for Bluetooth communications. Please ...the subwoofer/system control and enjoy the music contents stored in advance. ■ Controls and functions for Bluetooth components DOCK Set the input to the instruction manual of a Bluetooth component. BLUETOOTH ON/OFF • Start or cancel the pairing. • Connect or disconnect...
...if the registered pairing data has been deleted. p: Play e: Pause s: Stop b/a: Skip backward/forward OTHER FUNCTIONS ■ Pairing the Yamaha Bluetooth™ audio receiver and your Bluetooth component for the pairing operation. "Pairing" refers to the system for Bluetooth communications. Please ...the subwoofer/system control and enjoy the music contents stored in advance. ■ Controls and functions for Bluetooth components DOCK Set the input to the instruction manual of a Bluetooth component. BLUETOOTH ON/OFF • Start or cancel the pairing. • Connect or disconnect...
Owner's Manual
Page 34
... connected Bluetooth component. 1 Press DOCK to set the input to DOCK. 2 Press BLUETOOTH ON to start pairing. "Searching..." If the Bluetooth component detects the Yamaha Bluetooth audio receiver, the audio receiver name ("YBA-10 YAMAHA" for example) appears in the device list of the... is conducted successfully with a Bluetooth component other than 3 seconds to disconnect the system from that the Bluetooth component detects the Yamaha Bluetooth audio receiver. appears in the front panel display. The connecting operation on the system is completed, perform the connecting operation...
... connected Bluetooth component. 1 Press DOCK to set the input to DOCK. 2 Press BLUETOOTH ON to start pairing. "Searching..." If the Bluetooth component detects the Yamaha Bluetooth audio receiver, the audio receiver name ("YBA-10 YAMAHA" for example) appears in the device list of the... is conducted successfully with a Bluetooth component other than 3 seconds to disconnect the system from that the Bluetooth component detects the Yamaha Bluetooth audio receiver. appears in the front panel display. The connecting operation on the system is completed, perform the connecting operation...
Owner's Manual
Page 35
... assigned to exit adjusting mode. You can adjust the delay time by the 10 ms. Setting value 3 Press AUDIO DELAY again or ENTER to each input source.
... assigned to exit adjusting mode. You can adjust the delay time by the 10 ms. Setting value 3 Press AUDIO DELAY again or ENTER to each input source.
Owner's Manual
Page 36
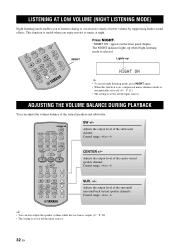
... dialog or vocals more clearly at night. SW +/- Control range: +6 to off. (☞ P. 21) • The setting is set for all the input sources. ADJUSTING THE VOLUME BALANCE DURING PLAYBACK You can also adjust the speaker volume while the test tone is output. (☞ P. 20) • The setting... is set for all the input sources. 32 En This function is selected. Adjusts the output level of the virtual speakers and subwoofer. Adjusts the output level of the center virtual...
... dialog or vocals more clearly at night. SW +/- Control range: +6 to off. (☞ P. 21) • The setting is set for all the input sources. ADJUSTING THE VOLUME BALANCE DURING PLAYBACK You can also adjust the speaker volume while the test tone is output. (☞ P. 20) • The setting... is set for all the input sources. 32 En This function is selected. Adjusts the output level of the virtual speakers and subwoofer. Adjusts the output level of the center virtual...
Owner's Manual
Page 38
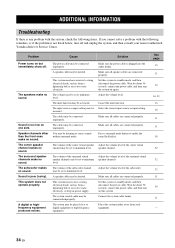
... close to minimum level. The system control cable may be incorrect. Make sure all cables are connected properly. Select the correct input source or input setting. Make sure all speaker cables are connected properly. Adjust the volume level of the center virtual speaker channel. The system... system. Sound is not listed below, turn on but immediately shuts off and unplug the system, and then consult your nearest authorized Yamaha dealer or Service Center. Sound is plugged into the outlet firmly. A speaker cable may be shorted. Adjust the volume level of the...
... close to minimum level. The system control cable may be incorrect. Make sure all cables are connected properly. Select the correct input source or input setting. Make sure all speaker cables are connected properly. Adjust the volume level of the center virtual speaker channel. The system... system. Sound is not listed below, turn on but immediately shuts off and unplug the system, and then consult your nearest authorized Yamaha dealer or Service Center. Sound is plugged into the outlet firmly. A speaker cable may be shorted. Adjust the volume level of the...
Owner's Manual
Page 42
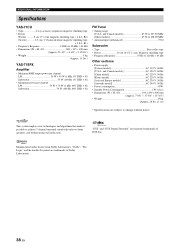
...110 V, 60 Hz [U.S.A. and Canada models 87.50 to 107.90 MHz [Other models 87.50 to 108.00 MHz • Antenna Input (unbalanced 75 Ω Subwoofer • Type Bass reflex type • Driver 16 cm (6-1/2") cone, Magnetic shielding type • Frequency ...8226; Dimensions (W × H × D 800 × 105 × 100 mm (Approx. 31-1/2" × 4-1/8" × 3-15/16") • Weight 5 kg (Approx. 11 lbs.) YAS-71SPX Amplifier • Minimum RMS output power per channel L/R 55 W + 55 W (1 kHz 1% THD + N) Subwoofer 55 W (100 Hz 1% THD + N) • Maximum power per channel ...
...110 V, 60 Hz [U.S.A. and Canada models 87.50 to 107.90 MHz [Other models 87.50 to 108.00 MHz • Antenna Input (unbalanced 75 Ω Subwoofer • Type Bass reflex type • Driver 16 cm (6-1/2") cone, Magnetic shielding type • Frequency ...8226; Dimensions (W × H × D 800 × 105 × 100 mm (Approx. 31-1/2" × 4-1/8" × 3-15/16") • Weight 5 kg (Approx. 11 lbs.) YAS-71SPX Amplifier • Minimum RMS output power per channel L/R 55 W + 55 W (1 kHz 1% THD + N) Subwoofer 55 W (100 Hz 1% THD + N) • Maximum power per channel ...

