Owner's Manual
Page 1
UA Front Surround System (CENTER SYSTEM + SUBWOOFER/SYSTEM CONTROL) YAS-71 (YAS-71CU + YAS-71SPX) OWNER'S MANUAL
UA Front Surround System (CENTER SYSTEM + SUBWOOFER/SYSTEM CONTROL) YAS-71 (YAS-71CU + YAS-71SPX) OWNER'S MANUAL
Owner's Manual
Page 2
... to qualified service personnel. i En REFER SERVICING TO QUALIFIED SERVICE PERSONNEL. • Explanation of Graphical Symbols The lightning flash with the apparatus. Retain this Owner's Manual in the literature accompanying the appliance. IMPORTANT SAFETY INSTRUCTIONS CAUTION RISK OF ELECTRIC SHOCK DO NOT OPEN CAUTION: TO REDUCE THE RISK OF ELECTRIC SHOCK...
... to qualified service personnel. i En REFER SERVICING TO QUALIFIED SERVICE PERSONNEL. • Explanation of Graphical Symbols The lightning flash with the apparatus. Retain this Owner's Manual in the literature accompanying the appliance. IMPORTANT SAFETY INSTRUCTIONS CAUTION RISK OF ELECTRIC SHOCK DO NOT OPEN CAUTION: TO REDUCE THE RISK OF ELECTRIC SHOCK...
Owner's Manual
Page 3
... AC line filter/s. If these requirements provides a reasonable level of interference, which can not locate the appropriate retailer, please contact Yamaha Electronics Corp., U.S.A. 6660 Orangethorpe Ave., Buena Park, CA 90620. ii En Follow all installations. Compliance with FCC regulations does not... not expressly approved by Yamaha may cause interference harmful to use only high quality shielded cables. This equipment generates/uses radio frequencies and, if not installed and used . In the case of the following measures: Relocate either this manual, meets FCC requirements. ...
... AC line filter/s. If these requirements provides a reasonable level of interference, which can not locate the appropriate retailer, please contact Yamaha Electronics Corp., U.S.A. 6660 Orangethorpe Ave., Buena Park, CA 90620. ii En Follow all installations. Compliance with FCC regulations does not... not expressly approved by Yamaha may cause interference harmful to use only high quality shielded cables. This equipment generates/uses radio frequencies and, if not installed and used . In the case of the following measures: Relocate either this manual, meets FCC requirements. ...
Owner's Manual
Page 4
...unit in a well ventilated, cool, dry, clean place - The cabinet should never be reached easily. 17 Be sure to read this manual carefully. Yamaha shall not be liable for any damage resulting from the wall outlet. 16 Install this unit near the wall outlet and where the AC ... attempt to avoid prolonged exposure from direct sunlight, heat sources, vibration, dust, moisture, and/or cold. We Want You Listening For A Lifetime Yamaha and the Electronic Industries Association's Consumer Electronics Group want you to modify or fix this unit. iii En Allow ventilation space of at a safe ...
...unit in a well ventilated, cool, dry, clean place - The cabinet should never be reached easily. 17 Be sure to read this manual carefully. Yamaha shall not be liable for any damage resulting from the wall outlet. 16 Install this unit near the wall outlet and where the AC ... attempt to avoid prolonged exposure from direct sunlight, heat sources, vibration, dust, moisture, and/or cold. We Want You Listening For A Lifetime Yamaha and the Electronic Industries Association's Consumer Electronics Group want you to modify or fix this unit. iii En Allow ventilation space of at a safe ...
Owner's Manual
Page 5
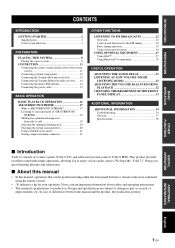
... PANEL DISPLAY 33 ADDITIONAL INFORMATION ADDITIONAL INFORMATION 34 Troubleshooting 34 Glossary 37 Specifications 38 ■ Introduction YAS-71 consists of differences between the manual and the product, the product has priority. INTRODUCTION PREPARATION BASIC OPERATION CONTENTS INTRODUCTION GETTING STARTED 2 ... Connecting the center system and the subwoofer/system control 11 Connecting external components 12 Connecting the Yamaha iPod universal dock 14 Connecting the Yamaha Bluetooth audio receiver ...... 14 Connecting the indoor FM antenna 14 Connecting the power cable 15 ...
... PANEL DISPLAY 33 ADDITIONAL INFORMATION ADDITIONAL INFORMATION 34 Troubleshooting 34 Glossary 37 Specifications 38 ■ Introduction YAS-71 consists of differences between the manual and the product, the product has priority. INTRODUCTION PREPARATION BASIC OPERATION CONTENTS INTRODUCTION GETTING STARTED 2 ... Connecting the center system and the subwoofer/system control 11 Connecting external components 12 Connecting the Yamaha iPod universal dock 14 Connecting the Yamaha Bluetooth audio receiver ...... 14 Connecting the indoor FM antenna 14 Connecting the power cable 15 ...
Owner's Manual
Page 6
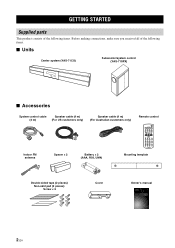
... control Indoor FM antenna Spacer × 2 Battery × 2 (AAA, R03, UM4) Mounting template Double-sided tape (2 pieces) Non-skid pad (2 pieces) Screw × 6 Cover Owner's manual UA Front Surround System (CENTER SYSTEM + SUBWOOFER/SYSTEM CONTROL) YAS-71 (YAS-71CU + YAS-71SPX) OWNER'S MANUAL 2 En
... control Indoor FM antenna Spacer × 2 Battery × 2 (AAA, R03, UM4) Mounting template Double-sided tape (2 pieces) Non-skid pad (2 pieces) Screw × 6 Cover Owner's manual UA Front Surround System (CENTER SYSTEM + SUBWOOFER/SYSTEM CONTROL) YAS-71 (YAS-71CU + YAS-71SPX) OWNER'S MANUAL 2 En
Owner's Manual
Page 20
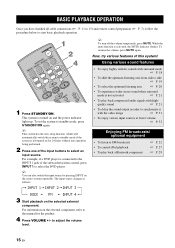
... video image ☞ P. 31 • To enjoy various input sources at lower volume ☞ P. 32 Enjoying FM broadcasts/ optional equipment • To listen to the manual for 24 hours without any operation being performed. 2 Press one of the input buttons to standby mode if the system is left turned on the...
... video image ☞ P. 31 • To enjoy various input sources at lower volume ☞ P. 32 Enjoying FM broadcasts/ optional equipment • To listen to the manual for 24 hours without any operation being performed. 2 Press one of the input buttons to standby mode if the system is left turned on the...
Owner's Manual
Page 26
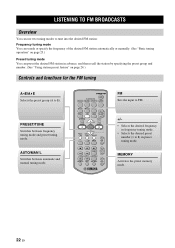
PRESET/TUNE Switches between automatic and manual tuning mode. +/- • Selects the desired frequency in frequency tuning mode. • Selects the desired preset number (1 to 8) in advance, and then recall the station ... modes to tune into the desired FM station: Frequency tuning mode You can search or specify the frequency of the desired FM station automatically or manually. (See "Basic tuning operation" on page 23.) Preset tuning mode You can preset the desired FM station in preset tuning mode. MEMORY Activates the preset...
PRESET/TUNE Switches between automatic and manual tuning mode. +/- • Selects the desired frequency in frequency tuning mode. • Selects the desired preset number (1 to 8) in advance, and then recall the station ... modes to tune into the desired FM station: Frequency tuning mode You can search or specify the frequency of the desired FM station automatically or manually. (See "Basic tuning operation" on page 23.) Preset tuning mode You can preset the desired FM station in preset tuning mode. MEMORY Activates the preset...

Owner's Manual
Page 27
...in the front panel display. 23 En English If you tune to an FM station using the manual tuning feature, the system receives the FM radio signals in stereo reception mode. once to switch Auto/Manual. When the system is tuned to a station, the TUNED indicator lights up No colon (:) ...mode. (☞ P. 24) 3 Press +/- Lights up when the system is weak, you can tune into the desired station by specifying the frequency manually. The AUTO indicator lights up y When you tune to a station using automatic tuning mode, the system receives the FM radio signal in monaural reception ...
...in the front panel display. 23 En English If you tune to an FM station using the manual tuning feature, the system receives the FM radio signals in stereo reception mode. once to switch Auto/Manual. When the system is tuned to a station, the TUNED indicator lights up No colon (:) ...mode. (☞ P. 24) 3 Press +/- Lights up when the system is weak, you can tune into the desired station by specifying the frequency manually. The AUTO indicator lights up y When you tune to a station using automatic tuning mode, the system receives the FM radio signal in monaural reception ...
Owner's Manual
Page 28
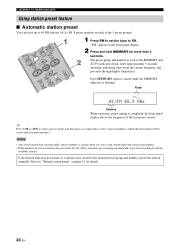
After approximately 5 seconds, automatic presetting starts from the current frequency and proceeds through higher frequencies. y Press A_E or A`E to "Manual station preset" on page 25 for details. 24 En If the desired station is not stored, or a station is completed, the front panel... group and number as well as the MEMORY and AUTO indicators flash. Press MEMORY again to the desired preset group and number, preset the station manually. repeatedly to select a preset number to which the first station will be stored after searching for more than 3 seconds. Refer to select a preset...
After approximately 5 seconds, automatic presetting starts from the current frequency and proceeds through higher frequencies. y Press A_E or A`E to "Manual station preset" on page 25 for details. 24 En If the desired station is not stored, or a station is completed, the front panel... group and number as well as the MEMORY and AUTO indicators flash. Press MEMORY again to the desired preset group and number, preset the station manually. repeatedly to select a preset number to which the first station will be stored after searching for more than 3 seconds. Refer to select a preset...
Owner's Manual
Page 29
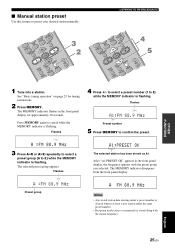
... number 5 Press MEMORY to confirm the preset. 3 Press A_E or A`E repeatedly to select a preset group (A to preset your desired station manually. Flashes The selected station has been stored as A1. Flashes 4 Press +/- LISTENING TO FM BROADCASTS OTHER FUNCTIONS 1 Tune into a station. After... display. The MEMORY indicator flashes in the front panel display, the frequency appears with the station frequency. 25 En English ■ Manual station preset Use this feature to E) while the MEMORY indicator is flashing. See "Basic tuning operation" on page 23 for approximately 30...
... number 5 Press MEMORY to confirm the preset. 3 Press A_E or A`E repeatedly to select a preset group (A to preset your desired station manually. Flashes The selected station has been stored as A1. Flashes 4 Press +/- LISTENING TO FM BROADCASTS OTHER FUNCTIONS 1 Tune into a station. After... display. The MEMORY indicator flashes in the front panel display, the frequency appears with the station frequency. 25 En English ■ Manual station preset Use this feature to E) while the MEMORY indicator is flashing. See "Basic tuning operation" on page 23 for approximately 30...
Owner's Manual
Page 32
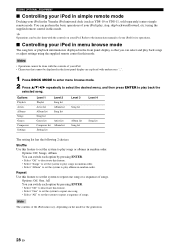
Refer to the instruction manuals of your iPod for its operations. ■ Controlling your iPod in menu browse mode The song lists or playback information is displayed in the front ... supplied remote control in random order. Note The contents of your iPod (play back songs or adjust settings using the supplied remote control in the Yamaha iPod universal dock (such as YDS-10 or YDS-11, sold separately) enters simple remote mode. USING OPTIONAL EQUIPMENT ■ Controlling your iPod in simple...
Refer to the instruction manuals of your iPod for its operations. ■ Controlling your iPod in menu browse mode The song lists or playback information is displayed in the front ... supplied remote control in random order. Note The contents of your iPod (play back songs or adjust settings using the supplied remote control in the Yamaha iPod universal dock (such as YDS-10 or YDS-11, sold separately) enters simple remote mode. USING OPTIONAL EQUIPMENT ■ Controlling your iPod in simple...
Owner's Manual
Page 33
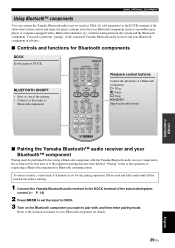
...e: Pause s: Stop b/a: Skip backward/forward OTHER FUNCTIONS ■ Pairing the Yamaha Bluetooth™ audio receiver and your Bluetooth component in your Bluetooth component for details. 29 En English Refer to the instruction manual of your Bluetooth component (such as a portable music player or computer equipped ... a Bluetooth component with , and then enter pairing mode. USING OPTIONAL EQUIPMENT Using Bluetooth™ components You can connect the Yamaha Bluetooth audio receiver (such as YBA-10, sold separately) to the DOCK terminal of the subwoofer/system control and enjoy the...
...e: Pause s: Stop b/a: Skip backward/forward OTHER FUNCTIONS ■ Pairing the Yamaha Bluetooth™ audio receiver and your Bluetooth component in your Bluetooth component for details. 29 En English Refer to the instruction manual of your Bluetooth component (such as a portable music player or computer equipped ... a Bluetooth component with , and then enter pairing mode. USING OPTIONAL EQUIPMENT Using Bluetooth™ components You can connect the Yamaha Bluetooth audio receiver (such as YBA-10, sold separately) to the DOCK terminal of the subwoofer/system control and enjoy the...
Owner's Manual
Page 34
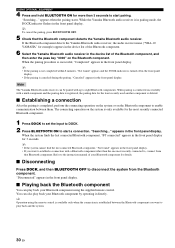
...8226; If the pairing is not completed within 8 minutes, "Not found " appears in the front panel display. Refer to the instruction manual of the Bluetooth component, and then enter the pass key "0000" on the Bluetooth component to enable communication between the Bluetooth component you... for details. ■ Disconnecting Press DOCK, and then BLUETOOTH OFF to start a connection. While the Yamaha Bluetooth audio receiver is established between them. Note The Yamaha Bluetooth audio receiver can be paired with a Bluetooth component other than 3 seconds to disconnect the system from...
...8226; If the pairing is not completed within 8 minutes, "Not found " appears in the front panel display. Refer to the instruction manual of the Bluetooth component, and then enter the pass key "0000" on the Bluetooth component to enable communication between the Bluetooth component you... for details. ■ Disconnecting Press DOCK, and then BLUETOOTH OFF to start a connection. While the Yamaha Bluetooth audio receiver is established between them. Note The Yamaha Bluetooth audio receiver can be paired with a Bluetooth component other than 3 seconds to disconnect the system from...
Owner's Manual
Page 39
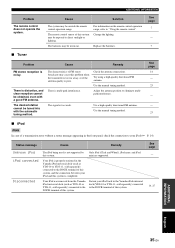
... reception is completed. Only iPod (Click and Wheel), iPod nano, and iPod mini are supported. Station your iPod back in the Yamaha iPod universal dock (YDS-10 or YDS-11, sold separately) connected to the DOCK terminal of this system. The batteries may be... Try using a high-quality directional FM antenna. Replace the batteries. There is poor. Use the manual tuning method. The characteristics of a transmission error without a status message appearing in the Yamaha iPod universal dock (such as YDS-10 or YDS-11, sold separately) connected to direct sunlight...
... reception is completed. Only iPod (Click and Wheel), iPod nano, and iPod mini are supported. Station your iPod back in the Yamaha iPod universal dock (YDS-10 or YDS-11, sold separately) connected to the DOCK terminal of this system. The batteries may be... Try using a high-quality directional FM antenna. Replace the batteries. There is poor. Use the manual tuning method. The characteristics of a transmission error without a status message appearing in the Yamaha iPod universal dock (such as YDS-10 or YDS-11, sold separately) connected to direct sunlight...