Owner's Manual
Page 2
... 820-40 of the polarized or grounding-type plug. IMPORTANT Please record the serial number of this apparatus near any ventilation openings. i En NO USER-SERVICEABLE PARTS INSIDE. MODEL: Serial No.: The serial number is provided to call the CATV system installer's attention to CATV system installer: This reminder is located on or pinched particularly at plugs, convenience receptacles, and the point where they...
... 820-40 of the polarized or grounding-type plug. IMPORTANT Please record the serial number of this apparatus near any ventilation openings. i En NO USER-SERVICEABLE PARTS INSIDE. MODEL: Serial No.: The serial number is provided to call the CATV system installer's attention to CATV system installer: This reminder is located on or pinched particularly at plugs, convenience receptacles, and the point where they...
Owner's Manual
Page 3
... to eliminate the problem by the interference. Cable/s supplied with the requirements listed in the users manual, may void your FCC authorization to be the source of other electronic devices. Follow all installations. If the antenna lead-in is found to use of this product is 300 ohm ribbon lead, change the lead-in to the operation of interference...
... to eliminate the problem by the interference. Cable/s supplied with the requirements listed in the users manual, may void your FCC authorization to be the source of other electronic devices. Follow all installations. If the antenna lead-in is found to use of this product is 300 ohm ribbon lead, change the lead-in to the operation of interference...
Owner's Manual
Page 4
... and/or this unit near the wall outlet and where the AC power plug can be held responsible for future reference. 2 Install this unit, do not locate this manual carefully. Since hearing damage from the wall outlet, grasp the plug; Contact qualified Yamaha service personnel when any damage resulting from use force on common operating errors before operating your equipment by STANDBY/ON...
... and/or this unit near the wall outlet and where the AC power plug can be held responsible for future reference. 2 Install this unit, do not locate this manual carefully. Since hearing damage from the wall outlet, grasp the plug; Contact qualified Yamaha service personnel when any damage resulting from use force on common operating errors before operating your equipment by STANDBY/ON...
Owner's Manual
Page 5
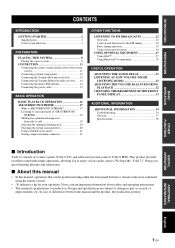
... subwoofer/system control 11 Connecting external components 12 Connecting the Yamaha iPod universal dock 14 Connecting the Yamaha Bluetooth audio receiver ...... 14 Connecting the indoor FM antenna 14 Connecting the power cable 15 BASIC OPERATION BASIC PLAYBACK OPERATION 16 AIR SURROUND XTREME 17 What is printed prior to enjoy various audio sources. We hope the "YAS-71" brings you to production. Notes contain important information about safety and operating instructions. • This manual is AIR SURROUND...
... subwoofer/system control 11 Connecting external components 12 Connecting the Yamaha iPod universal dock 14 Connecting the Yamaha Bluetooth audio receiver ...... 14 Connecting the indoor FM antenna 14 Connecting the power cable 15 BASIC OPERATION BASIC PLAYBACK OPERATION 16 AIR SURROUND XTREME 17 What is printed prior to enjoy various audio sources. We hope the "YAS-71" brings you to production. Notes contain important information about safety and operating instructions. • This manual is AIR SURROUND...
Owner's Manual
Page 6
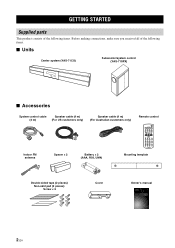
INTRODUCTION GETTING STARTED Supplied parts This product consists of the following items. Before making connections, make sure you received all of the following items. ■ Units Center system (YAS-71CU) Subwoofer/system control (YAS-71SPX) ■ Accessories System control cable Speaker cable (4 m) (4 m) (For US customers only) Speaker cable (4 m) (For Australian customers only) Remote control Indoor FM antenna Spacer × 2 Battery × 2 (AAA, R03, UM4) Mounting template Double-sided tape (2 pieces) Non...
INTRODUCTION GETTING STARTED Supplied parts This product consists of the following items. Before making connections, make sure you received all of the following items. ■ Units Center system (YAS-71CU) Subwoofer/system control (YAS-71SPX) ■ Accessories System control cable Speaker cable (4 m) (4 m) (For US customers only) Speaker cable (4 m) (For Australian customers only) Remote control Indoor FM antenna Spacer × 2 Battery × 2 (AAA, R03, UM4) Mounting template Double-sided tape (2 pieces) Non...
Owner's Manual
Page 8
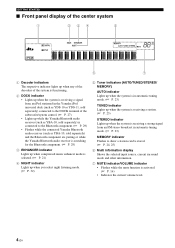
... the Yamaha iPod universal dock (such as YDS-10 or YDS-11, sold separately) connected to the DOCK terminal of the subwoofer/system control. (☞ P. 27) • Lights up while the Yamaha Bluetooth audio receiver (such as YBA-10, sold separately) is connected to the Bluetooth component. (☞ P. 29) • Flashes while the connected Yamaha Bluetooth audio receiver (such as YBA-10, sold separately) and the Bluetooth component are pairing...
... the Yamaha iPod universal dock (such as YDS-10 or YDS-11, sold separately) connected to the DOCK terminal of the subwoofer/system control. (☞ P. 27) • Lights up while the Yamaha Bluetooth audio receiver (such as YBA-10, sold separately) is connected to the Bluetooth component. (☞ P. 29) • Flashes while the connected Yamaha Bluetooth audio receiver (such as YBA-10, sold separately) and the Bluetooth component are pairing...
Owner's Manual
Page 9
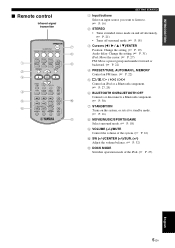
INTRODUCTION ■ Remote control Infrared signal transmitter GETTING STARTED 1 Input buttons Select an input source you want to listen to. (☞ P. 16) 2 STEREO • Turns extended stereo mode on and off alternately. (☞ P. 21) • Turns off surround mode. (☞ P. 18) 3 Cursors (W / X / S / T)/ENTER Position: Change the setting. (☞ P. 19) Audio delay: Change the setting. (☞ P. 31) iPod: Move the cursor. (☞ P. 27) FM: Move a preset group and number forward or backward...
INTRODUCTION ■ Remote control Infrared signal transmitter GETTING STARTED 1 Input buttons Select an input source you want to listen to. (☞ P. 16) 2 STEREO • Turns extended stereo mode on and off alternately. (☞ P. 21) • Turns off surround mode. (☞ P. 18) 3 Cursors (W / X / S / T)/ENTER Position: Change the setting. (☞ P. 19) Audio delay: Change the setting. (☞ P. 31) iPod: Move the cursor. (☞ P. 27) FM: Move a preset group and number forward or backward...
Owner's Manual
Page 12
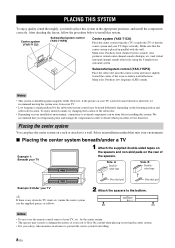
... beneath/under the center system, use the supplied spacers as follows. 2 Attach the spacers to install this system. Main roles: Produces front channel (stereo) sounds. Also produces virtual center channel sounds (dialogue, etc.) and virtual surround channel sounds effectively using the Yamaha front surround system. Placing the center system You can be heard differently depending on the rear of your rack or floor...
... beneath/under the center system, use the supplied spacers as follows. 2 Attach the spacers to install this system. Main roles: Produces front channel (stereo) sounds. Also produces virtual center channel sounds (dialogue, etc.) and virtual surround channel sounds effectively using the Yamaha front surround system. Placing the center system You can be heard differently depending on the rear of your rack or floor...
Owner's Manual
Page 14
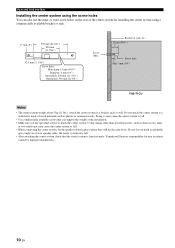
... fall . • When connecting the center system, fix the speaker cables in place where they will bear no responsibility for installing the center system using a commercially available bracket or rack. 77 mm (3") 550 mm (21-5/8") 290 mm (11-7/16") 52.5 mm (2-1/16") Screw holes Hole depth: 15 mm (9/16") Diameter: 6 mm (1/4") Inner pitch: 290 mm (11-7/16") Outer pitch: 550 mm (21-5/8") Screw (M6...
... fall . • When connecting the center system, fix the speaker cables in place where they will bear no responsibility for installing the center system using a commercially available bracket or rack. 77 mm (3") 550 mm (21-5/8") 290 mm (11-7/16") 52.5 mm (2-1/16") Screw holes Hole depth: 15 mm (9/16") Diameter: 6 mm (1/4") Inner pitch: 290 mm (11-7/16") Outer pitch: 550 mm (21-5/8") Screw (M6...
Owner's Manual
Page 20
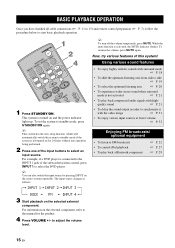
... mode if the system is not activated ☞ P. 21 • To play back a Bluetooth component ☞ P. 22 ☞ P. 27 ☞ P. 29 3 Start playback on and the power indicator lights up. y This system has the auto-sleep function, which will automatically switch the system to select an input source. Using various sound features 1 Press STANDBY/ON. To set the system to start basic playback operation. The input...
... mode if the system is not activated ☞ P. 21 • To play back a Bluetooth component ☞ P. 22 ☞ P. 27 ☞ P. 29 3 Start playback on and the power indicator lights up. y This system has the auto-sleep function, which will automatically switch the system to select an input source. Using various sound features 1 Press STANDBY/ON. To set the system to start basic playback operation. The input...
Owner's Manual
Page 25
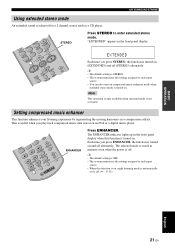
... power is turned on . y • The default setting is OFF. • The system memorizes the settings assigned to each input source. • You can also turn on compressed music enhancer mode when extended stereo mode is turned on . y • The default setting is turned on an iPod or a digital music player. Setting compressed music enhancer This function enhances your listening experience by regenerating the missing harmonics in the front panel...
... power is turned on . y • The default setting is OFF. • The system memorizes the settings assigned to each input source. • You can also turn on compressed music enhancer mode when extended stereo mode is turned on . y • The default setting is turned on an iPod or a digital music player. Setting compressed music enhancer This function enhances your listening experience by regenerating the missing harmonics in the front panel...
Owner's Manual
Page 31
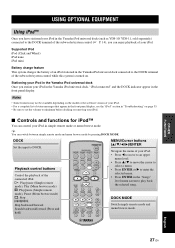
... can switch between simple remote mode and menu browse mode by pressing DOCK MODE. Notes • Some features may not be available depending on the model or the software version of your iPod. • For a complete list of status messages that appear in the front panel display, see the "iPod" section in "Troubleshooting" on . DOCK Set the input to DOCK. p: Play/pause (Simple remote mode), Play (Menu browse mode) e: Play/pause (Simple remote mode...
... can switch between simple remote mode and menu browse mode by pressing DOCK MODE. Notes • Some features may not be available depending on the model or the software version of your iPod. • For a complete list of status messages that appear in the front panel display, see the "iPod" section in "Troubleshooting" on . DOCK Set the input to DOCK. p: Play/pause (Simple remote mode), Play (Menu browse mode) e: Play/pause (Simple remote mode...
Owner's Manual
Page 32
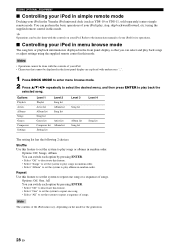
... random order. Shuffle Use this feature. • Select "One" to set the system to the instruction manuals of your iPod for its operations. ■ Controlling your iPod in menu browse mode The song lists or playback information is displayed in the Yamaha iPod universal dock (such as YDS-10 or YDS-11, sold separately) enters simple remote mode. You can switch each option by pressing...
... random order. Shuffle Use this feature. • Select "One" to set the system to the instruction manuals of your iPod for its operations. ■ Controlling your iPod in menu browse mode The song lists or playback information is displayed in the Yamaha iPod universal dock (such as YDS-10 or YDS-11, sold separately) enters simple remote mode. You can switch each option by pressing...
Owner's Manual
Page 33
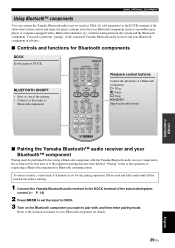
... subwoofer/system control. (☞ P. 14) 2 Press DOCK to DOCK. To ensure security, a time limit of registering a Bluetooth component for Bluetooth components DOCK Set the input to set for the pairing operation. "Pairing" refers to the operation of 8 minutes is set the input to DOCK. 3 Turn on the Bluetooth component you want to pair with the Yamaha Bluetooth audio receiver connected to perform "pairing" of a Bluetooth component. USING OPTIONAL EQUIPMENT Using Bluetooth™ components You can connect the Yamaha Bluetooth audio receiver (such as a portable music player...
... subwoofer/system control. (☞ P. 14) 2 Press DOCK to DOCK. To ensure security, a time limit of registering a Bluetooth component for Bluetooth components DOCK Set the input to set for the pairing operation. "Pairing" refers to the operation of 8 minutes is set the input to DOCK. 3 Turn on the Bluetooth component you want to pair with the Yamaha Bluetooth audio receiver connected to perform "pairing" of a Bluetooth component. USING OPTIONAL EQUIPMENT Using Bluetooth™ components You can connect the Yamaha Bluetooth audio receiver (such as a portable music player...
Owner's Manual
Page 34
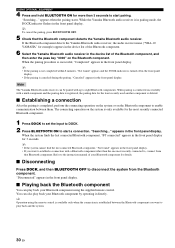
... Bluetooth components. y Operation using the supplied remote control. While the Yamaha Bluetooth audio receiver is successful, "Completed" appears in the front panel display. When the pairing procedure is in pairing mode, the DOCK indicator flashes in the front panel display. appears in the front panel display for 3 seconds. USING OPTIONAL EQUIPMENT 4 Press and hold BLUETOOTH ON for more than the one most recently connected Bluetooth component. 1 Press DOCK to set the input to DOCK. 2 Press BLUETOOTH...
... Bluetooth components. y Operation using the supplied remote control. While the Yamaha Bluetooth audio receiver is successful, "Completed" appears in the front panel display. When the pairing procedure is in pairing mode, the DOCK indicator flashes in the front panel display. appears in the front panel display for 3 seconds. USING OPTIONAL EQUIPMENT 4 Press and hold BLUETOOTH ON for more than the one most recently connected Bluetooth component. 1 Press DOCK to set the input to DOCK. 2 Press BLUETOOTH...
Owner's Manual
Page 36
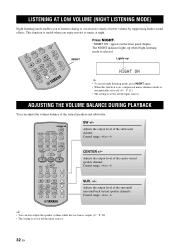
... setting is set for all the input sources. 32 En Adjusts the output level of the surround/ surround back virtual speaker channels. Control range: +6 to dialog or vocals more clearly at night. Lights up when Night listening mode is useful when you to listen to -6 y • You can adjust the volume balance of the subwoofer channel. Adjusts the output level of the virtual speakers and subwoofer...
... setting is set for all the input sources. 32 En Adjusts the output level of the surround/ surround back virtual speaker channels. Control range: +6 to dialog or vocals more clearly at night. Lights up when Night listening mode is useful when you to listen to -6 y • You can adjust the volume balance of the subwoofer channel. Adjusts the output level of the virtual speakers and subwoofer...
Owner's Manual
Page 38
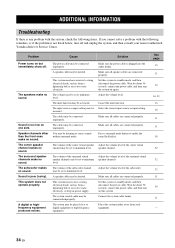
... your nearest authorized Yamaha dealer or Service Center. The surround speaker channels make no sound. This system does not operate properly. A digital or highfrequency equipment produces noises. This system may be set to standby mode, and then disconnect the power cable. The mute function may be activated. The input source or input setting may be incorrect. The cables may be connected improperly. The volume of the subwoofer. The system may...
... your nearest authorized Yamaha dealer or Service Center. The surround speaker channels make no sound. This system does not operate properly. A digital or highfrequency equipment produces noises. This system may be set to standby mode, and then disconnect the power cable. The mute function may be activated. The input source or input setting may be incorrect. The cables may be connected improperly. The volume of the subwoofer. The system may...
Owner's Manual
Page 39
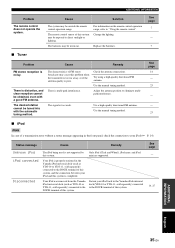
..., and iPod mini are supported. Change the lighting. Replace the batteries. See page 7 - 7 ■ Tuner Problem Cause Remedy FM stereo reception is poor. Your iPod is properly stationed in the Yamaha iPod universal dock (YDS-10 or YDS-11, sold separately) connected to direct sunlight or lighting. For information on the remote control operation range, refer to the DOCK terminal of this system, and the connection between your iPod back in the Yamaha iPod universal dock...
..., and iPod mini are supported. Change the lighting. Replace the batteries. See page 7 - 7 ■ Tuner Problem Cause Remedy FM stereo reception is poor. Your iPod is properly stationed in the Yamaha iPod universal dock (YDS-10 or YDS-11, sold separately) connected to direct sunlight or lighting. For information on the remote control operation range, refer to the DOCK terminal of this system, and the connection between your iPod back in the Yamaha iPod universal dock...
Owner's Manual
Page 41
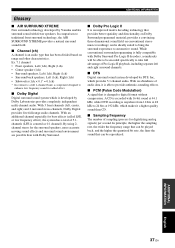
... stereo for added effect. ■ Dolby Digital Digital surround sound system which is developed by DTS, Inc., which makes it is fully compatible with fewer speakers. ADDITIONAL INFORMATION Glossary ■ AIR SURROUND XTREME New surround technology developed by Yamaha enables surround sound with Dolby Surround Pro Logic II decoders, soundtracks will be able to be encoded specifically to take full advantage of 5.1channels (LFE is an audio...
... stereo for added effect. ■ Dolby Digital Digital surround sound system which is developed by DTS, Inc., which makes it is fully compatible with fewer speakers. ADDITIONAL INFORMATION Glossary ■ AIR SURROUND XTREME New surround technology developed by Yamaha enables surround sound with Dolby Surround Pro Logic II decoders, soundtracks will be able to be encoded specifically to take full advantage of 5.1channels (LFE is an audio...
Owner's Manual
Page 42
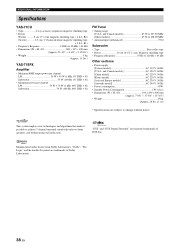
...; Antenna Input (unbalanced 75 Ω Subwoofer • Type Bass reflex type • Driver 16 cm (6-1/2") cone, Magnetic shielding type • Frequency Response 35 Hz to achieve 7-channel surround sound with only two front speakers, and without notice. This system employs new technologies and algorithms that make it possible to 120 Hz (-10 dB) Other sections • Power supply [Taiwan model AC...
...; Antenna Input (unbalanced 75 Ω Subwoofer • Type Bass reflex type • Driver 16 cm (6-1/2") cone, Magnetic shielding type • Frequency Response 35 Hz to achieve 7-channel surround sound with only two front speakers, and without notice. This system employs new technologies and algorithms that make it possible to 120 Hz (-10 dB) Other sections • Power supply [Taiwan model AC...


