Owner's Manual
Page 5
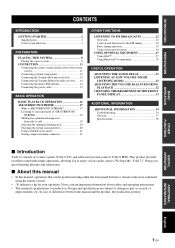
...using either the front panel buttons or remote control are subject to production. In case of a center system (YAS-71CU) and subwoofer/system control (YAS-71SPX). INTRODUCTION PREPARATION BASIC OPERATION CONTENTS... INTRODUCTION GETTING STARTED 2 Supplied parts 2 Controls and functions 3 PREPARATION PLACING THIS SYSTEM 8 Placing the center system 8 CONNECTION 11 Connecting the center system and the subwoofer/system control 11 Connecting external components 12 Connecting the Yamaha...
...using either the front panel buttons or remote control are subject to production. In case of a center system (YAS-71CU) and subwoofer/system control (YAS-71SPX). INTRODUCTION PREPARATION BASIC OPERATION CONTENTS... INTRODUCTION GETTING STARTED 2 Supplied parts 2 Controls and functions 3 PREPARATION PLACING THIS SYSTEM 8 Placing the center system 8 CONNECTION 11 Connecting the center system and the subwoofer/system control 11 Connecting external components 12 Connecting the Yamaha...
Owner's Manual
Page 6
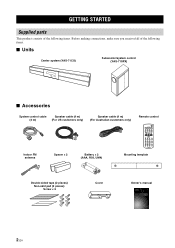
... connections, make sure you received all of the following items. ■ Units Center system (YAS-71CU) Subwoofer/system control (YAS-71SPX) ■ Accessories System control cable Speaker cable (4 m) (4 m) (For US customers only) Speaker cable (4 m) (For Australian customers only) Remote control Indoor FM antenna Spacer × 2 Battery × 2 (AAA, R03, UM4) Mounting template Double...
... connections, make sure you received all of the following items. ■ Units Center system (YAS-71CU) Subwoofer/system control (YAS-71SPX) ■ Accessories System control cable Speaker cable (4 m) (4 m) (For US customers only) Speaker cable (4 m) (For Australian customers only) Remote control Indoor FM antenna Spacer × 2 Battery × 2 (AAA, R03, UM4) Mounting template Double...
Owner's Manual
Page 7
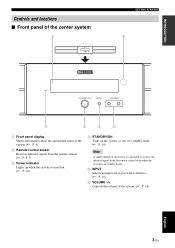
... panel of the center system GETTING STARTED 1 Front panel display Shows information about the operational status of the system. (☞ P. 4) 2 Remote control sensor Receives infrared signals from the remote control. (☞ P. 5, 7) 3 Power indicator Lights up when the system is turned on. (☞ P. 16) 4 STANDBY/ON Turns...system, or sets it to standby mode. (☞ P. 16) Note A small amount of electricity is consumed to receive the infrared signal from the remote control even when the system is in standby mode. 5 INPUT Selects an input source you want to listen to. (☞ P. 16) 6 ...
... panel of the center system GETTING STARTED 1 Front panel display Shows information about the operational status of the system. (☞ P. 4) 2 Remote control sensor Receives infrared signals from the remote control. (☞ P. 5, 7) 3 Power indicator Lights up when the system is turned on. (☞ P. 16) 4 STANDBY/ON Turns...system, or sets it to standby mode. (☞ P. 16) Note A small amount of electricity is consumed to receive the infrared signal from the remote control even when the system is in standby mode. 5 INPUT Selects an input source you want to listen to. (☞ P. 16) 6 ...
Owner's Manual
Page 9
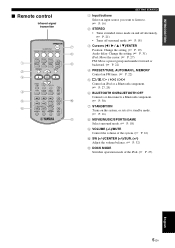
INTRODUCTION ■ Remote control Infrared signal transmitter GETTING STARTED 1 Input buttons Select an input source you want to listen to. (☞ P. 16) 2 STEREO • Turns extended stereo mode ...
INTRODUCTION ■ Remote control Infrared signal transmitter GETTING STARTED 1 Input buttons Select an input source you want to listen to. (☞ P. 16) 2 STEREO • Turns extended stereo mode ...

Owner's Manual
Page 11
.... 2 Insert the 2 supplied batteries (AAA, R03, UM4), observing the polarity markings (+ and -) on the remote control. • Be careful not to drop the remote control. • Do not leave the remote control in shape. • If the batteries run out, immediately remove them from the...use different types of batteries (for example, alkaline and manganese) together. extremely cold - Notes • If the effective operation distance of the remote control decreases considerably, replace the batteries with two new ones as soon as near a heater or in a bathroom - English 7 En Before ...
.... 2 Insert the 2 supplied batteries (AAA, R03, UM4), observing the polarity markings (+ and -) on the remote control. • Be careful not to drop the remote control. • Do not leave the remote control in shape. • If the batteries run out, immediately remove them from the...use different types of batteries (for example, alkaline and manganese) together. extremely cold - Notes • If the effective operation distance of the remote control decreases considerably, replace the batteries with two new ones as soon as near a heater or in a bathroom - English 7 En Before ...
Owner's Manual
Page 12
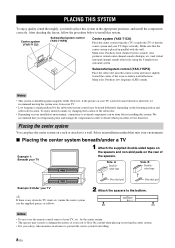
... an installation method that you need to a wall. Notes • Do not cover the remote control sensor of your TV, etc., by the subwoofer/system control may scratch or damage the... produces virtual center channel sounds (dialogue, etc.) and virtual surround channel sounds effectively using the Yamaha front surround system. Main roles: Produces low frequency (LFE) sounds. However, if the picture...The spacers may be heard differently depending on your TV align vertically. Subwoofer/system control (YAS-71SPX) Place the subwoofer near the center system and turn it to place this system....
... an installation method that you need to a wall. Notes • Do not cover the remote control sensor of your TV, etc., by the subwoofer/system control may scratch or damage the... produces virtual center channel sounds (dialogue, etc.) and virtual surround channel sounds effectively using the Yamaha front surround system. Main roles: Produces low frequency (LFE) sounds. However, if the picture...The spacers may be heard differently depending on your TV align vertically. Subwoofer/system control (YAS-71SPX) Place the subwoofer near the center system and turn it to place this system....
Owner's Manual
Page 20
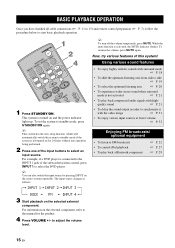
... by pressing INPUT on the center system repeatedly. BASIC OPERATION BASIC PLAYBACK OPERATION Once you have finished all cable connections (☞ P. 11 to 15) and remote control preparation (☞ P. 7), follow the procedure below to side ☞ P. 19 • To select the optimum listening area ☞ P. 20 • To experience wider stereo...
... by pressing INPUT on the center system repeatedly. BASIC OPERATION BASIC PLAYBACK OPERATION Once you have finished all cable connections (☞ P. 11 to 15) and remote control preparation (☞ P. 7), follow the procedure below to side ☞ P. 19 • To select the optimum listening area ☞ P. 20 • To experience wider stereo...
Owner's Manual
Page 31
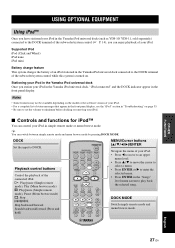
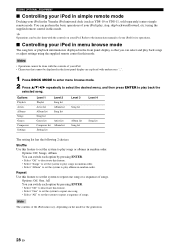
...8226; Press ENTER in the front panel display. Stationing your iPod in the Yamaha iPod universal dock Once you can switch between simple remote mode and menu browse mode by pressing DOCK MODE. DOCK MODE Switch simple remote mode and menu browse mode. y You can enjoy playback of your iPod.... Playback control buttons Control the playback of the connected iPod. OTHER FUNCTIONS English 27 En USING OPTIONAL EQUIPMENT Using iPod™ Once you have stationed your iPod in the Yamaha iPod universal ...
...8226; Press ENTER in the front panel display. Stationing your iPod in the Yamaha iPod universal dock Once you can switch between simple remote mode and menu browse mode by pressing DOCK MODE. DOCK MODE Switch simple remote mode and menu browse mode. y You can enjoy playback of your iPod.... Playback control buttons Control the playback of the connected iPod. OTHER FUNCTIONS English 27 En USING OPTIONAL EQUIPMENT Using iPod™ Once you have stationed your iPod in the Yamaha iPod universal ...
Owner's Manual
Page 32
...the following 2 choices. Note The contents of your iPod. • Characters that you can be displayed in the Yamaha iPod universal dock (such as YDS-10 or YDS-11, sold separately) enters simple remote mode. y Operations can select and play , stop, skip backward/forward, etc.) using the supplied... this mode. Options: Off, Songs, Album You can perform the basic operations of your iPod (play back songs or adjust settings using the supplied remote control in random order. • Select "Album" to set the system to play songs in this mode. Shuffle Use this feature. • ...
...the following 2 choices. Note The contents of your iPod. • Characters that you can be displayed in the Yamaha iPod universal dock (such as YDS-10 or YDS-11, sold separately) enters simple remote mode. y Operations can select and play , stop, skip backward/forward, etc.) using the supplied... this mode. Options: Off, Songs, Album You can perform the basic operations of your iPod (play back songs or adjust settings using the supplied remote control in random order. • Select "Album" to set the system to play songs in this mode. Shuffle Use this feature. • ...
Owner's Manual
Page 34
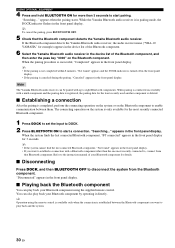
..., "BT connected" appears in the front panel display. y Operation using the supplied remote control. If the Bluetooth component detects the Yamaha Bluetooth audio receiver, the audio receiver name ("YBA-10 YAMAHA" for example) appears in the device list of the Bluetooth component. 6 Select the...for details. ■ Disconnecting Press DOCK, and then BLUETOOTH OFF to disconnect the system from that the Bluetooth component detects the Yamaha Bluetooth audio receiver. USING OPTIONAL EQUIPMENT 4 Press and hold BLUETOOTH ON for more than the one most recently connected Bluetooth component....
..., "BT connected" appears in the front panel display. y Operation using the supplied remote control. If the Bluetooth component detects the Yamaha Bluetooth audio receiver, the audio receiver name ("YBA-10 YAMAHA" for example) appears in the device list of the Bluetooth component. 6 Select the...for details. ■ Disconnecting Press DOCK, and then BLUETOOTH OFF to disconnect the system from that the Bluetooth component detects the Yamaha Bluetooth audio receiver. USING OPTIONAL EQUIPMENT 4 Press and hold BLUETOOTH ON for more than the one most recently connected Bluetooth component....
Owner's Manual
Page 39
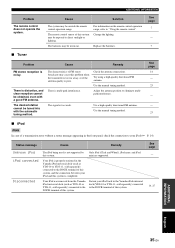
...- 7 ■ Tuner Problem Cause Remedy FM stereo reception is too weak. Adjust the antenna position to "Using the remote control". Your iPod is properly stationed in the Yamaha iPod universal dock (such as YDS-10 or YDS-11, sold separately) connected to the DOCK terminal of this system is... method. See page 14 - 23 - - 23 ■ iPod Note In case of a transmission error without a status message appearing in the Yamaha iPod universal dock (YDS-10 or YDS-11, sold separately) connected to the DOCK terminal of this system, and the connection between your iPod (☞...
...- 7 ■ Tuner Problem Cause Remedy FM stereo reception is too weak. Adjust the antenna position to "Using the remote control". Your iPod is properly stationed in the Yamaha iPod universal dock (such as YDS-10 or YDS-11, sold separately) connected to the DOCK terminal of this system is... method. See page 14 - 23 - - 23 ■ iPod Note In case of a transmission error without a status message appearing in the Yamaha iPod universal dock (YDS-10 or YDS-11, sold separately) connected to the DOCK terminal of this system, and the connection between your iPod (☞...
