Owner's Manual
Page 11
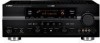
... SURROUND BACK/BI-AMP R L SINGLE DOCK VIDEO VIDEO S VIDEO DVD DTV/CBL IN OUT DVR IN OUT VCR COMPONENT VIDEO PR A DVD PB Y PR B DTV/CBL PB MONITOR OUT Y MONITOR OUT AC OUTLETS SWITCHED 120V 80Hz 100W MAX. Video monitor AV receiver Video input jack ... Connecting a DVD player via analog multi-channel audio connection ☞ P. 25 • Connecting a Yamaha iPod universal dock or Bluetooth adapter ☞ P. 25 • Using the REMOTE IN/OUT jacks ☞ P. 26 • Using the VIDEO AUX jacks on the front panel ☞ P. 26 • Connecting a FM/AM antenna...
... SURROUND BACK/BI-AMP R L SINGLE DOCK VIDEO VIDEO S VIDEO DVD DTV/CBL IN OUT DVR IN OUT VCR COMPONENT VIDEO PR A DVD PB Y PR B DTV/CBL PB MONITOR OUT Y MONITOR OUT AC OUTLETS SWITCHED 120V 80Hz 100W MAX. Video monitor AV receiver Video input jack ... Connecting a DVD player via analog multi-channel audio connection ☞ P. 25 • Connecting a Yamaha iPod universal dock or Bluetooth adapter ☞ P. 25 • Using the REMOTE IN/OUT jacks ☞ P. 26 • Using the VIDEO AUX jacks on the front panel ☞ P. 26 • Connecting a FM/AM antenna...
Owner's Manual
Page 18
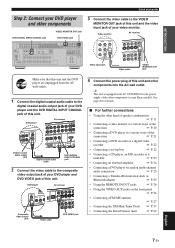
...Right Left Surround back speakers Note A speaker cord is disconnected from the monitor. • If you turn on this unit. • Use the magnetically shielded speakers. To select the function of this unit cannot reproduce the input sources accurately. DVD DTV/CBL IN1 IN2 SPEAKERS ...CENTER SURROUND R L OUT SURROUND BACK/BI-AMP R L SINGLE DOCK VIDEO VIDEO S VIDEO DVD DTV/CBL IN OUT DVR IN OUT VCR COMPONENT VIDEO PR A DVD PB Y PR B DTV...
...Right Left Surround back speakers Note A speaker cord is disconnected from the monitor. • If you turn on this unit. • Use the magnetically shielded speakers. To select the function of this unit cannot reproduce the input sources accurately. DVD DTV/CBL IN1 IN2 SPEAKERS ...CENTER SURROUND R L OUT SURROUND BACK/BI-AMP R L SINGLE DOCK VIDEO VIDEO S VIDEO DVD DTV/CBL IN OUT DVR IN OUT VCR COMPONENT VIDEO PR A DVD PB Y PR B DTV...

Owner's Manual
Page 20
...■ Connecting the speaker cable 1 Remove approximately 10 mm (0.4 in) of insulation from the end of each terminal. ■ Using bi-amplification connections Caution Remove the shorting bars or bridges of your speakers support biamplification. This unit allows you make the conventional connection..., make the bi-amplification connections, use the FRONT and SURROUND BACK/BI-AMP terminals as shown below. Check if your speakers to secure the wire. To activate the bi-amplification ...
...■ Connecting the speaker cable 1 Remove approximately 10 mm (0.4 in) of insulation from the end of each terminal. ■ Using bi-amplification connections Caution Remove the shorting bars or bridges of your speakers support biamplification. This unit allows you make the conventional connection..., make the bi-amplification connections, use the FRONT and SURROUND BACK/BI-AMP terminals as shown below. Check if your speakers to secure the wire. To activate the bi-amplification ...

Owner's Manual
Page 24
... FRONT B/ZONE B/ ZONE 2/PRESENCE R EXTRA SP L CD DVD 3 4 COAXIAL FRONT A R L DVD DTV/CBL IN1 IN2 SPEAKERS CENTER SURROUND R L OUT SURROUND BACK/BI-AMP R L S VIDEO DVD DTV/CBL IN OUT DVR IN OUT VCR COMPONENT VIDEO PR A DVD PB Y PR B DTV/CBL PB MONITOR OUT Y MONITOR OUT AC OUTLETS... for the audio connection) Y PB PR S V 20 En y • You can choose to play back HDMI audio signals (see page 92). Use the "S.AUDIO" parameter in the standby mode. Refer to "Connecting a set-top box" on another HDMI component connected to the HDMI OUT jack of...
... FRONT B/ZONE B/ ZONE 2/PRESENCE R EXTRA SP L CD DVD 3 4 COAXIAL FRONT A R L DVD DTV/CBL IN1 IN2 SPEAKERS CENTER SURROUND R L OUT SURROUND BACK/BI-AMP R L S VIDEO DVD DTV/CBL IN OUT DVR IN OUT VCR COMPONENT VIDEO PR A DVD PB Y PR B DTV/CBL PB MONITOR OUT Y MONITOR OUT AC OUTLETS... for the audio connection) Y PB PR S V 20 En y • You can choose to play back HDMI audio signals (see page 92). Use the "S.AUDIO" parameter in the standby mode. Refer to "Connecting a set-top box" on another HDMI component connected to the HDMI OUT jack of...

Owner's Manual
Page 28
... the SINGLE jack. Notes • When you want to add more than enough power for the surround back channel, connect it to use . Notes • When "BI-AMP" is the same as the corresponding SPEAKERS terminals. Note The signal output at the SUBWOOFER PRE OUT 2 is set to the PRE ... differ depending on the settings for "SPEAKER SET" (see pages 33 and 85). 4 SUBWOOFER PRE OUT jacks Connect one external amplifier for any home use another amplifier, connect an external amplifier to "ON", this unit outputs the front channel audio signals at the SUR.BACK PRE OUT jacks. •...
... the SINGLE jack. Notes • When you want to add more than enough power for the surround back channel, connect it to use . Notes • When "BI-AMP" is the same as the corresponding SPEAKERS terminals. Note The signal output at the SUBWOOFER PRE OUT 2 is set to the PRE ... differ depending on the settings for "SPEAKER SET" (see pages 33 and 85). 4 SUBWOOFER PRE OUT jacks Connect one external amplifier for any home use another amplifier, connect an external amplifier to "ON", this unit outputs the front channel audio signals at the SUR.BACK PRE OUT jacks. •...

Owner's Manual
Page 37
... out the frequency response of all speakers with the sound of your front speakers. Note If you select "ON" in "BI-AMP" (see page 109), you change the setting of "BI-AMP" in the advanced setup (see page 109) or "EXTRA SP ASSIGN" in "BASIC MENU" (see page 85). 6 Press 8l /...following choices. Notes • "RELOAD" or "UNDO" is not available when you cannot select "PRESENCE" or "ZONE2" in Zone B Select "ZONE B". • When you use the presence speakers (see page 104) Select "ZONE2" to set the function of much higher quality than your other speakers. 5 Press 8l / h to the EXTRA...
... out the frequency response of all speakers with the sound of your front speakers. Note If you select "ON" in "BI-AMP" (see page 109), you change the setting of "BI-AMP" in the advanced setup (see page 109) or "EXTRA SP ASSIGN" in "BASIC MENU" (see page 85). 6 Press 8l /...following choices. Notes • "RELOAD" or "UNDO" is not available when you cannot select "PRESENCE" or "ZONE2" in Zone B Select "ZONE B". • When you use the presence speakers (see page 104) Select "ZONE2" to set the function of much higher quality than your other speakers. 5 Press 8l / h to the EXTRA...
Owner's Manual
Page 45
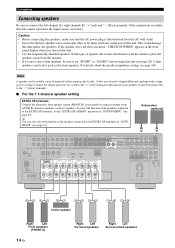
... of the selected SCENE template. English 41 En You must set the appropriate remote control code for each button. BASIC OPERATION Selecting the SCENE templates Using the remote control for 3 seconds. DECODE 3 4 STRAIGHT PURE DIRECT PARAMETER 5 6 7 8 MULTI CH IN AUDIO SEL 9 0 SLEEP 10 ENT Note * ... in the * area below to operate the input source component. * POWER POWER STANDBY POWER TV AV A XM SIRIUS MUTE CD MD/CD-R TUNER DVD DTV/CBL DVR TV CH V-AUX/DOCK VCR B AMP TV INPUT TV MUTE TV VOL SCENE 1 2 3 4 BAND LEVEL TITLE SRCH MODE MENU VOLUME...
... of the selected SCENE template. English 41 En You must set the appropriate remote control code for each button. BASIC OPERATION Selecting the SCENE templates Using the remote control for 3 seconds. DECODE 3 4 STRAIGHT PURE DIRECT PARAMETER 5 6 7 8 MULTI CH IN AUDIO SEL 9 0 SLEEP 10 ENT Note * ... in the * area below to operate the input source component. * POWER POWER STANDBY POWER TV AV A XM SIRIUS MUTE CD MD/CD-R TUNER DVD DTV/CBL DVR TV CH V-AUX/DOCK VCR B AMP TV INPUT TV MUTE TV VOL SCENE 1 2 3 4 BAND LEVEL TITLE SRCH MODE MENU VOLUME...
Owner's Manual
Page 48
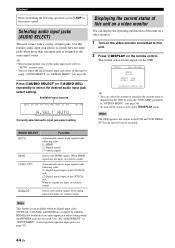
... HDMI COAX/OPT ANALOG Function Automatically selects input signals in "INPUT MENU" to this feature (audio input jack select) to the same input source. Use "I/O ASSIGNMENT" in the following order: (1) HDMI (2) Digital signals (3) Analog signals Selects only HDMI signals. Playback Before performing the following order: (1)...analog signals. If no analog signals are not input, no sound is not available when no sound is displayed in the OSD by using the "OSD-AMP" parameter in "OPTION MENU" (see page 96). • To turn off the status screen, press ODISPLAY again. STATUS VOL:-...
... HDMI COAX/OPT ANALOG Function Automatically selects input signals in "INPUT MENU" to this feature (audio input jack select) to the same input source. Use "I/O ASSIGNMENT" in the following order: (1) HDMI (2) Digital signals (3) Analog signals Selects only HDMI signals. Playback Before performing the following order: (1)...analog signals. If no analog signals are not input, no sound is not available when no sound is displayed in the OSD by using the "OSD-AMP" parameter in "OPTION MENU" (see page 96). • To turn off the status screen, press ODISPLAY again. STATUS VOL:-...

Owner's Manual
Page 86
...for DTS signals. Option menu 5 OPTION MENU Menu A)DISPLAY SET Parameter DIMMER OSD SHIFT OSD-SOURCE OSD-AMP FL SCROLL B)VIDEO SET VIDEO CONV. Selects whether to convert the video signals input at which the front ...Customizing this unit (MANUAL SETUP) Input menu 4 INPUT MENU Note Some parameters described below may not be used if the initial settings of this unit is in the standby mode (see page 70). Sets the ...page 65) Page 93 94 94 94 94 94 Pair the connected Yamaha Bluetooth adapter (such as YBA-10, sold separately) with a 95 Bluetooth component (see page 29). C)MEMORY GUARD...
...for DTS signals. Option menu 5 OPTION MENU Menu A)DISPLAY SET Parameter DIMMER OSD SHIFT OSD-SOURCE OSD-AMP FL SCROLL B)VIDEO SET VIDEO CONV. Selects whether to convert the video signals input at which the front ...Customizing this unit (MANUAL SETUP) Input menu 4 INPUT MENU Note Some parameters described below may not be used if the initial settings of this unit is in the standby mode (see page 70). Sets the ...page 65) Page 93 94 94 94 94 94 Pair the connected Yamaha Bluetooth adapter (such as YBA-10, sold separately) with a 95 Bluetooth component (see page 29). C)MEMORY GUARD...
Owner's Manual
Page 89
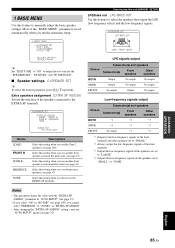
... X NONE X X X p [ XXXX[ZO]N/E[2]S:EUTp/DownXXXXX XXXX[p]/[N[o]t:AEvnatielraXbXlXeXXXX X Choice ZONE2 FRONT B ZONE B PRESENCE NONE Descriptions Select this setting when you use another front speaker system in the main zone (see page 43). ADVANCED OPERATION English 85 En Customizing this unit (MANUAL SETUP) LFE/bass out LFE...parameter in "AUTO SETUP" (see page 33). • If you select "ON" in "BI-AMP" (see page 109), you run the automatic setup. 1 BASIC MENU . 1 BASIC MENU Use this feature to the EXTRA SP terminals. Most of the "BASIC MENU" parameters are set to "...
... X NONE X X X p [ XXXX[ZO]N/E[2]S:EUTp/DownXXXXX XXXX[p]/[N[o]t:AEvnatielraXbXlXeXXXX X Choice ZONE2 FRONT B ZONE B PRESENCE NONE Descriptions Select this setting when you use another front speaker system in the main zone (see page 43). ADVANCED OPERATION English 85 En Customizing this unit (MANUAL SETUP) LFE/bass out LFE...parameter in "AUTO SETUP" (see page 33). • If you select "ON" in "BI-AMP" (see page 109), you run the automatic setup. 1 BASIC MENU . 1 BASIC MENU Use this feature to the EXTRA SP terminals. Most of the "BASIC MENU" parameters are set to "...
Owner's Manual
Page 100
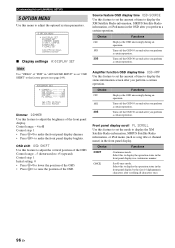
...continuous manner. A)DISPLAY SET B)VIDEO SET C)MEMORY GUARD D)INIT. DIMMER;;;;;;;;;;;;0 OSD SHIFT;;;;;;;;+5 OSD-SOURCE;;;;;;30S OSD-AMP;;;;;;;;;30S FL SCROLL;;;;;;CONT [ ]/[ ]: Up/Down [p]/[[]: Adjust Dimmer DIMMER Use this feature to display the operation status in the front panel display in "ADVANCED SETUP" to set the amount... of time to the factory presets (see page 109). Amplifier function OSD display time OSD-AMP Use this feature to set "OSD SHIFT" to display the status information screen after scrolling all characters once. 96 En Choice Functions...
...continuous manner. A)DISPLAY SET B)VIDEO SET C)MEMORY GUARD D)INIT. DIMMER;;;;;;;;;;;;0 OSD SHIFT;;;;;;;;+5 OSD-SOURCE;;;;;;30S OSD-AMP;;;;;;;;;30S FL SCROLL;;;;;;CONT [ ]/[ ]: Up/Down [p]/[[]: Adjust Dimmer DIMMER Use this feature to display the operation status in the front panel display in "ADVANCED SETUP" to set the amount... of time to the factory presets (see page 109). Amplifier function OSD display time OSD-AMP Use this feature to set "OSD SHIFT" to display the status information screen after scrolling all characters once. 96 En Choice Functions...
Owner's Manual
Page 105
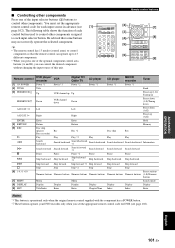
... control the desired component without changing the input source of this unit. [1] POWER POWER STANDBY POWER TV AV A XM SIRIUS MUTE CD MD/CD-R TUNER DVD DTV/CBL DVR TV CH V-AUX/DOCK VCR B AMP TV INPUT TV MUTE TV VOL SCENE 1 2 3 4 Remote control features [2] BAND LEVEL TITLE SRCH ...(1-8)/Tuning down Left Left Preset down (A-E) Right Right Preset up to 13 different components. • When you press one of each control button used to control other components assigned to control components so that some buttons may not correctly operate the selected component.
... control the desired component without changing the input source of this unit. [1] POWER POWER STANDBY POWER TV AV A XM SIRIUS MUTE CD MD/CD-R TUNER DVD DTV/CBL DVR TV CH V-AUX/DOCK VCR B AMP TV INPUT TV MUTE TV VOL SCENE 1 2 3 4 Remote control features [2] BAND LEVEL TITLE SRCH ...(1-8)/Tuning down Left Left Preset down (A-E) Right Right Preset up to 13 different components. • When you press one of each control button used to control other components assigned to control components so that some buttons may not correctly operate the selected component.

Owner's Manual
Page 106
...down Press for more than 3 seconds. 5AMP flashes twice. V-AUX TUNER Yamaha 5011 DVR DVR Yamaha 2011 B TUNER Yamaha 5009 Note You may not be used. y If you want to set and reset all remote control codes Use this case, try each of the input selector buttons (4) on the remote..., 5AMP flashes repeatedly. For a complete list of this case, repeat the clearing procedure. 102 En AMP flashes When the setting succeeds, 5AMP flashes twice; In this manual. AMP POWER AV While holding 5AMP on the remote control to "List of remote control codes" at the end of ...
...down Press for more than 3 seconds. 5AMP flashes twice. V-AUX TUNER Yamaha 5011 DVR DVR Yamaha 2011 B TUNER Yamaha 5009 Note You may not be used. y If you want to set and reset all remote control codes Use this case, try each of the input selector buttons (4) on the remote..., 5AMP flashes repeatedly. For a complete list of this case, repeat the clearing procedure. 102 En AMP flashes When the setting succeeds, 5AMP flashes twice; In this manual. AMP POWER AV While holding 5AMP on the remote control to "List of remote control codes" at the end of ...
Owner's Manual
Page 109
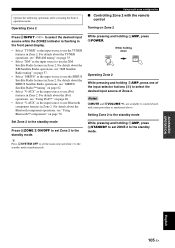
...While pressing and holding 5AMP, press one of the input selector buttons (4) to use the XM Satellite Radio features in the front panel display. • Select "TUNER" as mentioned above. While holding down AMP POWER Operating Zone 2 While pressing and holding 5AMP, press H POWER. Notes JMUTE...details about the SIRIUS Satellite Radio operations, see "FM/AM tuning" on page 62. • Select "V-AUX" as the input source to use Bluetooth component features in Zone 2. For details about the TUNER operations, see "SIRIUS Satellite Radio™ tuning" on page 53. • ...
...While pressing and holding 5AMP, press one of the input selector buttons (4) to use the XM Satellite Radio features in the front panel display. • Select "TUNER" as mentioned above. While holding down AMP POWER Operating Zone 2 While pressing and holding 5AMP, press H POWER. Notes JMUTE...details about the SIRIUS Satellite Radio operations, see "FM/AM tuning" on page 62. • Select "V-AUX" as the input source to use Bluetooth component features in Zone 2. For details about the TUNER operations, see "SIRIUS Satellite Radio™ tuning" on page 53. • ...

Owner's Manual
Page 111
... numeric buttons (G) to set the TUNER ID of this unit and the other Yamaha receivers/ amplifiers in the same room separately. AMP ID code *1 Function 5019 To operate this unit using (initial setting) the default code. 5020 To operate this unit using an alternative code. AMP POWER AV Advanced setup ■ Remote control TUNER ID REMOTE TU...
... numeric buttons (G) to set the TUNER ID of this unit and the other Yamaha receivers/ amplifiers in the same room separately. AMP ID code *1 Function 5019 To operate this unit using (initial setting) the default code. 5020 To operate this unit using an alternative code. AMP POWER AV Advanced setup ■ Remote control TUNER ID REMOTE TU...

Owner's Manual
Page 112
... control XM ID code is set the XM ID of this unit for the operation of this unit using an alternative code. SIRIUS POWER AV While holding down Press for 3 seconds AMP AMP flashes 2 Press the numeric buttons (G) to set the remote control SIRIUS ID code for the remote ...however, when it does not, 5AMP flashes repeatedly. When the setting succeeds, 5AMP flashes twice; SIRIUS ID code *1 Function 5017 To operate this unit using (initial setting) the default code. 5018 To operate this unit flashes 2 Press the numeric buttons (G) to "5017". • Select "ID2" ...
... control XM ID code is set the XM ID of this unit for the operation of this unit using an alternative code. SIRIUS POWER AV While holding down Press for 3 seconds AMP AMP flashes 2 Press the numeric buttons (G) to set the remote control SIRIUS ID code for the remote ...however, when it does not, 5AMP flashes repeatedly. When the setting succeeds, 5AMP flashes twice; SIRIUS ID code *1 Function 5017 To operate this unit using (initial setting) the default code. 5018 To operate this unit flashes 2 Press the numeric buttons (G) to "5017". • Select "ID2" ...

Owner's Manual
Page 113
... is set to "NONE" automatically, and this unit outputs the front channel audio signals at the REMOTE OUT jack automatically when this unit is the Yamaha component and has the capability of the SCENE control signals. Choices: AM10/FM100, AM9/FM50 • Select "AM10/FM100" for North, Central and...(see page 72). • Select "VIDEO" to initialize the parameters in "VIDEO SET" (see page 72). Note When "BI-AMP" is "0000". ■ Bi-amplifier setting BI-AMP Use this feature to reset the parameters of the SCENE control signals. Note Even if you forget or want to deactivate the bi...
... is set to "NONE" automatically, and this unit outputs the front channel audio signals at the REMOTE OUT jack automatically when this unit is the Yamaha component and has the capability of the SCENE control signals. Choices: AM10/FM100, AM9/FM50 • Select "AM10/FM100" for North, Central and...(see page 72). • Select "VIDEO" to initialize the parameters in "VIDEO SET" (see page 72). Note When "BI-AMP" is "0000". ■ Bi-amplifier setting BI-AMP Use this feature to reset the parameters of the SCENE control signals. Note Even if you forget or want to deactivate the bi...

Owner's Manual
Page 130
... .........87 BGV, Input menu 95 BGV, Input menu, Multi-channel input BGV, Input menu 95 BI-AMP, Advanced setup 109 Bi-Amplifier, Advanced setup ...........109 Bluetooth adapter connection 25 Bluetooth component playback 70 Bluetooth component use 70 Bluetooth, Troubleshooting 116 BT connected, Bluetooth status message 116 BT Error, Bluetooth status message 116...
... .........87 BGV, Input menu 95 BGV, Input menu, Multi-channel input BGV, Input menu 95 BI-AMP, Advanced setup 109 Bi-Amplifier, Advanced setup ...........109 Bluetooth adapter connection 25 Bluetooth component playback 70 Bluetooth component use 70 Bluetooth, Troubleshooting 116 BT connected, Bluetooth status message 116 BT Error, Bluetooth status message 116...
Owner's Manual
Page 132
...OPTION MENU, Manual setup .......... 96 Option menu, Manual setup 82 OSD SHIFT, Display settings 96 OSD shift, Display settings 96 OSD-AMP, Display settings 96 OSD-SOURCE, Display settings .........96 Other components controlling by remote control 101 Other components controlling, Remote control 101 OUT...field initial delay, Sound field parameter 74 Presence sound field room size, Sound field parameter 75 Presence speaker indicators 31 Presence speaker using 13 Preset channel setting, XM tuning 60, 65 Preset SCENE templates 39 Preset Search mode, SIRIUS tuning 64 Preset Search mode...
...OPTION MENU, Manual setup .......... 96 Option menu, Manual setup 82 OSD SHIFT, Display settings 96 OSD shift, Display settings 96 OSD-AMP, Display settings 96 OSD-SOURCE, Display settings .........96 Other components controlling by remote control 101 Other components controlling, Remote control 101 OUT...field initial delay, Sound field parameter 74 Presence sound field room size, Sound field parameter 75 Presence speaker indicators 31 Presence speaker using 13 Preset channel setting, XM tuning 60, 65 Preset SCENE templates 39 Preset Search mode, SIRIUS tuning 64 Preset Search mode...


