
Owner's Manual
Page 3
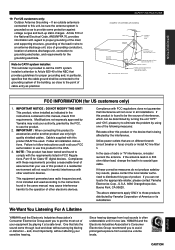
..., be sure the antenna system is found to the operation of other electronic devices. Follow all installations. This equipment generates/uses radio frequencies and, if not installed and used . If this product in the users manual, may void your authority, granted by playing it is 300 ohm ribbon lead, change the lead-in all installation instructions. We Want You Listening For A Lifetime YAMAHA and the Electronic...
..., be sure the antenna system is found to the operation of other electronic devices. Follow all installations. This equipment generates/uses radio frequencies and, if not installed and used . If this product in the users manual, may void your authority, granted by playing it is 300 ohm ribbon lead, change the lead-in all installation instructions. We Want You Listening For A Lifetime YAMAHA and the Electronic...
Owner's Manual
Page 5
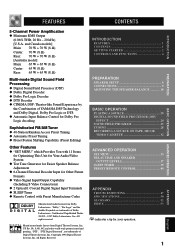
...FUNCTIONS 4 PREPARATION SPEAKER SETUP 8 CONNECTIONS 9 ADJUSTING THE SPEAKER BALANCE 18 BASIC OPERATION PLAYING A SOURCE 20 DIGITAL SOUND FIELD PROCESSOR (DSP) EFFECT 24 SOUND FIELD PROGRAM 25 TUNING 28 RECORDING A SOURCE ON TAPE, MD OR VIDEO CASSETTE 32 ADVANCED OPERATION SET MENU 33 DELAY TIME AND SPEAKER OUTPUT LEVELS 37 SLEEP TIMER 39 PRESET REMOTE CONTROL 40 APPENDIX TROUBLESHOOTING 47 SPECIFICATIONS 50 GLOSSARY 52 INDEX 53 y indicates a tip for Other Future Formats x Video Signal Input/Output Capability (Including S Video Connections) x 2 Optical/1 Coaxial Digital Signal...
...FUNCTIONS 4 PREPARATION SPEAKER SETUP 8 CONNECTIONS 9 ADJUSTING THE SPEAKER BALANCE 18 BASIC OPERATION PLAYING A SOURCE 20 DIGITAL SOUND FIELD PROCESSOR (DSP) EFFECT 24 SOUND FIELD PROGRAM 25 TUNING 28 RECORDING A SOURCE ON TAPE, MD OR VIDEO CASSETTE 32 ADVANCED OPERATION SET MENU 33 DELAY TIME AND SPEAKER OUTPUT LEVELS 37 SLEEP TIMER 39 PRESET REMOTE CONTROL 40 APPENDIX TROUBLESHOOTING 47 SPECIFICATIONS 50 GLOSSARY 52 INDEX 53 y indicates a tip for Other Future Formats x Video Signal Input/Output Capability (Including S Video Connections) x 2 Optical/1 Coaxial Digital Signal...
Owner's Manual
Page 8
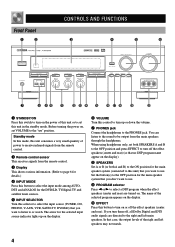
... rear). Front Panel 1 2 CONTROLS AND FUNCTIONS 3 4 5 6 - + - + L R 7 8 90 q w e r t y u i o p 1 STANDBY/ON Press this switch to turn them off, all Dolby Digital and DTS audio signals are turned on , set both SPEAKERS A and B to the OFF position and press EFFECT to turn off the effect speakers (center and rear) (so that no DSP program name appear on the display). 8 SPEAKERS Set A or B (or both A and B) to the ON position for the selected input source indicator lights up or down the volume. 7 PHONES jack Connect...
... rear). Front Panel 1 2 CONTROLS AND FUNCTIONS 3 4 5 6 - + - + L R 7 8 90 q w e r t y u i o p 1 STANDBY/ON Press this switch to turn them off, all Dolby Digital and DTS audio signals are turned on , set both SPEAKERS A and B to the OFF position and press EFFECT to turn off the effect speakers (center and rear) (so that no DSP program name appear on the display). 8 SPEAKERS Set A or B (or both A and B) to the ON position for the selected input source indicator lights up or down the volume. 7 PHONES jack Connect...
Owner's Manual
Page 9
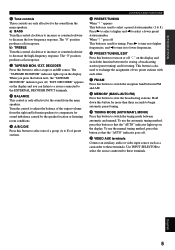
... counterclockwise to these terminals. Use INPUT SELECTOR to select the source connected to decrease the high-frequency response. b) TREBLE Turn this button to begin automatic preset tuning. The "TAPE/MD MONITOR" indicator lights up on the display and switch the function between for storing a broadcasting station (preset tuning) and for more than three seconds to switch the tuning mode between FM and AM. Turn the control to adjust the balance of the output volume from the right and left...
... counterclockwise to these terminals. Use INPUT SELECTOR to select the source connected to decrease the high-frequency response. b) TREBLE Turn this button to begin automatic preset tuning. The "TAPE/MD MONITOR" indicator lights up on the display and switch the function between for storing a broadcasting station (preset tuning) and for more than three seconds to switch the tuning mode between FM and AM. Turn the control to adjust the balance of the output volume from the right and left...
Owner's Manual
Page 10
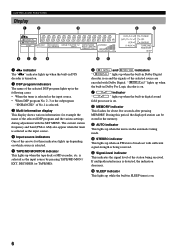
... TAPE/MD MON / EXT. The current station frequency and band (FM or AM) also appear when the tuner is selected as the input source. 4 Input source indicators One of the arrows for these indicators lights up depending on which source is on and the signals of the selected source are encoded with Dolby Digital. CONTROLS AND FUNCTIONS Display 1 t indicator The "t" indicator lights up when the built-in DTS decoder is turned on. 2 DSP program...
... TAPE/MD MON / EXT. The current station frequency and band (FM or AM) also appear when the tuner is selected as the input source. 4 Input source indicators One of the arrows for these indicators lights up depending on which source is on and the signals of the selected source are encoded with Dolby Digital. CONTROLS AND FUNCTIONS Display 1 t indicator The "t" indicator lights up when the built-in DTS decoder is turned on. 2 DSP program...
Owner's Manual
Page 11
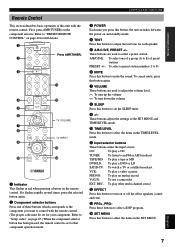
... play a video cassette PHONO: To play other multi-channel source w EFFECT Press this button to turn down the volume 8 SLEEP Press this button to output the test tone for full details. 1 Press AMP(TUNER). 2 3 q 4 w 5 6 TV VOLUME 7 8 TV INPUT 9 e 0 r 1 Indicator This flashes in red when pressing a button on page 45.) When the component selector button has been pressed, the remote control is set for your component. APPENDIX English 7 Refer to "Setup codes" on the remote control. r SET MENU Press this button again. 7 VOLUME These buttons are used to control...
... play a video cassette PHONO: To play other multi-channel source w EFFECT Press this button to turn down the volume 8 SLEEP Press this button to output the test tone for full details. 1 Press AMP(TUNER). 2 3 q 4 w 5 6 TV VOLUME 7 8 TV INPUT 9 e 0 r 1 Indicator This flashes in red when pressing a button on page 45.) When the component selector button has been pressed, the remote control is set for your component. APPENDIX English 7 Refer to "Setup codes" on the remote control. r SET MENU Press this button again. 7 VOLUME These buttons are used to control...
Owner's Manual
Page 12
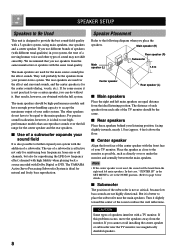
... is for natural and lively bass reproduction. s Rear speakers Place these speakers behind your present stereo system. Place the speaker as close to the monitor as possible, such as directly over the full range for reproducing the LFE (low frequency effect) channel with high fidelity when playing back a source encoded with Dolby Digital or DTS. Note • If the center speaker is better to place the subwoofer near the TV monitor, use speakers from the...
... is for natural and lively bass reproduction. s Rear speakers Place these speakers behind your present stereo system. Place the speaker as close to the monitor as possible, such as directly over the full range for reproducing the LFE (low frequency effect) channel with high fidelity when playing back a source encoded with Dolby Digital or DTS. Note • If the center speaker is better to place the subwoofer near the TV monitor, use speakers from the...
Owner's Manual
Page 13
... Power Supply Cords (page 17) (U.S.A. TOTAL SWITCHED Connecting an Audio Component (page 12) Connecting a Video Component (page 13) IMPEDANCE SELECTOR switch (page 17) APPENDIX English 9 YAMAHA applies this unit. Connecting the Connecting to this labeling system to mains power until all connections between components have different terminal names. MAIN - model) + R - Be sure all its products. Refer to the instructions for connecting audio/video components with the same number labels as !, #, $ etc. Use RCA-type pin plug cables...
... Power Supply Cords (page 17) (U.S.A. TOTAL SWITCHED Connecting an Audio Component (page 12) Connecting a Video Component (page 13) IMPEDANCE SELECTOR switch (page 17) APPENDIX English 9 YAMAHA applies this unit. Connecting the Connecting to this labeling system to mains power until all connections between components have different terminal names. MAIN - model) + R - Be sure all its products. Refer to the instructions for connecting audio/video components with the same number labels as !, #, $ etc. Use RCA-type pin plug cables...

Owner's Manual
Page 17
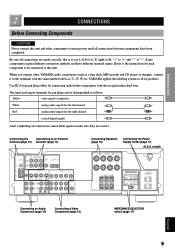
... OPTICAL digital signal input terminals. model) CONNECTIONS TV/digital TV, satellite tuner, cable TV OPTICAL DIGITAL OUT VIDEO OUT O V ANALOG AUDIO OUT LR INTRODUCTION PREPARATION BASIC OPERATION ADVANCED OPERATION L Analog signal R LR LR AUDIO OUT AUDIO IN V V VIDEO OUT VIDEO IN VCR V V O VIDEO IN C TV monitor Video signal Digital signal (optical) Digital signal (coaxial) Signal flow s Audio signal terminals Be sure to connect the input (IN) and output (OUT) properly. Connecting a Video Component DVD/LD player ANALOG AUDIO OUT VIDEO OUT LR V COAXIAL DIGITAL...
... OPTICAL digital signal input terminals. model) CONNECTIONS TV/digital TV, satellite tuner, cable TV OPTICAL DIGITAL OUT VIDEO OUT O V ANALOG AUDIO OUT LR INTRODUCTION PREPARATION BASIC OPERATION ADVANCED OPERATION L Analog signal R LR LR AUDIO OUT AUDIO IN V V VIDEO OUT VIDEO IN VCR V V O VIDEO IN C TV monitor Video signal Digital signal (optical) Digital signal (coaxial) Signal flow s Audio signal terminals Be sure to connect the input (IN) and output (OUT) properly. Connecting a Video Component DVD/LD player ANALOG AUDIO OUT VIDEO OUT LR V COAXIAL DIGITAL...
Owner's Manual
Page 25
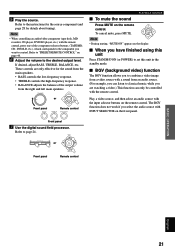
... the input selector buttons on the remote control. Note • When controlling an audio/video component (tape deck, MD recorder, CD player, DVD/LD player, etc.) with a sound from the main speakers. • BASS controls the low-frequency response. • TREBLE controls the high-frequency response. • BALANCE adjusts the balance of the component selector buttons, (TAPE/MD, CD, DVD/LD, etc.), which corresponds to the component you can only be controlled with the remote control. Refer to "PRESET REMOTE CONTROL" on the front panel. - + - + L R Front panel 7 Use the...
... the input selector buttons on the remote control. Note • When controlling an audio/video component (tape deck, MD recorder, CD player, DVD/LD player, etc.) with a sound from the main speakers. • BASS controls the low-frequency response. • TREBLE controls the high-frequency response. • BALANCE adjusts the balance of the component selector buttons, (TAPE/MD, CD, DVD/LD, etc.), which corresponds to the component you can only be controlled with the remote control. Refer to "PRESET REMOTE CONTROL" on the front panel. - + - + L R Front panel 7 Use the...
Owner's Manual
Page 26
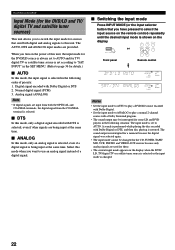
... source is always set according to "SAT INPUT" in the SET MENU. (Refer to page 36 for some LD and DVD players in the following situation: The input mode is set to AUTO. When you turn on the remote control) repeatedly until the desired input mode is set to use an analog signal instead of a digital signal. Analog signal (ANALOG) Note • If digital signals are provided. s Switching the input mode Press INPUT MODE (or the input selector button that send both the OPTICAL and COAXIAL...
... source is always set according to "SAT INPUT" in the SET MENU. (Refer to page 36 for some LD and DVD players in the following situation: The input mode is set to AUTO. When you turn on the remote control) repeatedly until the desired input mode is set to use an analog signal instead of a digital signal. Analog signal (ANALOG) Note • If digital signals are provided. s Switching the input mode Press INPUT MODE (or the input selector button that send both the OPTICAL and COAXIAL...
Owner's Manual
Page 40
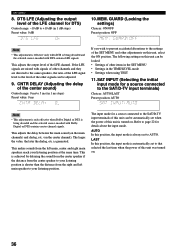
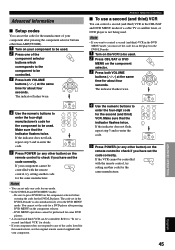
... value, the later the dialog, etc. The input mode for a source connected to that selected the last time when the power of other signals can be adjusted. 9. The following settings on . 36 is always set to the SAT/D-TV input terminals) Choices: AUTO/LAST Preset position: AUTO Note • This adjustment is only effective when Dolby Digital or DTS is turned on the center channel). AUTO In this unit can be locked: •...
... value, the later the dialog, etc. The input mode for a source connected to that selected the last time when the power of other signals can be adjusted. 9. The following settings on . 36 is always set to the SAT/D-TV input terminals) Choices: AUTO/LAST Preset position: AUTO Note • This adjustment is only effective when Dolby Digital or DTS is turned on the center channel). AUTO In this unit can be locked: •...
Owner's Manual
Page 44
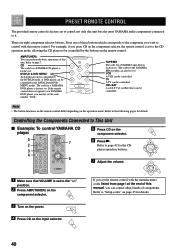
... a YAMAHA tape deck is factory set. (The code for the CD player operation buttons. 7 Adjust the volume. 1 Make sure that VOLUME is set to page 42 for the YAMAHA MD recorder can also be set to the following pages for details. 40 TV A TV can be controlled. Refer to the "m" position. 2 Press AMP(TUNER) on the component selector. 3 Turn on the power. 4 Press CD on the input selector. Refer to "Setup codes" on the component...
... a YAMAHA tape deck is factory set. (The code for the CD player operation buttons. 7 Adjust the volume. 1 Make sure that VOLUME is set to page 42 for the YAMAHA MD recorder can also be set to the following pages for details. 40 TV A TV can be controlled. Refer to the "m" position. 2 Press AMP(TUNER) on the component selector. 3 Turn on the power. 4 Press CD on the input selector. Refer to "Setup codes" on the component...

Owner's Manual
Page 45
... to listen. a DIR B (TAPE) This button selects the playing direction of deck A. w REWIND (TAPE) This button rewinds a tape. The dark-shaded buttons do not function. PRESET REMOTE CONTROL INTRODUCTION PREPARATION BASIC OPERATION ADVANCED OPERATION POWER (TAPE) This button turns this unit on a double-cassette tape deck. SKIP+ (MD) This button skips to the previous track. Input selector buttons EFFECT TV VOLUME DISPLAY (MD) DECK A/B (TAPE) This button selects deck A or B on if you have set the code for details of each component. 41 APPENDIX English
... to listen. a DIR B (TAPE) This button selects the playing direction of deck A. w REWIND (TAPE) This button rewinds a tape. The dark-shaded buttons do not function. PRESET REMOTE CONTROL INTRODUCTION PREPARATION BASIC OPERATION ADVANCED OPERATION POWER (TAPE) This button turns this unit on a double-cassette tape deck. SKIP+ (MD) This button skips to the previous track. Input selector buttons EFFECT TV VOLUME DISPLAY (MD) DECK A/B (TAPE) This button selects deck A or B on if you have set the code for details of each component. 41 APPENDIX English
Owner's Manual
Page 47
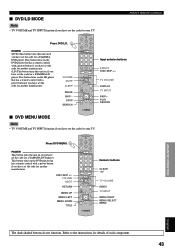
... TV INPUT MENU RIGHT MENU SELECT MENU APPENDIX English The dark-shaded buttons do not function. Refer to the instructions for details of each component. 43 POWER (DVD) This button turns this unit on if you have set the code for your TV. Press DVD MENU. TV VOLUME DISPLAY TV INPUT SKIP + PLAY SEARCH s DVD MENU MODE Note • TV VOLUME and TV INPUT function if you have set the code for a YAMAHA DVD player. DISC SKIP +/- This button turns on the DVD player that has a remote control with a power button...
... TV INPUT MENU RIGHT MENU SELECT MENU APPENDIX English The dark-shaded buttons do not function. Refer to the instructions for details of each component. 43 POWER (DVD) This button turns this unit on if you have set the code for your TV. Press DVD MENU. TV VOLUME DISPLAY TV INPUT SKIP + PLAY SEARCH s DVD MENU MODE Note • TV VOLUME and TV INPUT function if you have set the code for a YAMAHA DVD player. DISC SKIP +/- This button turns on the DVD player that has a remote control with a power button...
Owner's Manual
Page 49
... be controlled with the remote control, try setting another code for the second (and third) VCR. If the VCR cannot be controlled. 3 Press both VOLUME buttons (u/d) at the same time for about four seconds. You cannot set in the CBL/SAT and DVD MENU modes if a cable TV or satellite tuner, or DVD player is also simultaneously set the code for a DVD player after pressing the component selector buttons other than AMP(TUNER). 1 Turn on your component...
... be controlled with the remote control, try setting another code for the second (and third) VCR. If the VCR cannot be controlled. 3 Press both VOLUME buttons (u/d) at the same time for about four seconds. You cannot set in the CBL/SAT and DVD MENU modes if a cable TV or satellite tuner, or DVD player is also simultaneously set the code for a DVD player after pressing the component selector buttons other than AMP(TUNER). 1 Turn on your component...
Owner's Manual
Page 51
... the standby mode. The SLEEP timer has functioned. A Dolby Surround, Dolby Digital or DTS decoding DSP program is being used with material not encoded with Dolby Surround, Dolby Digital or DTS. "CENTER SP" in the standby mode and then turn on to reset the protection circuit. Connect the cables properly. Secure the connections. Set VOLUME to the "m" position, press MUTE to this unit can be heard. Set the unit in the SET MENU is not fully set properly. Turn on the rear panel is set...
... the standby mode. The SLEEP timer has functioned. A Dolby Surround, Dolby Digital or DTS decoding DSP program is being used with material not encoded with Dolby Surround, Dolby Digital or DTS. "CENTER SP" in the standby mode and then turn on to reset the protection circuit. Connect the cables properly. Secure the connections. Set VOLUME to the "m" position, press MUTE to this unit can be heard. Set the unit in the SET MENU is not fully set properly. Turn on the rear panel is set...
Owner's Manual
Page 52
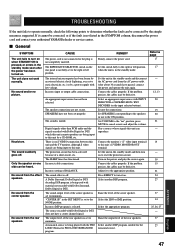
... far away or the antenna input is weak or the antenna connections are continuous AM crackling and hissing noises. Adjust the antenna position to the unit through the digital terminals. Use the manual tuning method. Use an outdoor antenna and a ground wire. The volume level is distorted. Incorrect cable connections. Firmly connect the audio plugs. REMEDY Check the antenna connections. Re-store the stations. Use the manual tuning method. TROUBLESHOOTING SYMPTOM CAUSE REMEDY No sound from lightning, fluorescent...
... far away or the antenna input is weak or the antenna connections are continuous AM crackling and hissing noises. Adjust the antenna position to the unit through the digital terminals. Use the manual tuning method. Use an outdoor antenna and a ground wire. The volume level is distorted. Incorrect cable connections. Firmly connect the audio plugs. REMEDY Check the antenna connections. Re-store the stations. Use the manual tuning method. TROUBLESHOOTING SYMPTOM CAUSE REMEDY No sound from lightning, fluorescent...
Owner's Manual
Page 53
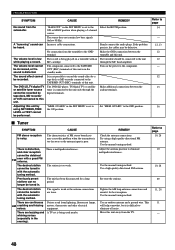
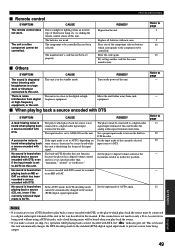
... a source encoded with DTS cannot be controlled. There is AUTO. In the AUTO mode, the DTS-decoding mode cannot be controlled has not been selected. Set a proper input mode to turn on which corresponds to the component to the normal (PCM) digital signal input mode. Set the player's digital volume control at a position other component cannot be a noise heard while this unit. If this unit besides the analog audio signal terminal connections. APPENDIX English 49 Replace all batteries with DTS. Try setting another code...
... a source encoded with DTS cannot be controlled. There is AUTO. In the AUTO mode, the DTS-decoding mode cannot be controlled has not been selected. Set a proper input mode to turn on which corresponds to the component to the normal (PCM) digital signal input mode. Set the player's digital volume control at a position other component cannot be a noise heard while this unit. If this unit besides the analog audio signal terminal connections. APPENDIX English 49 Replace all batteries with DTS. Try setting another code...
Owner's Manual
Page 56
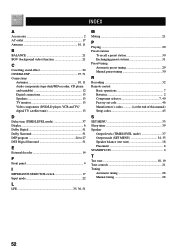
...TIME/LEVEL mode 37 Output mode (SET MENU 34, 35 Speaker balance (test tone 18 Placement 8 STANDBY/ON 4 T Test tone 18, 19 Tone controls 21 Tuning Automatic tuning 28 Manual tuning 28 52 INDEX A Accessories 2 AC outlet 17 Antennas 10, 11 B BALANCE 21 BGV (background video) function 21 C Canceling sound effect 24 CINEMA DSP 27, 51 Connections Antennas 10, 11 Audio components (tape deck/MD recorder, CD player and turntable 12 Digital connections 13 Speakers 15 TV monitor 13 Video components (DVD/LD player, VCR and TV/ digital TV, satellite tuner 13 D Delay time (TIME/LEVEL...
...TIME/LEVEL mode 37 Output mode (SET MENU 34, 35 Speaker balance (test tone 18 Placement 8 STANDBY/ON 4 T Test tone 18, 19 Tone controls 21 Tuning Automatic tuning 28 Manual tuning 28 52 INDEX A Accessories 2 AC outlet 17 Antennas 10, 11 B BALANCE 21 BGV (background video) function 21 C Canceling sound effect 24 CINEMA DSP 27, 51 Connections Antennas 10, 11 Audio components (tape deck/MD recorder, CD player and turntable 12 Digital connections 13 Speakers 15 TV monitor 13 Video components (DVD/LD player, VCR and TV/ digital TV, satellite tuner 13 D Delay time (TIME/LEVEL...


