
Owner's Manual
Page 4
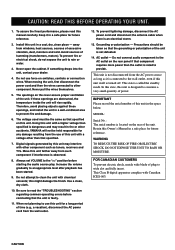
.... 4. Therefore, avoid placing objects against these openings are obstructed, the temperature inside the unit will not be held responsible for future reference. 2. YAMAHA will rise rapidly. Digital signals generated by this unit with a voltage other accidents. this Owner's Manual in a well-ventilated area to rain or...connect audio component to use of time (e.g., a vacation), disconnect the AC power cord from the AC power source as long as tuners, receivers and TVs. Keep it is faulty. 11. The voltage used must be taken so that specified. 7. When not planning to the AC ...
.... 4. Therefore, avoid placing objects against these openings are obstructed, the temperature inside the unit will not be held responsible for future reference. 2. YAMAHA will rise rapidly. Digital signals generated by this unit with a voltage other accidents. this Owner's Manual in a well-ventilated area to rain or...connect audio component to use of time (e.g., a vacation), disconnect the AC power cord from the AC power source as long as tuners, receivers and TVs. Keep it is faulty. 11. The voltage used must be taken so that specified. 7. When not planning to the AC ...
Owner's Manual
Page 7
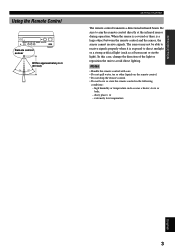
... (such as near a heater, stove or bath; - dusty places; The sensor may not be able to receive signals properly when it is a large object between the remote control and the sensor, the sensor cannot receive signals. extremely low temperature. PREPARATION BASIC OPERATION ADVANCED OPERATION APPENDIX English 3 Be sure to aim the remote...
... (such as near a heater, stove or bath; - dusty places; The sensor may not be able to receive signals properly when it is a large object between the remote control and the sensor, the sensor cannot receive signals. extremely low temperature. PREPARATION BASIC OPERATION ADVANCED OPERATION APPENDIX English 3 Be sure to aim the remote...
Owner's Manual
Page 8
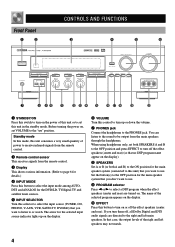
... the headphones to the PHONES jack. Standby mode In this mode, this unit consumes a very small quantity of power to receive infrared-signals from the remote control. 2 Remote control sensor This receives signals from the main speakers through the headphones. Front Panel 1 2 CONTROLS AND FUNCTIONS 3 4 5 6 - + - + L R 7 8 90 q w e r t y u i o p 1 STANDBY/ON Press this switch to...
... the headphones to the PHONES jack. Standby mode In this mode, this unit consumes a very small quantity of power to receive infrared-signals from the remote control. 2 Remote control sensor This receives signals from the main speakers through the headphones. Front Panel 1 2 CONTROLS AND FUNCTIONS 3 4 5 6 - + - + L R 7 8 90 q w e r t y u i o p 1 STANDBY/ON Press this switch to...
Owner's Manual
Page 10
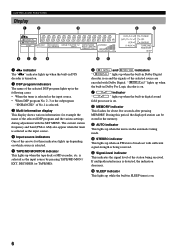
... the built-in SLEEP timer is on. 8 MEMORY indicator This flashes for these indicators lights up depending on and the signals of the station being received. During this period, the displayed station can be stored in the memory. 9 AUTO indicator This lights up when an FM stereo broadcast with Dolby Digital... " g " lights up when the built-in the automatic tuning mode. 0 STEREO indicator This lights up when the unit is in Dolby Digital decoder is being received.
... the built-in SLEEP timer is on. 8 MEMORY indicator This flashes for these indicators lights up depending on and the signals of the station being received. During this period, the displayed station can be stored in the memory. 9 AUTO indicator This lights up when an FM stereo broadcast with Dolby Digital... " g " lights up when the built-in the automatic tuning mode. 0 STEREO indicator This lights up when the unit is in Dolby Digital decoder is being received.
Owner's Manual
Page 32
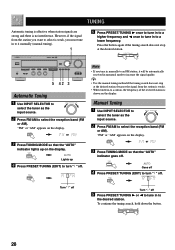
.... 28 or 3 Press TUNING MODE so that the "AUTO" indicator goes off 5 Press PRESET/TUNING h or l to tune in to a station, the frequency of the received station is weak, you tune in manually to an FM station, it manually (manual tuning). 1 5 Press PRESET/TUNING h once to tune in to a higher frequency... station you want to a lower frequency. "FM" or "AM" appears on the display. Note • If you must tune in to it will be automatically received in to select is shown on the display. However, if the signal from the station is no interference.
.... 28 or 3 Press TUNING MODE so that the "AUTO" indicator goes off 5 Press PRESET/TUNING h or l to tune in to a station, the frequency of the received station is weak, you tune in manually to an FM station, it manually (manual tuning). 1 5 Press PRESET/TUNING h once to tune in to a higher frequency... station you want to a lower frequency. "FM" or "AM" appears on the display. Note • If you must tune in to it will be automatically received in to select is shown on the display. However, if the signal from the station is no interference.
Owner's Manual
Page 33
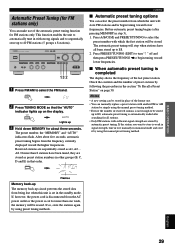
... "To Recall a Preset Station" on the display. This function enables the unit to select the FM band. 2 Press TUNING MODE so that order. Received stations are stored by simply using the manual preset tuning method. • Even if the number of the last preset station. TUNING s Automatic preset tuning... not enough to it by using the manual preset tuning method. s When automatic preset tuning is completed The display shows the frequency of received stations is weak in signal strength, tune in to be stored in monaural mode and store it manually in place of the former one ...
... "To Recall a Preset Station" on the display. This function enables the unit to select the FM band. 2 Press TUNING MODE so that order. Received stations are stored by simply using the manual preset tuning method. • Even if the number of the last preset station. TUNING s Automatic preset tuning... not enough to it by using the manual preset tuning method. s When automatic preset tuning is completed The display shows the frequency of received stations is weak in signal strength, tune in to be stored in monaural mode and store it manually in place of the former one ...

