

Owners Manual
Page 1
AV Receiver Owner's Manual English for North America
AV Receiver Owner's Manual English for North America
Owners Manual
Page 2
...universal dock 34 Controlling an iPod/iPhone 34 Playing back tunes from Bluetooth™ components....... 36 Connecting a Yamaha Bluetooth wireless audio receiver 36 Pairing Bluetooth™ components 36 Using Bluetooth™ components 37 SETUP Configuring the settings specific for each...55 Displaying/Setting the Advanced Setup menu 55 Setting the impedance of speakers 55 Avoiding crossing remote control signals when using multiple Yamaha receivers 56 Initializing various settings for this unit 56 Using the HDMI Control function 57 APPENDIX Troubleshooting 60 General 60 HDMI 63 ...
...universal dock 34 Controlling an iPod/iPhone 34 Playing back tunes from Bluetooth™ components....... 36 Connecting a Yamaha Bluetooth wireless audio receiver 36 Pairing Bluetooth™ components 36 Using Bluetooth™ components 37 SETUP Configuring the settings specific for each...55 Displaying/Setting the Advanced Setup menu 55 Setting the impedance of speakers 55 Avoiding crossing remote control signals when using multiple Yamaha receivers 56 Initializing various settings for this unit 56 Using the HDMI Control function 57 APPENDIX Troubleshooting 60 General 60 HDMI 63 ...
Owners Manual
Page 3
to match your speakers and listening environment - Speaker distance settings ...43 - Speaker impedance configuration...10 - Sound quality control with the equalizer Speaker layout...10 - Speaker cable connection...10 - Subwoofer cable connection ...12 ■ Acoustic parameter adjustment to 5.1-channel configurations - Setting for 2- Specifying the settings for each speaker 42 - Volume control for each speaker...43 - Speaker channels and functions ...9 - INTRODUCTION Features and capabilities ■ Built-in high-quality, high-power 5-channel amplifier ■...
to match your speakers and listening environment - Speaker distance settings ...43 - Speaker impedance configuration...10 - Sound quality control with the equalizer Speaker layout...10 - Speaker cable connection...10 - Subwoofer cable connection ...12 ■ Acoustic parameter adjustment to 5.1-channel configurations - Setting for 2- Specifying the settings for each speaker 42 - Volume control for each speaker...43 - Speaker channels and functions ...9 - INTRODUCTION Features and capabilities ■ Built-in high-quality, high-power 5-channel amplifier ■...

Owners Manual
Page 4
NOTE If there are subject to the VIDEO AUX jacks when you received all of the parts. • J1 indicates that the reference is in the footnote. If this manual • This manual is printed prior to the ...
NOTE If there are subject to the VIDEO AUX jacks when you received all of the parts. • J1 indicates that the reference is in the footnote. If this manual • This manual is printed prior to the ...
Owners Manual
Page 6
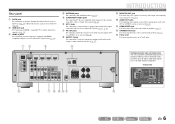
... to output audio/video signals to it (☞p. 15). INTRODUCTION Part names and functions i MONITOR OUT jack For connecting a TV capable of receiving video input, and outputting video signals to (☞p. 14). k SUBWOOFER jack For connecting a subwoofer with analog audio outputs to input sound into... For connecting an HDMI - g AV OUT jacks For outputting audio/video signals received when analog inputs (AV35 or AUDIO1-2) are selected (☞p. 20). Rear panel a DOCK jack For connecting an optional Yamaha iPod universal dock (such as the AV5 or AUDIO1-2 jacks are compatible with ...
... to output audio/video signals to it (☞p. 15). INTRODUCTION Part names and functions i MONITOR OUT jack For connecting a TV capable of receiving video input, and outputting video signals to (☞p. 14). k SUBWOOFER jack For connecting a subwoofer with analog audio outputs to input sound into... For connecting an HDMI - g AV OUT jacks For outputting audio/video signals received when analog inputs (AV35 or AUDIO1-2) are selected (☞p. 20). Rear panel a DOCK jack For connecting an optional Yamaha iPod universal dock (such as the AV5 or AUDIO1-2 jacks are compatible with ...
Owners Manual
Page 7
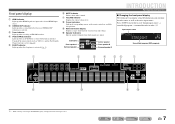
c Tuner indicator Lights up when the sleep timer is selected. e SLEEP indicator Lights up when receiving an FM/AM broadcast. h Cursor indicators Light up if corresponding cursors on menu items and settings. j Speaker indicators Indicate speaker terminals.... SW L CR SL SR Sound field program (DSP program) a b c d ef g iPod CHARGE SLEEP STEREO TUNED VOL. Press fINFO repeatedly to cycle through an optional Yamaha iPod universal dock (such as the active input source. MUTE SW L CR SL SR h i h j J 1 : While selecting a tuner input, the FM/AM frequency...
c Tuner indicator Lights up when the sleep timer is selected. e SLEEP indicator Lights up when receiving an FM/AM broadcast. h Cursor indicators Light up if corresponding cursors on menu items and settings. j Speaker indicators Indicate speaker terminals.... SW L CR SL SR Sound field program (DSP program) a b c d ef g iPod CHARGE SLEEP STEREO TUNED VOL. Press fINFO repeatedly to cycle through an optional Yamaha iPod universal dock (such as the active input source. MUTE SW L CR SL SR h i h j J 1 : While selecting a tuner input, the FM/AM frequency...
Owners Manual
Page 8
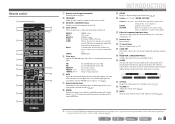
... m TV control keys Operate a monitor such as a TV. r VOLUME +/- En 8 Remote control a b c d e f g h i j k l m SOURCE 1 1 5 TRANSMIT CODE SET SLEEP RECEIVER HDMI 2 3 4 AV 2 3 4 AUDIO 1 2 V-AUX [ A ] [ B ] DOCK TUNER FM AM PRESET TUNING INFO MEMORY MOVIE ENHANCER SUR. c SOURCE A (SOURCE Power) Switches an external component...function. FM Sets the FM/AM tuner band to the DOCK TUNER jack. J1 DOCK A Yamaha iPod universal dock or Bluetooth wireless audio receiver connected to FM. p SLEEP Sets this key repeatedly to place itself in standby mode to ...
... m TV control keys Operate a monitor such as a TV. r VOLUME +/- En 8 Remote control a b c d e f g h i j k l m SOURCE 1 1 5 TRANSMIT CODE SET SLEEP RECEIVER HDMI 2 3 4 AV 2 3 4 AUDIO 1 2 V-AUX [ A ] [ B ] DOCK TUNER FM AM PRESET TUNING INFO MEMORY MOVIE ENHANCER SUR. c SOURCE A (SOURCE Power) Switches an external component...function. FM Sets the FM/AM tuner band to the DOCK TUNER jack. J1 DOCK A Yamaha iPod universal dock or Bluetooth wireless audio receiver connected to FM. p SLEEP Sets this key repeatedly to place itself in standby mode to ...

Owners Manual
Page 15
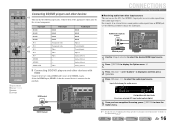
... supports HDMI Control functions (Ex. TV audio output Optical digital audio output Coaxial digital audio output Analog stereo output Connection Connect to the receiver's AV4 jack. Connect to the TV: When using a single HDMI cable. Panasonic VIERA Link) and Audio Return Channel functions, audio/... Audio Return Channel function and HDMI Control function When your TV using a TV that supports the HDMI Control functions When using the receiver's remote control by entering the TV's remote control code (☞p. 52). Depending on the connection on this unit automatically when listening...
... supports HDMI Control functions (Ex. TV audio output Optical digital audio output Coaxial digital audio output Analog stereo output Connection Connect to the receiver's AV4 jack. Connect to the TV: When using a single HDMI cable. Panasonic VIERA Link) and Audio Return Channel functions, audio/... Audio Return Channel function and HDMI Control function When your TV using a TV that supports the HDMI Control functions When using the receiver's remote control by entering the TV's remote control code (☞p. 52). Depending on the connection on this unit automatically when listening...
Owners Manual
Page 16
... AV1 input audio (optical digital) 5 Once you have completed the setup, press qOPTION to select the audio input source. Connect them to receive audio signals from other devices d This unit has the following method to display the Option menu. d Input selector j Cursor C / D... - - J 1 : See the section on "Configuring the settings specific for each input source (Option menu)" for playback. SOURCE 1 1 5 TRANSMIT CODE SET SLEEP RECEIVER HDMI 2 3 4 AV 2 3 4 AUDIO 1 2 V-AUX [ A ] [ B ] DOCK TUNER FM AM PRESET TUNING INFO MEMORY MOVIE ENHANCER SUR. DECODE ...
... AV1 input audio (optical digital) 5 Once you have completed the setup, press qOPTION to select the audio input source. Connect them to receive audio signals from other devices d This unit has the following method to display the Option menu. d Input selector j Cursor C / D... - - J 1 : See the section on "Configuring the settings specific for each input source (Option menu)" for playback. SOURCE 1 1 5 TRANSMIT CODE SET SLEEP RECEIVER HDMI 2 3 4 AV 2 3 4 AUDIO 1 2 V-AUX [ A ] [ B ] DOCK TUNER FM AM PRESET TUNING INFO MEMORY MOVIE ENHANCER SUR. DECODE ...

Owners Manual
Page 17
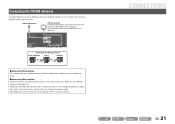
... with a component video cable to for playback. When connecting these devices, select the AV3-5 or the AUDIO1-2 jacks as the audio input for playback. See "Receiving audio from other AV inputs or AUDIO1-2. AV1 VOL. Component video / Audio (Optical) output COMPONENT VIDEO PR PB Y OPTICAL DOCK COMPONENT VIDEO PR ARC HDMI...
... with a component video cable to for playback. When connecting these devices, select the AV3-5 or the AUDIO1-2 jacks as the audio input for playback. See "Receiving audio from other AV inputs or AUDIO1-2. AV1 VOL. Component video / Audio (Optical) output COMPONENT VIDEO PR PB Y OPTICAL DOCK COMPONENT VIDEO PR ARC HDMI...

Owners Manual
Page 20
... player Video cameras • Be sure to turn down the volume when connecting this unit and the other TVs or external devices. This receiver can record these input audio and video signals to VCRs or similar devices, or send them to use these jacks. HDMI audio/video signals... video signals, and digital audio signals cannot be transmitted from the PORTABLE jack is transmitted. Using the AUDIO OUT jacks Connect this jacks to the receiver. Video / Audio input VIDEO V AUDIO L R ARC DOCK COMPONENT VIDEO PR HDMI OUT PR (BD/DVD) HDMI 1 HDMI 2 HDMI 3 HDMI 4 PB Y MONITOR OUT PB V...
... player Video cameras • Be sure to turn down the volume when connecting this unit and the other TVs or external devices. This receiver can record these input audio and video signals to VCRs or similar devices, or send them to use these jacks. HDMI audio/video signals... video signals, and digital audio signals cannot be transmitted from the PORTABLE jack is transmitted. Using the AUDIO OUT jacks Connect this jacks to the receiver. Video / Audio input VIDEO V AUDIO L R ARC DOCK COMPONENT VIDEO PR HDMI OUT PR (BD/DVD) HDMI 1 HDMI 2 HDMI 3 HDMI 4 PB Y MONITOR OUT PB V...
Owners Manual
Page 21
... respective jacks. CONNECTIONS En 21 Connect the jack to a store-bought ground bar or copper plate with a vinyl-covered wire and bury this receiver. For more information, consult the nearest authorized dealer. ■ Improving AM reception Connect this unit to the ground socket of the AM antenna ...have no polarity. Indoor FM antenna AM loop antenna Position the AM antenna away from the receiver. The wires of an electrical outlet. HDMI 3 HDMI 4 FM GND AM MONITOR OUT SURROUND CENTER SPEAKERS FRONT Connecting the AM loop antenna...
... respective jacks. CONNECTIONS En 21 Connect the jack to a store-bought ground bar or copper plate with a vinyl-covered wire and bury this receiver. For more information, consult the nearest authorized dealer. ■ Improving AM reception Connect this unit to the ground socket of the AM antenna ...have no polarity. Indoor FM antenna AM loop antenna Position the AM antenna away from the receiver. The wires of an electrical outlet. HDMI 3 HDMI 4 FM GND AM MONITOR OUT SURROUND CENTER SPEAKERS FRONT Connecting the AM loop antenna...
Owners Manual
Page 22
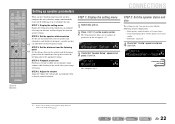
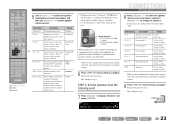
... tone Playback a test tone to allow you to the actual effect your speakers, configure this unit appears. J1 SETUP VOL. SOURCE 1 1 5 TRANSMIT CODE SET SLEEP RECEIVER HDMI 2 3 4 AV 2 3 4 AUDIO 1 2 V-AUX [ A ] [ B ] DOCK TUNER FM AM PRESET TUNING INFO MEMORY MOVIE ENHANCER SUR. STEP 5: Adjust the volume Adjust the volume for low-frequency...
... tone Playback a test tone to allow you to the actual effect your speakers, configure this unit appears. J1 SETUP VOL. SOURCE 1 1 5 TRANSMIT CODE SET SLEEP RECEIVER HDMI 2 3 4 AV 2 3 4 AUDIO 1 2 V-AUX [ A ] [ B ] DOCK TUNER FM AM PRESET TUNING INFO MEMORY MOVIE ENHANCER SUR. STEP 5: Adjust the volume Adjust the volume for low-frequency...
Owners Manual
Page 23
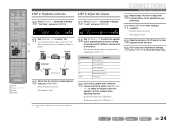
... Center j Sur. When you want to configure, and press jCursor D / E to complete settings. 6 Press jRETURN when setting is no subwoofer). SOURCE 1 1 5 TRANSMIT CODE SET SLEEP RECEIVER HDMI 2 3 4 AV 2 3 4 AUDIO 1 2 V-AUX [ A ] [ B ] DOCK TUNER FM AM PRESET TUNING INFO MEMORY MOVIE ENHANCER SUR. DECODE MUSIC STEREO STRAIGHT BD DVD SETUP SCENE TV CD...
... Center j Sur. When you want to configure, and press jCursor D / E to complete settings. 6 Press jRETURN when setting is no subwoofer). SOURCE 1 1 5 TRANSMIT CODE SET SLEEP RECEIVER HDMI 2 3 4 AV 2 3 4 AUDIO 1 2 V-AUX [ A ] [ B ] DOCK TUNER FM AM PRESET TUNING INFO MEMORY MOVIE ENHANCER SUR. DECODE MUSIC STEREO STRAIGHT BD DVD SETUP SCENE TV CD...
Owners Manual
Page 24
... Setup menu. J 1 : Only speakers configured for speakers with a different volume level to switch the speaker that is complete. LEVEL VOL. SOURCE 1 1 5 TRANSMIT CODE SET SLEEP RECEIVER HDMI 2 3 4 AV 2 3 4 AUDIO 1 2 V-AUX [ A ] [ B ] DOCK TUNER FM AM PRESET TUNING INFO MEMORY MOVIE ENHANCER SUR. A test tone plays back as soon as follows. J1 CONNECTIONS...
... Setup menu. J 1 : Only speakers configured for speakers with a different volume level to switch the speaker that is complete. LEVEL VOL. SOURCE 1 1 5 TRANSMIT CODE SET SLEEP RECEIVER HDMI 2 3 4 AV 2 3 4 AUDIO 1 2 V-AUX [ A ] [ B ] DOCK TUNER FM AM PRESET TUNING INFO MEMORY MOVIE ENHANCER SUR. A test tone plays back as soon as follows. J1 CONNECTIONS...
Owners Manual
Page 25
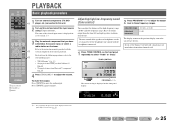
...; "Playing back tunes from your iPod™/iPhone™" (☞p. 34) • "Playing back tunes from other channels well. PLAYBACK SOURCE 1 1 5 TRANSMIT CODE SET SLEEP RECEIVER HDMI 2 3 4 AV 2 3 4 AUDIO 1 2 V-AUX [ A ] [ B ] DOCK TUNER FM AM PRESET TUNING INFO MEMORY MOVIE ENHANCER SUR. To mute the output. TONE Treble VOL. TONE CONTROL PHONES...
...; "Playing back tunes from your iPod™/iPhone™" (☞p. 34) • "Playing back tunes from other channels well. PLAYBACK SOURCE 1 1 5 TRANSMIT CODE SET SLEEP RECEIVER HDMI 2 3 4 AV 2 3 4 AUDIO 1 2 V-AUX [ A ] [ B ] DOCK TUNER FM AM PRESET TUNING INFO MEMORY MOVIE ENHANCER SUR. To mute the output. TONE Treble VOL. TONE CONTROL PHONES...
Owners Manual
Page 26
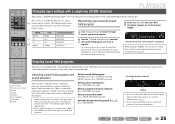
...programs. Selects sound field program: MOVIE category: Press gMOVIE repeatedly. When you change input sources and sound field programs with a Yamaha digital sound field processing (DSP) chip. Four scenes are currently outputting sound (☞p. 7). • You can also use...different uses, such as the initial factory settings. DECODE repeatedly. Sound field program categories MOVIE Sci-Fi VOL. PLAYBACK SOURCE 1 1 5 TRANSMIT CODE SET SLEEP RECEIVER HDMI 2 3 4 AV 2 3 4 AUDIO 1 2 V-AUX [ A ] [ B ] DOCK TUNER FM AM PRESET TUNING INFO MEMORY MOVIE ENHANCER SUR...
...programs. Selects sound field program: MOVIE category: Press gMOVIE repeatedly. When you change input sources and sound field programs with a Yamaha digital sound field processing (DSP) chip. Four scenes are currently outputting sound (☞p. 7). • You can also use...different uses, such as the initial factory settings. DECODE repeatedly. Sound field program categories MOVIE Sci-Fi VOL. PLAYBACK SOURCE 1 1 5 TRANSMIT CODE SET SLEEP RECEIVER HDMI 2 3 4 AV 2 3 4 AUDIO 1 2 V-AUX [ A ] [ B ] DOCK TUNER FM AM PRESET TUNING INFO MEMORY MOVIE ENHANCER SUR...
Owners Manual
Page 27
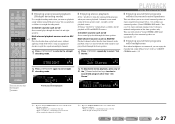
... 1 2 3 4 5 6 7 8 9 INPUT MUTE 0 10 TV TV VOL TV CH ENT 1 Press gSTRAIGHT to exit straight decoding mode. STRAIGHT VOL. En 27 SOURCE 1 1 5 TRANSMIT CODE SET SLEEP RECEIVER HDMI 2 3 4 AV 2 3 4 AUDIO 1 2 V-AUX [ A ] [ B ] DOCK TUNER FM AM PRESET TUNING INFO MEMORY MOVIE ENHANCER SUR. You can even enjoy surround sound presence with just a minimal...
... 1 2 3 4 5 6 7 8 9 INPUT MUTE 0 10 TV TV VOL TV CH ENT 1 Press gSTRAIGHT to exit straight decoding mode. STRAIGHT VOL. En 27 SOURCE 1 1 5 TRANSMIT CODE SET SLEEP RECEIVER HDMI 2 3 4 AV 2 3 4 AUDIO 1 2 V-AUX [ A ] [ B ] DOCK TUNER FM AM PRESET TUNING INFO MEMORY MOVIE ENHANCER SUR. You can even enjoy surround sound presence with just a minimal...
Owners Manual
Page 30
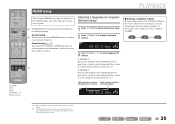
...when entering a number. J2 For example, enter as follows to enter a frequency. En 30 Normal tuning e You can preset the frequencies of this unit to receive. Preset tuning (☞p. 31) You can tune in . 1 2 3 4 5 6 7 8 9 INPUT MUTE 0 10 TV TV VOL TV CH ENT...unit provides the following two modes for a station on a higher frequency than a second to search automatically for tuning. SOURCE 1 1 5 TRANSMIT CODE SET SLEEP RECEIVER HDMI 2 3 4 AV 2 3 4 AUDIO 1 2 V-AUX [ A ] [ B ] DOCK TUNER FM AM PRESET TUNING INFO MEMORY MOVIE ENHANCER SUR...
...when entering a number. J2 For example, enter as follows to enter a frequency. En 30 Normal tuning e You can preset the frequencies of this unit to receive. Preset tuning (☞p. 31) You can tune in . 1 2 3 4 5 6 7 8 9 INPUT MUTE 0 10 TV TV VOL TV CH ENT...unit provides the following two modes for a station on a higher frequency than a second to search automatically for tuning. SOURCE 1 1 5 TRANSMIT CODE SET SLEEP RECEIVER HDMI 2 3 4 AV 2 3 4 AUDIO 1 2 V-AUX [ A ] [ B ] DOCK TUNER FM AM PRESET TUNING INFO MEMORY MOVIE ENHANCER SUR...

Owners Manual
Page 31
...tuning) You can force this unit to its original settings, use the jCursor D / E to display the Option menu. There are receiving an FM broadcast and cannot obtain a stable stereo broadcast, you can register up to 40 FM/AM stations as preset stations. AM ... [ B ] DOCK TUNER 1 d Press dTUNER to switch to display the Option menu. To return this unit to "Stereo." SOURCE 1 1 5 TRANSMIT CODE SET SLEEP RECEIVER HDMI 2 3 4 AV 2 3 4 AUDIO 1 2 ■ When signal reception is poor When you are two methods of these methods to register stations. ■ ...
...tuning) You can force this unit to its original settings, use the jCursor D / E to display the Option menu. There are receiving an FM broadcast and cannot obtain a stable stereo broadcast, you can register up to 40 FM/AM stations as preset stations. AM ... [ B ] DOCK TUNER 1 d Press dTUNER to switch to display the Option menu. To return this unit to "Stereo." SOURCE 1 1 5 TRANSMIT CODE SET SLEEP RECEIVER HDMI 2 3 4 AV 2 3 4 AUDIO 1 2 ■ When signal reception is poor When you are two methods of these methods to register stations. ■ ...


