

Owners Manual
Page 1
AV Receiver Owner's Manual English for North America
AV Receiver Owner's Manual English for North America
Owners Manual
Page 2
...universal dock 34 Controlling an iPod/iPhone 34 Playing back tunes from Bluetooth™ components....... 36 Connecting a Yamaha Bluetooth wireless audio receiver 36 Pairing Bluetooth™ components 36 Using Bluetooth™ components 37 SETUP Configuring the settings specific for each...55 Displaying/Setting the Advanced Setup menu 55 Setting the impedance of speakers 55 Avoiding crossing remote control signals when using multiple Yamaha receivers 56 Initializing various settings for this unit 56 Using the HDMI Control function 57 APPENDIX Troubleshooting 60 General 60 HDMI 63 ...
...universal dock 34 Controlling an iPod/iPhone 34 Playing back tunes from Bluetooth™ components....... 36 Connecting a Yamaha Bluetooth wireless audio receiver 36 Pairing Bluetooth™ components 36 Using Bluetooth™ components 37 SETUP Configuring the settings specific for each...55 Displaying/Setting the Advanced Setup menu 55 Setting the impedance of speakers 55 Avoiding crossing remote control signals when using multiple Yamaha receivers 56 Initializing various settings for this unit 56 Using the HDMI Control function 57 APPENDIX Troubleshooting 60 General 60 HDMI 63 ...
Owners Manual
Page 3
Speaker layout...10 - Speaker cable connection...10 - Specifying the settings for each speaker 42 - Subwoofer cable connection ...12 ■ Acoustic parameter adjustment to 5.1-channel configurations - to match your speakers and listening environment - Volume control for each speaker...43 - Setting for 2- Speaker distance settings ...43 - Speaker impedance configuration...10 - Sound quality control with the equalizer Speaker channels and functions ...9 - INTRODUCTION Features and capabilities ■ Built-in high-quality, high-power 5-channel amplifier ■...
Speaker layout...10 - Speaker cable connection...10 - Specifying the settings for each speaker 42 - Subwoofer cable connection ...12 ■ Acoustic parameter adjustment to 5.1-channel configurations - to match your speakers and listening environment - Volume control for each speaker...43 - Setting for 2- Speaker distance settings ...43 - Speaker impedance configuration...10 - Sound quality control with the equalizer Speaker channels and functions ...9 - INTRODUCTION Features and capabilities ■ Built-in high-quality, high-power 5-channel amplifier ■...

Owners Manual
Page 4
...; Attaching the VIDEO AUX input cover (included) To protect against dust, attach the supplied VIDEO AUX input cover to the VIDEO AUX jacks when you received all of the parts. • J1 indicates that the reference is printed prior to production. En 4 NOTE If there are subject to the corresponding numbers...
...; Attaching the VIDEO AUX input cover (included) To protect against dust, attach the supplied VIDEO AUX input cover to the VIDEO AUX jacks when you received all of the parts. • J1 indicates that the reference is printed prior to production. En 4 NOTE If there are subject to the corresponding numbers...
Owners Manual
Page 6
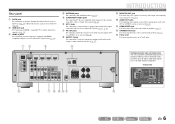
... f AV1-5 jacks For connecting to (☞p. 14). INTRODUCTION Part names and functions i MONITOR OUT jack For connecting a TV capable of receiving video input, and outputting video signals to a TV or other external component. k SUBWOOFER jack For connecting a subwoofer with component video signals,... Power cord For connecting this unit can receive audio/video signals (☞p. 17, p. 18). e COMPONENT VIDEO jacks For connecting TV that this unit to output video signal (☞p. 14). Rear panel a DOCK jack For connecting an optional Yamaha iPod universal dock (such as the AV5 ...
... f AV1-5 jacks For connecting to (☞p. 14). INTRODUCTION Part names and functions i MONITOR OUT jack For connecting a TV capable of receiving video input, and outputting video signals to a TV or other external component. k SUBWOOFER jack For connecting a subwoofer with component video signals,... Power cord For connecting this unit can receive audio/video signals (☞p. 17, p. 18). e COMPONENT VIDEO jacks For connecting TV that this unit to output video signal (☞p. 14). Rear panel a DOCK jack For connecting an optional Yamaha iPod universal dock (such as the AV5 ...
Owners Manual
Page 7
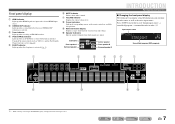
...VOL. c Tuner indicator Lights up if corresponding cursors on menu items and settings. Press fINFO repeatedly to cycle through an optional Yamaha iPod universal dock (such as the active input source. e SLEEP indicator Lights up when the sleep timer is muted. i...tuner input, the FM/AM frequency is active (☞p. 35). En 7 g VOLUME indicator Displays the current volume level. h Cursor indicators Light up when receiving an FM/AM broadcast. b CINEMA DSP indicator Lights up when an iPod/iPhone is selected. Subwoofer Front speaker L Surround speaker L SW L CR SL SR...
...VOL. c Tuner indicator Lights up if corresponding cursors on menu items and settings. Press fINFO repeatedly to cycle through an optional Yamaha iPod universal dock (such as the active input source. e SLEEP indicator Lights up when the sleep timer is muted. i...tuner input, the FM/AM frequency is active (☞p. 35). En 7 g VOLUME indicator Displays the current volume level. h Cursor indicators Light up when receiving an FM/AM broadcast. b CINEMA DSP indicator Lights up when an iPod/iPhone is selected. Subwoofer Front speaker L Surround speaker L SW L CR SL SR...
Owners Manual
Page 8
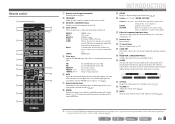
... the FM/AM tuner band to operate registered components. f INFO Cycles the information displayed on and standby modes. Confirms a selected item. o RECEIVER A (RECEIVER Power) Switches this unit from the remote control. J 1 : You can use separate kExternal component operation keys for the sleep timer function. ...Operates the FM/AM tuner. q OPTION Displays the Option menu for external components. J1 DOCK A Yamaha iPod universal dock or Bluetooth wireless audio receiver connected to set the time for each input source (☞p. 38). Press this key when this...
... the FM/AM tuner band to operate registered components. f INFO Cycles the information displayed on and standby modes. Confirms a selected item. o RECEIVER A (RECEIVER Power) Switches this unit from the remote control. J 1 : You can use separate kExternal component operation keys for the sleep timer function. ...Operates the FM/AM tuner. q OPTION Displays the Option menu for external components. J1 DOCK A Yamaha iPod universal dock or Bluetooth wireless audio receiver connected to set the time for each input source (☞p. 38). Press this key when this...

Owners Manual
Page 15
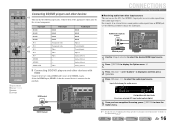
... to this unit, connect its AV1-5 or AUDIO1-2 jacks to the COAXIAL jack of the AV2 or AV3 with just a single key operation using the receiver's remote control by entering the TV's remote control code (☞p. 52). Connect to the TV: When using a TV that you to switch the input source... Coaxial digital audio output Analog stereo output Connection Connect to enjoy the TV sound. ■ Connecting a video monitor Connect the video pin cable to the receiver's AV4 jack. If the TV supports optical digital audio output, we recommend that supports HDMI Control functions (Ex.
... to this unit, connect its AV1-5 or AUDIO1-2 jacks to the COAXIAL jack of the AV2 or AV3 with just a single key operation using the receiver's remote control by entering the TV's remote control code (☞p. 52). Connect to the TV: When using a TV that you to switch the input source... Coaxial digital audio output Analog stereo output Connection Connect to enjoy the TV sound. ■ Connecting a video monitor Connect the video pin cable to the receiver's AV4 jack. If the TV supports optical digital audio output, we recommend that supports HDMI Control functions (Ex.
Owners Manual
Page 16
...AV 3 OPTICAL ( TV ) AV 4 AV 5 AV OUT AUDIO 1 AUDIO 2 AUDIO OUT BD/DVD player CONNECTIONS Connecting external devices ■ Receiving audio from other input sources This unit can use the AV1-5 or AUDIO1-2 input jacks to for details on the Option menu (☞p. 38). ...have selected AV1 input audio (optical digital) 5 Once you have completed the setup, press qOPTION to display the Option menu. SOURCE 1 1 5 TRANSMIT CODE SET SLEEP RECEIVER HDMI 2 3 4 AV 2 3 4 AUDIO 1 2 V-AUX [ A ] [ B ] DOCK TUNER FM AM PRESET TUNING INFO MEMORY MOVIE ENHANCER SUR. Video...
...AV 3 OPTICAL ( TV ) AV 4 AV 5 AV OUT AUDIO 1 AUDIO 2 AUDIO OUT BD/DVD player CONNECTIONS Connecting external devices ■ Receiving audio from other input sources This unit can use the AV1-5 or AUDIO1-2 input jacks to for details on the Option menu (☞p. 38). ...have selected AV1 input audio (optical digital) 5 Once you have completed the setup, press qOPTION to display the Option menu. SOURCE 1 1 5 TRANSMIT CODE SET SLEEP RECEIVER HDMI 2 3 4 AV 2 3 4 AUDIO 1 2 V-AUX [ A ] [ B ] DOCK TUNER FM AM PRESET TUNING INFO MEMORY MOVIE ENHANCER SUR. Video...

Owners Manual
Page 17
See "Receiving audio from other AV inputs or AUDIO1-2. Component video / Audio (Optical) output COMPONENT VIDEO PR PB Y OPTICAL DOCK COMPONENT VIDEO PR ARC HDMI OUT PR ...
See "Receiving audio from other AV inputs or AUDIO1-2. Component video / Audio (Optical) output COMPONENT VIDEO PR PB Y OPTICAL DOCK COMPONENT VIDEO PR ARC HDMI OUT PR ...

Owners Manual
Page 20
... Video cameras • Be sure to external devices through the AV OUT and AUDIO OUT jacks. Select the V-AUX input to the receiver. HDMI audio/video signals, component video signals, and digital audio signals cannot be transmitted from the PORTABLE jack is transmitted. Connecting video ... selected incoming analog audio/video signals to turn down the volume when connecting this unit and the other TVs or external devices. En 20 This receiver can record these jacks. Video / Audio input VIDEO V AUDIO L R ARC DOCK COMPONENT VIDEO PR HDMI OUT PR (BD/DVD) HDMI 1 HDMI 2 HDMI ...
... Video cameras • Be sure to external devices through the AV OUT and AUDIO OUT jacks. Select the V-AUX input to the receiver. HDMI audio/video signals, component video signals, and digital audio signals cannot be transmitted from the PORTABLE jack is transmitted. Connecting video ... selected incoming analog audio/video signals to turn down the volume when connecting this unit and the other TVs or external devices. En 20 This receiver can record these jacks. Video / Audio input VIDEO V AUDIO L R ARC DOCK COMPONENT VIDEO PR HDMI OUT PR (BD/DVD) HDMI 1 HDMI 2 HDMI ...
Owners Manual
Page 21
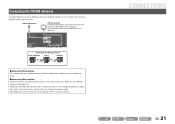
Indoor FM antenna AM loop antenna Position the AM antenna away from the receiver. HDMI 3 HDMI 4 FM GND AM MONITOR OUT SURROUND CENTER SPEAKERS FRONT Connecting the AM loop antenna Press and hold Insert Release ■ Improving FM reception ... sure the AM loop antenna is not to be connected to a store-bought ground bar or copper plate with a vinyl-covered wire and bury this receiver. Connect these antennas properly to an outdoor antenna with this new attachment in moist ground. Connecting the FM/AM antennas An indoor FM antenna and...
Indoor FM antenna AM loop antenna Position the AM antenna away from the receiver. HDMI 3 HDMI 4 FM GND AM MONITOR OUT SURROUND CENTER SPEAKERS FRONT Connecting the AM loop antenna Press and hold Insert Release ■ Improving FM reception ... sure the AM loop antenna is not to be connected to a store-bought ground bar or copper plate with a vinyl-covered wire and bury this receiver. Connect these antennas properly to an outdoor antenna with this new attachment in moist ground. Connecting the FM/AM antennas An indoor FM antenna and...
Owners Manual
Page 22
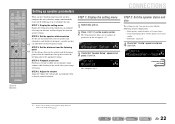
SOURCE 1 1 5 TRANSMIT CODE SET SLEEP RECEIVER HDMI 2 3 4 AV 2 3 4 AUDIO 1 2 V-AUX [ A ] [ B ] DOCK TUNER FM AM PRESET TUNING INFO MEMORY MOVIE ENHANCER SUR. STEP 1: Display the setting menu Display the Setup menu from ...
SOURCE 1 1 5 TRANSMIT CODE SET SLEEP RECEIVER HDMI 2 3 4 AV 2 3 4 AUDIO 1 2 V-AUX [ A ] [ B ] DOCK TUNER FM AM PRESET TUNING INFO MEMORY MOVIE ENHANCER SUR. STEP 1: Display the setting menu Display the Setup menu from ...
Owners Manual
Page 23
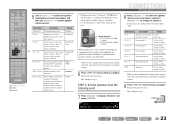
... "Extra Bass" is no subwoofer). This completes step 2. Information Description Setting Unit Switches between setting feet (ft) / units (feet / meters). SOURCE 1 1 5 TRANSMIT CODE SET SLEEP RECEIVER HDMI 2 3 4 AV 2 3 4 AUDIO 1 2 V-AUX [ A ] [ B ] DOCK TUNER FM AM PRESET TUNING INFO MEMORY MOVIE ENHANCER SUR. Small/Large Center j Sur. Choose "None" if you configured are...
... "Extra Bass" is no subwoofer). This completes step 2. Information Description Setting Unit Switches between setting feet (ft) / units (feet / meters). SOURCE 1 1 5 TRANSMIT CODE SET SLEEP RECEIVER HDMI 2 3 4 AV 2 3 4 AUDIO 1 2 V-AUX [ A ] [ B ] DOCK TUNER FM AM PRESET TUNING INFO MEMORY MOVIE ENHANCER SUR. Small/Large Center j Sur. Choose "None" if you configured are...
Owners Manual
Page 24
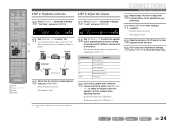
... Front speaker L or R as follows. To raise the volume: Press jCursor E. Return to close the Setup menu. d FL----d ---- LEVEL VOL. SOURCE 1 1 5 TRANSMIT CODE SET SLEEP RECEIVER HDMI 2 3 4 AV 2 3 4 AUDIO 1 2 V-AUX [ A ] [ B ] DOCK TUNER FM AM PRESET TUNING INFO MEMORY MOVIE ENHANCER SUR. ENTER VOLUME RETURN DISPLAY TOP MENU REC POP-UP MENU...
... Front speaker L or R as follows. To raise the volume: Press jCursor E. Return to close the Setup menu. d FL----d ---- LEVEL VOL. SOURCE 1 1 5 TRANSMIT CODE SET SLEEP RECEIVER HDMI 2 3 4 AV 2 3 4 AUDIO 1 2 V-AUX [ A ] [ B ] DOCK TUNER FM AM PRESET TUNING INFO MEMORY MOVIE ENHANCER SUR. ENTER VOLUME RETURN DISPLAY TOP MENU REC POP-UP MENU...
Owners Manual
Page 25
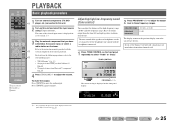
... off, sounds may not match those frequency ranges. For details on the front panel display. to unmute. En 25 PLAYBACK SOURCE 1 1 5 TRANSMIT CODE SET SLEEP RECEIVER HDMI 2 3 4 AV 2 3 4 AUDIO 1 2 V-AUX [ A ] [ B ] DOCK TUNER FM AM PRESET TUNING INFO MEMORY MOVIE ENHANCER SUR. Adjusting high/low-frequency sound (Tone control) You can adjust...
... off, sounds may not match those frequency ranges. For details on the front panel display. to unmute. En 25 PLAYBACK SOURCE 1 1 5 TRANSMIT CODE SET SLEEP RECEIVER HDMI 2 3 4 AV 2 3 4 AUDIO 1 2 V-AUX [ A ] [ B ] DOCK TUNER FM AM PRESET TUNING INFO MEMORY MOVIE ENHANCER SUR. Adjusting high/low-frequency sound (Tone control) You can adjust...
Owners Manual
Page 26
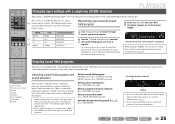
... enjoy multi-channel playback for that sounds best with the source you change input sources and sound field programs with a Yamaha digital sound field processing (DSP) chip. Selects stereo reproduction: Press gSTEREO repeatedly. Switches Straight decoding mode (☞p. 27... field settings (sound field programs) in the same category. MUSIC category: Press gMUSIC repeatedly. DECODE repeatedly. PLAYBACK SOURCE 1 1 5 TRANSMIT CODE SET SLEEP RECEIVER HDMI 2 3 4 AV 2 3 4 AUDIO 1 2 V-AUX [ A ] [ B ] DOCK TUNER FM AM PRESET TUNING INFO MEMORY MOVIE ENHANCER...
... enjoy multi-channel playback for that sounds best with the source you change input sources and sound field programs with a Yamaha digital sound field processing (DSP) chip. Selects stereo reproduction: Press gSTEREO repeatedly. Switches Straight decoding mode (☞p. 27... field settings (sound field programs) in the same category. MUSIC category: Press gMUSIC repeatedly. DECODE repeatedly. PLAYBACK SOURCE 1 1 5 TRANSMIT CODE SET SLEEP RECEIVER HDMI 2 3 4 AV 2 3 4 AUDIO 1 2 V-AUX [ A ] [ B ] DOCK TUNER FM AM PRESET TUNING INFO MEMORY MOVIE ENHANCER...
Owners Manual
Page 27
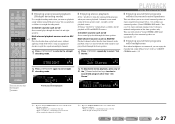
... sources such as CD Stereo sound plays through the front speakers. 1 Press gSTEREO repeatedly to activate the straight decoding mode. SOURCE 1 1 5 TRANSMIT CODE SET SLEEP RECEIVER HDMI 2 3 4 AV 2 3 4 AUDIO 1 2 V-AUX [ A ] [ B ] DOCK TUNER FM AM PRESET TUNING INFO MEMORY MOVIE ENHANCER SUR. ENTER VOLUME RETURN DISPLAY TOP MENU REC POP-UP MENU...
... sources such as CD Stereo sound plays through the front speakers. 1 Press gSTEREO repeatedly to activate the straight decoding mode. SOURCE 1 1 5 TRANSMIT CODE SET SLEEP RECEIVER HDMI 2 3 4 AV 2 3 4 AUDIO 1 2 V-AUX [ A ] [ B ] DOCK TUNER FM AM PRESET TUNING INFO MEMORY MOVIE ENHANCER SUR. ENTER VOLUME RETURN DISPLAY TOP MENU REC POP-UP MENU...
Owners Manual
Page 30
... eTUNING I l Numeric keys Selecting a frequency for a station, release the key once the search has started. J1 Lights up when receiving Lights up when receiving a broadcast from a station a stereo broadcast FM STEREO TUNED 98.5 VOL. Leave the decimal point out when entering a number. J... 2 : "Wrong Station!" En 30 SOURCE 1 1 5 TRANSMIT CODE SET SLEEP RECEIVER HDMI 2 3 4 AV 2 3 4 AUDIO 1 2 V-AUX [ A ] [ B ] DOCK TUNER FM AM PRESET TUNING INFO MEMORY MOVIE ENHANCER SUR. J2 For...
... eTUNING I l Numeric keys Selecting a frequency for a station, release the key once the search has started. J1 Lights up when receiving Lights up when receiving a broadcast from a station a stereo broadcast FM STEREO TUNED 98.5 VOL. Leave the decimal point out when entering a number. J... 2 : "Wrong Station!" En 30 SOURCE 1 1 5 TRANSMIT CODE SET SLEEP RECEIVER HDMI 2 3 4 AV 2 3 4 AUDIO 1 2 V-AUX [ A ] [ B ] DOCK TUNER FM AM PRESET TUNING INFO MEMORY MOVIE ENHANCER SUR. J2 For...

Owners Manual
Page 31
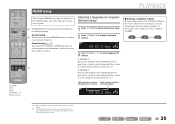
...Press jENTER, then press ePRESET F / G or jCursor B / C to choose the preset number from which to select "Auto Preset." To return this unit to receive in a monaural mode. AM stations cannot be selected automatically immediately after you select a preset number. J1 3 Use jCursor B / C to start the Auto Preset ... for each input source (Option menu)" for stations MEMORY When Auto Preset is complete FINISH Auto Preset VOL. There are receiving an FM broadcast and cannot obtain a stable stereo broadcast, you can register up to 40 automatically. SOURCE 1 1 5 TRANSMIT CODE SET ...
...Press jENTER, then press ePRESET F / G or jCursor B / C to choose the preset number from which to select "Auto Preset." To return this unit to receive in a monaural mode. AM stations cannot be selected automatically immediately after you select a preset number. J1 3 Use jCursor B / C to start the Auto Preset ... for each input source (Option menu)" for stations MEMORY When Auto Preset is complete FINISH Auto Preset VOL. There are receiving an FM broadcast and cannot obtain a stable stereo broadcast, you can register up to 40 automatically. SOURCE 1 1 5 TRANSMIT CODE SET ...


