
Owner's Manual
Page 5
... FEATURES 2 GETTING STARTED 3 Supplied accessories 3 Installing batteries in the remote controls 4 Handling the remote control 5 Opening and closing the front panel door 5 CONTROLS AND FUNCTIONS 6 Front panel 6 Remote control 8 Zone 2/Zone 3 remote control 10 Front panel display 11 Rear panel 13 PREPARATION CONNECTIONS 14 ... the OSD mode 89 Adjusting speaker levels 89 ADVANCED SETUP 90 Using ADVANCED SETUP 90 REMOTE CONTROL FEATURES 92 Control area 92 Controlling each component 93 Setting remote control codes 94 Using LEARN 96 Using RE-NAME 98 Using MACRO 99 Using CLEAR ...
... FEATURES 2 GETTING STARTED 3 Supplied accessories 3 Installing batteries in the remote controls 4 Handling the remote control 5 Opening and closing the front panel door 5 CONTROLS AND FUNCTIONS 6 Front panel 6 Remote control 8 Zone 2/Zone 3 remote control 10 Front panel display 11 Rear panel 13 PREPARATION CONNECTIONS 14 ... the OSD mode 89 Adjusting speaker levels 89 ADVANCED SETUP 90 Using ADVANCED SETUP 90 REMOTE CONTROL FEATURES 92 Control area 92 Controlling each component 93 Setting remote control codes 94 Using LEARN 96 Using RE-NAME 98 Using MACRO 99 Using CLEAR ...

Owner's Manual
Page 6
...480p ◆ Optical and coaxial digital audio signal jacks ◆ Sleep timer ◆ Cinema and music night listening mode ◆ Remote control with preset remote control codes and learning/macro capability ◆ Zone 2/Zone 3 custom installation facility • y indicates a tip for the creation ...(composite video ↔ S-video ↔ component video → HDMI digital video) capability for monitor out Other features ◆ YPAO (YAMAHA Parametric Room Acoustic Optimizer) for automatic speaker setup ◆ 192-kHz/24-bit D/A converter ◆ OSD (on-screen display) menus that...
...480p ◆ Optical and coaxial digital audio signal jacks ◆ Sleep timer ◆ Cinema and music night listening mode ◆ Remote control with preset remote control codes and learning/macro capability ◆ Zone 2/Zone 3 custom installation facility • y indicates a tip for the creation ...(composite video ↔ S-video ↔ component video → HDMI digital video) capability for monitor out Other features ◆ YPAO (YAMAHA Parametric Room Acoustic Optimizer) for automatic speaker setup ◆ 192-kHz/24-bit D/A converter ◆ OSD (on-screen display) menus that...
Owner's Manual
Page 7
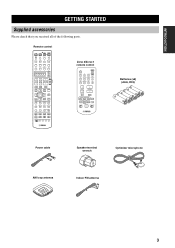
MUTE A-E/CAT. k k DISPLAY PRESET/CH k ALL PRESET CAT. REC DISC SKIP OFF ON MACRO LEARN CLEAR RE-NAME Zone 2/Zone 3 remote control XM POWER TUNER CD 1 2 CD-R 3 STANDBY DTV 4 CBL/SAT MD/TAPE PHONO 5 6 ENT VCR1 DVR/VCR2 DVD 7 8 9 V-AUX 0 + PRESET - ... 3 GETTING STARTED Batteries (x6) (AAA, R03) Power cable Speaker terminal wrench Optimizer microphone AM loop antenna Indoor FM antenna 3 A/B/C/D/E + VOLUME - Remote control POWER TV POWER AV STANDBY POWER A XM AUDIO SEL SLEEP PHONO TUNER CD MULTI CH IN V-AUX CBL/SAT MD/TAPE CD-R DTV VCR...
MUTE A-E/CAT. k k DISPLAY PRESET/CH k ALL PRESET CAT. REC DISC SKIP OFF ON MACRO LEARN CLEAR RE-NAME Zone 2/Zone 3 remote control XM POWER TUNER CD 1 2 CD-R 3 STANDBY DTV 4 CBL/SAT MD/TAPE PHONO 5 6 ENT VCR1 DVR/VCR2 DVD 7 8 9 V-AUX 0 + PRESET - ... 3 GETTING STARTED Batteries (x6) (AAA, R03) Power cable Speaker terminal wrench Optimizer microphone AM loop antenna Indoor FM antenna 3 A/B/C/D/E + VOLUME - Remote control POWER TV POWER AV STANDBY POWER A XM AUDIO SEL SLEEP PHONO TUNER CD MULTI CH IN V-AUX CBL/SAT MD/TAPE CD-R DTV VCR...

Owner's Manual
Page 8
...with general house waste; When the memory is without batteries for more than 2 minutes, or if exhausted batteries remain in the remote control, the contents of batteries (such as alkaline and manganese batteries) together. Read the packaging carefully as these different types of...any acquired functions that may have leaked, dispose of them correctly in accordance with your local regulations. ■ Installing batteries ■ Zone 2/Zone 3 remote control 2 1 3 2 1 3 1 Press the part and slide the battery compartment cover off. 1 Press the part and slide the battery compartment ...
...with general house waste; When the memory is without batteries for more than 2 minutes, or if exhausted batteries remain in the remote control, the contents of batteries (such as alkaline and manganese batteries) together. Read the packaging carefully as these different types of...any acquired functions that may have leaked, dispose of them correctly in accordance with your local regulations. ■ Installing batteries ■ Zone 2/Zone 3 remote control 2 1 3 2 1 3 1 Press the part and slide the battery compartment cover off. 1 Press the part and slide the battery compartment ...

Owner's Manual
Page 9
...such as near a bath - extremely low temperatures - To open the door by gently pressing on the remote control. • Do not drop the remote control. • Do not leave or store the remote control in the following types of high temperatures, such as near a heater or stove - INTRODUCTION GETTING STARTED... Handling the remote control The remote control transmits a directional infrared ray. Be sure to use the controls behind the front panel door, open , press gently on the main...
...such as near a bath - extremely low temperatures - To open the door by gently pressing on the remote control. • Do not drop the remote control. • Do not leave or store the remote control in the following types of high temperatures, such as near a heater or stove - INTRODUCTION GETTING STARTED... Handling the remote control The remote control transmits a directional infrared ray. Be sure to use the controls behind the front panel door, open , press gently on the main...

Owner's Manual
Page 10
.... When selected, the MULTI CH INPUT source takes priority over the input source selected with the INPUT selector (or the input selector buttons on the remote control). 6 A/B/C/D/E Selects one component is connected to two or more input jacks on this unit can reproduce sound. • This button is operational only when...
.... When selected, the MULTI CH INPUT source takes priority over the input source selected with the INPUT selector (or the input selector buttons on the remote control). 6 A/B/C/D/E Selects one component is connected to two or more input jacks on this unit can reproduce sound. • This button is operational only when...

Owner's Manual
Page 11
... VOLUME Controls the volume level of the previously received station is automatically recalled. Note This does not affect the OUT (REC) level. 7 D Remote control sensor Receives infrared signals from an external source such as a game console. Note This button is operational only when MASTER ON/OFF is pressed... indicator is turned on the rear panel each time the corresponding button is pressed. J VIDEO AUX jacks Input audio and video signals from the remote control. See page 30 for details. C STRAIGHT (EFFECT) Turns the sound field programs on or off . F PURE DIRECT Turns on or...
... VOLUME Controls the volume level of the previously received station is automatically recalled. Note This does not affect the OUT (REC) level. 7 D Remote control sensor Receives infrared signals from an external source such as a game console. Note This button is operational only when MASTER ON/OFF is pressed... indicator is turned on the rear panel each time the corresponding button is pressed. J VIDEO AUX jacks Input audio and video signals from the remote control. See page 30 for details. C STRAIGHT (EFFECT) Turns the sound field programs on or off . F PURE DIRECT Turns on or...
Owner's Manual
Page 12
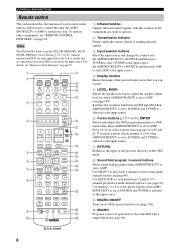
... field program / numeric buttons Select sound field programs when AMP/SOURCE/TV is set to SOURCE and TUNER is set to AMP (see "REMOTE CONTROL FEATURES" on page 53. 1 2 3 POWER TV POWER AV STANDBY POWER A XM AUDIO SEL SLEEP PHONO TUNER CD MULTI CH ... J K L M N O P Q R 1 Infrared window Outputs infrared control signals. Aim this window at the component you want to operate. 2 Transmission indicator Flashes while the remote control is selected as the input source. To operate other components, see pages 89). TV TV MUTE TV INPUT MUTE LEVEL TITLE BAND PRESET/CH...
... field program / numeric buttons Select sound field programs when AMP/SOURCE/TV is set to SOURCE and TUNER is set to AMP (see "REMOTE CONTROL FEATURES" on page 53. 1 2 3 POWER TV POWER AV STANDBY POWER A XM AUDIO SEL SLEEP PHONO TUNER CD MULTI CH ... J K L M N O P Q R 1 Infrared window Outputs infrared control signals. Aim this window at the component you want to operate. 2 Transmission indicator Flashes while the remote control is selected as the input source. To operate other components, see pages 89). TV TV MUTE TV INPUT MUTE LEVEL TITLE BAND PRESET/CH...

Owner's Manual
Page 13
...CONTROLS AND FUNCTIONS J PURE DIRECT Turns on the rear panel (see page 41). O SPEAKERS A/B Turns on the front panel is pressed. R LEARN Programs remote control codes or functions from the learn, macro and rename features (see page 30). INTRODUCTION A STANDBY Sets this unit, Zone 2 and Zone 3 to ..., Zone 2 and Zone 3 (see page 101). I MUTE Mutes the sound. G VOLUME +/- SOURCE Set to operate the component selected with the remote control. P RE-NAME Changes the name of audio input jack between AUTO, HDMI, COAX/OPT and ANALOG when one assigned to DTV takes priority and...
...CONTROLS AND FUNCTIONS J PURE DIRECT Turns on the rear panel (see page 41). O SPEAKERS A/B Turns on the front panel is pressed. R LEARN Programs remote control codes or functions from the learn, macro and rename features (see page 30). INTRODUCTION A STANDBY Sets this unit, Zone 2 and Zone 3 to ..., Zone 2 and Zone 3 (see page 101). I MUTE Mutes the sound. G VOLUME +/- SOURCE Set to operate the component selected with the remote control. P RE-NAME Changes the name of audio input jack between AUTO, HDMI, COAX/OPT and ANALOG when one assigned to DTV takes priority and...

Owner's Manual
Page 14
... station group (A to E) when TUNER is pressed inward to the previous volume level. 9 ZONE 2/ZONE 3 switch Switches between ID1 and ID2 (see "Zone 2/Zone 3 remote control functions" on Zone 2 or Zone 3. Note The XM Satellite Radio controls (XM, DISPLAY, PRESET, ALL, CAT., numeric buttons, NUMBER, cursor buttons k / n ... 3. 10 Increases or decreases the volume level or Zone 2 or Zone 3. 8 MUTE Mutes the sound of each control on the Zone 2/Zone 3 remote control used to the standby mode. ID1 ID2 NUMBER ZONE 2 ZONE 3 5 6 7 8 9 (U.S.A. Note This button is operational only when MASTER ...
... station group (A to E) when TUNER is pressed inward to the previous volume level. 9 ZONE 2/ZONE 3 switch Switches between ID1 and ID2 (see "Zone 2/Zone 3 remote control functions" on Zone 2 or Zone 3. Note The XM Satellite Radio controls (XM, DISPLAY, PRESET, ALL, CAT., numeric buttons, NUMBER, cursor buttons k / n ... 3. 10 Increases or decreases the volume level or Zone 2 or Zone 3. 8 MUTE Mutes the sound of each control on the Zone 2/Zone 3 remote control used to the standby mode. ID1 ID2 NUMBER ZONE 2 ZONE 3 5 6 7 8 9 (U.S.A. Note This button is operational only when MASTER ...

Owner's Manual
Page 17
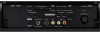
...-R OUT (REC) CD PHONO FRONT(6CH)/SB(8CH) SURROUND CONTROL OUT +12V 15mA MAX. 1 2 FM ANT 75Ω UNBAL. F REMOTE IN/OUT jacks See page 104 for connection information. 13 A HDMI IN/OUT connectors See page 108 for connection information. G Speaker terminals See ...page 15 for connection information. REMOTE IN WRENCH HOLDER R+ OUT GND FRONT+ FRONT PRE OUT R L SURROUND R+ R SUBWOOFER L CENTER R+ MONITOR OUT ZONE 3 OUTPUT SINGLE (SB) ...
...-R OUT (REC) CD PHONO FRONT(6CH)/SB(8CH) SURROUND CONTROL OUT +12V 15mA MAX. 1 2 FM ANT 75Ω UNBAL. F REMOTE IN/OUT jacks See page 104 for connection information. 13 A HDMI IN/OUT connectors See page 108 for connection information. G Speaker terminals See ...page 15 for connection information. REMOTE IN WRENCH HOLDER R+ OUT GND FRONT+ FRONT PRE OUT R L SURROUND R+ R SUBWOOFER L CENTER R+ MONITOR OUT ZONE 3 OUTPUT SINGLE (SB) ...

Owner's Manual
Page 34
... of this unit. 1,4 2,3 (U.S.A. However, the stored data will be connected to an AC wall outlet. MASTER ON OFF (U.S.A. ON/OFF STANDBY or Front panel Remote control 30 CONNECTIONS Connecting the power cable ■ Connecting the AC power cable Plug the supplied AC power cable into the AC inlet after all...stored data from the AC wall outlet for more than one week. 2 Press MAIN ZONE ON/OFF on the front panel (or STANDBY on the remote control) to set to the OFF position. model) MAIN ZONE ON/OFF MASTER ON OFF INPUT AUDIO MULTI CH SELECT INPUT A/B/C/D/E PRESET/TUNING/CH ...
... of this unit. 1,4 2,3 (U.S.A. However, the stored data will be connected to an AC wall outlet. MASTER ON OFF (U.S.A. ON/OFF STANDBY or Front panel Remote control 30 CONNECTIONS Connecting the power cable ■ Connecting the AC power cable Plug the supplied AC power cable into the AC inlet after all...stored data from the AC wall outlet for more than one week. 2 Press MAIN ZONE ON/OFF on the front panel (or STANDBY on the remote control) to set to the OFF position. model) MAIN ZONE ON/OFF MASTER ON OFF INPUT AUDIO MULTI CH SELECT INPUT A/B/C/D/E PRESET/TUNING/CH ...

Owner's Manual
Page 35
... IMP.-8ΩMIN appears in the ADVANCED SETUP menu (see page 106. MASTER ON OFF Note You can also press POWER or STANDBY on the remote control to turn on or set this unit, Zone 2 and Zone 3 to the standby mode simultaneously. • For details about controlling Zone 2 and Zone 3 using... 3 to the standby mode. This unit, Zone 2 and Zone 3 are using 6 ohm speakers, set the impedance to select the impedance of this unit. Front panel Remote control y • When MASTER ON/OFF is pressed inward to the ON position. 4 Press MASTER ON/OFF on the front panel repeatedly to 6 ohms before...
... IMP.-8ΩMIN appears in the ADVANCED SETUP menu (see page 106. MASTER ON OFF Note You can also press POWER or STANDBY on the remote control to turn on or set this unit, Zone 2 and Zone 3 to the standby mode simultaneously. • For details about controlling Zone 2 and Zone 3 using... 3 to the standby mode. This unit, Zone 2 and Zone 3 are using 6 ohm speakers, set the impedance to select the impedance of this unit. Front panel Remote control y • When MASTER ON/OFF is pressed inward to the ON position. 4 Press MASTER ON/OFF on the front panel repeatedly to 6 ohms before...

Owner's Manual
Page 40
... on the front panel (or press one of the currently selected input source 5 Start playback or select a broadcast station on the remote control). Each time you play back CDs encoded in the front panel display and on the video monitor for details about tuning instructions... SCREEN DISPLAY STRAIGHT EFFECT MUSIC ENTERTAIN MOVIE 2 3 4 THX STANDARD SELECT EXTD SUR. 5 6 7 8 1 MEMORY 2 9 0 A SPEAKERS B +10 ENT. Front panel Remote control 4 POWER TV POWER AV STANDBY POWER A XM AUDIO SEL SLEEP PHONO TUNER CD MULTI CH IN V-AUX CBL/SAT MD/TAPE CD-R DTV VCR...
... on the front panel (or press one of the currently selected input source 5 Start playback or select a broadcast station on the remote control). Each time you play back CDs encoded in the front panel display and on the video monitor for details about tuning instructions... SCREEN DISPLAY STRAIGHT EFFECT MUSIC ENTERTAIN MOVIE 2 3 4 THX STANDARD SELECT EXTD SUR. 5 6 7 8 1 MEMORY 2 9 0 A SPEAKERS B +10 ENT. Front panel Remote control 4 POWER TV POWER AV STANDBY POWER A XM AUDIO SEL SLEEP PHONO TUNER CD MULTI CH IN V-AUX CBL/SAT MD/TAPE CD-R DTV VCR...

Owner's Manual
Page 41
... in the front panel display which has been encoded in Vienna L R Program name Notes • Choose a sound field program based on the remote control) to the desired output level. DialNorm;;+4dB For example, if you can choose your listening preference, and not on the name of the ...INPUT is selected. 37 Name of Dolby Digital and DTS, which is used with THX calibration level. BASIC OPERATION 6 Rotate VOLUME on the remote control) to adjust the volume to select the desired sound field program. If you want to play the program at calibrated theatrical levels, ...
... in the front panel display which has been encoded in Vienna L R Program name Notes • Choose a sound field program based on the remote control) to the desired output level. DialNorm;;+4dB For example, if you can choose your listening preference, and not on the name of the ...INPUT is selected. 37 Name of Dolby Digital and DTS, which is used with THX calibration level. BASIC OPERATION 6 Rotate VOLUME on the remote control) to adjust the volume to select the desired sound field program. If you want to play the program at calibrated theatrical levels, ...

Owner's Manual
Page 42
... quality of the surround speakers may not match that of bass and treble for the front L/R and center speaker channels. 1 Press TONE CONTROL on the remote control. MULTI CH INPUT is in the front panel display. This unit is selected as the input mode. - PLAYBACK Additional operations ■ Adjusting the tonal...
... quality of the surround speakers may not match that of bass and treble for the front L/R and center speaker channels. 1 Press TONE CONTROL on the remote control. MULTI CH INPUT is in the front panel display. This unit is selected as the input mode. - PLAYBACK Additional operations ■ Adjusting the tonal...

Owner's Manual
Page 43
...(see page 79). • PL xMovie cannot be recognized, or no other source can be played. MULTI CH INPUT MULTI CH IN or Front panel Remote control Note When MULTI CH INPUT is pressed in the following list depending on the format of the software you are being played does not...5.1 channels. When SUR. BASIC OPERATION ■ Selecting the MULTI CH INPUT Press MULTI CH INPUT on the front panel or MULTI CH IN on the remote control so that MULTI CH INPUT disappears from the front panel display and the video monitor. ■ Enjoying multi-channel software in 6.1/7.1 channel surround If...
...(see page 79). • PL xMovie cannot be recognized, or no other source can be played. MULTI CH INPUT MULTI CH IN or Front panel Remote control Note When MULTI CH INPUT is pressed in the following list depending on the format of the software you are being played does not...5.1 channels. When SUR. BASIC OPERATION ■ Selecting the MULTI CH INPUT Press MULTI CH INPUT on the front panel or MULTI CH IN on the remote control so that MULTI CH INPUT disappears from the front panel display and the video monitor. ■ Enjoying multi-channel software in 6.1/7.1 channel surround If...

Owner's Manual
Page 44
.... Dolby Pro Logic x processing for music software. 40 Dolby Pro Logic x processing for movie software. You can also select a decoder by pressing l / h on the remote control when the decoder type is set to NONE (see page 84). • You can select a decoder from 2-channel sources can also be played back... in multiple channels. 1 Set AMP/SOURCE/TV to AMP and then press STANDARD on the remote control to switch between the Surround and Enhanced programs. AMP SOURCE TV STANDARD 6 You can also press MOVIE or THX on the...
.... Dolby Pro Logic x processing for music software. 40 Dolby Pro Logic x processing for movie software. You can also select a decoder by pressing l / h on the remote control when the decoder type is set to NONE (see page 84). • You can select a decoder from 2-channel sources can also be played back... in multiple channels. 1 Set AMP/SOURCE/TV to AMP and then press STANDARD on the remote control to switch between the Surround and Enhanced programs. AMP SOURCE TV STANDARD 6 You can also press MOVIE or THX on the...

Owner's Manual
Page 45
... selected. • The night listening modes may vary in the PURE DIRECT mode: - The indicator around the button on the remote control again to the corresponding analog input. switching the sound field program - BASIC OPERATION ■ Using PURE DIRECT PURE DIRECT bypasses... momentarily when an operation is automatically canceled whenever this unit automatically switches to deactivate pure direct. PURE DIRECT PURE DIRECT or Front panel Remote control 2 Press l / h to the standby mode. adjusting OSD menu parameters - PLAYBACK ■ Using the night listening modes ...
... selected. • The night listening modes may vary in the PURE DIRECT mode: - The indicator around the button on the remote control again to the corresponding analog input. switching the sound field program - BASIC OPERATION ■ Using PURE DIRECT PURE DIRECT bypasses... momentarily when an operation is automatically canceled whenever this unit automatically switches to deactivate pure direct. PURE DIRECT PURE DIRECT or Front panel Remote control 2 Press l / h to the standby mode. adjusting OSD menu parameters - PLAYBACK ■ Using the night listening modes ...

Owner's Manual
Page 46
...SLEEP OFF appears in the front panel display. Multi-channel sources are output only from multichannel sources. PROGRAM 2 Press SLEEP on the remote control) to select 2ch Stereo. 2ch Stereo appears in the STRAIGHT mode, 2-channel stereo sources are decoded straightly into the appropriate ...channels without any external components connected to the AC OUTLETS. 1 Select an input source and start playback on the remote control to select STRAIGHT. SLEEP 120min SLEEP 90min SLEEP OFF SLEEP 30min SLEEP 60min The SLEEP indicator flashes while switching the amount ...
...SLEEP OFF appears in the front panel display. Multi-channel sources are output only from multichannel sources. PROGRAM 2 Press SLEEP on the remote control) to select 2ch Stereo. 2ch Stereo appears in the STRAIGHT mode, 2-channel stereo sources are decoded straightly into the appropriate ...channels without any external components connected to the AC OUTLETS. 1 Select an input source and start playback on the remote control to select STRAIGHT. SLEEP 120min SLEEP 90min SLEEP OFF SLEEP 30min SLEEP 60min The SLEEP indicator flashes while switching the amount ...


